Table of Contents >> Show >> Hide
- Why Moss on a Roof Is a Problem (Even If It Looks Kinda Cute)
- Before You Start: Is This a DIY Job or a “Call a Pro” Situation?
- Tools and Supplies Checklist
- The Roof-Friendly Method: Kill It First, Then Remove It Gently
- Cleaning Moss Off Different Roof Types
- What NOT To Do (Unless You Enjoy Regret)
- How to Prevent Moss From Coming Back
- Quick FAQs and Troubleshooting
- Conclusion: A Clean Roof Without the Drama
- Real-World Experiences: What People Learn After Cleaning Roof Moss
- SEO Tags
If your roof has started growing moss, congratulations: your house is officially hosting a tiny, green, spongey roommate that pays zero rent and hoards moisture like it’s prepping for the apocalypse.
The good news: roof moss removal is usually doable with the right method. The bad news: the “right method” is not “blast it with a pressure washer and hope your shingles forgive you.”
This guide walks you through how to clean moss off the roof safely, gently, and effectivelyplus how to keep it from coming back like a sequel nobody asked for.
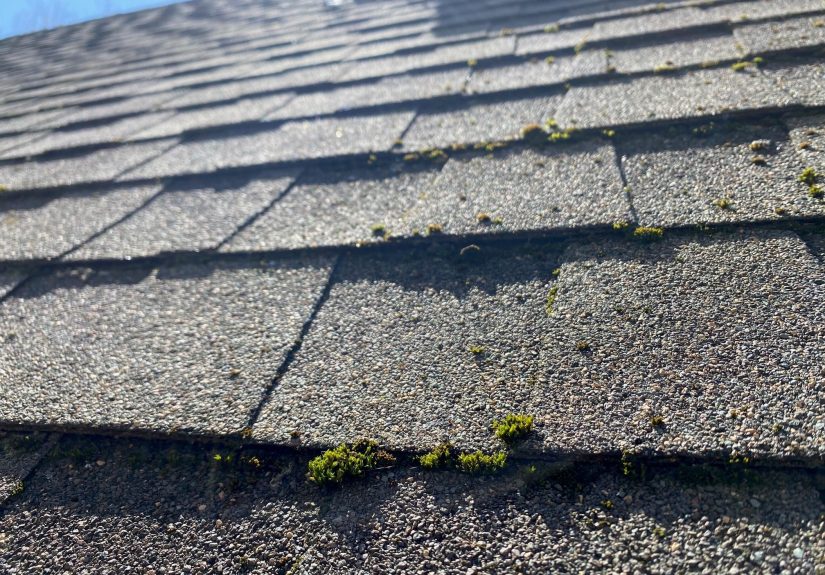
Why Moss on a Roof Is a Problem (Even If It Looks Kinda Cute)
Moss holds moisture like a sponge
Moss loves damp, shaded spotsespecially roof valleys, the north-facing side of the house, and areas under overhanging trees. Once it’s established, moss can keep the roof surface wetter for longer after rain or dew, which is not what roofing materials want for a long and peaceful life.
Moss can mess with shingles
On asphalt shingles, thick moss can creep under edges and lift them slightly. Even small lifting can create places for water and debris to hang out. Over time, that can speed up wear and invite leaks or localized damage.
Moss vs. algae vs. lichen: know your enemy
- Moss: green, fuzzy, often forms clumps and mats. The slippery one.
- Algae: often shows as dark streaks. More cosmetic, but still worth addressing for curb appeal.
- Lichen: crusty, flat-ish patches that cling like they signed a lease. Often tougher to remove without damaging the surface.
Before You Start: Is This a DIY Job or a “Call a Pro” Situation?
Cleaning moss off a roof is as much a safety decision as it is a cleaning decision. Roofs are high, angled, and occasionally determined to turn you into a cautionary tale.
Strong “hire a professional” signals
- The roof is steep (or you can’t stand on it comfortably without feeling like a cartoon character sliding off).
- The roof is two stories or higher.
- You have slate, clay tile, concrete tile, or any brittle roofing material.
- The moss is widespread and thick (big areas of green carpet, not just a few patches).
- You’re not set up for safe ladder use and fall protection.
If you DIY, treat safety like Step Zero
- Wear non-slip shoes and eye protection. Gloves are your friend.
- Work on a dry day. Wet moss is basically nature’s banana peel.
- Use a stable ladder, ideally with a helper spotting you.
- Avoid stepping on delicate areas, roof edges, or wet sections.
Tools and Supplies Checklist
Pick your approach based on roof type and how much moss you’re dealing with. In general, the safest strategy is kill the moss gently, then rinse lightly, and let time (and rain) do part of the cleanup.
Helpful tools
- Pump sprayer (garden sprayer or backpack sprayer)
- Garden hose with a spray nozzle (low to medium pressure)
- Plastic scraper or plastic putty knife (for careful spot work)
- Soft-bristle brush (only if needed, and gently)
- Leaf blower (optional, for loose debris after treatment)
- Tarps or plastic sheeting to protect plants
Cleaning options (choose one route)
- Commercial moss remover labeled for roofs (often zinc-based or similar formulations)
- Diluted bleach solution (effective, but needs extra plant/metal protection and careful handling)
- Oxygen bleach solution (often marketed as “oxygenated” cleaners; generally gentler on landscaping than chlorine bleach)
Important: Never mix cleaning chemicals. If you use bleach, do not combine it with ammonia-containing products or other cleaners. Use one product at a time, exactly as directed.
The Roof-Friendly Method: Kill It First, Then Remove It Gently
Most reputable guidance agrees on two big ideas:
- Avoid high-pressure washing on asphalt shingles.
- Use a low-pressure application of a moss-killing solution, allow dwell time, then rinse gently.
Step 1: Prep the area (protect what’s below)
- Move patio furniture and cover sensitive items near downspouts.
- Lightly water shrubs and grass below the roofline. Wet leaves absorb less chemical runoff.
- Cover delicate plants with tarps (but don’t “cook” them in the sunremove coverings when you’re done).
- Close windows near the work area.
Step 2: Apply your moss-killing solution (low pressure)
You have a few common options. The goal is to coat the mossnot flood the roof and send a chemical waterfall into your flower beds.
Option A: Bleach-and-water solution (effective, but be careful)
Many roof care guides use a diluted chlorine bleach solution for organic growth on asphalt shingles. Concentrations vary by source and roof conditions, so consider starting milder, testing a small spot, and following any manufacturer guidance for your shingle brand.
- Apply using a pump sprayer.
- Let it sit (dwell) around 10–20 minutes, depending on conditions.
- Rinse thoroughly with gentle, downward-flowing water.
Tip: Keep rinsing water directed down the roof slope so you don’t force water under shingles.
Option B: Oxygen bleach solution (often more plant-friendly)
Oxygen bleach-based cleaners can break down organic growth with less risk to landscaping than chlorine bleach. Follow label directions for roof use, apply with a sprayer, allow soak time, then rinse gently.
Option C: Roof moss remover (store-bought)
Commercial roof moss killers are convenient and often designed to reduce roof damage risk. Some are “apply and leave” treatments that rely on weather to loosen moss over time. If you want faster results, you may still do a gentle rinse after the recommended dwell time.
Step 3: Light rinse, then patience
After treatment, you may notice moss darken, dry, and loosen. Some of it may come off immediately with a gentle rinse; the rest can release gradually with rain and wind.
If you must remove stubborn patches, do it like you’re handling a priceless artifactnot like you’re sanding a deck.
Step 4: Spot-remove carefully (only if needed)
- Use a soft-bristle brush with gentle pressure.
- Brush downward with the shingle direction.
- Skip metal bristles, wire brushes, and aggressive scraping.
Cleaning Moss Off Different Roof Types
Roofs are not one-size-fits-all. Your cleaning method should match your material, or you’ll trade moss for damagean upgrade nobody enjoys.
Asphalt shingles (most common)
- Use low-pressure application of cleaner and gentle rinse.
- Avoid pressure washers and aggressive scrubbing that can remove protective granules.
- Work from the top down so you’re not lifting shingle edges.
Metal roofs
- Metal sheds moss more easily, but coatings can be scratched.
- Use a mild roof-safe cleaner and rinse gently.
- Avoid abrasive pads or stiff brushes that can damage protective finishes.
Clay tile, concrete tile, slate
- These materials can crack under foot traffic.
- Cleaning often requires specialized access and professional techniques.
- If you DIY at all, work from a ladder or scaffold and avoid walking on tiles.
What NOT To Do (Unless You Enjoy Regret)
Don’t pressure wash asphalt shingles
High pressure can strip granules, shorten roof life, and force water under shingles. If you remember only one thing, remember this: your roof is not a driveway.
Don’t scrape like you’re removing barnacles
Aggressive scraping can damage shingles, especially older ones that are already brittle. If the moss is thick, it’s usually safer to treat it first and remove it after it loosens.
Don’t rinse upward
Always rinse down the roof slope. Shooting water upward can push it into seams and under shingle edges.
Don’t freestyle chemical cocktails
Mixing cleaners is dangerous. Use one product at a time, follow label directions, and keep the area ventilated.
How to Prevent Moss From Coming Back
Once you’ve cleaned moss off the roof, prevention is what keeps you from doing this again next yearunless roof moss removal is your new hobby (no judgment, but also… why?).
Trim shade and improve airflow
Moss thrives in shade and persistent dampness. Trim overhanging branches to let sunlight hit the roof and speed drying after rain.
Keep the roof clear of debris
Leaves and pine needles trap moisture and create a cozy moss starter kit. Clear valleys and problem areas seasonally, and keep gutters flowing so water doesn’t back up onto shingles.
Install zinc or copper strips near the ridge
Zinc or copper strips installed near the roof ridge can help discourage regrowth. When rainwater runs over the metal, small amounts of ions can inhibit moss and algae development along the runoff path. These strips help prevent new growth, but they won’t remove existing mossso clean first, then install.
Consider algae-resistant roofing when it’s time to replace
If your roof is nearing the end of its life and you live in a damp or shaded area, algae-resistant shingles may help reduce staining and organic growth over time. It’s not a magic shield, but it can tilt the odds in your favor.
Quick FAQs and Troubleshooting
How long does it take for moss to go away after treatment?
Sometimes you’ll see results the same day, especially with a gentle rinse. But often moss loosens gradually over days or weeks as it dries out and weather does the finishing work.
Is vinegar enough to kill roof moss?
Vinegar can help with some light growth, but many how-to resources note it’s not reliably strong enough on its own for established moss. For bigger patches, use a roof-appropriate moss killer or a properly diluted treatment designed for roof materials.
Will cleaning damage my roof?
It canif you use high pressure, scrub aggressively, or use harsh chemicals improperly. Stick to low-pressure application, gentle rinsing, and the least aggressive method that gets results. When in doubt, consult your shingle manufacturer guidance or hire a pro.
When is the best time to remove moss?
Many pros prefer mild seasons (spring or fall) when moss is actively growing and treatments are more effective. Avoid freezing weather or blazing hot days that make solutions evaporate too fast.
Conclusion: A Clean Roof Without the Drama
To clean moss off the roof safely, think “gentle and strategic,” not “maximum power.” Treat the moss with a roof-safe solution, give it time to loosen, rinse with low pressure, and only use light brushing if you truly need it.
Then lock in prevention: trim shade, clear debris, improve drainage, and consider zinc or copper strips to make your roof a less welcoming place for moss to move back in.
If the roof is steep, tall, or fragileor if the moss has turned into a full-blown rooftop ecosystemhire a professional. The goal is a clean roof, not a thrilling story for the emergency room waiting area.
Real-World Experiences: What People Learn After Cleaning Roof Moss
Homeowners’ “moss stories” tend to follow a few familiar patternsbecause roof moss removal is one of those projects that looks simple until gravity, slippery growth, and landscaping consequences show up to audit your decisions.
1) The “Pressure Washer Confidence” Phase (and the regret that follows)
A common first instinct is: “I’ll just pressure wash it off.” It feels fast, powerful, and satisfyinglike you’re erasing the problem with a wand. The experience many people report, though, is that pressure washing can create new issues: loosened granules on asphalt shingles, roughened surfaces, or water pushed into places it doesn’t belong. The moss might disappear in dramatic fashion, but you may trade it for shortened shingle life or mystery leaks later. The takeaway: the most satisfying method in the moment isn’t always the kindest method long-term.
2) The “Why Are My Plants Angry?” Surprise
Even careful DIYers get caught off guard by runoff. People often say they “only used a little cleaner,” but roof lines concentrate water. That means whatever is on the roof can end up in one or two downspout zonesright where favorite shrubs live. A frequent lesson is that pre-wetting plants, covering sensitive landscaping, and rinsing thoroughly afterward isn’t overkill. It’s the difference between “roof looks great” and “roof looks great, but my hydrangeas are staging a protest.” If you want a win-win, protection and dilution steps matter as much as the cleaner you choose.
3) The “It Came Back!” Moment
Another shared experience: someone cleans the moss, the roof looks better… and then green fuzz returns within a year or two. When people compare notes, the common factor is usually shade and debris. Roofs under trees stay damp longer, collect organic matter, and provide the perfect moss habitat. The fix isn’t just repeating the cleaningit’s changing conditions. Trimming back branches, keeping gutters clear, and removing roof debris regularly can feel boring compared to spraying a solution, but those steps often make the biggest difference in how long results last.
4) The “I Didn’t Realize How Slippery This Is” Wake-Up Call
Many DIYers start with good intentions and then realize moss is slickeven when it looks dry. People often describe moving slowly, keeping weight low, and wishing they’d planned to do more from a ladder rather than standing on the roof. A practical tip that comes up: use a sprayer that lets you apply cleaner from a safer position (like a ladder or an eave area), and avoid stepping onto treated or wet spots. If you feel even slightly unsafe, that’s your brain doing you a favorlisten to it.
5) The “Prevention Actually Works” Discovery
Homeowners who install zinc or copper strips often describe prevention as the real game-changer. The strips don’t remove existing moss, so some people feel underwhelmed at first. But over time, many notice less regrowth along the runoff path, especially when combined with tree trimming and debris control. The experience-based lesson: a one-time cleaning is a reset button; prevention is the reason you don’t have to keep pressing it.
6) The “I’m Glad I Called a Pro” Realization
Plenty of people start DIY and then pivotespecially on steep roofs, multi-story homes, or fragile materials. The most common sentiment afterward is relief: pros have proper access equipment, fall protection, and experience choosing chemicals and pressure levels for the roof type. If you’re weighing the cost, consider this: roof work has a higher “consequence factor” than many home projects. Paying for expertise can be cheaper than repairing accidental damageor dealing with an injury.
Bottom line from real-world experiences: the best roof moss removal plan is the one that keeps you safe, protects the roof surface, and includes prevention so you’re not doing the same project on repeat.