Table of Contents >> Show >> Hide
- What “Professional” Really Means (Spoiler: It’s Not “Expensive”)
- Budget Game Plan Before You Touch the Tree
- Pro Order of Operations: Step-by-Step Christmas Tree Decorating
- Step 1: Fluff Like You Mean It (This Is Where Fullness Comes From)
- Step 2: Add Lights for Depth (Not Just a Surface Glow)
- Step 3: Add Ribbon or Garland (Your Budget’s Best “Volume Builder”)
- Step 4: Start Big (Large Ornaments Go First, and Not Only on the Tips)
- Step 5: Add Medium + Small Ornaments (Fill the Gaps, Repeat the Story)
- Step 6: Make Ornament Clusters (Big Impact, Tiny Cost)
- Step 7: Add Picks, Sprays, and “Filler” (This Is Where Trees Get Fancy)
- Step 8: Finish the Top and the Base (Because “Done” Is a Whole Look)
- Cheap Decor That Looks Shockingly Expensive
- Where to Find Budget Christmas Tree Decor Without Settling for “Cheap-Looking”
- Common Christmas Tree Problems (and the Fast Fixes Pros Use)
- Safety and Sanity Checks (The Unsexy but Important Part)
- Conclusion: A Pro-Looking Tree Is a Process, Not a Purchase
- Extra: Experience-Based Tips That Make Budget Trees Work in Real Homes (500+ Words)
Let’s get one thing straight: a “professional-looking” Christmas tree isn’t about owning 400 heirloom glass ornaments and a ribbon that costs more per yard than your electric bill. A pro tree is about planning, layering, and making the eye believe you spent more than you did. (A noble holiday tradition, right up there with pretending you like fruitcake.)
In this guide, you’ll learn how to decorate a Christmas tree on a budget using a stylist’s order of operationsso your tree looks full, balanced, and intentionally designed. We’ll use budget Christmas tree ideas that rely on texture, depth, and a few “big impact / low cost” tricks like ornament clusters, ribbon tucking, and DIY fillers.
What “Professional” Really Means (Spoiler: It’s Not “Expensive”)
When designers style a tree, they’re quietly chasing three things:
- Cohesion: a simple color story and repeated textures so it looks “collected,” not chaotic.
- Depth: décor placed inside the branches (not only on the tips) to create dimension.
- Visual rhythm: big pieces first, then medium, then smalllike building an outfit that isn’t just 12 hats.
If you nail those, you can absolutely decorate a Christmas tree like a pro with affordable ornaments and some strategic ribbon. The goal is “magazine vibe,” not “maxed-out credit card vibe.”
Budget Game Plan Before You Touch the Tree
1) Pick a Simple Color Story (2–3 Colors + 1 Metallic = Easy Mode)
A budget-friendly tree looks higher-end when it has a clear palette. Choose:
- Two main colors: e.g., navy + silver, blush + champagne, red + gold, black + white.
- One “bridge” neutral: cream, wood tones, or greenery (your tree already provides this).
- One metallic: gold, silver, brass, or mixed metals for sparkle.
Pro tip: “Matching sets” can look flat. A better cheat is to mix finishesmatte, shiny, glitter, velvetinside the same color family. Your wallet stays calm while your tree looks curated.
2) Decide Where to Splurge vs. Save
If you’re spending money, spend it where it shows most:
- Splurge (if you can): lights (they’re the foundation), a standout topper, and one statement ribbon.
- Save aggressively: filler ornaments, picks, garland alternatives, and “volume builders” (more on those soon).
Think of it like cooking: you don’t need the world’s fanciest salt, but you do want the pasta to be cooked.
3) Shop Your House First (Your Future Tree Is Hiding in a Closet)
Before buying anything, gather what you already have:
- Ornaments from past years (even mismatched onespalette can unify them).
- Ribbon from gift wrap, craft bins, or leftover party décor.
- Natural elements: pinecones, twigs, eucalyptus, dried berries (real or faux), even cinnamon sticks.
- “Unexpected ornaments”: mini frames, cookie cutters, bells, or small toys (yes, the tiny dinosaur can be festivedon’t fight it).
Pro Order of Operations: Step-by-Step Christmas Tree Decorating
If you only steal one thing from professional Christmas tree decorating tips, steal this: the order matters. Here’s the sequence that makes everything easier and prettier.
Step 1: Fluff Like You Mean It (This Is Where Fullness Comes From)
A sparse-looking tree is often just an un-fluffed tree. Separate branches, bend tips outward, and create layers so you don’t see a sad hollow center. On an artificial tree, aim for a slightly irregular silhouetteperfect symmetry can look fake. Real trees: rotate it, find the “front,” and plan heavier décor on the thinner side.
Step 2: Add Lights for Depth (Not Just a Surface Glow)
The easiest way to make a budget tree look expensive is to make it glow. Don’t just wrap lights around the outside like you’re mummifying the tree. Instead, work in sections and push some lights deeper near the trunk, then bring others out toward the tips. This creates that rich, layered sparkle you see in photos.
If your lights look uneven, step back and squint (yes, squinting is a legitimate design tool). Any dark “holes” get another loop of lights tucked in. Also: test strands before you decorateholiday rage is real.
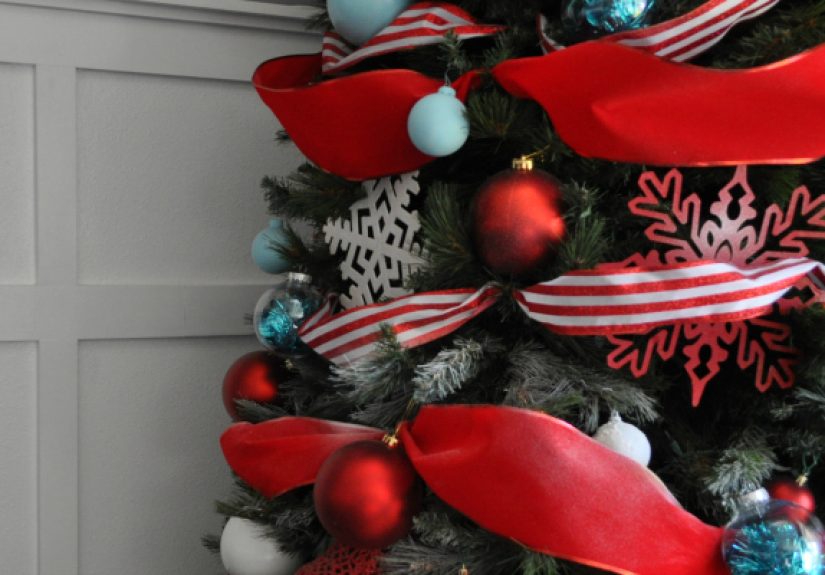
Step 3: Add Ribbon or Garland (Your Budget’s Best “Volume Builder”)
Ribbon is a professional cheat code because it covers a lot of visual space for relatively little money. To make it look designer, don’t wrap it tightly around the tree like a barber pole. Instead, cut longer sections and tuck them into the branches so the ribbon dips in and out, creating soft waves.
- Wired ribbon holds shape best (hello, instant luxury).
- Textured ribbon (mesh, burlap-style, velvet) grips branches better and looks richer.
- Mixing ribbons works if you keep them in the same palette (think: one patterned + one solid).
Budget alternative: if ribbon isn’t your thing, use bead garland, felt garland, or even DIY popcorn garland for a cozy vintage vibe.
Step 4: Start Big (Large Ornaments Go First, and Not Only on the Tips)
Pros place larger ornaments first because they create structure. Here’s the move that instantly upgrades your tree: push some larger ornaments deeper into the branches, closer to the trunk, especially near the bottom half. This builds depth and makes the tree look full even if you don’t own a million ornaments.
Keep heavier ornaments closer to sturdier interior branches. Lighter ornaments can sit on the outer tips. This prevents branch droop and keeps the tree balanced.
Step 5: Add Medium + Small Ornaments (Fill the Gaps, Repeat the Story)
Now you’re filling space and repeating your palette. Spread ornaments evenly around the treenot just in the “photo front.” If you can see your tree from the side, decorate the side. If you can see it from all angles, congrats: you have to do a full 360. (Still worth it. Your future self will thank you.)
A simple strategy: repeat each main color every few inches so the eye travels around the tree. Mix finishes to keep it lively: shiny reflects light, matte calms the look, glitter adds sparkle.
Step 6: Make Ornament Clusters (Big Impact, Tiny Cost)
Want the “designer tree” look without buying oversized ornaments? Cluster smaller ornaments together so they read as one bold moment. Use pipe cleaners or floral wire to tie 3–5 ornaments into a tight bunch, then hang the cluster as a unit. It adds drama, fills awkward gaps, and makes your ornament collection look suddenly… intentional.
Step 7: Add Picks, Sprays, and “Filler” (This Is Where Trees Get Fancy)
Picks are those stems of faux berries, glitter branches, pine, eucalyptus, or florals that you tuck in to add height and texture. They’re how trees get that styled, layered look.
- Put picks in groups rather than scattering single stems everywhere.
- Angle them outward so they expand the silhouette and hide bare spots.
- Use them to balance color (e.g., if one side looks too “gold-heavy,” tuck in a few gold sprays on the opposite side).
Step 8: Finish the Top and the Base (Because “Done” Is a Whole Look)
Tree toppers and tree skirts are the bookends. A beautiful tree can still look unfinished if the base is a tangle of cords and the topper is… vibes-only.
- Topper on a budget: oversized bow, star, snowflake, or even a bundle of picks arranged like a crown.
- Base on a budget: a woven basket collar, a neutral blanket, or a simple skirt in a texture that matches your ribbon (faux fur, knit, burlap-style).
Hide cords with the skirt/collar, and consider a timer for lights so you’re not living the “did I leave the tree on?” lifestyle.
Cheap Decor That Looks Shockingly Expensive
Use Natural Elements (AKA “Free Fancy”)
Pinecones, cinnamon sticks, dried orange slices, and sprigs of greenery add texture that feels warm and elevated. Dried oranges are especially great: they add color, smell amazing while making them, and look like something from a boutique holiday catalog.
Rethink Garland: Ribbon, Beads, or “One Hero Garland + Budget Fill”
If lush garland is out of budget, do one premium piece (like a thick pine garland) and supplement with ribbon loops. You’ll get the layered look without paying for ten feet of “why is this greenery $60?”
Mix “High-Low” Ornaments
A pro trick is to mix a few special ornaments (handmade, sentimental, or just cool) with inexpensive shatterproof filler balls. The tree reads as curated because the eye notices the interesting piecesand the fillers quietly do their job, like backup dancers who never miss a beat.
Where to Find Budget Christmas Tree Decor Without Settling for “Cheap-Looking”
- After-holiday sales: buy lights, ribbon, and neutral ornaments for next year when discounts are steep.
- Thrift and vintage: look for unique ornaments that add personality. Even a few vintage-style pieces can make the whole tree feel collected.
- Craft stores: watch for coupons and seasonal sales on ribbon and picks.
- Big-box multipacks: basic ornament sets are perfect fillersthen you customize the “wow” with clusters and picks.
- Swap groups / Buy Nothing: people declutter holiday décor constantly. Your dream ribbon might be someone else’s “why did I buy this?”
Common Christmas Tree Problems (and the Fast Fixes Pros Use)
“My Tree Looks Flat”
Add depth: push some ornaments and lights deeper into the branches. Then add picks to expand the silhouette. Flat trees are usually “everything is on the outside” trees.
“It Looks Messy, Not Magical”
Reduce randomness. Group ornaments by color and size, repeat key colors, and remove a few items that don’t fit your palette. Sometimes the most professional move is editing.
“Bare Spots Are Laughing at Me”
Bare spots get ribbon tucks, ornament clusters, and picks. If the tree is thin in one area, face that area toward a wallor make it the “feature side” and add more volume there intentionally.
“My Lights Look Uneven”
Step back, squint, and add another strand to dark areas. Also, distribute lights at multiple depths. A soft glow inside the tree makes everything look richer.
Safety and Sanity Checks (The Unsexy but Important Part)
A gorgeous tree is not worth a hazard. Before you plug anything in:
- Inspect light strings for damage and avoid overloading outlets.
- Turn lights off when you’re asleep or away (timers make this painless).
- Keep the tree away from fireplaces, heaters, and open flames.
- If you have a real tree, keep it watered so it doesn’t dry out.
This is the part where I gently remind you that “holiday sparkle” should not come with a side of emergency sirens.
Conclusion: A Pro-Looking Tree Is a Process, Not a Purchase
If you remember nothing else, remember this: professionals follow an order and build layers. Fluff first, lights for depth, ribbon for volume, then ornaments from big to small, then picks to finish. That method makes even budget Christmas tree decorations look intentionaland that’s the real secret sauce.
And if your tree still isn’t perfect? Congratulations: it’s authentic. The best trees don’t just look prettythey look like life happened around them, hot cocoa was spilled nearby, and someone argued over whether tinsel is “cute” or “a crime.”
Extra: Experience-Based Tips That Make Budget Trees Work in Real Homes (500+ Words)
Decorating advice is easy when the tree is perfectly fluffed, the living room is spotless, and nobody owns a cat with the moral compass of a tiny raccoon. Real life is… not that. So here are practical, experience-style lessons that consistently help people get a professional-looking Christmas tree on a budgetespecially in normal homes where storage space is limited and time is a myth.
First, the “one-hour tree” is usually a lie. The biggest difference between a tree that looks “fine” and one that looks “wow” is almost always time spent on the early steps. Fluffing and lights are the unglamorous foundation. People often rush those because they’re impatient to hang ornaments (relatable), but the ornament stage is where you’re tempted to buy more stuff. When the base is good, you need fewer decorations to get that full look. In other words: invest effort first so you don’t invest dollars later.
Second, budget trees benefit from “big shapes.” If all you hang are medium ornaments, the tree can look busy but still oddly skimpy. That’s why ribbon and clusters work so well: they create larger visual moments without requiring oversized, expensive ornaments. A few clusters placed intentionally can make a modest ornament collection look styled. It’s basically fashion advice for trees: a statement coat makes the whole outfit look expensive.
Third, your room matters as much as your tree. Pros style trees to match the spacecolor, mood, and scale. If your living room leans warm (wood floors, tan sofa, cozy lighting), ultra-cool white lights can look harsh unless you soften the palette with warmer ornaments and natural textures. If your space is modern and minimal, you don’t need 12 colors to feel festive; you need texturematte ornaments, metallic accents, maybe a single bold ribbon. Matching the tree to the room is a free upgrade because it stops the tree from feeling like it was dropped in from another universe.
Fourth, “editing” is a superpower. A common budget mistake is trying to use everything you own at once. Instead, pull out all décor, then put 20% back in the box. Keep the pieces that match your palette, have special meaning, or add a different texture. The tree will look more intentional, and you’ll have leftovers for a second mini tree, a garland moment, or a tabletop vignette. (Or for bribing a child to stop re-hanging the same ornament on the dog.)
Fifth, make peace with your “problem zone.” Almost every tree has a side that’s thinner, a corner that’s darker, or a section that looks like it gave up. Professionals don’t panic; they allocate resources. Put ribbon dips, clusters, and picks where the tree needs help. Place your favorite ornaments at eye level where you’ll see them most. And if your tree is in a corner? Decorate the front and two sides beautifully and keep the back simpler. That’s not cheating. That’s design efficiency.
Finally, the most “professional” trees feel personal. A tree that looks expensive but has zero personality can feel like a hotel lobbypretty, but emotionally vacant. Add a few ornaments that mean something: a travel souvenir, a handmade ornament, a goofy family tradition piece. The trick is to weave those into a cohesive palette so the tree still feels styled. That’s how you get the magic combination: a tree that looks like a designer did it, but also looks like you live there.


