Table of Contents >> Show >> Hide
- Why Bolts Get Stuck (So You Can Beat the Boss Fight)
- Before You Start: A Quick Safety & Sanity Checklist
- The Best Strategy: Escalate in Smart Steps
- Step 1: Clean and “Expose” the Bolt
- Step 2: Use the Right Tooling (This Is Where Most Wins Happen)
- Step 3: Penetrating Oil (Give It Time to Be Brilliant)
- Step 4: Add Shock (Vibration Breaks Rust’s Grip)
- Step 5: Work It Back and Forth (Don’t Try to “One-Turn” It)
- Step 6: Increase Leverage Carefully (More Force, Not More Chaos)
- Step 7: Heat (Effective, But Not a Casual Move)
- What If the Bolt Head Is Rounded (Or Starting to Round)?
- What If the Bolt Snaps or the Head Breaks Off?
- Common Stuck-Bolt Scenarios (And the Best Approach)
- How to Prevent Bolts from Getting Stuck Again
- FAQ: Stuck Bolt Removal Questions People Google at 2:00 AM
- Real-World Experiences: What Actually Happens in the Garage (About )
- Conclusion
A stuck bolt is basically a tiny metal drama queen. It doesn’t just “feel” tightit’s often
glued in place by rust, corrosion, dirt, old threadlocker, or years of heat-cycling that
turned your innocent weekend project into a grudge match.
The good news: most stuck bolts can be freed with a smart, calm approach that uses
physics (and patience) instead of pure rage. The bad news: if you go full gorilla right away,
you can round the head, snap the bolt, or damage the part it’s threaded into. Let’s avoid
that cinematic heartbreak.
Why Bolts Get Stuck (So You Can Beat the Boss Fight)
Understanding why a bolt seized helps you choose the right method. Common culprits include:
- Rust and corrosion: Rust expands and “locks” threads together like nature’s superglue.
- Galvanic corrosion: Dissimilar metals (like steel bolts in aluminum) can basically bond over time.
- Threadlocker: Some fasteners were installed with products meant to resist vibrationand removal.
- Over-torque: The bolt was tightened beyond spec, stretching threads and increasing friction.
- Heat cycling: Exhaust parts, engines, outdoor equipmentrepeated heating and cooling can seize hardware.
- Paint, dirt, and debris: Threads can get packed with junk that turns “unscrew” into “nope.”
Before You Start: A Quick Safety & Sanity Checklist
You’ll get better results (and fewer new curse words) if you set up correctly:
- Wear eye protectionrust flakes, metal shards, and tool slips are real.
- Stabilize the work so you’re not fighting the bolt and the whole object.
- Use the right socket (usually a 6-point socket for stuck bolts) to reduce rounding.
- Stop if the head starts roundingswitch tactics early.
-
Heat, cutting, drilling, or heavy power tools? If you’re a teen or inexperienced, get an adult or a pro
involved. Those methods can be hazardous when done wrong.
The Best Strategy: Escalate in Smart Steps
The biggest mistake people make is jumping straight to maximum force. Better approach:
start with low-risk, high-success methods, then escalate only if needed.
Step 1: Clean and “Expose” the Bolt
Rust and grime prevent good tool contact and keep penetrating oil from doing its job.
Brush off the head, the nut, and any exposed threads with a wire brush. If it’s caked,
a quick scrape and wipe can make a surprising difference.
Why it works: Better grip reduces rounding, and cleaner pathways help penetrants wick into the threads.
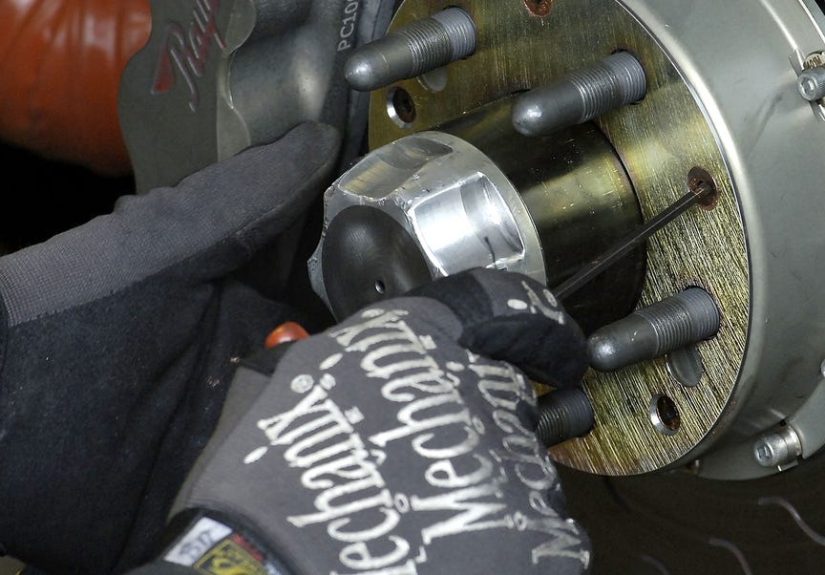
Step 2: Use the Right Tooling (This Is Where Most Wins Happen)
If the bolt head is intact, you want maximum grip and steady control:
- 6-point socket instead of 12-point (more contact, less slip).
- Proper size (no “close enough” socketsthis is how rounding begins).
- Breaker bar for controlled leverage (rather than a tiny ratchet you’ll destroy).
- Keep the socket fully seated and apply force smoothly.
Pro tip: Try a tiny tightening movement firstjust a hair. That micro-movement can crack the rust bond
and make loosening easier.
Step 3: Penetrating Oil (Give It Time to Be Brilliant)
A true penetrating oil (not just a general-purpose spray) can creep into microscopic gaps,
break down rust, and reduce friction. Spray it around the head, the nut, and any exposed threads.
Then wait. Yes, waiting is part of the technique.
- Short soak: 10–20 minutes for mildly stuck fasteners.
- Serious soak: Several hours or overnight for stubborn, rusty bolts.
- Reapply: A second or third application often helps more than doubling your strength.
Why it works: Capillary action pulls penetrant into the threads. Time is the “delivery service.”
Step 4: Add Shock (Vibration Breaks Rust’s Grip)
If the bolt won’t move after soaking, add vibrationgently. You can tap the bolt head or nut
(not like you’re auditioning for a demolition crew, but firm enough to send a shock through the threads).
A manual impact driver or an impact tool can also help in some situations.
Why it works: Rust bonds are brittle. Vibration can fracture them and help penetrant travel deeper.
Step 5: Work It Back and Forth (Don’t Try to “One-Turn” It)
If you get even the tiniest movement, resist the urge to crank it all the way out immediately.
Instead:
- Turn slightly loose.
- Then slightly back in.
- Repeat, adding penetrant as you go.
Why it works: This “thread-walking” clears corrosion gradually and reduces the chance of snapping the bolt.
Step 6: Increase Leverage Carefully (More Force, Not More Chaos)
If you need more torque, use tools designed for it. A longer breaker bar increases leverage
without requiring you to do something questionable, like balancing on a wrench like it’s a circus act.
Watch-out: More leverage also increases the chance of breaking the bolt. If it feels like it’s twisting
but not turning, stop and switch tacticsespecially on smaller bolts.
Step 7: Heat (Effective, But Not a Casual Move)
Heat can expand metal, break corrosion bonds, and soften some threadlocking compounds.
This is a common mechanic trickbut it can also be risky around fuel, wiring, plastics, paint,
or penetrating oil residue.
- Safer option: A heat gun can be less risky than an open flame for many DIY contexts.
- Important: Never apply open flame near flammables or where penetrant vapors could ignite.
- If you’re not experienced: Get an adult or a professional for torch work.
Bonus trick: Some pros use heat and then apply wax so it wicks into threadsanother way to lubricate where oil can’t easily reach.
What If the Bolt Head Is Rounded (Or Starting to Round)?
A rounded-off bolt is the fastener equivalent of a shaved key: your tools can’t bite.
The best move is to stop early and switch to grip-focused tactics.
Use Extractor Sockets or Grip Tools
- Bolt extractor sockets are designed to bite into rounded heads.
- Locking pliers can work if there’s enough head exposed to clamp tightly.
- File flats on the head (if accessible) to give a wrench better purchase.
Why it works: You’re creating fresh contact surfaces instead of relying on a chewed-up hex.
What If the Bolt Snaps or the Head Breaks Off?
This is where the job can shift from “DIY weekend” to “precision extraction.” There are methods
involving drilling, extractors, welding a nut to the stud, or repairing threads with inserts.
These can work extremely wellbut mistakes can damage the surrounding part or make removal harder.
If you’re inexperienced (or you’re working on something expensive like an engine block),
it’s often smart to involve a professional at this stage. The goal isn’t to prove toughness;
it’s to avoid turning a $3 bolt into a $300 repair.
Common Stuck-Bolt Scenarios (And the Best Approach)
1) Rusted Outdoor Hardware (Furniture, Fences, Deck Fixtures)
These usually respond well to: cleaning + penetrant + time + back-and-forth movement.
Corrosion is the main enemy, so patience is your best tool.
2) Automotive Bolts (Exhaust, Suspension, Underbody)
These fasteners often face heat cycling and heavy corrosion. Use penetrant pre-soaks,
correct sockets, controlled torque, and consider professional help for heat or extraction.
3) Bathroom / Kitchen Fixtures
Moisture, mineral buildup, and corrosion can lock fasteners. Use gentle penetrant application,
protect finishes, and avoid brute force that can crack porcelain or strip soft metals.
How to Prevent Bolts from Getting Stuck Again
Once you win the battle, you can prevent the sequel:
- Replace damaged hardware (rounded heads and stretched bolts are repeat offenders).
- Clean threads before reinstalling (wire brush, thread chaser, or appropriate cleaning tool).
- Use anti-seize compound where appropriate (especially in high-heat or corrosion-prone areas).
- Use correct torqueover-tightening is a fast track to future misery.
- Choose the right fastener material for the environment (outdoor, marine, high-heat).
FAQ: Stuck Bolt Removal Questions People Google at 2:00 AM
Does WD-40 work for stuck bolts?
Some general sprays can help, but a dedicated penetrating oil is usually more effective on seized fasteners.
If the bolt is heavily rusted, time (longer soak) and added vibration often matter as much as the product.
How long should I let penetrating oil soak?
For mildly stuck bolts, 10–20 minutes can work. For badly rusted hardware, a few hours or overnight
soaks often make the difference between success and a snapped bolt.
How do I avoid breaking the bolt?
Use a 6-point socket, apply steady torque, stop if the bolt feels like it’s “stretching,” and use
the back-and-forth method once it moves. If it won’t budge, escalate with penetrant and shock
before increasing leverage.
Real-World Experiences: What Actually Happens in the Garage (About )
Most stuck-bolt stories start with confidence and end with someone staring at a rounded head like it
personally betrayed them. One common scenario: a homeowner tackling a lawnmower blade replacement.
The blade bolt looks harmlessuntil you discover it has spent years marinating in damp grass clippings.
The first instinct is to yank harder. The better move is to clean the bolt head, soak it, and walk away for a bit.
People who do this are often shocked by how “impossible” turns into “oh… it moved” after a patient soak.
The lesson: time isn’t wasted if it prevents a snapped bolt (or an emergency trip for new tools).
Another frequent tale comes from outdoor furniture or fence hardware. You try to remove a bolt that hasn’t moved
since the last decade. You put a wrench on it, turn, and suddenly you feel the tool slipping. That’s the moment
to stop, not “power through.” The folks who succeed here usually switch to a 6-point socket, re-seat it firmly,
and add penetrant. Then they use the back-and-forth techniquetiny movements that feel silly until they work.
Slowly, rust gives up. The humor in these situations is that the “hero move” is not a dramatic heave; it’s
quietly repeating small, smart steps like you’re negotiating with a stubborn toddler who refuses to put on shoes.
Then there’s the classic “bathroom fixture surprise.” Someone tries to replace a towel bar or tighten a loose
faucet handle, and the fastener is corroded just enough to turn removal into an episode. The tricky part here is
that bathroom parts can be softer metal or surrounded by delicate surfaces. People who go too aggressive can crack
tile, chip porcelain, or strip a small fastener instantly. The more successful approach is careful penetrant use,
gentle tapping for vibration, and a slow, controlled turn with the correct bit or socket. In other words: finesse,
not fury.
Automotive bolts come with their own special flavor of stubbornespecially anything under a car. A common win is
simply planning ahead: spraying penetrant the night before a repair. That one decision can turn a knuckle-busting,
tool-throwing struggle into a straightforward removal the next day. And when something still refuses to move,
experienced DIYers often learn a key truth: if the bolt is starting to round or feels like it’s about to snap,
the smartest “experience-based” move is to pause and change tactics (or call in help) before you create a much
bigger problem. Nobody brags about snapping a boltbecause the only prize is extra work.
The big takeaway from all these real-world stories is simple: stuck bolt removal is less about strength and more
about sequencing. Clean, soak, shock, grip, and only then escalate. Do that, and you’ll win most battleswithout
turning your project into a multi-day saga titled: “How I Accidentally Invented New Words.”
Conclusion
If you remember one thing, make it this: don’t rush the escalation. Most stuck bolts come free when you
improve grip, give penetrants time to work, add vibration, and move the fastener back and forth instead of
demanding a heroic one-turn exit. Save high-risk methods (like open-flame heat and drilling) for situations
where safer options failedand when in doubt, bring in someone experienced. Your future self (and your knuckles)
will thank you.