Table of Contents >> Show >> Hide
- Why a Candy Corn Garland Is Such a Great Halloween Craft
- Supplies You’ll Need
- How to Make a Candy Corn Garland
- Tips for a Better-Looking Candy Corn Garland
- Creative Variations to Try
- Where to Hang a Candy Corn Garland
- Common Mistakes to Avoid
- What Making a Candy Corn Garland Is Really Like: The Experience Behind the Craft
- Final Thoughts
- SEO Tags
There are two kinds of Halloween people: the ones who think candy corn is a charming fall icon, and the ones who act like it personally offended them in 2009. Happily, both camps can usually agree on one thing: candy corn makes ridiculously cute decor. That is exactly why a DIY candy corn garland works so well. It is cheerful, inexpensive, easy to customize, and just festive enough to say, “Yes, I decorate for Halloween, but I’m not trying to summon anything from the attic.”
This paper craft is especially great because it hits the sweet spot between simple and satisfying. You do not need a craft room that looks like a boutique supply closet. You need cardstock, scissors, glue or tape, a hole punch, string, and a free printable template that does the heavy lifting for you. Once the template is printed, the rest is basically a cut, layer, punch, and string operationalso known as the kind of project that looks far fancier than it really is.
Below, you will find an easy, step-by-step guide to making a candy corn garland, plus practical tips for sturdier pieces, straighter stringing, cleaner layering, and styling ideas for mantels, windows, party tables, classrooms, and front doors. There are also creative variations, common mistakes to avoid, and a longer real-life section on what the experience of making one is actually likebecause every craft sounds neat in theory until someone loses the tape and the dog steals the twine.
Why a Candy Corn Garland Is Such a Great Halloween Craft
A candy corn garland checks a lot of boxes at once. It is budget-friendly, beginner-friendly, and kid-friendly, which is a powerful trio in the world of seasonal decorating. It also uses materials that are easy to find in the United States during the fall: yellow, orange, and white cardstock or construction paper, basic adhesives, and twine or ribbon.
Another reason this craft keeps showing up in Halloween decorating ideas is that the shape is instantly recognizable. You do not need elaborate details, glitter cannons, or a dramatic backstory. Three stacked colors and a rounded triangle shape do the entire job. That means you can make a banner that reads clearly from across the room, whether it is hanging over a dessert table, along a mantel, across a classroom bulletin board, or on a stair rail.
And let’s be honest: some Halloween decor leans so spooky that your living room starts to look like a haunted law office. Candy corn garland brings in that classic orange-and-yellow energy without becoming too scary for kids or too goofy for grown-ups. It is playful, nostalgic, and surprisingly versatile.
Supplies You’ll Need
- Free printable candy corn template
- Yellow cardstock
- Orange cardstock
- White cardstock
- Scissors
- Craft glue, glue stick, double-sided tape, or clear tape
- Hole punch
- Twine, ribbon, baker’s twine, or lightweight string
- Pencil for tracing, if your template is printed separately
- Optional: ruler, mini clothespins, glitter accents, black marker, or foam adhesive dots
Cardstock is the best choice for a garland that needs to hang nicely and survive more than one enthusiastic October. Regular printer paper can work in a pinch, but it tends to curl, wrinkle, and droop like it stayed up too late watching horror movies. Construction paper is fine for a softer, kid-craft look, while cardstock gives you crisp edges and better structure.
How to Make a Candy Corn Garland
1. Print the Free Template and Plan Your Garland Length
Start by printing your free printable candy corn template. Some templates come with three separate layers already sized for the yellow base, orange middle, and white top. Others offer a single outline that you can divide into sections. Either approach works, but separate layers make assembly faster and neater.
Before cutting everything, decide where the garland will hang. A short stretch above a mirror may need only 6 to 8 candy corn shapes. A mantel or doorway may need 10 to 15. A classroom bulletin board or party backdrop can easily use more. Laying out the pieces first helps you avoid that classic crafter’s dilemma: finishing the project and realizing the garland is somehow two feet too short.
2. Cut the Yellow Base Pieces First
Use the largest candy corn section to cut the yellow base from cardstock. This bottom piece sets the scale for the entire garland, so cut all of these first. It is the easiest way to keep your banner consistent from end to end.
A smart move is to trace several bases at once and then batch-cut them. That saves time and creates a more uniform look. Precision matters here, but perfection does not. Minor variations actually give handmade garlands a little personality. You are making charming Halloween decor, not filing tax forms.
3. Cut the Orange Middle and White Top Layers
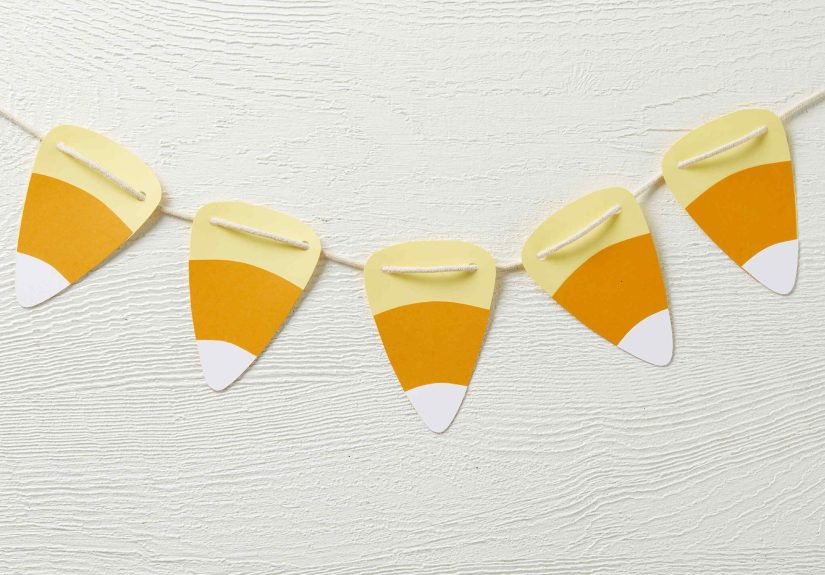
Next, cut the medium orange layer and the small white top layer. Each finished candy corn needs one of each color. Try stacking your paper carefully and cutting a few pieces at a time if your scissors are sharp and your hands are steady.
When the pieces are arranged properly, the pointed ends should line up at the bottom while the top edges create that familiar rounded candy corn look. The orange layer should sit centered over the yellow, and the white layer should sit centered over the orange.
4. Glue the Layers Together
Assemble each candy corn by attaching the orange layer to the yellow base and the white layer to the orange section. Glue sticks are great for a flatter, cleaner finish, while craft glue offers a stronger hold. Double-sided tape also works well and dries instantly, which is ideal for impatient crafters and small assistants with strong opinions.
Press each layer gently so the paper bonds without wrinkling. Then give the pieces a minute or two to settle before moving to the next step. This helps reduce shifting, especially if you are working fast or using slightly thinner paper.
5. Punch Holes and String the Garland
Once the candy corn pieces are assembled, use a hole punch to make one hole near the top left corner and one near the top right corner of each piece. Keep the placement consistent so the garland hangs evenly.
Thread twine, ribbon, or baker’s twine through the holes. You can weave the string through every piece for a classic banner style, or leave a little space between each candy corn for a lighter, more playful look. Narrow ribbon adds a polished finish. Jute twine feels rustic. Black-and-white baker’s twine gives it a slightly vintage Halloween vibe.
Then hang your garland and enjoy the fact that you just turned paper into seasonal magic.
Tips for a Better-Looking Candy Corn Garland
Use Cardstock Instead of Flimsy Paper
Sturdier paper makes the biggest difference. Cardstock holds the shape, resists sagging, and gives the banner enough structure to hang cleanly.
Keep Your Hole Placement Consistent
Uneven holes cause some pieces to tilt while others sit straight, and then your garland starts looking like it had a rough morning. Punch holes in the same spot on every piece, or mark them lightly with pencil first.
Lay Out the Colors Before Gluing
This sounds obvious until you glue an orange layer upside down and stare at it like it betrayed you. A quick layout on the table keeps assembly smooth.
Choose Hanging Spots with Contrast
Candy corn colors pop best against black, gray, natural wood, brick, white walls, or greenery. On a bright orange wall, the garland may look like it is trying to hide.
Creative Variations to Try
One of the best parts of this project is how easy it is to customize. Once you have the basic candy corn shape, you can make the garland more playful, more polished, or more kid-centered.
- Add names or letters: Use black marker or adhesive letters to spell “Boo,” “Happy Halloween,” or kids’ names on each piece.
- Use patterned paper: Swap plain cardstock for polka dots, gingham, glitter cardstock, or scrapbook paper.
- Make a mini version: Smaller candy corn shapes work well for table decor, party backdrops, or classroom displays.
- Try dimensional adhesive: Foam dots can raise the white and orange layers for a little depth.
- Mix in other shapes: Add paper bats, pumpkins, stars, or ghost cutouts between the candy corn pieces.
- Create a kid-craft version: Let children color a black-and-white template, then cut and string the finished pieces.
Where to Hang a Candy Corn Garland
This is the kind of project that earns its keep because it works in so many spaces. Over a mantel is the obvious choice, but it is far from the only one.
Try hanging it across a front door mirror, over a dessert or snack table, along a stair rail, across a bookshelf, over a window, around a classroom board, or on a covered porch for a friendlier Halloween welcome. It also works well for fall birthday parties, school harvest events, and trunk-or-treat displays.
For a cozy layered look, pair it with mini pumpkins, LED candles, paper bats, black lanterns, or a simple neutral backdrop. Candy corn decor shines when it has a little contrast around it, so lean into dark tones, wood textures, or clean white walls to help the colors stand out.
Common Mistakes to Avoid
- Using paper that is too thin: Thin paper wrinkles and curls quickly.
- Making the pieces too large for the space: Giant candy corn can be cute, but not when it swallows your entire mantel.
- Rushing the glue step: Shifting layers can make the whole banner look crooked.
- Skipping a layout test: Always place the pieces in a row before stringing.
- Overdecorating every piece: A few accents are charming. A glitter avalanche is another story.
What Making a Candy Corn Garland Is Really Like: The Experience Behind the Craft
There is something delightfully old-school about making a candy corn garland. It is not a hyper-optimized, app-connected, twelve-tool DIY situation. It is paper, scissors, bright fall colors, and about an hour of pleasantly focused crafting. In a season that can get weirdly busycostumes, parties, school events, pumpkin patches, mystery bins of decorations from the garagethis project feels refreshingly manageable.
The experience usually starts with the colors. Yellow, orange, and white cardstock laid out on a table instantly shifts the mood. Even before you cut the first shape, it starts to feel like fall. The template gives the project structure, which is part of the appeal. You are not staring at a blank page wondering where to begin. You print, trace, cut, and suddenly the table is covered in little candy corn pieces that look festive even before they become a garland.
This is also one of those crafts that works beautifully across age groups. Kids can help trace, sort colors, glue layers, and hand pieces across the table like tiny production managers. Adults can handle the cleaner cuts, hole punching, and final styling. Teenagers, depending on mood and snack availability, may participate somewhere between “fully engaged” and “I am only here because there is cider.” Either way, the project invites people in.
Another part of the experience is that it feels productive in a very visible way. Some crafts are fun while you are making them but disappear into a drawer afterward. A candy corn garland becomes instant decor. The minute it goes up, the room changes. A plain shelf looks more seasonal. A doorway looks more welcoming. A snack table suddenly looks like it has a point of view. That quick payoff is deeply satisfying.
There is also room for imperfection, which makes the process more enjoyable. A slightly lopsided candy corn still looks like candy corn. A garland with uneven spacing still reads as handmade and cheerful. The project does not punish you for not being a precision-cutting wizard. In fact, a little variety often makes it look warmer and more personal.
And then there is the nostalgic factor. Candy corn itself has a very specific place in American fall culture. Whether people love eating it, avoid eating it, or only admire it from a safe decorative distance, the shape is familiar. Making a garland out of it taps into that old-school Halloween energypaper crafts, classroom parties, kitchen-table creativity, and decorations that feel homemade instead of mass-produced.
By the time the final piece is strung and the garland is hung, the whole project tends to feel bigger than the materials involved. It is not just cardstock and twine anymore. It is a small seasonal ritual. It is a reason to gather at the table, put on a playlist, make something colorful, and give the room a little October personality. For such a simple project, that is a surprisingly nice return on investment.
Final Thoughts
A DIY candy corn garland is proof that Halloween decor does not have to be expensive, complicated, or mildly possessed to be effective. With a free printable template, a few sheets of cardstock, and a little string, you can create a decoration that looks cheerful, classic, and handmade in the best possible way.
Whether you are crafting with kids, decorating a party, dressing up a classroom, or just trying to give your mantel a little fall charm, this project is a reliable win. It is colorful without being chaotic, nostalgic without feeling dated, and easy enough that you can finish it before your coffee gets cold. That is rare in both crafting and life.


