Table of Contents >> Show >> Hide
- What You’ll Need
- Before You Cut: Measure Like You Mean It
- Method 1: Classic Fitted Sheet With an Elastic Casing (All the Way Around)
- Method 2: The Quick Elastic-at-the-Corners Version
- Fabric Tips That Save You From Midnight Regret
- Troubleshooting: When Your Sheet Has Opinions
- Finishing Touches: Make It Look Store-Bought (But Better)
- Conclusion
- Real-World “Experience” Notes: What People Learn After Making a Fitted Sheet (and Why You Will Too)
A fitted sheet is basically a giant fabric hat for your mattressone that should stay put, not slowly creep off in the night like it’s trying to escape your laundry routine.
If you’ve ever wrestled with a too-shallow “pocket” sheet (or woken up to elastic snapping you in the kneecap), making your own is a surprisingly satisfying fix.
You get the exact size, the exact fabric, andbest of allthe smug confidence of someone who can say, “Yeah, I made that sheet.”
This guide walks you through two beginner-friendly ways to sew a fitted sheet:
the classic elastic casing all the way around (snug and secure) and a quicker elastic-at-the-corners option (fast, less elastic, still effective).
Either way, you’ll end up with a sheet that actually fits your mattressdepth, topper, and all.
What You’ll Need
Materials
- Fabric: cotton percale, cotton sateen, linen, or a repurposed flat sheet (prewashed)
- Elastic: 1/4" to 1/2" wide (3/8" is a sweet spot for many sheets)
- Matching thread: polyester thread is durable for bedding that gets washed often
- Optional: bias tape or twill tape for corner labels (to find the “top” instantly)
Tools
- Sewing machine (a basic zigzag stitch is plenty)
- Measuring tape (or ruler + patience)
- Fabric marker or chalk
- Scissors or rotary cutter + mat
- Pins or clips
- Iron and ironing board
- Safety pin or bodkin (for threading elastic through a casing)
- Seam ripper (optional, but it’s the grown-up version of an “undo” button)
Before You Cut: Measure Like You Mean It
The secret to a fitted sheet that behaves is simple: measure the mattress you actually sleep on.
Not the label. Not the vibes. The mattress.
You need three numbers:
length (L), width (W), and depth (D) (height/thickness).
Then add a little extra so the sheet can tuck under the mattress and stay there when you do your nightly blanket burrito routine.
Step 1: Measure the mattress
- L = mattress length
- W = mattress width
- D = mattress depth (include toppers/pads if they live on the bed)
- T = tuck allowance (usually 3"–5"; go bigger for slippery fabrics or very deep mattresses)
Step 2: Calculate your fabric cut size
Cut a rectangle:
Cut Length = L + (2 × D) + (2 × T)
Cut Width = W + (2 × D) + (2 × T)
Example (Queen):
Let’s say your mattress is 60" × 80" and 12" deep, and you want 4" of tuck.
Cut Length = 80 + 24 + 8 = 112"
Cut Width = 60 + 24 + 8 = 92"
Fabric width reality check: A lot of “sheeting” fabric is 108" wide, which makes life easier for larger beds.
If your fabric is narrower (like 44"–60"), you may need to seam panels together. That’s not hard, but it’s a different project mood.
If you want the simplest path: use extra-wide sheeting, linen sheeting, or repurpose a flat sheet that’s already plenty wide.
Method 1: Classic Fitted Sheet With an Elastic Casing (All the Way Around)
This is the “real deal” method: you create a hemmed tunnel (casing) and thread elastic through it so the sheet hugs the entire mattress edge.
It takes a little longer, but it’s excellent for deep pockets and wiggly sleepers.
Step 1: Cut the fabric rectangle
Using your calculated cut length and width, cut your fabric.
If you’re using a flat sheet, you can trim it downbonus points if it already has a neat top hem you can reuse somewhere.
After cutting, press the fabric so you’re working with crisp edges (future-you will be grateful).
Step 2: Mark and cut the corner squares
Each corner needs a square removed so the sheet can form “boxed” corners.
The square size is typically:
Corner Square = D + T
(Then you’ll sew with a seam allowancecommonly 1/2"so don’t be stingy.)
How to mark it: On each corner, measure D + T in from the side and D + T in from the end.
Draw a square and cut it out.
Repeat on all four corners.
Shortcut that feels like cheating (in a good way):
Fold the fabric in half lengthwise, then in half again widthwise, stacking all corners.
Then you only mark and cut once through all layers. Just make sure everything is aligned like you’re auditioning for “Project Runway: Bedding Edition.”
Step 3: Sew the boxed corners
Take one cut-out corner. With right sides together, bring the two cut edges together so they match.
You’re creating a seam that turns the flat corner into a 3D corner.
- Sew with a 1/2" seam allowance (or your preferred bedding-friendly seam).
- Backstitch at the start and end for strength.
- Finish the raw edge with a zigzag stitch or serger to reduce fraying.
Repeat for all corners. Then do a quick “test drape” over the mattress (even without elastic yet).
If the corners look wildly wrong, it’s better to find out now than after you’ve lovingly fed elastic through 12 feet of casing.
Step 4: Finish the raw edge
Run a zigzag stitch or serge around the entire bottom edge of the sheet.
This helps prevent fraying and makes the casing fold cleaner.
If you don’t have a serger, zigzag is totally fineyour washing machine will never know the difference.
Step 5: Make the elastic casing
Press the edge up 1/4" toward the wrong side, then press up again 3/4"–1" (depending on your elastic width).
Stitch close to the inner folded edge to form a tunnel.
Leave a 2"–3" opening unsewn so you can thread elastic through.
Tip: Make your casing slightly wider than the elastic. Elastic needs room to slide, not an extreme workout.
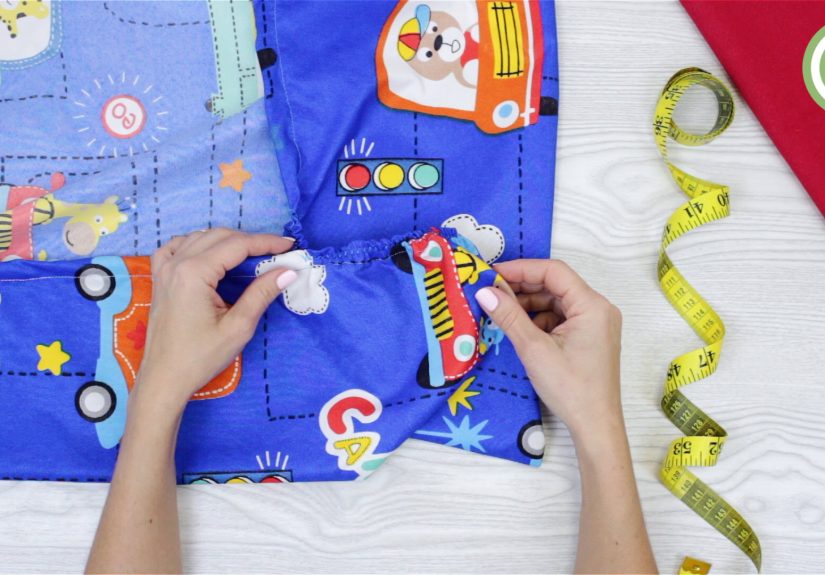
Step 6: Cut and insert the elastic
Elastic length depends on mattress size, fabric weight, and how “snug” you want the sheet.
A practical approach:
- Measure the sheet’s bottom edge perimeter (around the casing line).
- Cut elastic to about 75%–85% of that measurement for a firm-but-stretchy fit.
- If you’re unsure, cut longer first. You can always shorten. Elastic does not magically grow back.
Attach a safety pin to one end of the elastic and feed it through the casing.
Keep the other end pinned outside the opening so it doesn’t disappear into the tunnel like it’s avoiding responsibility.
Step 7: Join elastic ends and close the opening
Overlap elastic ends by about 1"–2" and zigzag stitch across the overlap several times.
Then pull the casing smooth and stitch the opening closed.
Step 8: Final fit test
Put the sheet on the bed. If it’s too loose, shorten the elastic slightly.
If it’s too tight (and you’re sweating like you’re wrestling an alligator), lengthen it a bit by resewing with less overlapor cut a new, longer piece.
Method 2: The Quick Elastic-at-the-Corners Version
Want a faster build and less elastic? This method secures elastic only at the corners (or corners + a short stretch along each side).
It’s popular for crib/toddler sheets and works well on many adult beds tooespecially if your fabric already has some grip.
Step 1: Cut and sew corners the same way
Follow Method 1 through:
cut rectangle → cut corner squares → sew boxed corners → finish edge.
The sheet shape is identical so far.
Step 2: Make a simple hem (or partial casing)
Fold the edge up 1/4", press, then fold up again 1/2"–3/4" and stitch.
This keeps things neat and gives you a stable edge to attach elastic.
Step 3: Add elastic to each corner
Common practice is to place elastic across the “boxed corner” area on the wrong side of the sheet and stitch it down while stretching.
You can use:
- Four short pieces (one per corner), typically around 10"–12" each, or
- Longer pieces that start a few inches away from the corner and run along the edges for extra hold.
Position the elastic centered at the corner seam on the wrong side, then pin each end along the edge.
Using a zigzag stitch, sew the elastic down while stretching it so the fabric gathers.
Repeat for all corners.
Why zigzag? Because elastic stretches. Straight stitches do not enjoy stretching. Zigzag is the flexible friend you want here.
Step 4: Test fit and tweak
Put it on the bed. If corners pop off, increase elastic length along each side or switch to the full casing method.
If it’s overly tight at corners (hello, puckering), use slightly longer elastic pieces or stretch less as you sew.
Fabric Tips That Save You From Midnight Regret
Prewash like you mean it
Bedding gets washed a lot. Prewash and dry your fabric the same way you’ll launder the finished sheet.
This helps prevent shrink surprise laterbecause a “custom fitted sheet” that suddenly becomes a “tight yoga sheet” is not the dream.
Choose fabric that matches your sleep personality
- Cotton percale: crisp, breathable, classic hotel feel
- Cotton sateen: smoother, slightly lustrous, drapes nicely
- Linen: airy, gets softer over time, relaxed texture
Think about mattress depth (a.k.a. the “pocket”)
If your mattress is thick (or you use a topper), build in more depth and tuck allowance.
A fitted sheet that fits a 10" mattress won’t magically behave on a 16" mattress. Elastic is powerful, but it’s not a wizard.
Troubleshooting: When Your Sheet Has Opinions
Problem: The sheet keeps popping off the corners
- Add more tuck allowance (T) next time, or remake with a larger corner square.
- Use the full elastic casing method for a stronger grip.
- Increase elastic tension slightly (shorter elastic), but don’t overdo it.
Problem: The sheet is too tight
- Lengthen the elastic (casing method), or reduce how much you stretch while sewing (corner method).
- Check that you measured depth including topper/mattress pad.
- Confirm seam allowanceif you took bigger seams, you reduced the finished size.
Problem: Twisted elastic inside the casing
- When threading, stop every few feet and smooth the elastic flat.
- Use a wider casing if the elastic is bunching.
- If it’s already twisted: yes, a seam ripper may be involved. You will survive.
Problem: Corners look bulky or lumpy
- Trim seam allowance and finish edges cleanly.
- Press seams open (or to one side) before adding casing.
- Consider a French seam for a neat, durable finish if you’re feeling fancy.
Finishing Touches: Make It Look Store-Bought (But Better)
Add corner labels
Sew a small ribbon or tag on the “top” corners so you can put the sheet on correctly the first time.
This is a tiny detail with massive quality-of-life energy.
Care and folding
Wash your finished sheet once before declaring victorythis is the final test for seams and elastic.
For folding, use the classic “tuck corners into corners” technique to tame the elastic and get a neat rectangle.
Your linen closet will look like it has its life together, even if your sock drawer does not.
Conclusion
Making a fitted sheet is one of those projects that sounds intimidating until you do it oncethen you realize it’s mostly measuring, a few boxed corners, and some friendly elastic.
Choose the full-casing method for the most secure fit, or go with corner elastic when you want something quicker.
Either way, you’ll end up with a fitted sheet that matches your mattress (and your style) instead of forcing you to “make it work.”
Real-World “Experience” Notes: What People Learn After Making a Fitted Sheet (and Why You Will Too)
Let’s talk about the part no one puts on the supply list: the little lessons that show up the moment you start sewing bedding.
Not “Pinterest-perfect,” not “I did it in 12 minutes while sipping tea,” but the real stuff that happens in actual homes with actual mattresses.
If you’re nodding along, congratulationsyou’re officially a sewist now.
1) Everyone underestimates mattress depth.
A mattress that looks “normal” can be surprisingly tall once you add a protector and a topper.
The first time people make a fitted sheet, they often measure the mattress alone… and then wonder why the sheet behaves like a crop top.
The fix is simple: measure the whole bed sandwich the way you sleep on it.
If your bed setup changes seasonally (thicker pad in winter, lighter in summer), build for the thicker version and let elastic do the rest.
2) Elastic is either your best friend or your tiny nemesis.
Threading elastic through a casing feels easy until the safety pin pops open and the elastic vanishes into the tunnel.
Then it becomes a suspense movie.
The trick that saves a lot of frustration is clipping the “outside” end to the fabric so it cannot escape.
Also: stop occasionally and smooth the elastic flat. A twisted elastic loop will still work, but it tends to create weird lumps that make you side-eye your own craftsmanship.
3) Test-fitting early feels silly… until it saves you.
People often skip trying the sheet on the bed before sewing the casing closed because they’re excited.
Totally understandable.
But a quick test fit right after sewing the boxed corners can reveal if your corner squares were too big, too small, or if your seam allowance drifted into “creative interpretation.”
Think of it like trying on jeans before hemming them: fewer regrets, more confidence.
4) Corner elastic is the gateway method.
Many people start with elastic-at-the-corners because it’s faster and uses less elastic, and it feels less intimidating than threading elastic around the entire perimeter.
It’s also a great option when making smaller sheets (crib/toddler) or when you’re experimenting with repurposed fabric.
Later, some move up to the full casing method for extra securityespecially if the mattress is deep or the sleeper is a “rotisserie chicken” type who flips all night.
5) You’ll become weirdly picky about store-bought sheets.
After you’ve made one sheet that fits perfectly, you start noticing everything:
shallow pockets, wimpy elastic, fabric that pills, corners that slip.
This isn’t snobberyit’s awareness.
You now know what goes into a great fitted sheet, and you’re allowed to have standards.
(Just try not to become the person who corners strangers at brunch to discuss elastic percentages. Or do. Honestly, I respect it.)
6) The best “luxury upgrade” is shockingly small.
It’s not fancy thread count math. It’s labeling the top corners.
A tiny ribbon tag can save you from the nightly ritual of rotating the sheet like a confused pizza chef.
Once people do this once, they do it foreveron every sheet in the house.
It’s the kind of simple hack that feels like cheating, but in the “why didn’t I do this sooner?” way.
Bottom line: making a fitted sheet is less about perfection and more about dialing in your bed’s specific needs.
Measure well, give yourself a little extra tuck, and remember that elastic is forgiving (as long as you don’t ask it to perform miracles).
By the time you finish, you’ll have a sheet that fits your mattress like it was meant to be there… because it was.


