Table of Contents >> Show >> Hide
- What Makes a Cheerleader Skirt Different?
- Supplies You Will Need
- Choosing the Best Fabric for a Pleated Cheerleader Skirt
- Take Accurate Measurements
- Decide on Your Pleat Style
- Cut the Skirt Panels
- Mark the Pleats
- Fold, Pin, and Press the Pleats
- Secure the Pleats at the Waist
- Make the Waistband
- Attach the Waistband
- Add the Zipper or Elastic Closure
- Hem the Skirt
- Add Cheerleader-Style Details
- Common Mistakes and How to Avoid Them
- Care Tips for a Pleated Cheerleader Skirt
- Real Sewing Experience: What I Learned Making Pleated Cheerleader Skirts
- Conclusion
A pleated cheerleader skirt is one of those sewing projects that looks dramatic, crisp, and slightly intimidatinguntil you realize it is mostly careful measuring, patient pressing, and convincing fabric to behave like it has somewhere important to be. Whether you are making a costume, a spirit-day outfit, a dance skirt, or a custom uniform-inspired piece, the secret is not magic. It is math, steam, straight stitches, and a waistband that does not surrender halfway through the first cartwheel.
This guide walks you through how to make a pleated cheerleader skirt from scratch using beginner-friendly sewing techniques. You will learn how to choose fabric, take measurements, calculate pleats, cut panels, press sharp folds, add a waistband, install a zipper or elastic closure, and finish the hem neatly. The goal is a skirt that looks sporty, polished, and funwithout needing a professional costume shop or a degree in geometry.
Before we begin, one quick note: if you are making a skirt for an actual school, competition, or team uniform, check the organization’s rules on length, color, logos, and fit. For costumes and casual wear, you have more creative freedom. Add stripes, contrast panels, metallic trim, or whatever makes your inner sewing coach blow the whistle with joy.
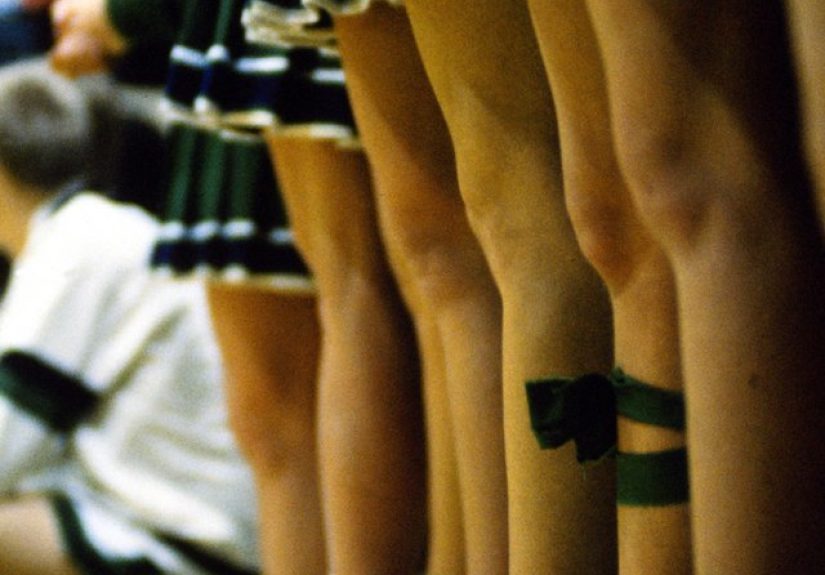
What Makes a Cheerleader Skirt Different?
A classic cheerleader skirt is short, structured, and designed to move. Unlike a soft gathered skirt, it usually has crisp knife pleats or box pleats that open when the wearer walks, jumps, or dances. The waistband sits firmly at the natural waist or high hip, and the fabric typically has enough body to hold the pleats without collapsing into sad laundry-day wrinkles.
The most recognizable style uses knife pleats that all fold in the same direction. Another popular option uses box pleats, where two folds face away from each other, creating a wider, more architectural look. Both styles work beautifully, but knife pleats are especially common for cheer-inspired skirts because they create rhythmic movement and a clean athletic silhouette.
Supplies You Will Need
You do not need a fancy sewing studio to make a pleated cheerleader skirt, but accurate tools will make the project much easier. Pleats are not forgiving when measured by “vibes.” A ruler, measuring tape, and iron are your best friends here.
- Medium-weight woven fabric, such as cotton twill, polyester gabardine, poplin, uniform cloth, or lightweight suiting
- Matching thread
- Fusible interfacing for the waistband
- 7- to 9-inch zipper, or elastic if making a pull-on version
- Measuring tape
- Fabric scissors or rotary cutter
- Ruler or yardstick
- Fabric marker, chalk, or washable pen
- Pins, sewing clips, or basting thread
- Iron and pressing cloth
- Sewing machine
- Optional trim, ribbon, bias tape, or contrast fabric for stripes
Choosing the Best Fabric for a Pleated Cheerleader Skirt
The best fabric for a pleated cheerleader skirt has structure, resists excessive wrinkling, and can hold a pressed edge. Polyester blends are common in uniform-style skirts because they are durable and easy to care for. Cotton twill is great for beginners because it presses well and does not slide around like a mischievous cat on a kitchen counter. Gabardine gives a classic uniform look and has a smooth finish that works nicely for sharp pleats.
Avoid very stretchy knits for your first pleated skirt unless you are using a pattern designed for stretch. Pleats need stability. If the fabric stretches too much, the pleats may grow, twist, or refuse to line up. Lightweight chiffon and satin can be used for fashion pleated skirts, but for a cheerleader-style skirt, medium-weight fabric is much easier to control.
How Much Fabric Do You Need?
For most adult sizes, 2 to 3 yards of 45-inch-wide fabric is a safe estimate, depending on the waist measurement, skirt length, and pleat depth. Pleated skirts use more fabric than flat skirts because every pleat hides extra width inside the fold. A skirt that finishes at a 30-inch waist may begin as a fabric panel that is 75 to 90 inches wide before pleating.
If you are making a child’s skirt, 1 to 1.5 yards may be enough. If you want deep dramatic pleats or a plus-size skirt, buy extra fabric. It is much better to have leftover fabric for a matching hair bow than to be short by four inches and forced into a midnight fabric-store crisis.
Take Accurate Measurements
Good measurements make the entire project smoother. Measure the person who will wear the skirt while they are standing naturally. Do not pull the tape too tight. A cheerleader skirt should be secure, but nobody wants a waistband that feels like a polite python.
- Waist measurement: Measure where the waistband will sit.
- Hip measurement: Measure the fullest part of the hips.
- Skirt length: Measure from the waistband to the desired hem.
- Waistband width: Decide whether you want a 1.5-inch, 2-inch, or wider waistband.
Add seam allowance to all pieces. A standard 1/2-inch seam allowance works well for beginners. If you plan to install a zipper at the side or center back, include seam allowance there too.
Decide on Your Pleat Style
The two easiest pleat options for this project are knife pleats and box pleats. Knife pleats fold in one direction, giving the skirt a crisp, classic cheer look. Box pleats fold toward opposite sides, creating wider panels and a slightly preppy style. For a traditional cheerleader skirt, knife pleats are the best choice.
Simple Pleat Math
Let us say the finished waist is 30 inches, and you want 2-inch visible pleats. Each knife pleat needs visible width plus hidden fold depth. A common beginner formula is to use three times the finished waist width for the skirt panel. That means a 30-inch waist would need about 90 inches of fabric width before pleating, plus seam allowances.
For a cleaner calculation, use this method:
- Choose the visible pleat width, such as 2 inches.
- Choose the pleat depth, usually the same as the visible width.
- Each pleat unit equals visible width plus two fold depths.
- For a 2-inch pleat with 2-inch depth, each full unit uses 6 inches of fabric.
- After folding, that unit finishes as 2 inches at the waist.
So, if your waist is 30 inches and each finished pleat is 2 inches wide, you need 15 pleats. Since each pleat uses 6 inches of fabric, your skirt panel should be about 90 inches wide, plus seam allowances. See? The math is not terrifying. It just wants snacks and a calculator.
Cut the Skirt Panels
Cut one long rectangle for the skirt body or divide the width into front and back panels if your fabric is not wide enough. The height of the rectangle should equal the finished skirt length plus waistband seam allowance and hem allowance. For example, if you want a 15-inch finished skirt, add 1/2 inch at the top and 1 inch at the bottom. Cut the skirt panel 16.5 inches tall.
If using two panels, remember to add seam allowance to both side seams. Sew the panels together at one side first, leaving the other side open for the zipper. Finish raw edges with a zigzag stitch, serger, or pinking shears to prevent fraying.
Mark the Pleats
Lay the skirt panel wrong side up on a large flat surface. Starting at one edge, mark your pleat lines along the top edge. For a 2-inch finished knife pleat with 2-inch depth, mark every 2 inches in a repeating pattern: fold line, placement line, fold line, placement line. Use a ruler so the marks stay even from top to bottom.
You can mark only the upper few inches if you want pleats stitched down near the waist, or mark the entire skirt length if you want to press full-length pleats. For a cheerleader skirt, full-length pressed pleats usually look best because they create that sharp, uniform-inspired swing.
Tip for Beginners
Before cutting your real fabric, practice pleating a strip of scrap fabric. Mark a few pleats, fold them, press them, and see how the fabric behaves. This small test can save you from discovering too late that your chosen fabric has the cooperation level of a toddler in a shoe store.
Fold, Pin, and Press the Pleats
Fold each pleat in the same direction, bringing each fold line over to its matching placement line. Pin or clip the pleats at the waist and again near the hem. Check that the visible pleat widths are even. Small differences become noticeable once the waistband is attached, so take your time here.
Press each pleat with steam, using a pressing cloth to protect the fabric. Do not drag the iron back and forth. Lift and press instead. Dragging can distort the folds. For extra-sharp pleats, press from both the right side and wrong side. Let the fabric cool before moving it; cooling helps the pleat set.
If your fabric is slippery or thick, hand-baste across the top edge before sewing. Basting keeps the pleats from shifting under the machine foot. It may feel like an extra step, but it is easier than unpicking a crooked waistband while questioning all your life choices.
Secure the Pleats at the Waist
Once all pleats are pinned and pressed, sew a basting stitch across the top edge within the seam allowance. This locks the pleats in place before you attach the waistband. Keep the skirt flat and do not stretch the fabric as you sew. If the pleats shift, stop with the needle down, lift the presser foot, smooth the fabric, and continue.
For a more professional cheerleader skirt, you can also stitch down each pleat for 2 to 4 inches from the waist. This technique keeps the upper skirt smooth while allowing the lower pleats to open with movement. It is especially useful if the fabric is bulky or the skirt flares too much at the top.
Make the Waistband
Cut the waistband to match the waist measurement plus seam allowance and overlap for a hook-and-eye or button closure. A finished waistband of 1.5 to 2 inches looks balanced on most cheerleader skirts. Cut the waistband fabric twice the finished width plus seam allowances. For a 2-inch finished waistband with 1/2-inch seam allowances, cut the strip 5 inches tall.
Apply fusible interfacing to the wrong side of the waistband. Interfacing gives the waistband strength, prevents stretching, and helps the skirt sit neatly. Fold the waistband in half lengthwise and press. Then press one long raw edge under by 1/2 inch. This folded edge will cover the inside seam later.
Attach the Waistband
With right sides together, pin the unfolded edge of the waistband to the top of the skirt. Match the center front, side seams, and back opening. Sew using a 1/2-inch seam allowance. Press the seam allowance upward toward the waistband.
Fold the waistband over to the inside of the skirt so the folded edge covers the stitching line. Pin carefully from the outside. Stitch in the ditch along the waistband seam from the right side, catching the folded inner edge underneath. If you prefer more control, hand-sew the inside waistband with a slip stitch.
Add the Zipper or Elastic Closure
A side zipper gives the cleanest uniform-style finish. Place the zipper along the open side seam, right sides together, and sew it in using a regular zipper foot or invisible zipper foot. Interface the zipper opening if your fabric is lightweight. After installing the zipper, sew the remaining side seam below it and press the seam open.
If you prefer a beginner-friendly pull-on skirt, you can use a back elastic waistband instead. However, elastic works best when only part of the waistband stretches. A fully pleated skirt with a full elastic waist can become bulky because the pleats and elastic compete for attention. A flat front with elastic in the back is often more comfortable and better looking.
Hem the Skirt
Try on the skirt before hemming. Check the length while standing straight. Cheerleader-inspired skirts are usually short, but comfort and coverage matter. Mark the hem evenly all around. Turn the raw edge under 1/2 inch, press, then turn under another 1/2 inch and stitch. For a very clean finish, use a blind hem or narrow machine hem.
After hemming, press the pleats again from waist to hem. Make sure the pleat folds continue neatly through the hemline. If the hem looks bulky, grade the seam allowances or use a lighter hem finish next time.
Add Cheerleader-Style Details
Now comes the fun part: customizing the skirt. Add contrast stripes near the hem using ribbon, bias tape, or fabric strips. You can place one stripe above the hem for a simple varsity look or use two stripes in team colors. Stitch trim carefully so it stays parallel to the hem. Nothing says “homemade in a panic” like a stripe that wanders uphill.
You can also add a contrast waistband, color-blocked pleats, embroidered initials, or a matching bow. If the skirt is for performance, keep embellishments secure and lightweight. Avoid heavy decorations that could pull the pleats out of shape.
Common Mistakes and How to Avoid Them
Using Fabric That Is Too Soft
Very soft fabric may not hold pleats well. Choose a fabric with body, such as twill, gabardine, or poplin. If the fabric feels floppy on the bolt, it will probably look floppy as a pleated skirt.
Skipping the Pressing Step
Pleats need pressing. A finger crease is not enough. Use steam, a pressing cloth, and patience. Let the pleats cool before moving the fabric.
Not Adding Enough Fabric Width
Pleats eat fabric. If your starting panel is too narrow, the finished skirt will be tight or the pleats will be shallow. Plan for two to three times the waist measurement, depending on pleat depth.
Forgetting Ease
Add a little wearing ease at the waist, especially if the skirt will be worn for movement. A skirt that fits perfectly while standing still may feel too tight during dancing, sitting, or cheering.
Care Tips for a Pleated Cheerleader Skirt
To keep pleats sharp, hang the skirt after wearing instead of tossing it into a laundry basket. Wash according to the fabric type. Polyester blends often tolerate machine washing, while specialty fabrics may need gentle care. After washing, reshape the pleats while damp and press them again if needed.
If you want long-lasting pleats, consider topstitching the upper pleats or using fabric that holds a crease well. For costume use, spray starch can help create temporary crispness, but test it on a scrap first to avoid stains or stiffness.
Real Sewing Experience: What I Learned Making Pleated Cheerleader Skirts
The first time I made a pleated cheerleader skirt, I underestimated two things: how much fabric pleats require and how persuasive an iron can be. I began with what looked like a generous rectangle of fabric. Once I started folding the pleats, that rectangle shrank faster than snacks at a sleepover. The lesson was immediate: always calculate pleat depth before cutting, and when in doubt, buy extra fabric.
Another experience worth sharing is that marking matters more than sewing speed. Many beginners want to rush to the machine because sewing feels like the “real” part of the project. With pleated skirts, the real work happens before the first permanent stitch. Measuring, marking, folding, pinning, and pressing determine whether the skirt looks crisp or chaotic. The sewing machine simply confirms the choices you already made.
I have also learned that basting is not a waste of time. On one project, I skipped basting because the pleats looked secure with pins. The fabric shifted under the presser foot, and by the time I reached the waistband, several pleats had wandered out of formation like they were late for marching band practice. After unpicking the seam, I basted the top edge by hand, and the second attempt looked dramatically better.
Fabric choice also changes the entire mood of the skirt. Cotton twill creates a sturdy, casual cheer-inspired look and is forgiving for beginners. Polyester gabardine looks more like a traditional uniform and holds pleats well, but it can become shiny if pressed with too much heat. A pressing cloth is essential. I once pressed dark polyester directly and created a shiny patch that could probably signal aircraft. Since then, I always test heat settings on a scrap.
When adding stripes, I recommend sewing them before closing the final side seam if possible. It is much easier to stitch trim onto a flat panel than to wrestle a finished skirt in circles around the sewing machine. Use a ruler to keep stripes even, and pin more than you think you need. Trim has a sneaky way of shifting just enough to annoy you later.
Fitting is another important lesson. A cheerleader skirt should feel secure but not restrictive. If the skirt is for a costume party, a little comfort ease makes the night more enjoyable. If it is for dance or performance, test movement before finishing the closure. Sit, step, turn, and lift the knees slightly. If the waistband digs in or the hem feels too short, adjust before the final stitching.
The biggest confidence booster is realizing that pleats do not have to be perfect to look good. They need to be consistent. A beginner-made skirt with evenly spaced 2-inch pleats will often look better than an overcomplicated design with uneven folds. Start simple, master the rhythm, and then experiment with contrast colors, deeper pleats, or decorative topstitching.
Finally, take your time with the last press. The final pressing transforms the skirt from “I made this” to “Where did you buy that?” Press each fold carefully, let it cool, and hang the skirt before wearing. That quiet finishing step gives the whole project a polished, sporty finishand yes, it is absolutely acceptable to twirl in front of the mirror afterward. Consider it quality control.
Conclusion
Making a pleated cheerleader skirt is a satisfying sewing project because it combines simple shapes with high-impact results. You do not need advanced patternmaking skills, but you do need accurate measurements, enough fabric, steady pleat marking, and a good pressing routine. Choose a structured woven fabric, plan your pleat width, secure the folds before attaching the waistband, and finish the skirt with a zipper or partial elastic closure.
The beauty of this project is how customizable it can be. Make it classic with solid fabric and sharp knife pleats, playful with contrast stripes, or bold with team-inspired colors. Once you understand the basic construction, you can adapt the design for costumes, dancewear, spirit events, cosplay, or everyday fashion. A pleated cheerleader skirt may look complicated at first glance, but stitch by stitch, fold by fold, it becomes a project that is totally within reach.