Table of Contents >> Show >> Hide
- Why cereal boxes work so well for pendant shades
- Quick safety talk (because we like our DIYs un-scorched)
- Supplies and tools
- Step 1: Build the cereal-box “skeleton” (aka the shade’s secret confidence)
- Step 2: Mix your papier-mâché paste (choose your fighter)
- Step 3: Papier-mâché the shade (strong, smooth, and not soggy)
- Step 4: Dry, refine, and prep for paint
- Step 5: Make it look expensive (finishing ideas)
- Step 6: Install and hang the pendant
- Troubleshooting (so you don’t rage-recycle it)
- Design variations: same technique, totally different vibe
- Care and cleaning
- Conclusion
- Experience Notes: what it’s really like to make these (the honest, slightly messy truth)
Your empty cereal box is about to get a second careerone that involves mood lighting, compliments from guests,
and you casually saying, “Oh this? I made it.” (Try not to look too smug. Or do. You earned it.)
This project turns lightweight cardboard into a surprisingly polished pendant shade using papier-mâché,
a little patience, and a finish that can look anywhere from cozy-modern to “gallery store that sells candles for $48.”
We’re making the shade (the decorative part) and pairing it with a ready-made pendant cord kit so the electrical side
stays safe and sane. The result: an upcycled, sculptural light pendant that costs little, looks expensive,
and gives your cereal box the glow-up of the year.
Why cereal boxes work so well for pendant shades
Cereal-box cardboard is thin, flexible, and easy to curve into clean cylinders and gentle tapers. It’s also sturdy enough
to act like a “skeleton” under papier-mâché layers. Once the paper layers dry, the whole thing becomes rigidlike
a lightweight shell. Think: paper boat, but make it interior design.
Quick safety talk (because we like our DIYs un-scorched)
Papier-mâché is paper. Paper and heat are not besties. The good news: modern LED bulbs run much cooler than older
incandescent bulbs, which makes LED the smart choice for a paper shade. Use an LED bulb, keep breathing room around
the bulb, and use a quality pendant cord/socket kit that’s properly rated (UL/ETL listed is ideal).
- Use LED only. Choose an LED bulb that stays cool and fits well inside the shade.
- Give the bulb space. Don’t let paper touch the bulb; build the shade large enough for clearance and airflow.
- Don’t invent electrical engineering. Use a ready-made pendant cord set; if you’re hardwiring, ask a qualified adult/electrician.
- Seal completely. Fully dry and seal the shade so humidity doesn’t soften it over time.
Supplies and tools
For the shade structure
- 1–2 empty cereal boxes (or similar thin cardboard packaging)
- Masking tape (or painter’s tape)
- Hot glue gun + glue sticks
- Scissors and/or craft knife (use a cutting mat)
- Thick cardboard (shipping box cardboard works great) for reinforcement rings
- 4 bamboo skewers (or wooden dowels) for spacers
- Balloon (optional but helpful as an internal support while layering)
- Newspaper or brown kraft paper torn into strips/pieces
For papier-mâché and finishing
- Flour, water, and salt (for classic paste) or white glue + water (for a clearer, tougher paste)
- Primer (water-based)
- Paint (chalk-style paint gives a soft matte look, but any interior acrylic works)
- Fine sandpaper (220–320 grit)
- Optional: metal leaf adhesive (“size”) and copper leaf
- Optional: clear topcoat/sealer (water-based polycrylic or clear acrylic spray)
For lighting
- Pendant cord/socket kit (plug-in style is easiest)
- LED bulb (choose a shape that won’t crowd the shade)
- Small screwdriver (if your kit needs one)
Step 1: Build the cereal-box “skeleton” (aka the shade’s secret confidence)
Make a clean cylinder (or a gentle taper)
Flatten the cereal box and cut along the seams so you get a large, flexible sheet. Decide your shade size:
a classic drum is easiest (straight sides), while a slight taper looks more designer (wider at the bottom).
Wrap the cardboard into your shape and overlap the edge by about 1/2 inch. Tack it with hot glue, then reinforce
the seam with tape inside and out so it won’t shift while you papier-mâché.
Add an inner ledge to hold the “mounting sandwich”
Cut two narrow strips of cardboard (about 1/2 inch wide). Glue them inside the top opening, running around the interior
like a little shelf. This ledge supports the hardware platform later so the socket area stays stable.
(It’s the unglamorous part that makes everything else look professional. Like primer. Or good posture.)
Build the mounting platform (rings + spacers)
From thick cardboard, cut two matching circles sized to sit inside the top opening of your shade. In the center of each circle,
cut a hole big enough for the socket hardware to pass through comfortably (check your kit’s dimensions).
Now cut four short pieces of bamboo skewer (around 3 inches each) and glue them between the two circles like pillars,
creating a rigid “cardboard sandwich.” This keeps the socket area strong, centered, and slightly recessed for airflow.
Test-fit the platform on the inner ledge. Adjust if needed before the papier-mâché startsbecause trimming wet paper is a hobby
nobody wants.
Step 2: Mix your papier-mâché paste (choose your fighter)
Option A: Cooked flour paste (smooth and strong)
This version thickens on the stove and spreads nicely. In a saucepan, warm water with salt. In a separate bowl, whisk flour with
cold water until it’s lump-free, then whisk it into the warm salted water. Stir gently until it thickens to a pudding-like consistency.
Cool completely before using so you don’t accidentally “cook” your newspaper. (Yes, that can happen. Paper has feelings.)
Option B: No-cook flour paste (fast, easy, slightly more rustic)
Whisk flour and water until smooth, then add salt. It works great for quick layers, but it can be more prone to mold if layers stay damp
for too longso keep layers thin and dry them thoroughly.
Option C: Glue paste (dries clearer, grips hard)
Mix white glue (PVA) with water. This can dry clearer and can be a great choice when you want a cleaner surface and less “flour haze.”
It’s also handy if you’re using lighter paper or want a slightly more durable shell.
Step 3: Papier-mâché the shade (strong, smooth, and not soggy)
Cover your workspace with plastic or a trash bag “tablecloth.” Tear newspaper into strips or small pieces.
(Torn edges blend better than scissors-cut edgesthis is one of those little craft secrets that makes things look less like a school volcano.)
Layering technique
- Dip paper into paste, then slide it between your fingers to remove excess. You want coated, not dripping.
- Apply a full layer vertically around the shade, inside and outside.
- Apply the next layer horizontally for strengthlike crisscrossing plywood grain, but with paper.
- Let it dry fully between major layers. Add 3–6 total layers until the shade feels rigid when tapped.
To help the shape stay true, you can place a lightly inflated balloon inside the cylinder while you work. It acts like a temporary internal brace,
especially helpful if your cardboard is thin or your room is humid.
Don’t forget the platform area
Add smaller paper pieces around the mounting platform so it blends into the shade structure. Keep the socket hole clear and neat.
This is also where airflow matters mostso avoid thick blobs of paste.
Step 4: Dry, refine, and prep for paint
Drying is where papier-mâché becomes either a masterpiece or a science experiment. Speed is your friend: use a fan, rotate the shade,
and make sure both the inside and outside dry evenly. When fully dry, lightly sand any sharp ridges or “paper cliffs.”
Next, prime the entire shadeinside and out. Primer helps paint look smooth and helps seal in any remaining floury texture.
Let it dry completely before painting.
Step 5: Make it look expensive (finishing ideas)
Matte modern with chalk-style paint
Two thin coats usually beat one thick coat. A soft matte finish hides minor texture and gives a sculptural look.
If you want a “plaster-ish” vibe, choose a warm white, greige, or muted clay tone.
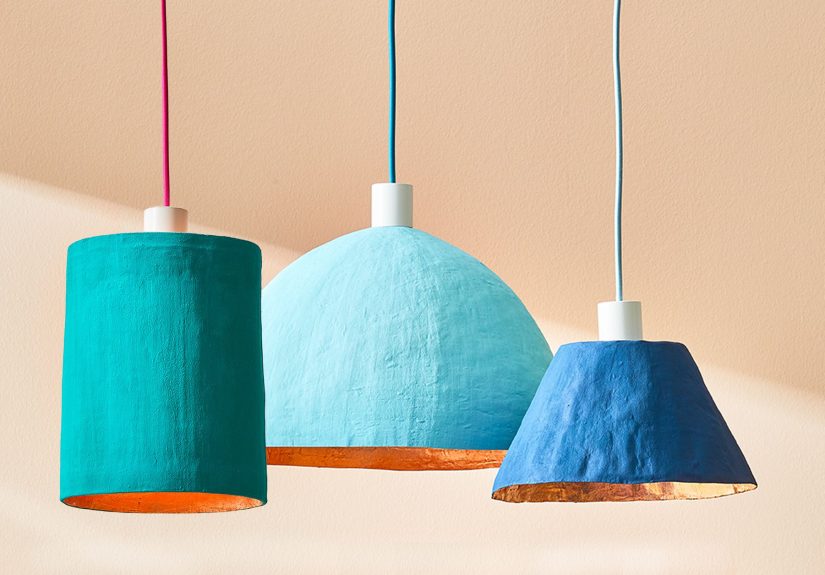
Warm glow with copper leaf on the inside
Lining the interior with copper leaf (or imitation copper leaf) bounces warm light and makes the pendant glow like it’s lit by pure good taste.
Brush leafing adhesive (size) onto the inside, wait until it reaches tack (sticky, not wet), then press leaf sheets into place.
Use a soft brush to smooth and remove loose flakes. Once finished, apply a compatible sealer so it won’t tarnish or shed.
Other finishes that look designer
- Speckled stone: Flick diluted darker paint with a toothbrush, then seal.
- Two-tone dip: Paint the bottom third a darker shade for instant “boutique lighting” energy.
- Textured linen look: Use brown kraft paper for the outer layers, then paint lightly so fibers show.
- Scandi minimal: Plain white outside, metallic inside, clean corddone.
Step 6: Install and hang the pendant
The easiest route is a plug-in pendant cord kit: thread the cord through the mounting hole, secure the socket hardware per the kit instructions,
and make sure everything sits tight on the cardboard platform. Then hang from a ceiling hook rated for the weight.
If you’re using a hardwired ceiling box, don’t guesshave a qualified adult/electrician handle the wiring.
Screw in an LED bulb and do a quick “heat check” the first time you run it: turn it on for 15–30 minutes and make sure the shade stays cool.
If it feels warm, switch to a lower-heat LED bulb and confirm the bulb isn’t too close to the paper.
Troubleshooting (so you don’t rage-recycle it)
If the shade warps
Warping usually means uneven drying. Rotate it while it dries and use a balloon or temporary brace inside.
Thin, even layers beat thick layers every time.
If you see mold or smell “damp basement”
Stop and dry it fast: fan, dehumidifier, warm dry room. Mold risk goes up when flour paste stays wet too long,
which is why salt helps and fast drying matters. When fully dry, seal the shade thoroughly.
If the seam looks obvious
Add an extra paper layer over the seam, feathering the edges outward. After drying, sand lightly and prime well.
Paint is forgiving; shadows are not.
If the surface feels bumpy
Use smaller paper pieces on the final layer, smooth them with your fingers (remove excess paste), and lightly sand after drying.
Primer also helps “unify” the texture.
Design variations: same technique, totally different vibe
- Tall drum: Great over kitchen islandsclean lines, lots of presence.
- Short, wide drum: Cozy dining-room glow that feels modern and soft.
- Gentle taper: Looks custom and gives more clearance near the socket.
- Scalloped bottom edge: Cut the cardboard edge before papier-mâché for a playful silhouette.
- Ribbed look: Glue thin cardboard “ribs” vertically, then papier-mâché over them.
Care and cleaning
Dust with a dry microfiber cloth or a soft brush. Avoid water, sprays, or steamy bathroomspaper does not enjoy being moisturized.
If you sealed with a clear topcoat, it’ll handle gentle dry wiping much better long-term.
Conclusion
Stylish lighting doesn’t have to come from a showroom. With a cereal box, a few layers of papier-mâché, and a finish you actually love,
you can create a pendant that looks curatednot crafty. Keep it safe with LED bulbs and a quality cord kit, take your time with drying,
and don’t be afraid of a bold interior finish like copper leaf. Your breakfast cereal came in a box. Your new favorite light can, too.
Experience Notes: what it’s really like to make these (the honest, slightly messy truth)
The first “aha” moment usually hits when you form the cereal-box cylinder and realize it already looks like a legit shade frame.
It’s oddly satisfyinglike you’ve discovered a secret furniture component hiding in the pantry. The second moment comes about five minutes
into papier-mâché, when your fingers are covered in paste and you accept that you are now a creature of glue and good intentions.
That’s normal. Embrace it. Keep a bowl of water and a towel nearby, and you’ll feel much more in control.
Makers often underestimate drying time the first round. Papier-mâché can feel dry on the surface while still being damp underneath,
especially around seams and the mounting platform. If you rush and add another thick layer, you can trap moisture and create a soft,
squishy spot that refuses to firm up. The best “experienced crafter” move is boring but effective: thinner layers, stronger airflow,
and patience between coats. A fan turns this from a two-day project into something you can finish over a weekend without drama.
Another real-world lesson: your final layer matters more than your first three. Early layers are for strength; later layers are for beauty.
If you want a smoother look, switch to smaller paper pieces on the last layer and take a little extra time to lay them flat.
You’ll feel the difference when you paintbumps and ridges can make shadows that look like accidental “texture,” and not the cute kind.
A quick sand-and-prime routine solves most of it, but the calmer you keep the paper during that last layer, the less fixing you’ll do later.
The copper-leaf interior is where people usually surprise themselves. It looks intimidating (metal leaf feels fancy), but the process is basically:
brush on adhesive, wait until sticky, gently press leaf, then softly brush away the crumbs. The first sheet will tear. That’s okay.
Copper leaf is a drama queen; it wants to crinkle and float away if you breathe too confidently. Once you get the hang of it, the inside starts
looking like a warm, glowy jewel boxand suddenly your handmade shade doesn’t read “DIY,” it reads “designer.”
Hanging day is the victory lapand also the moment to be sensible. Most people feel tempted to use the brightest bulb they own to show off the glow,
but “blinding brilliance” is not the goal with paper shades. A warm LED in a reasonable brightness range gives a softer, more flattering light,
and it keeps everything cooler. It’s also normal to do a “first burn” test: let the light run for 15–30 minutes while you’re nearby,
then check that the shade stays cool and nothing smells warm or weird. After that, you’ll stop worrying and start enjoying the fact that your
old cereal box is now the most complimented thing in the room. That’s the true upcycle flex.


