Table of Contents >> Show >> Hide
- Why Build Your Own Washer and Dryer Pedestal?
- Plan Your DIY Laundry Pedestal
- Tools and Materials You’ll Need
- Step-by-Step: Build a Simple 2×4 Washer and Dryer Pedestal
- Optional Upgrades: Drawers and Fancy Finishes
- Safety, Weight, and Vibration Tips
- Real-World Cost and Time Expectations
- Hands-On Experiences: Lessons From DIY Washer Pedestals
- Conclusion
If you have a front-loading washer and dryer, you probably know the back pain that comes from
crouching down to rescue a single missing sock from the drum. Manufacturers know it toothat’s why
they sell factory pedestals for hundreds of dollars each. The good news? You can build a sturdy,
attractive DIY washer and dryer pedestal for a fraction of the price and customize it to your
laundry room.
In this guide, you’ll learn why pedestals are worth the effort, how to plan the right size and
height, what materials you’ll need, and a clear step-by-step method to build your own platform.
We’ll also look at real-world experiences and lessons learned from DIYers so you can avoid
common mistakes (and the dreaded “walking washer”).
Why Build Your Own Washer and Dryer Pedestal?
1. Save Your Back (and Your Knees)
Pedestals lift front-load machines by about 10–16 inches, bringing the doors closer to standing
height. That means:
- Less bending and squatting to load and unload clothes
- Easier access to the back of the drum to grab stubborn socks
- More comfortable folding and sorting directly in front of the machines
Appliance makers highlight this ergonomic benefit as the primary reason pedestals exist. Raising
the machines just a foot or so can make a big difference if you do multiple loads a week or have
back or joint issues.
2. Add Storage Without Expanding the Room
Space is gold in a laundry room. Many commercial pedestals come with drawers underneath for
detergent, dryer sheets, cleaning supplies, or even extra towels. A DIY platform can do the same:
- Build open cubbies for baskets that hold detergent, stain remover, and dryer balls.
- Add one large central drawer for bulk items like oversized detergent jugs or extra paper towels.
- Close off the front with doors if you want a clean, cabinet-like look.
You’re building a piece of furniture anywaymight as well put it to work as storage.
3. Spend Less Than Store-Bought Pedestals
Factory pedestals often sell for $250–$400 each and are basically painted metal boxes
with a drawer. Many DIYers have pointed out that these boxes are wildly overpriced compared with
the cost of lumber and screws. With basic 2x4s, plywood, and a weekend of work, you can:
- Build a platform for both machines for under $100–$150 in many areas
- Customize the dimensions, height, and finish to match your room
- End up with something stronger than many thin-metal factory options
Plan Your DIY Laundry Pedestal
Measure Your Machines (Carefully)
Before you cut a single board, grab a tape measure and write down:
- The width of the washer and dryer
- The depth (front to back)
- The distance from the back of the machine to any hoses or drain lines
For a shared platform, measure the total width of both machines sitting side by side. Then add
at least 2 inches to the width and depth so you have a bit of clearance for vibration and to make
sliding them in easier. Many pro plans recommend this simple “machine size + 2 inches” rule to
avoid a tight squeeze.
Choose the Right Height
Common DIY pedestal heights range from 12 to 18 inches:
- Around 12 inches: Enough to reduce bending without making the machines feel too tall.
- Around 16 inches: A popular “sweet spot” that still allows a laundry basket underneath.
-
18 inches or more: Maximum storage height, but check that the doors can still open fully and
that you can reach controls comfortably.
Stand in front of your machines and imagine the doors 12–16 inches higher. You can even stack
some scrap boards or boxes and temporarily raise a laundry basket to that height to see what feels
right for you.
Front-Load vs. Top-Load Machines
This project is designed for front-load washers and dryers. Most top-load washers are not meant
to be raised this high because:
- The lid may become too high for shorter users to reach comfortably.
- The machine’s balance and suspension may not behave well on a tall platform.
If you have a top-loader, keep any riser very low and confirm with the manufacturer before
building anything taller than a couple of inches.
Tools and Materials You’ll Need
This is a straightforward carpentry project. You don’t need a full professional workshop, but
you will need some basic tools and materials.
Core Materials (for a typical two-machine pedestal)
- 2×4 lumber for the frame and cross-bracing
- Optional 4×4 posts for extra-strong legs on very heavy machines
- 3/4-inch plywood for the top surface and possibly the sides
- Wood screws (2½–3 inches for framing, 1¼ inches for plywood)
- Construction adhesive or wood glue
- Wood filler and sandpaper
- Primer and paint, or stain and clear coat
Tools
- Tape measure, pencil, and square
- Circular saw or miter saw
- Drill/driver with bits for pre-drilling and driving screws
- Safety glasses and hearing protection
- Level (2- or 4-foot)
-
Optional: pocket hole jig for cleaner joints, brad nailer for trim, and clamps for easier
assembly
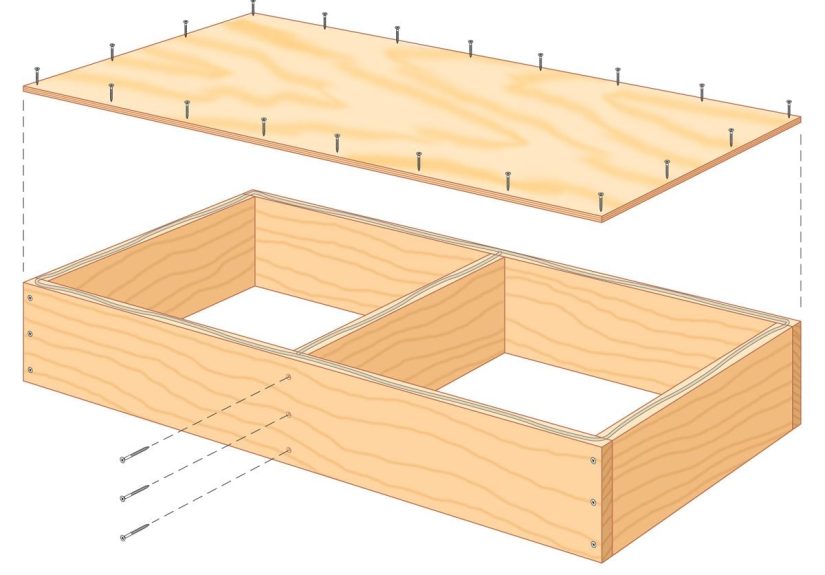
Step-by-Step: Build a Simple 2×4 Washer and Dryer Pedestal
Step 1: Lay Out and Build the Base Frame
Start with a rectangular frame sized to your machines plus that extra clearance:
-
Cut two long 2x4s to the overall width you need (for example, width of both machines + 2
inches). - Cut several shorter 2x4s for the front-to-back dimension (machine depth + 2 inches).
-
Assemble a rectangle by placing the shorter boards between the long ones, like a ladder frame.
Use screws and wood glue at every joint.
Add at least two or three interior cross-support boards spaced evenly. Remember, a full washer
can easily weigh 200+ pounds with water and clothes, so the frame must handle that weight
without sagging.
Step 2: Add Legs and Vertical Support
Next, you’ll give the frame its height:
- Decide on your finished height (for example, 16 inches).
- Cut legs from either 2x4s (turned on edge) or 4×4 posts to that length.
-
Attach one leg near each corner inside the frame using screws through the frame into the leg.
Add glue for strength. -
Add additional legs or blocking in the middle if your span is wide, especially under where
the washer will sit.
For an extra-sturdy build, some DIYers notch the tops of 4×4 legs so the frame sits directly on
the posts rather than relying only on screws. It takes more time but gives you a very solid
platform.
Step 3: Add Cross-Bracing for Vibration
Modern high-speed spin cycles can shake a pedestal if it’s not braced well. To reduce wobble:
- Add 2×4 cross-braces between the legs near the bottom.
-
Sheath the sides with plywood, leaving only the front open if you’re not adding drawers. This
creates a “box” that resists racking (side-to-side movement). - Use construction adhesive in addition to screws where plywood meets the frame.
A pedestal that feels rock-solid before you add the machines will handle vibration much better
once the washer starts spinning.
Step 4: Attach the Top and Add a Safety Lip
Once the frame and legs are done, it’s time to add the top:
- Cut 3/4-inch plywood to the exact size of your frame.
- Apply glue to the top edges of the frame and set the plywood in place.
-
Secure the plywood with 1¼-inch screws every 6–8 inches around the perimeter and into the
cross-braces.
For extra safety, many DIYers add a “lip” around the topstrips of plywood or 1x trim that stand
a couple of inches above the surface. This helps keep the machines from “walking” off the edge
if they vibrate. It also stiffens the top.
Step 5: Finish, Paint, and Level
Before you move the pedestal into place:
- Fill screw holes and gaps with wood filler, then sand smooth.
- Prime and paint or stain and seal the platform.
- Choose a finish that can handle moisture, since laundry rooms can be humid and spills happen.
When you set the pedestal in its final location, use a level and shims to get it perfectly
flat in both directions. An out-of-level base will make even a new washer rattle and walk.
Step 6: Load the Machines Safely
This is not a one-person jobwashers and dryers are heavy and awkward:
- Get help from at least one other adult.
- Unplug the machines and disconnect water and vent lines before moving them.
-
Lift with your legs, not your back, and slide the machines gently onto the pedestal, keeping
them centered. -
Once in place, reconnect hoses, vents, and power, then run a small test load to check for
vibration.
Optional Upgrades: Drawers and Fancy Finishes
If you’re comfortable with basic woodworking, you can turn the front of your pedestal into a
storage powerhouse.
Build a Large Center Drawer
A popular upgrade is one big, deep drawer in the middle. You’ll:
- Frame the opening with 2x4s, leaving space in the center.
- Build a simple plywood box drawer with pocket screws or butt joints.
- Mount heavy-duty drawer slides to support the weight of detergent and cleaning supplies.
- Attach a nice drawer front and hardware to match your cabinets or trim.
Open Cubbies and Bins
If drawers feel like too much work, open cubbies are an easier option:
- Divide the front opening into two or three compartments with vertical dividers.
- Use baskets or bins to hold smaller items.
- Leave the back open if you need access to plumbing, or close it off for a cleaner look.
Style It Like Built-In Furniture
A few finishing touches can make your pedestal look custom, not “2×4 DIY”:
- Add baseboard-style trim along the bottom and simple casing around the front opening.
- Paint it the same color as your cabinets or wall for a built-in feel.
- Use high-durability enamel paint for a wipeable, long-lasting finish.
Safety, Weight, and Vibration Tips
Before you call the project done, run through a quick safety and performance checklist:
-
Check weight limits. A full washer and dryer together can easily exceed
500 pounds. Make sure your frame has plenty of cross-bracing, a thick top, and solid legs. -
Secure separate platforms. If you build two individual pedestals, bolt
them together once they’re in place for better stability. -
Address vibration. If the washer shakes, re-level the pedestal and washer
feet, add more bracing, and double-check that the floor underneath is solid. -
Protect against moisture. Consider sealing the bottom edges with caulk or
a waterproofing product if your laundry room is prone to spills or minor leaks.
Real-World Cost and Time Expectations
Most DIYers report spending:
- Time: One weekend for a basic platform; a full weekend plus evenings for a pedestal with drawers and detailed trim.
-
Cost: Often under $100–$150 for lumber, screws, and paint, depending on
local prices and whether you already own some tools.
Considering that store-bought pedestals can run several hundred dollars each, a DIY build often
pays for itself immediately while giving you better storage and a more custom look.
Hands-On Experiences: Lessons From DIY Washer Pedestals
Beyond the plans and measurements, the most useful advice usually comes from people who live
with their DIY pedestals every day. When you read through real-world stories, a few themes come
up again and again.
“I Wish I Had Built It Sooner”
One of the most common comments from DIYers is simple: they regret waiting so long to build a
pedestal. Once the machines are at a comfortable height, doing laundry feels less like a chore
and more like a quick task you can knock out between other things. That psychological shift is
bigger than it sounds. It’s not just about your back; it’s about how easy the whole routine
feels when you’re not dropping into a squat every five minutes.
The Lip on the Top Is a Game-Changer
Many people start with a flat platform and later add a raised lip after a few intense spin
cycles. When a washer is perfectly balanced and level, it may barely movebut real life isn’t
perfect. Loads get uneven, or someone forgets to adjust the feet after moving the machine. A
one- to two-inch raised edge around the top can keep the machines safely “corralled” even when
they vibrate more than expected.
Some DIYers extend plywood sides above the top by an inch or two instead of adding separate trim.
This method adds both safety and strength because the plywood acts as a structural sidewall as
well as a guard rail.
Overbuilding Beats Underbuilding
If there’s a recurring philosophy among people who have done this project, it’s this: overbuild
rather than underbuild. That might mean:
- Using 2x4s spaced more closely than you think you need.
- Adding an extra cross-brace directly under the washer.
- Sheathing more of the sides with plywood for stiffness.
- Using construction adhesive in addition to screws at critical joints.
The cost difference between a “just enough” frame and a beefy, rock-solid one is usually a few
extra boards and a handful of screws. But the peace of mindespecially when the washer hits
maximum spinis worth every penny.
Vibration Isn’t Only About the Pedestal
Another lesson from experience: the pedestal is only half the equation. A perfectly built,
perfectly level platform can still shake if:
- The floor beneath it is bouncy (common over crawl spaces or older homes).
- The washer’s internal drum is out of balance or not level.
- The machines are not centered on the platform.
DIYers often end up doing a “triple leveling”: first the floor and pedestal, then the pedestal
and washer, then fine-tuning the washer’s adjustable feet. Some also add anti-vibration pads
under the pedestal or under the washer feet to help tame noise and motion.
Storage Options Evolve Over Time
People who build their own pedestals also report that their storage needs change. At first, they
may use the space underneath for big detergent jugs. Later, they realize it’s the perfect spot
for sorting baskets, extra towels, or even pet supplies. The beauty of DIY is that you can adapt
the pedestal as you goadd dividers, swap bins, or even retrofit a drawer later if you started
with open cubbies.
That “Custom” Feeling Is Hard to Beat
Finally, there’s the satisfaction factor. A store-bought pedestal may work fine, but a DIY one
feels like part of your homebuilt to your dimensions, your style, and your budget. When friends
see your laundry room and say, “Wait, you built that?” it’s a nice bonus on top of saving money
and making laundry day easier.
Conclusion
Making your own washer and dryer pedestal is one of those projects that looks intimidating on
paper but breaks down into manageable steps: measure, cut, assemble, brace, and finish. With a
solid frame, thoughtful bracing, and a good finish, you can create a platform that saves your
back, adds storage, and looks like it came straight from a magazine feature.
Whether you build a simple 2×4 platform or a fully tricked-out pedestal with drawers and trim,
you’ll end up with a custom solution that fits your space, your machines, and your budgetand
you’ll never have to crawl into a washer drum again just to find one runaway sock.


