Table of Contents >> Show >> Hide
- What Makes a Good Concrete Mix for Fake Rocks?
- Tools and Materials You Will Need
- Best Mix Ratios for DIY Fake Rocks
- How to Mix Concrete for Making Fake Rocks
- How Much Water Should You Use?
- Coloring Concrete to Look Like Real Rock
- Curing Fake Concrete Rocks
- Common Mistakes to Avoid
- Specific Example: A Small Garden Boulder Mix
- Experience Notes: What Actually Helps When Making Fake Rocks
- Final Thoughts
Fake rocks are the garden world’s best little magic trick. They can hide an ugly utility box, frame a pond, add drama to a flower bed, or make your backyard look like a tiny national parkwithout requiring a forklift, a chiropractor, or a dramatic phone call to your strongest cousin.
The secret is not just shaping the rock. The real secret is learning how to mix concrete for making fake rocks so the material is strong enough to survive weather, workable enough to sculpt, and textured enough to fool the eye. Too wet, and it slumps like a sad pancake. Too dry, and it crumbles like stale cornbread. Just right, and you get a mix that can be pressed, carved, scratched, stained, and admired while you casually tell guests, “Oh that? I made it.”
This easy DIY guide explains the best concrete mix for fake rocks, how much water to add, what tools to use, how to sculpt realistic stone texture, and how to cure your faux boulders so they do not crack after all your hard work. We will focus on decorative landscape rocks, garden boulders, pond-edge stones, and lightweight hypertufa-style rocksnot structural stepping stones, climbing features, retaining walls, or anything meant to support people or serious weight.
What Makes a Good Concrete Mix for Fake Rocks?
Concrete is a blend of cement, water, sand, and aggregate. Cement is the binder; concrete is the finished material. Think of cement as the flour and concrete as the cake, except this cake can ruin your shoes and does not belong at a birthday party.
For fake rocks, you usually want a mix that is lighter, more sculptable, and less chunky than standard slab concrete. Regular bagged concrete mix often contains gravel, which is great for posts, patios, and footings, but not always ideal when you are trying to carve convincing cracks, edges, and weathered stone lines. Large aggregate can poke through the surface and make detail work harder.
The best DIY fake rock mix is usually one of these three options:
1. Mortar-Style Sculpting Mix
A mortar-style mix uses Portland cement and sand, sometimes with bonding additive or fibers. It is smoother than regular concrete and easier to apply over chicken wire, hardware cloth, foam, or a lightweight form. This is a strong choice for artificial landscape rocks with detailed surfaces.
2. Sand Mix or Topping Mix
Sand mix, often sold in bags at home improvement stores, contains cement and sand but no large gravel. It is convenient, consistent, and beginner-friendly. If you want a simple answer for small to medium faux rocks, sand mix is often easier to use than all-purpose concrete.
3. Hypertufa Mix
Hypertufa is a lighter, porous, stone-like blend commonly made with Portland cement, perlite or vermiculite, and peat moss or coconut coir. It is excellent for decorative garden rocks, planters, troughs, and aged stone effects. It is not as hard as standard concrete, but it has a natural, weathered look that plants and moss seem to enjoy moving into like tiny green tenants.
Tools and Materials You Will Need
Before mixing anything, gather your supplies. Concrete has a charming habit of getting stiff exactly when you realize your trowel is across the yard.
Basic Materials
- Portland cement, sand mix, mortar mix, or concrete mix
- Clean water
- Perlite, vermiculite, peat moss, or coconut coir for lightweight hypertufa rocks
- Concrete bonding additive, optional but useful for better adhesion
- Concrete reinforcing fibers, optional for extra toughness
- Concrete color, oxide pigment, or exterior masonry stain
- Chicken wire, hardware cloth, foam, cardboard, or crumpled newspaper for shaping the form
- Plastic sheeting or trash bags for curing
Tools
- Mixing tub, wheelbarrow, or 5-gallon bucket
- Hoe, margin trowel, drill mixer, or small concrete mixer
- Rubber gloves and eye protection
- Dust mask or respirator for dry cement dust
- Spray bottle for misting
- Wire cutters if using chicken wire
- Putty knife, sponge, stiff brush, rock, stick, or trowel for texture
Always wear gloves, eye protection, and a mask when handling dry cement or wet concrete. Cement dust can irritate your lungs, skin, and eyes, and wet cement can be harsh on bare skin. In other words, concrete is fun, but it is not a spa treatment.
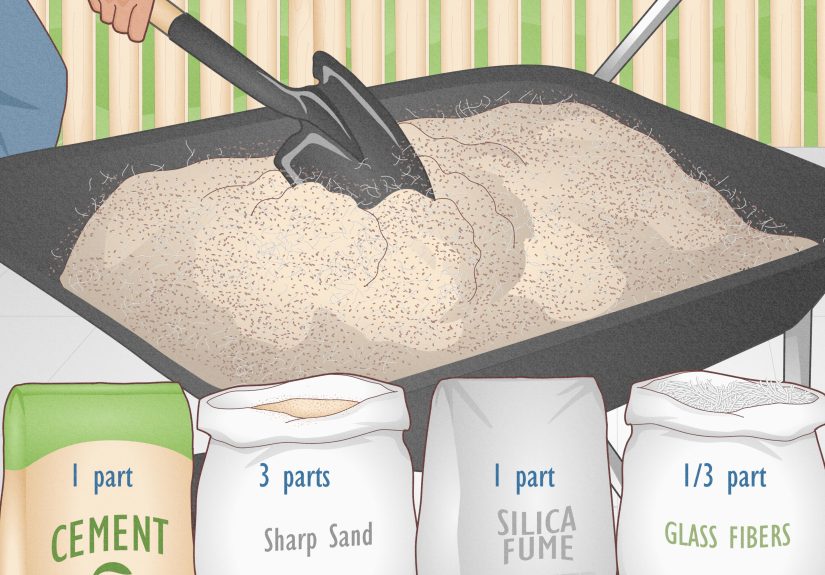
Best Mix Ratios for DIY Fake Rocks
There is no single perfect fake rock recipe because the best mix depends on the size, weight, texture, and purpose of the rock. A small pond accent does not need the same mix as a hollow boulder covering a septic lid. Still, these ratios are reliable starting points.
Simple Faux Rock Mortar Mix
Use this for sculpting over wire forms or foam bases:
- 1 part Portland cement
- 2 to 3 parts clean sand
- Water added slowly until the mix holds shape
- Optional: acrylic bonding additive replacing part of the water
- Optional: a handful of reinforcing fibers per batch
This mix should feel like thick peanut butter or stiff mashed potatoes. It should stick to the armature without sliding off. If it runs down the side like gray cake batter, you added too much water. If it falls off in dusty clumps, add a little water and mix again.
Lightweight Hypertufa Rock Mix
Use this for porous, aged garden rocks:
- 1 part Portland cement
- 1.5 parts perlite or vermiculite
- 1.5 parts peat moss or coconut coir
- Water added slowly until the mix clumps in your hand
- Optional: reinforcing fibers for larger pieces
For a stronger hypertufa-style rock, use 2 parts Portland cement, 3 parts perlite or vermiculite, and 3 parts peat moss or coir. The organic material helps create a rough, natural texture, while perlite or vermiculite keeps the rock lighter than standard concrete.
Bagged Sand Mix Method
If you want the easiest route, buy a bag of sand mix or topping mix and follow the water instructions on the bag. Add water slowly and stop when the mix is stiff and moldable. This method removes the guesswork and is great for beginners who would rather make rocks than become amateur cement chemists by lunchtime.
How to Mix Concrete for Making Fake Rocks
Mixing concrete is not difficult, but it rewards patience. The biggest beginner mistake is dumping in too much water at once. Water makes concrete workable, but excess water weakens the finished piece and can cause cracking, dusting, or a chalky surface.
Step 1: Prepare the Rock Form
Before mixing, build your fake rock shape. For hollow rocks, bend chicken wire or hardware cloth into a boulder form. For lightweight decorative rocks, carve foam into a rough shape. You can also use cardboard, plastic containers, crumpled newspaper, or scrap materials as a temporary base.
Do not make the shape too perfect. Real rocks are lumpy, chipped, awkward, and wonderfully irregular. If your form looks like a potato that got into geology, you are probably on the right track.
Step 2: Measure the Dry Ingredients
Use a bucket or scoop to keep proportions consistent. For a mortar-style mix, start with one bucket of Portland cement and two to three buckets of sand. For hypertufa, measure equal or near-equal volumes of cement, perlite, and peat/coir depending on your chosen recipe.
Mix the dry ingredients thoroughly before adding water. This prevents cement pockets, weak spots, and mystery clumps that show up later like unwanted plot twists.
Step 3: Add Water Slowly
Add about half the expected water first. Mix until the dry material begins to darken and clump. Then add more water in small amounts. A spray bottle, cup, or small pitcher gives better control than a garden hose, which can turn your carefully planned batch into concrete soup in three seconds.
The right consistency depends on how you will use it. For applying over chicken wire, aim for a stiff mix that sticks to a vertical surface. For pressing into a mold, a slightly wetter mix may work better. For carving and texturing, stiff is usually your friend.
Step 4: Let the Mix Rest Briefly
After the first mixing, let the batch sit for a few minutes. This allows dry particles to absorb water. Then remix and adjust. Many beginners add more water too early because the mix looks dry at first. Give it a moment. Concrete is not ignoring you; it is hydrating.
Step 5: Apply the First Coat
Press the mix firmly into the wire or onto the form. For chicken wire forms, push the material through the mesh slightly so it locks in place. Start with a rough base coat about 1/2 inch thick for small rocks. Larger hollow rocks may need a thicker coat or multiple layers.
Do not worry about perfect texture yet. The first coat is about strength and coverage. If it looks like a gray dinosaur egg at this stage, congratulations, that is normal.
Step 6: Add a Texture Coat
Once the base coat has stiffened but is still damp, add a second coat for texture. Use a trowel, sponge, stiff brush, crumpled plastic, bark, real rocks, or even your gloved fingers to create ridges, cracks, pits, and layers.
Natural stone rarely has smooth, symmetrical lines. Make some grooves deep, some shallow, and some broken. Add small chips around edges. Press in different directions. The more controlled randomness you create, the more believable the fake rock becomes.
How Much Water Should You Use?
The honest answer is: less than your impatient side wants to use. For bagged products, always start with the manufacturer’s recommended water amount. For homemade mixes, add water gradually until the material holds its shape when squeezed.
Try the squeeze test: grab a gloved handful and squeeze. It should clump together without dripping. If water runs out, it is too wet. If it falls apart instantly, it is too dry. For sculpting fake rocks, the mix should be damp, firm, and slightly sticky.
Too much water can lead to weak concrete, surface cracking, longer curing, and slumping. Too little water can prevent proper hydration and make the surface crumbly. The sweet spot is a workable mix that still has body.
Coloring Concrete to Look Like Real Rock
Plain concrete usually dries light gray, which is fine if your dream rock is “parking garage chic.” For a more realistic look, use layers of color.
Integral Color
Integral color means adding pigment directly to the wet mix. Earth tones work best: charcoal, tan, buff, brown, rust, and muted green. Start light. You can always darken the surface later, but fixing a rock that looks like a chocolate muffin is less fun.
Surface Staining
After curing, apply exterior masonry stain or diluted concrete pigment in layers. Use darker color in cracks and lighter color on high spots. Real rocks have shadows, mineral streaks, stains, and weathered patches. One flat color is what gives many fake rocks away.
Dry Brushing
Dry brushing is a simple trick: dip a brush lightly in color, wipe most of it off, then drag it across raised areas. This highlights texture and makes the surface look more natural.
Curing Fake Concrete Rocks
Curing is where the magic continues after the messy part ends. Concrete does not simply “dry.” It hardens through a chemical reaction with water. If moisture leaves too quickly, the rock may crack, weaken, or develop a dusty surface.
After shaping your fake rock, cover it loosely with plastic. Keep it shaded and protected from wind and direct sun. Mist it lightly as needed so it stays damp, not flooded. Let it cure for at least 24 to 48 hours before handling gently, and give it several days to gain strength before moving it into the landscape.
For hypertufa, longer curing is better. Many makers keep hypertufa covered and damp for one to two weeks, then let it weather before planting near it. If the rock will sit near delicate plants, rinse it several times after curing to reduce surface alkalinity.
Common Mistakes to Avoid
Adding Too Much Water
This is the champion mistake. A wetter mix feels easier for five minutes, then punishes you for years with cracks, weak spots, and slumping. Add water slowly and mix thoroughly before deciding you need more.
Using Large Aggregate for Detail Work
Standard concrete with gravel is strong, but it is harder to sculpt into realistic stone. Use sand mix, mortar mix, or screened materials when surface detail matters.
Skipping Reinforcement
Large hollow rocks need wire mesh, hardware cloth, fibers, or another support system. Concrete is strong in compression but can crack when thin, unsupported, or moved roughly.
Rushing the Cure
A fake rock may look finished the next day, but concrete keeps gaining strength over time. Moving it too soon can create cracks. Let it cure like it is taking a very serious garden nap.
Making the Rock Too Perfect
Perfect symmetry screams “manufactured.” Real rocks have uneven faces, broken edges, mineral lines, holes, and odd personalities. Give your faux rock some weirdness.
Specific Example: A Small Garden Boulder Mix
For a beginner-friendly garden boulder about 18 inches wide, make a chicken wire form and place it on a plastic-covered work surface. Mix 1 part Portland cement with 2.5 parts sand. Add a small amount of concrete bonding additive to the mixing water if desired. Stir until the mix is firm enough to stick to a trowel.
Apply a 1/2-inch base coat over the wire. Let it firm up for 30 to 60 minutes, depending on temperature and humidity. Then apply a thinner texture coat. Use a rough stone to press natural pits into the surface. Drag a putty knife lightly to create cracks. Dab the surface with a damp sponge to soften sharp tool marks.
Cover with plastic and mist daily for several days. Once cured, stain the cracks dark gray or brown, then dry-brush lighter tan or gray over the raised areas. Place it near plants, mulch, or pond stones so it blends into the landscape. The final result should look like it has been there for years, not like it escaped from a craft table yesterday.
Experience Notes: What Actually Helps When Making Fake Rocks
After working through a few fake rock projects, one thing becomes very clear: the mix matters, but timing matters just as much. Fresh concrete is too soft for crisp carving. Overly stiff concrete fights every tool like it has personal boundaries. The best texture window often happens when the surface has firmed up enough to hold marks but is still damp enough to scratch, press, and shape.
A useful habit is to make a tiny test rock before making the “real” one. Mix a small batch, slap it over a scrap of wire, and try your texture tools. Press it with a real stone. Scratch it with a stick. Dab it with a sponge. This little practice blob teaches you more than staring suspiciously at a bucket of wet cement. It also saves your main project from becoming an abstract sculpture titled Regret in Gray.
Another lesson: build the form smaller than you think. Once concrete is added, the rock grows quickly. A chicken wire shape that looks modest can turn into a backyard boulder with the confidence of a rhinoceros. Keep the armature compact and irregular. Add bulk only where it improves the silhouette.
Texture also looks better in layers. Do not try to create every crack, pit, and ledge in one dramatic pass. Start with large planes and ridges first. Then add secondary cracks. Finish with tiny surface marks. Real stone has visual depth because it has been shaped by pressure, weather, water, and time. Your job is to fake all of that in an afternoon without looking like you tried too hard.
Color is another place where subtlety wins. Many beginners apply one heavy coat of gray or brown and wonder why the rock looks like painted concrete. Instead, use thin washes. Let darker color settle in crevices. Wipe high spots. Add a dusty tan or pale gray highlight. A tiny amount of greenish or rusty color can make the rock look older, especially near a pond or garden bed.
Placement is part of the illusion. Even a beautifully made faux rock can look suspicious if it sits alone in the middle of a lawn like it is waiting for a bus. Nestle it partly into mulch, soil, gravel, or low plants. Group it with real stones when possible. Angle the most realistic face toward the viewing area. Hide the weakest side behind ornamental grass. Every fake rock deserves good lighting and a little stage management.
Finally, keep expectations realistic. Your first fake rock may not fool a geologist. That is fine. It only needs to improve your yard, hide the thing you wanted hidden, and make you happy when you walk past it with coffee. Concrete work is messy, forgiving, and oddly satisfying. Once you understand the mix, moisture, texture, and curing process, each rock gets better. Before long, you may find yourself judging real rocks for not having enough character.
Final Thoughts
Learning how to mix concrete for making fake rocks is mostly about balance. You need enough cement for strength, enough sand or lightweight material for texture, enough water for workability, and enough patience to let the rock cure properly. Whether you choose a mortar-style mix, a bagged sand mix, or lightweight hypertufa, the goal is the same: a stiff, moldable material that can hold shape and accept texture.
Start small, mix carefully, protect your skin and eyes, and let nature inspire the final shape. Real rocks are imperfect, so your DIY fake rocks do not need to look polished. They need lumps, cracks, shadows, and attitude. In the world of faux stone, a little rugged weirdness is not a flawit is the whole point.