Table of Contents >> Show >> Hide
- Quick 10-Second Check: Which Bostitch Stapler Do You Have?
- What You’ll Need
- Staple Matching: The #1 Reason “It Won’t Open” (or It Opens… and Then Regrets It)
- Safety Notes (Fast, Practical, and Worth It)
- The 9 Steps to Open a Bostitch Heavy Duty Stapler (with Pictures)
- Step 1: Confirm the model type and the staple you’re using
- Step 2: Put the stapler on a stable surface and “de-tension” it
- Step 3: Find the release point (it’s not always obvious)
- Step 4: Open the stapler using the method that matches your design
- Step 5: Remove the pusher/slide completely (don’t twist it)
- Step 6: Load a full strip of staples the right way up
- Step 7: Reinsert the pusher and close the magazine until it clicks
- Step 8: Test staple 2–3 sheets, then adjust for thicker stacks
- Step 9: If it won’t open or it jams, do a quick unjam routine
- Troubleshooting: “Why Won’t My Bostitch Stapler Open?”
- Maintenance Tips That Keep It Opening Smoothly
- FAQ
- Real-World Experiences & Tips (So You Don’t Learn the Hard Way)
- Conclusion
A Bostitch heavy duty stapler is basically the office equivalent of a pickup truck: it’s built to haul a ridiculous
stack of paper without crying for help. But when it’s time to reload staples, clear a jam, or just figure out how
the thing even opens, the “heavy duty” part can feel a little too… duty-heavy.
This guide pulls together the most common Bostitch/Stanley Bostitch heavy-duty designs (rear-loading desktop models,
spring-powered one-finger staplers, and the B8 plier stapler) so you can open yours safely, load it correctly, and
get back to stapling like a responsible adult (or at least like someone who owns a stapler).
Quick 10-Second Check: Which Bostitch Stapler Do You Have?
1) Rear-loading heavy duty desktop stapler
You’ll see a metal “pusher” or a slide mechanism at the back. Loading usually happens from the rear.
These are common in 60-sheet and 130-sheet staplers.
2) Spring-powered / one-finger stapler (often loads from the base)
Many spring-powered models open from underneath: you flip it over and open the base to reveal the staple channel.
3) B8 heavy duty plier stapler
This handheld “plier” style typically top-loads and uses B8 staples (often 1/4" or 3/8" leg length).
It’s popular for mailrooms, packaging, and retail bag closing.
What You’ll Need
- Your stapler (obviously, but we’re keeping it professional).
- The correct staples for your model (more on staple matching below).
- A small flathead screwdriver (optional, for stubborn latchesgentle persuasion only).
- Needle-nose pliers or tweezers (optional, for jam removal).
- A scrap sheet of paper for testing.
Staple Matching: The #1 Reason “It Won’t Open” (or It Opens… and Then Regrets It)
Heavy-duty staplers don’t just want staples. They want the right staplescorrect series/width and leg
length. The wrong size can cause feeding problems, make the magazine feel stuck, or create jams that convince you
the stapler is possessed.
Common examples (varies by model)
| Stapler type | Typical loading style | Typical staple compatibility |
|---|---|---|
| 130-sheet heavy duty desktop | Rear-loading | Often heavy-duty staples in multiple leg lengths (example: SB35 series 1/4"–5/8") |
| 60-sheet personal heavy duty desktop | Rear-loading | Often uses heavier staples in specific lengths (example: 3/8" for smaller stacks, 1/2" for thicker stacks) |
| B8 heavy duty plier stapler | Top-loading | B8 staples commonly in 1/4" or 3/8" leg length |
If you’re unsure, check the label on the stapler’s base, the box, or the printing near the magazine. Staple series
matters just as much as leg length.
Safety Notes (Fast, Practical, and Worth It)
- Keep fingers away from the business end while opening and testing.
- Unplug electric staplers before you open the magazine or clear jams.
- Don’t force parts with Hulk energy. If it won’t move, you’re probably missing a latch or release.
The 9 Steps to Open a Bostitch Heavy Duty Stapler (with Pictures)
Step 1: Confirm the model type and the staple you’re using
Staple type
Before you open anything, confirm your stapler style (rear-load, base-load, or top-load) and confirm your staples
match. This prevents 90% of the “why is this so hard?” moments.
Step 2: Put the stapler on a stable surface and “de-tension” it
OK
Set the stapler down on a desk. If it’s mid-staple or stuck, gently lift and lower the handle once to return it to
a neutral position. If it’s electric, unplug it now.
Step 3: Find the release point (it’s not always obvious)
Release
Look for one of these:
- A release button near the top/handle area (common on some desktop staplers).
- A rear latch or pusher rod that slides out the back (common on heavy-duty rear-load models).
- A base door that opens when the stapler is upside down (common on spring-powered/base-load designs).
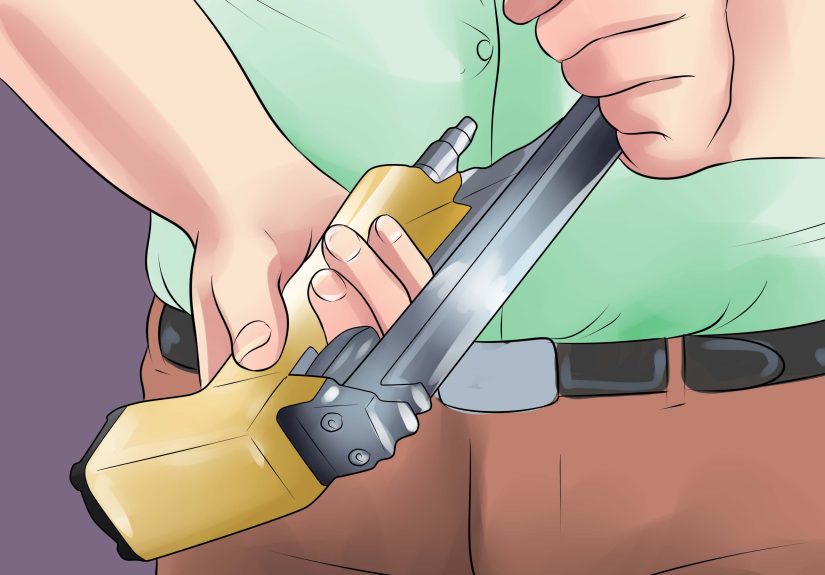
Step 4: Open the stapler using the method that matches your design
Rear-load
Base-load
Top-load
If it’s rear-loading: Locate the rear pusher/slider. Press the latch (if present), then pull the
pusher straight out from the back.
If it’s base-loading/spring-powered: Flip the stapler upside down and open the base to expose the
staple channel, then pull the magazine pusher back.
If it’s a B8 plier stapler: Open the top-loading magazine (often a quick-release at the top) to
access the staple track.
Step 5: Remove the pusher/slide completely (don’t twist it)
Pull straight
Once unlatched, pull the pusher/slide out in a straight line. If it stops halfway, check for a secondary catch or
a jammed staple near the back of the magazine.
Step 6: Load a full strip of staples the right way up
Crown (flat top) faces up
Place a full strip into the magazine channel. Avoid tossing in loose singles unless your model explicitly supports
it (most do not). Make sure the strip sits flat and centered. If it rocks side-to-side, it’s often the wrong staple
width/series.
Step 7: Reinsert the pusher and close the magazine until it clicks
Push in
CLICK
Slide the pusher back into place and press until it latches. On some rear-loading models, you may need to push it
all the way flush with the back, then lift slightly so the hooks catch. If your model uses a release button near
the handle, close the magazine until it snaps shut.
Step 8: Test staple 2–3 sheets, then adjust for thicker stacks
✓
Test
Test with a small stack first. If your heavy-duty model has a paper stop or adjustable guide, set it for consistent
placement. If it offers different clinch modes (standard vs. flat clinch), choose the one that matches your need:
flat clinch helps documents stack more neatly; standard clinch is the classic “pinch” style.
Step 9: If it won’t open or it jams, do a quick unjam routine
Tweezers
Remove bent staples
- Unload the magazine. Remove the staple strip so you’re not fighting fresh staples while clearing old ones.
- Open the stapler as far as your model allows. Some open 180°; others open only enough to access the channel.
- Remove bent/broken staples with tweezers or needle-nose pliers. A small flathead can help lift a staple that’s wedged.
- Check the feed path for fragments (tiny broken pieces can cause repeat jams).
- Reload with correct staples and test again with a small stack.
Troubleshooting: “Why Won’t My Bostitch Stapler Open?”
You’re missing a hidden release
Many heavy-duty models look like they should pry open, but actually require a button, latch, or rear release. If you
feel strong resistance, stop and search for the release point rather than forcing the cover.
The magazine is under tension
If the pusher spring is pulling hard against a jam or a misloaded strip, the magazine can feel “locked.” Unload what
you can, then gently wiggle the pusher backward to relieve pressure before trying again.
Wrong staple width/series
A staple strip that’s too wide won’t sit in the channel; too narrow can twist and jam. Match both the series
and the leg length to your model’s rating.
Overcapacity stapling (the silent stapler killer)
“It staples 130 sheets” is not the same as “it staples 130 sheets of every paper on Earth.” Heavier paper stock,
coated pages, or mixed materials can reduce real-world capacity. If you’re constantly at the limit, use the longer
recommended leg length and staple fewer pages per set.
Maintenance Tips That Keep It Opening Smoothly
- Refill before you hit empty. Running near-empty can cause uneven feeding in some magazines.
- Keep the channel clean. Paper dust and broken staple bits love to camp out where the driver blade travels.
- Don’t mix staple types in one load. Different coatings or widths can create feed inconsistencies.
- Store it closed. Leaving the mechanism open can collect dust and increase the chance of someone poking a finger where it doesn’t belong.
FAQ
Can I open my Bostitch stapler all the way (180 degrees)?
Some Bostitch office staplers open 180 degrees for tacking or crafts, but heavy-duty desktop models vary. If yours
doesn’t open flat, don’t force ituse the intended magazine opening method instead.
Do I need tools to open it?
Normally, no. If you need a screwdriver every time, something is offeither the wrong staples, a jam, or you’re not
using the correct release.
Why does it jam right after I reload?
The most common causes are: wrong staple series, staples loaded upside down, a fragment left from a previous jam,
or trying to staple a stack thicker than your current staple leg length can handle.
Real-World Experiences & Tips (So You Don’t Learn the Hard Way)
In busy offices and schools, the stapler is often treated like a shared appliancesomewhere between a microwave and
a mysterious communal fridge. That means the person opening it is rarely the same person who loaded it, and “What
staples did we buy?” becomes an archaeological dig through supply drawers. A practical habit that saves time: keep
the staple box next to the stapler (or tape a note under the base with the exact staple series and leg
lengths). It sounds small, but it prevents the classic scenario where someone crams in “close enough” staples, the
magazine starts feeding crooked, and now the stapler “won’t open” because the strip is wedged at an angle.
Another common experience: heavy-duty rear-loading staplers feel “stuck” the first time you try to pull the pusher
out. People often pull upward like they’re starting a lawn mower. Instead, the smoother move is to press the rear
latch (if there is one) and pull straight back, slow and steady. If it still resists, it’s usually because the
spring is pushing against a jam or a bent staple. Unloading what you can and removing even one mangled staple can
make the whole mechanism suddenly feel normal againlike it just needed to vent.
Mailrooms and shipping stations have their own flavor of stapler drama. Plier staplers (like the B8 style) are
fantastic until someone uses them on slightly thicker material than they’re rated forlike light corrugate or
layered packaging. The stapler might still “fire,” but the staple legs can curl weirdly, and the next staple
catches on that deformed metal. The best workaround people use in practice is simple: don’t jump from 10 sheets to
40 sheets without testing. Run a quick test staple when switching materials (paper to thicker stock, or paper to
bag/board). If the clinch looks messy, switch to the correct leg length or reduce thickness.
A surprisingly useful routine in shared workplaces is the “two-test rule.” After any reload, staple 2–3 sheets
twice. Why twice? Because the first staple can still be influenced by the way the strip settled when you closed
the magazine. If the second staple is clean, you’re good. If the second staple misfires, you likely have a feed
path issue (fragment, wrong staple width, or strip not seated flat). This tiny ritual prevents the dreaded moment
when you staple a 70-page packet for a meeting and discover on page 68 that your stapler has been quietly folding
staples into modern art.
Finally, one of the most consistent “experience-based” lessons: don’t confuse “heavy duty capacity” with “every
staple length works for every job.” People often keep one staple size loaded and try to power through everything.
In real life, the staple leg length mattersespecially when you’re near the top end of capacity. Using too short a
leg length on a thick stack can lead to incomplete clinches, jammy feeding, or staples that look secure until you
pick up the packet and it explodes into confetti. Keeping one extra box of the longer recommended staples nearby
is a small upgrade that makes your stapler feel dramatically more reliable.
Conclusion
Opening a Bostitch heavy duty stapler isn’t hard once you match the design to the correct opening method: rear-load
pusher out the back, base-load open from underneath, or top-load on plier models. Use the right staple series, pull
parts straight (not sideways), and do a quick test staple after reloading. If you hit resistance, stop and look for
the release or a jambecause forcing a heavy-duty stapler is how you end up buying a new stapler and pretending it
was “always like that.”