Table of Contents >> Show >> Hide
- Why Baseboards Matter More Than You Think
- What You Need Before You Start
- Choose the Right Paint for Baseboards
- Should You Paint Baseboards Before or After Walls?
- How to Prep Baseboards for Paint
- How to Paint Baseboards Step by Step
- How to Paint Baseboards With Carpet
- Common Baseboard Painting Mistakes to Avoid
- Pro Tips for a Cleaner, Smoother Finish
- What the Finished Result Should Look Like
- Final Thoughts
- Experience-Based Lessons From Real-World Baseboard Painting
- SEO Tags
Baseboards do not get much glory. They sit quietly at ankle level, collect dust like it is their side hustle, and only get noticed when they are chipped, yellowed, or wearing a streak of mystery grime. But once you paint them properly, the whole room looks cleaner, sharper, and more finished. It is the kind of upgrade that makes people say, “Did you remodel?” when what you really did was spend a Saturday with a brush, a drop cloth, and a stubborn commitment to crisp lines.
If you want that smooth, durable, professional-looking finish, there is good news: painting baseboards is not especially difficult. The catch is that it rewards patience more than speed. In other words, this is not the place for wild optimism and one thick coat. This is a job for prep work, smart tools, and a little humility. The baseboards always know when you are cutting corners.
Why Baseboards Matter More Than You Think
Baseboards frame the bottom of a room the same way crown molding frames the top. When they are clean and freshly painted, walls look brighter, floors look neater, and the room feels intentionally finished. When they are scuffed, cracked, or painted with visible drips, the opposite happens. Even beautiful wall color can look unfinished next to tired trim.
That is why learning how to paint baseboards the right way is worth the effort. It is not just about color. It is about surface prep, paint selection, and technique. Get those three things right, and the results can last for years.
What You Need Before You Start
A good baseboard painting project begins with the right tools. You do not need a truck full of contractor gear, but you do need more than a random old brush from the garage that looks like it survived a small electrical fire.
Basic Supplies
- Drop cloth or rosin paper
- Painter’s tape
- Vacuum or microfiber cloth
- Mild cleaner or degreaser
- Putty knife
- Wood filler or spackling compound
- Paintable acrylic latex caulk
- 120- to 220-grit sandpaper or sanding sponge
- Tack cloth or damp lint-free rag
- Primer, if needed
- Trim paint
- High-quality 2-inch to 2.5-inch angled sash brush
If you are painting in a carpeted room, add a wide putty knife or paint shield to your setup. That simple extra tool can save you from turning beige carpet into a modern art statement.
Choose the Right Paint for Baseboards
Not all paint is created equal, and baseboards have a rough life. They get kicked, bumped by vacuums, nibbled by toy trucks, and occasionally introduced to mop water with suspicious enthusiasm. So durability matters.
Best Paint Type
For most interior baseboards, a high-quality trim enamel or cabinet-and-trim paint works best. Many painters prefer waterborne alkyd or acrylic enamel because it levels nicely, dries harder than standard wall paint, and is easier to clean than older oil-based formulas. That combination makes it ideal for trim, doors, and baseboards.
Best Finish
Satin and semi-gloss are the most popular finishes for baseboards. Semi-gloss is a classic choice because it is durable, easy to wipe clean, and reflects enough light to make trim stand out. Satin is slightly softer in appearance and can be more forgiving if your trim is older or imperfect. If you want a traditional crisp contrast against eggshell or matte walls, semi-gloss is usually the winner.
Best Color
White is still the default baseboard color in many American homes, but it is far from the only option. A warm white can soften a room with creamy walls, while a cooler white creates a sharper contrast. You can also color drench a room by painting baseboards, walls, and trim in the same color but with different sheens. That look is stylish, modern, and surprisingly forgiving in smaller spaces.
Should You Paint Baseboards Before or After Walls?
If you are painting an entire room, the most practical order is usually ceiling first, walls second, and trim last. That approach helps reduce drips and makes touch-ups easier. If you are only repainting the baseboards and leaving the walls alone, then focus on protecting the wall with painter’s tape and work carefully along the top edge.
So yes, there is room for debate in the trim-versus-walls argument. But in a full room makeover, finishing with the baseboards is usually the cleanest strategy.
How to Prep Baseboards for Paint
This is the make-or-break stage. The better your prep, the more expensive your final result will look. Skip it, and your baseboards will cheerfully display every flaw you hoped the paint would hide.
1. Clean the Surface Thoroughly
Baseboards collect dust, pet hair, grease, and grime, especially near kitchens, hallways, and entryways. Wipe them down with a damp cloth and a mild cleaner. If they are especially dirty, use a degreasing cleaner, then rinse or wipe again so no residue remains.
Paint does not bond well to dirt. It just sits on top of it, like a bad life choice.
2. Fill Nail Holes, Dents, and Scratches
Use wood filler or spackling compound to patch nail holes, shallow dents, and chips. Let it dry completely, then sand it smooth. If the trim has cracked caulk lines, gouges, or old damage, this is the moment to deal with them.
3. Caulk Gaps
If you see small gaps where the baseboard meets the wall, run a thin bead of paintable acrylic latex caulk along the seam. Smooth it with a damp finger or cloth. This step makes a huge visual difference because it turns a slightly rough installation into a crisp, custom-looking finish.
4. Sand the Baseboards
Sanding is not optional if you want proper adhesion and a smooth finish. For already painted trim, lightly scuff the surface to dull the sheen. On rougher or older trim, start a bit coarser and then move finer. On newer trim, a lighter sanding is usually enough. Always sand with the grain when possible.
5. Remove Dust
Vacuum first, then wipe with a tack cloth or damp lint-free rag. Dust left behind will turn your finish from smooth to suspiciously crunchy.
6. Prime When Needed
If your baseboards are bare wood, stained wood, patched in multiple areas, or switching from a dark color to a light one, use primer. Primer helps with adhesion, blocks stains, and gives you a more even final color. If the trim is already painted and in good condition, a full prime coat may not be necessary, but spot priming repaired areas is still smart.
How to Paint Baseboards Step by Step
Step 1: Protect Floors and Walls
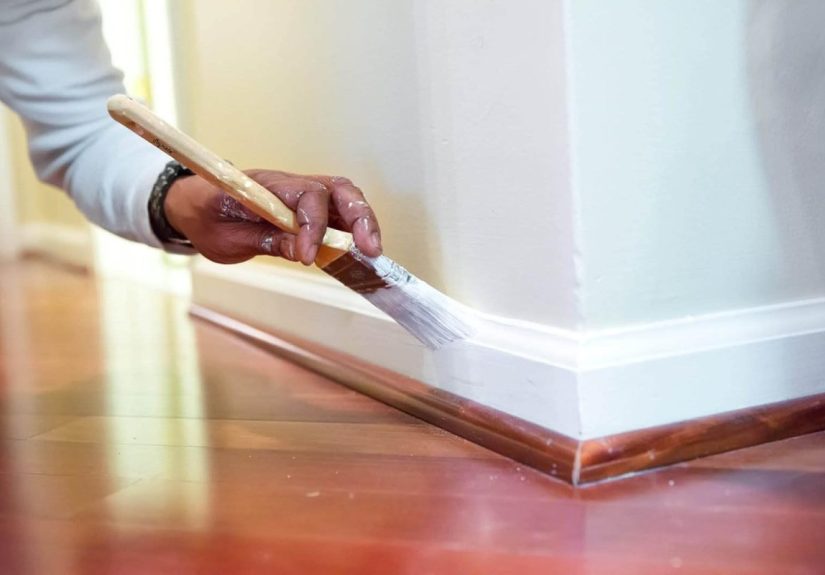
Lay down a drop cloth or protective paper. Tape off the wall above the baseboard if needed. On hard floors, tape can help protect the edge, though careful brushing often works just as well. On carpet, tuck a shield or wide putty knife between the baseboard and carpet fibers as you work.
Step 2: Stir the Paint and Load the Brush Properly
Stir the paint thoroughly. Pour a small amount into a separate working container rather than dipping directly from the can. Load your angled brush about one-third to halfway up the bristles, then tap off the excess. Do not overload it. You want control, not a dripping drama.
Step 3: Start at One End and Work in Sections
Paint a manageable section, usually a few feet at a time. Begin near the top edge and work your way across the face of the baseboard. Use smooth, controlled strokes. Lay the paint on, then lightly tip it off in the direction of the trim for a more even finish.
Step 4: Follow the Length of the Board
Long final strokes along the length of the baseboard help reduce brush marks. Avoid dabbing at one tiny area repeatedly. That is how you create ridges, thick spots, and the unmistakable look of “I lost patience at 3:17 p.m.”
Step 5: Let the First Coat Dry Fully
Do not rush the second coat. Trim enamels need adequate dry time to level properly and harden. Follow the label for recoat times, and remember that humidity and cooler temperatures can slow things down.
Step 6: Sand Lightly Between Coats
For the smoothest finish, lightly sand between coats with fine-grit sandpaper or a sanding sponge. Wipe away the dust before recoating. This step is especially helpful if the first coat raised the grain slightly or caught dust.
Step 7: Apply the Second Coat
The second coat is where the magic happens. Color evens out, coverage improves, and the baseboards finally look intentional instead of mid-project. Use the same controlled technique and avoid heavy build-up in corners or along the top edge.
How to Paint Baseboards With Carpet
This part scares many DIYers, and fairly so. Carpet does not forgive. But the process is manageable if you work slowly.
- Vacuum the carpet edge first.
- Tuck painter’s tape or a thin plastic shield down between the carpet and baseboard.
- Use a putty knife to press the carpet fibers away from the trim.
- Paint with a lightly loaded brush to avoid drips.
- Move the shield as you go rather than trusting a single setup for the whole wall.
The biggest mistake here is using too much paint. A dripping brush and carpet are not a romantic pairing.
Common Baseboard Painting Mistakes to Avoid
Skipping Prep
If you paint over dust, gloss, or greasy fingerprints, the finish may peel, bubble, or look rough.
Using Wall Paint on Trim
Wall paint is usually not tough enough for baseboards. Use trim-specific paint for better durability and a harder finish.
Applying Thick Coats
Heavy coats are more likely to sag, puddle in profiles, and dry unevenly. Two thin coats beat one thick coat almost every time.
Using a Cheap Brush
A bargain brush often sheds bristles, leaves more marks, and makes the job harder than it needs to be. This is one place where better tools actually matter.
Ignoring Dry Time
Paint that feels dry to the touch is not always cured. Be gentle with freshly painted baseboards for several days, especially in high-traffic rooms.
Pro Tips for a Cleaner, Smoother Finish
- Use bright side lighting to spot drips, gaps, and missed patches before the paint dries.
- Label your paint can with the room name for easier touch-ups later.
- If the trim has ornate detail, use the tips of the bristles and do not flood grooves with paint.
- Keep a damp rag nearby for quick cleanup of accidental smudges.
- Test your trim color next to the wall color before committing to the whole room.
What the Finished Result Should Look Like
Properly painted baseboards should look smooth, even, and solid in color. The caulk line where wall meets trim should appear neat, not lumpy. The finish should feel hard and clean, not gummy or tacky. Most importantly, the baseboards should quietly make the room look better without announcing every brushstroke like a needy social media post.
Final Thoughts
If you have been wondering how to paint baseboards the right way, the answer is simple but not lazy: clean thoroughly, repair defects, sand carefully, use the right trim paint, and apply two controlled coats with a quality angled brush. That combination produces the kind of polished result people associate with professional painting.
In other words, painting baseboards is not glamorous, but it is one of the smartest cosmetic upgrades you can make. It is affordable, beginner-friendly, and wildly satisfying once the tape comes off and the room suddenly looks sharper from floor to ceiling.
Experience-Based Lessons From Real-World Baseboard Painting
Anyone who has painted baseboards in a lived-in home learns very quickly that the project is never just about paint. It is about furniture that is heavier than it looked yesterday, walls that are somehow not straight, and the shocking discovery that dust can apparently reproduce overnight. In theory, baseboards are simple. In practice, they are one of the best teachers of patience in all of DIY.
One common experience is realizing that the first twenty minutes of cleaning changes everything. Baseboards often look “not that dirty” until a damp cloth turns gray in one pass. Once they are truly clean, you can finally see the real issues: tiny dents, hairline gaps, old drips, uneven caulk, and scuffs from years of shoes, strollers, chairs, and robot vacuums doing questionable navigation. That moment is actually encouraging. It means you are no longer guessing. You are fixing what is really there.
Another lesson people learn is that sanding feels unnecessary right up until they skip it. Unsanded glossy trim has a way of making fresh paint look temporary, almost like it is sitting on top of the surface instead of becoming part of it. But when you scuff sand first, the brush glides better, the paint grabs better, and the finished result looks far more deliberate. It is one of those quiet improvements you cannot always name, but you definitely notice.
Then there is the brush technique. Most beginners start with too much paint, because that seems efficient. It is not. A heavily loaded brush creates drips at the corners, puddles on the top lip, and thick ridges that dry into permanent evidence. The more experience people get, the lighter their touch becomes. They stop trying to force coverage in one pass and start trusting two thin coats. That is usually the turning point between a project that looks homemade and one that looks professionally finished.
Painting baseboards around carpet also teaches respect. Respect for painter’s tape, respect for putty knives, and deep respect for gravity. The people who get the cleanest results are not always the ones with the steadiest hands. Often they are simply the ones who slow down, protect the area well, and move methodically. That is a useful lesson far beyond trim painting.
Perhaps the most satisfying experience comes at the very end, when the room is put back together. Fresh baseboards do not scream for attention, but they change the feeling of the entire space. Walls seem cleaner. Floors look more intentional. Even older rooms gain a crispness they did not have before. It is a reminder that small architectural details matter, and that good prep work almost always shows in the final result.
So if your first attempt is not perfect, welcome to the club. Nearly everyone learns baseboard painting by making one or two slightly annoying mistakes and then figuring out what professionals have known all along: the job looks easy only after the prep is done well.


