Table of Contents >> Show >> Hide
- What a dryer lint trap actually does (and why it matters)
- The 30-second habit: clean the lint screen every load
- When “looks clean” isn’t clean: the residue problem
- How to deep clean a dryer lint trap (the right way)
- Don’t forget the lint trap slot (aka the lint’s second home)
- How often should you deep clean the lint trap?
- Signs your lint trap needs attention (before your dryer starts complaining)
- Common mistakes to avoid (a.k.a. how lint wins)
- Quick troubleshooting: lint trap clean, still not drying
- Special cases: combo units and bottom-mounted filters
- Conclusion: keep it simple, keep it consistent
- Real-World Experiences: What People Learn After They Start Cleaning the Lint Trap Properly
Your dryer lint trap is basically a tiny bouncer standing at the door of your dryer, stopping fuzz, fibers, and
“mystery fluff” from sneaking deeper into the machine. And like any bouncer, it gets overwhelmed if you never
let it take a break. Cleaning your dryer lint trap the right way helps your clothes dry faster, protects your
dryer’s parts, and reduces the risk of lint-related overheating (which is a very unfun kind of surprise).
The best part? Proper lint trap cleaning is quick, cheap, and doesn’t require a toolbox that looks like it belongs
on a space station. You just need a simple routine, a deeper clean once in a while, and a couple of “don’t do that”
reminders (because yes, someone out there is scraping lint with a butter knife).
What a dryer lint trap actually does (and why it matters)
Every time clothes tumble, they shed fibers. Your lint screen (also called the lint filter) catches most of those
fibers so they don’t clog your dryer’s airflow path. Good airflow is everything in a dryer: it helps hot air move
through the drum, pull moisture out of clothing, and exit properly. When the lint trap is cloggedor coated with
residueit blocks airflow. That can mean longer drying times, higher energy use, hotter operating temperatures, and
extra wear on the machine.
Think of your lint screen like a coffee filter. It works great when it’s clean. But if it’s coated in waxy buildup
from dryer sheets or fabric softener residue, it can act like it’s “clean” while actually blocking air like a tiny,
invisible plastic wrap layer.
The 30-second habit: clean the lint screen every load
For everyday maintenance, keep it simple and dry:
Step-by-step: after each load
- Turn the dryer off and open the door.
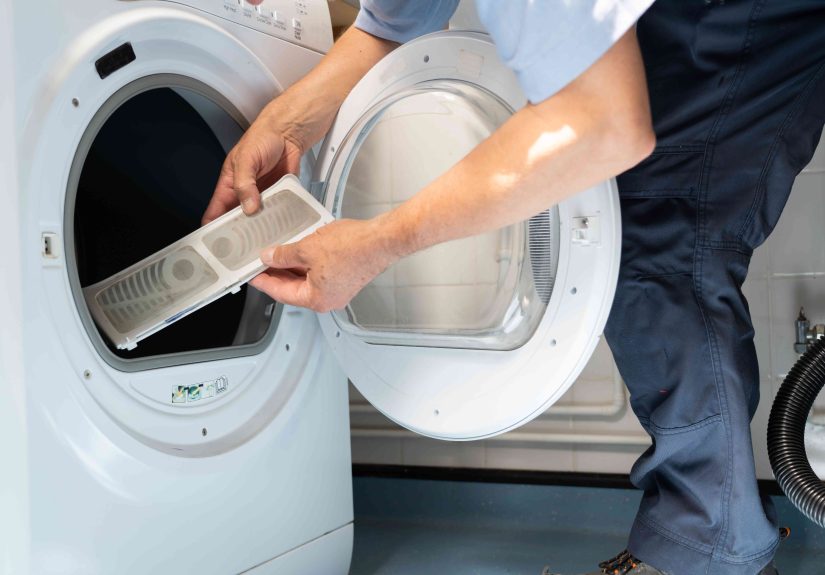
- Pull out the lint screen (usually in the door opening or on top of the dryer, depending on model).
- Peel lint off with your fingers and throw it away. (Don’t “save it for later.” Lint is not a hobby.)
- Check both sides of the screenlint likes hiding.
- Reinsert the lint screen fully before starting the next load.
That’s it. No water needed for the daily clean. In fact, for the regular after-load cleanup, staying dry helps you
avoid turning lint into stubborn “lint papier-mâché.”
When “looks clean” isn’t clean: the residue problem
If you use dryer sheets, liquid fabric softener, or certain detergents, your lint screen can build up a thin,
waxy film. That film can reduce airflow even when the screen looks mostly lint-free. The result is often:
- Clothes taking longer to dry (or needing a second cycle)
- Overheating shutoffs or “dryer feels hotter than normal” vibes
- Lint not sticking to the screen like it used to
The quick “water test”
Here’s a simple way to check for residue: take the lint screen to a sink and run water over it.
- If water sheets through evenly: you’re probably fine.
- If water beads up or runs off in “tracks”: residue is likely blocking the mesh.
If you fail the water test, don’t panic. You just need a proper wash.
How to deep clean a dryer lint trap (the right way)
A deep clean removes residue and trapped micro-lint from the mesh. Most manufacturers recommend warm/hot water,
mild detergent, and a soft brush.
What you’ll need
- Warm or hot water
- Mild dish soap (or mild detergent)
- A soft nylon brush (old dish brush or soft cleaning brush)
- A clean towel
Step-by-step: washing the lint screen
- Remove lint first (dry). Roll or peel off all visible lint before wetting the screen.
- Rinse with warm/hot water on both sides.
-
Apply a small amount of dish soap and gently scrub the mesh with the nylon brush.
Focus on the screen area, not just the frame. - Rinse thoroughly until water runs clean and you don’t feel slick residue.
-
Dry completely with a towel and air-dry for a few minutes if needed.
(A damp lint screen can trap lint faster and may affect airflow.) - Reinstall the lint screen snugly and securely.
Be gentle. The mesh is designed for airflow, not for aggressive scrubbing like you’re trying to erase a bad
decision from 2019.
Don’t forget the lint trap slot (aka the lint’s second home)
Cleaning the screen is step one. But lint can also collect in the slot/housing where the lint screen slides in.
That hidden lint restricts airflow and can end up deeper in the dryer if ignored.
Step-by-step: cleaning the lint trap opening
- Unplug the dryer (or switch off the breaker). Safety first.
- Remove the lint screen.
- Vacuum the slot using a crevice tool. Go slowly and avoid snagging internal parts.
-
Use a dryer lint brush (optional but helpful). Insert gently, rotate, and pull out lint.
Vacuum again after brushing. - Reinstall the lint screen once everything looks clear.
If your lint filter is located on top of the dryer, be extra careful not to push lint downward. The goal is to
remove lint, not relocate it into the dryer’s secret compartments.
How often should you deep clean the lint trap?
There’s a simple rule and a flexible rule:
- Simple rule: Remove lint from the screen every load.
-
Flexible rule: Wash the lint screen periodicallymore often if you use dryer sheets or fabric
softener, or if drying time is getting longer.
Many households do a lint screen wash about once a month, or every few weeks if they’re heavy dryer-sheet users.
If you never use dryer sheets and your water test looks good, you may not need to wash as often. Let performance
(and the water test) guide you.
Signs your lint trap needs attention (before your dryer starts complaining)
- Clothes take longer to dry than they used to
- The dryer feels hotter or seems to shut off early
- Lint doesn’t collect well on the screen
- Water beads on the screen during the water test
- You see lint around the door seal or near the filter area
These symptoms can also point to a clogged dryer vent (the duct that exhausts air outside). If you’ve cleaned the
lint screen and slot and drying time is still bad, it’s smart to inspect the vent system next.
Common mistakes to avoid (a.k.a. how lint wins)
1) Skipping the lint screen because “I’m in a hurry”
If you have time to start a dryer cycle, you have time to peel lint off the screen. This is the adult version of
returning your shopping cart: small effort, big collective benefit, and yes, people notice when you don’t do it.
2) Washing the screen every load
Daily cleaning should be dry. Washing is for periodic deep cleaning. Wet lint can stick and get harder to remove,
and a damp screen can catch lint faster.
3) Using sharp tools
Knives, screwdrivers, and pointy objects can damage the mesh. A damaged lint screen can let lint bypass the filter,
which is exactly what you don’t want.
4) Running the dryer without the lint filter
Never do this. The lint screen is a core safety and performance part of the dryer.
5) Ignoring the “whole airflow” picture
A clean lint trap helps, but it’s not the only airflow checkpoint. Crushed vent hoses, long duct runs, and clogged
exterior vent flaps can also slow drying and raise temperatures. If your dryer suddenly needs two cycles, treat that
as a cluenot a personality trait.
Quick troubleshooting: lint trap clean, still not drying
If you’ve cleaned the lint screen, washed off residue, and vacuumed the lint trap slot, but drying is still slow,
check these common issues:
- Overloading: Stuffing the drum reduces airflow through the clothes.
- Venting: The exhaust duct may be clogged or kinked.
- Exterior vent flap: It may be stuck shut or blocked by lint, debris, or even a curious critter.
- Moisture sensor: Some dryers have sensors that can get coated and need gentle cleaning.
If you notice burning smells, repeated overheating shutoffs, or the dryer is extremely hot to the touch, stop using
it and address airflow/venting before running another cycle.
Special cases: combo units and bottom-mounted filters
Not all lint traps are created equal. Some dryers (and washer/dryer combo units) have different lint filter
locations and may require more frequent cleaning or multiple filters. Follow your model’s instructions for filter
placement and cleaning. The basics still apply: remove lint regularly, wash periodically if residue builds up, and
keep the housing area clear.
Conclusion: keep it simple, keep it consistent
Proper dryer lint trap cleaning is a small habit with a big payoff: faster drying, fewer headaches, and a happier
dryer that doesn’t feel like it’s training for a volcano cosplay. Remove lint after every load, wash the screen
occasionally to remove residue, vacuum the slot when buildup appears, and pay attention to drying time changes.
Your dryer will run more efficientlyand you’ll spend less time wondering why a “normal cycle” now takes the length
of a feature film.
Real-World Experiences: What People Learn After They Start Cleaning the Lint Trap Properly
Once people get serious about lint trap cleaning, a few patterns show up again and againusually right after they
realize they’ve been doing it the “I just yank the fuzz off and sprint away” method for years. The first surprise
is how much a washed lint screen can change drying performance. Plenty of homeowners report that their dryer went
from “two cycles for towels” to “one cycle like it’s 2012 again” after they finally scrubbed the screen with soap
and water. The reason is almost always residue: the screen looked clean, but the mesh wasn’t breathing. After a
proper wash, airflow improves, cycles shorten, and the dryer doesn’t feel like it’s working overtime.
Another common experience: the water test becomes a household party trick. People run water over the screen, watch
it bead up like a freshly waxed car, and suddenly understand why their dryer has been acting dramatic. It’s one of
those rare moments where a simple test feels like you uncovered a conspiracy. And it changes behavior fast. Many
folks start cutting back on dryer sheets or switching to alternatives (like wool dryer balls) once they see how
residue can build up.
Appliance techs often mention a “hidden lint” problem: the lint trap slot looks fine from the top, but the housing
below has a fuzzy lining worthy of a winter coat. People who vacuum the slot for the first time are usually shocked
by what comes outespecially if they’ve owned the dryer for years. The most relatable reaction is: “Wait… that was
in there the whole time?” Yes. Yes, it was. And once that lint is removed, many notice the dryer runs cooler, the
laundry room feels less humid, and the machine sounds smoother because it isn’t fighting for airflow.
Families also learn quickly that lint management affects more than drying time. For example, pet owners (especially
with shedding dogs or cats) often find their lint screens clog faster, and the slot collects more hair-lint “felt.”
Their best tip is consistency: a quick screen clean every load, plus a slot vacuum more often than the average
household. Parents of athletes and gym-goers notice something similar with microfiber and performance fabrics:
certain loads create fine lint that clings to the mesh and seems harder to remove. A gentle periodic wash helps
keep the screen from getting that “invisible blockage” effect.
One more real-world lesson: the lint screen is not a trash can. People sometimes drop lint behind the dryer, leave
it on top of the machine, or let it drift onto the floor like it’s seasonal décor. Then they wonder why the laundry
room looks dusty and why lint appears in odd places. The fix is boring but effective: peel lint into a bin (or a
small trash can kept right by the dryer), wipe the area occasionally, and don’t let lint become part of the room’s
“aesthetic.”
Ultimately, the biggest takeaway people share is this: proper lint trap cleaning isn’t hardit’s just easy to
ignore until your dryer starts sending hints. Once someone experiences the difference (faster drying, less heat,
fewer “why are my jeans still damp?” moments), they usually stick with the routine. It’s one of the few home
maintenance habits that pays you back almost immediately. Not bad for something you can do in the time it takes to
argue with a fitted sheet.


