Table of Contents >> Show >> Hide
- Before Anything Else: The “Please Don’t Get Yourself in Trouble” Checklist
- Quick Pick: Which Method Should You Use?
- Way 1: Use Apple’s Built-In Call Recording (No Extra App)
- Way 2: Record Incoming Calls with Google Voice (No iPhone Recording App)
- Way 3: Use Speakerphone + Record with Another Device (Simple and Surprisingly Reliable)
- Way 4: Use Speakerphone + Record with a Computer (Mac QuickTime Method)
- Troubleshooting and FAQs
- Conclusion: Pick the Method That Fits Your Call (and Your Comfort Level)
- Real-World Experiences: What It’s Like Using These 4 Methods
There are two kinds of iPhone moments: the ones you’ll remember forever, and the ones you’ll absolutely forget the second you hang up.
If you’ve ever ended a call and thought, “Wait… what time is the appointment?” or “Did they say Tuesday or two days?”welcome.
Recording a call can be genuinely useful for interviews, customer support callbacks, verbal instructions, family logistics, or that one friend who gives directions like,
“Turn left where the old tree used to be.”
The catch: call recording has historically been limited on iPhone, and for good reasonprivacy laws and consent rules can be strict.
The good news is you now have several legit, no-sketchy-workarounds options that don’t require installing a dedicated call-recording app on your iPhone.
Below are four practical ways, plus tips to keep your recordings clean, organized, and (most importantly) legal.
Before Anything Else: The “Please Don’t Get Yourself in Trouble” Checklist
In the U.S., federal law generally allows recording if at least one person on the call consents (that can be you), but state laws can be stricter.
Some states require everyone on the call to agree. And if you’re calling across state lines, the safest move is to follow the stricter rule.
Translation: when in doubt, tell the other person you’re recording and get a clear “yes.”
A simple, non-awkward consent script
- Work call: “Just a heads-upI’d like to record this call so I don’t miss details. Is that okay?”
- Interview: “Do I have your permission to record for accuracy? I’ll only use it for notes.”
- Family logistics: “I’m going to record this so I remember the schedulecool with you?”
If they say no, don’t record. (Also: people who refuse being recorded sometimes just want you to stop collecting evidence of their “I never said that” habits.
Kidding. Mostly.)
Quick Pick: Which Method Should You Use?
- If your Phone app shows Call Recording: Use Way 1 (built-in, clean, easiest).
- If you only need to record incoming calls to a Google Voice number: Use Way 2.
- If you want a universal option that works almost anywhere: Use Way 3 (speakerphone + another device).
- If you want longer recordings and better file handling: Use Way 4 (speakerphone + computer recording).
Way 1: Use Apple’s Built-In Call Recording (No Extra App)
On newer iOS versions, Apple introduced a built-in Call Recording option in the Phone app in certain regions and languages.
When you start recording, both call participants hear an audio notice that recording is in progressthis is a feature, not a bug.
It helps keep things transparent and consent-friendly.
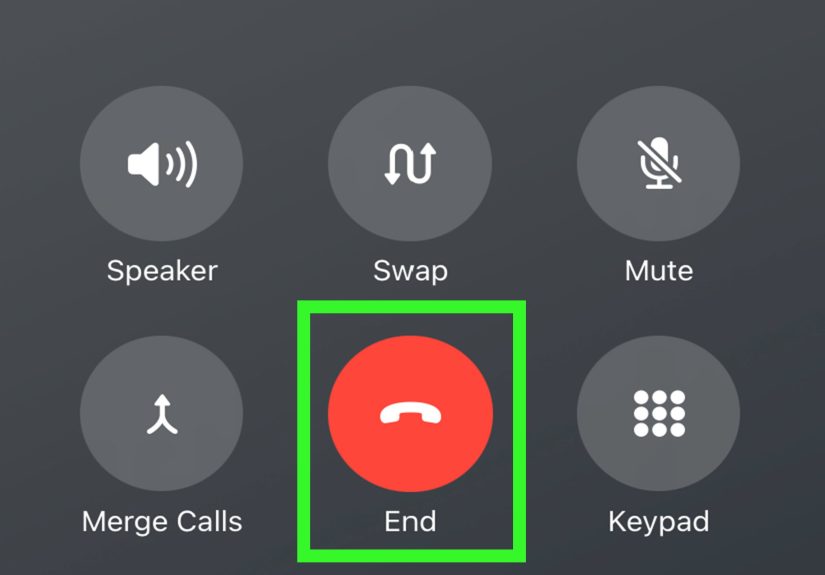
How to record a call in the Phone app
- Open the Phone app and make (or answer) a call.
- During the call, tap the More button.
- Tap Call Recording.
- To stop, tap Stop or simply hang up.
Where the recording goes (and how to find it fast)
Your iPhone automatically saves recordings to a Call Recordings folder inside the Notes app.
That means you can treat recordings like “smart notes”: label them, search them, share them, and keep everything in one place instead of juggling random audio files.
Transcripts, summaries, and other “nice-to-have” features
- Transcripts: In supported regions/languages, you may see a transcript in Notes. It might take a moment to generate.
- Searchability: Once you have a transcript, searching becomes dramatically easier than scrubbing audio.
- Sharing: You can share the audio (and sometimes the transcript) from Notesjust be mindful of privacy.
- Housekeeping: Delete what you don’t need. If you delete the audio, the transcript goes with it.
Why you might not see Call Recording
If you don’t see the option, it doesn’t necessarily mean you’re doing something wrong.
Availability can depend on your iOS version, region, language settings, device support, and feature availability where you are.
If the built-in button isn’t there, jump to Ways 2–4 below.
Way 2: Record Incoming Calls with Google Voice (No iPhone Recording App)
Google Voice can record incoming calls to your Google Voice number (for personal accounts).
You enable the setting, then press a keypad button during the call to start/stop recording.
Like Apple’s approach, Google Voice announces recording to everyone on the callgood for consent and good for not being that person.
Best for
- Recording inbound calls (clients calling you back, voicemail-like situations, phone interviews where they call you)
- People who want a method that doesn’t rely on iPhone’s built-in call recording availability
Limitations (read these so you don’t rage-text your phone)
- Incoming only: Google Voice recording is typically for incoming calls, not outgoing calls.
- Announcement is automatic: Everyone hears it. There’s no “silent mode.”
- Setup required: You need a Google Voice number and the incoming call options enabled.
How to set up and record incoming calls
- Go to voice.google.com and sign in to your Google account.
- Open Settings, then find Calls (wording may vary slightly by interface updates).
- Turn on Incoming call options.
- When you receive an incoming call to your Google Voice number and answer it, press 4 on the dial pad to start recording.
- Press 4 again to stop recording.
Pro tip: If your goal is to capture details (not create a podcast), tell the caller up front anyway.
“You’ll hear an automated message that recording startedjust confirming you’re okay with that.”
It sounds professional, and it prevents the classic “Wait, what was that announcement?” derailment.
Way 3: Use Speakerphone + Record with Another Device (Simple and Surprisingly Reliable)
This is the universal “works in almost any situation” method: put the iPhone call on speaker, then record the audio using a second device.
That second device can be another iPhone/iPad using Voice Memos, an Android phone’s recorder, or even a small digital recorder.
The key: you’re not installing a recording app on the calling iPhone, and you’re not relying on carrier tricks.
Best for
- Recording outgoing calls (where Google Voice won’t help)
- Situations where your iPhone doesn’t have the built-in call recording feature available
- Quick “I just need this once” moments
Step-by-step
- Start the call on your iPhone.
- Tap Speaker to put the call on speakerphone.
- On a second device, open a recorder:
- On an iPhone/iPad: open Voice Memos and tap Record.
- On a Mac: you can use QuickTime (see Way 4 for details).
- Place the recording device 6–12 inches from the iPhone, angled toward the speaker/mic area.
- When finished, stop recording and immediately rename the file with something obvious (date + topic).
Audio-quality tips that make a huge difference
- Choose a quiet room: Fans and kitchen chaos will sound like a helicopter documentary.
- Reduce echo: Soft surfaces (carpet, curtains) help. Bathrooms do not. Bathrooms never help.
- Use Airplane Mode on the recording device: If you’re recording on a phone, Airplane Mode can reduce interference buzz.
- Do a 5-second test: Say “test, test” and play it back before the important part starts.
This method is not glamorous, but it’s dependable. In the real world, “dependable” beats “fancy” almost every time.
Way 4: Use Speakerphone + Record with a Computer (Mac QuickTime Method)
If you want longer recordings, easier file organization, and fewer “Where did that audio go?” moments, a computer can be your best friend.
On a Mac, QuickTime Player can record audio from your microphone with a couple clicks.
You’re essentially capturing the speakerphone conversation using the Mac’s mic (or an external mic for better clarity).
Best for
- Long interviews
- Work calls where you want easy saving, labeling, and backups
- Cleaner recordings using a better microphone
Step-by-step on a Mac (QuickTime Player)
- Start your call on iPhone and switch to Speaker.
- On your Mac, open QuickTime Player.
- Go to File > New Audio Recording.
- Click the small arrow/options menu to pick a microphone (built-in or external).
- Press Record and keep the Mac reasonably close to the iPhone.
- When done, click Stop, then save the file with a clear name.
Upgrade the sound (optional, but worth it)
- External mic: Even an affordable USB mic can improve clarity compared to a laptop mic.
- Positioning: Place the iPhone and mic so both speakers are captured evenly.
- Keep notifications quiet: Silence your iPhone notifications so your recording doesn’t include 47 pings and a surprise “DING!”
Bonus: once your recording is on a computer, it’s easier to back up, share securely, and store in a project folder with related notes.
Troubleshooting and FAQs
“I don’t see Call Recording in the Phone app. Now what?”
If the built-in option isn’t present, it may not be available for your device, region, language, or iOS version.
In that case, use Way 3 (speakerphone + another device) or Way 4 (computer recording), which don’t rely on that feature at all.
“Will the other person know I’m recording?”
With Apple’s built-in call recording and Google Voice recording, yesan audio notice is played.
Even if you’re in a one-party consent state, it’s still a good practice to get clear permission. It keeps trust intact and reduces legal risk.
“Can I record outgoing calls without installing an app?”
Yes. Way 3 and Way 4 work for outgoing calls because you’re recording the speakerphone audio externally.
If your iPhone has the built-in call recording feature available, that can also work for outgoing calls.
“What about FaceTime?”
FaceTime is a different beast than standard phone calls.
If your goal is recording a regular phone call, stick with the four methods above.
If you’re recording any kind of call, the consent rule still applies: tell the other person, get a “yes,” and respect a “no.”
Conclusion: Pick the Method That Fits Your Call (and Your Comfort Level)
If your iPhone supports built-in call recording, that’s usually the smoothest option: it’s integrated, transparent, and saves neatly into Notes.
If you mainly need inbound recordings, Google Voice can do the job with a clear announcement.
And if you want a “works almost anywhere” approachespecially for outgoing callsspeakerphone recording with another device or a computer is the reliable fallback.
The best call recording setup is the one you can repeat without stress:
get consent, press record, label the file, and move on with your life.
Future-you will be gratefuland may even stop texting present-you, “Wait what did they say again???”
(No promises.)
Real-World Experiences: What It’s Like Using These 4 Methods
Guides make call recording sound tidy: tap a button, save a file, done. Real life is a little messierbecause real calls happen in cars,
busy kitchens, noisy offices, and moments when you’re already juggling ten things. Here are some realistic “what people learn the hard way”
experiences that can help you avoid common pitfalls.
1) The “I recorded it… where did it go?” moment
People often assume recordings will land in the Voice Memos app because that’s the iPhone’s most obvious recording tool.
With Apple’s built-in call recording, recordings save to the Notes app in a Call Recordings folder.
The first time someone uses it, they may open Voice Memos, see nothing, and briefly consider whether their phone is gaslighting them.
The fix is simple: open Notes, look for the Call Recordings folder, and rename the note right away (for example: “2026-01-29 Dentist Instructions”).
Labeling early prevents the classic “Call Recording (3)” mystery file situation.
2) The “announcement surprise” and why it’s actually helpful
Both Apple and Google Voice use an audio notice that recording is happening. Some people worry the announcement will derail the call.
In practice, it often improves the conversation: the other person feels respected, everyone is clearer, and the “consent moment” is handled upfront.
The best real-world approach is to say something like, “You’ll hear a quick recording noticejust confirming you’re okay with that.”
That tiny sentence prevents confusion and avoids awkward pauses like, “Uh… what did that robot voice just say?”
3) Speakerphone recordings: the echo battle is real
The most common experience with Way 3 (speakerphone + another device) is discovering how loud your environment really is.
Air vents, keyboards, street noise, and even a humming refrigerator can make voices harder to understand.
People who get the best results do three small things: (1) they move to a quieter room, (2) they avoid echo chambers like bathrooms or empty rooms,
and (3) they place the recording device close enough to capture both sides clearly without blasting the speaker.
A quick five-second test recording before the “important part” starts is the difference between “crystal clear” and “sounds like a submarine.”
4) Longer calls feel safer on a computer
For interviews or work calls, many people prefer Way 4 (Mac + QuickTime) because it feels more stable and organized.
Saving a file directly into a project folder (with the date in the filename) reduces the chance you’ll lose it in a sea of screenshots and memes.
Another real benefit: if you’re taking notes on your computer anyway, having the audio there makes follow-up easier.
The most common “aha” moment is realizing that a slightly better microphone (even a basic USB mic) can dramatically improve intelligibility,
especially when one speaker talks quietly or has a soft voice.
5) The best habit isn’t recordingit’s post-call organization
The biggest real-world win is building a 30-second routine after each recorded call:
rename the file, add a one-line summary (“next steps: send forms by Friday”), and store it in one consistent place.
People who skip this step end up with recordings they never listen to because they can’t remember which file contains which detail.
People who do it once become the kind of organized wizard everyone secretly wants to be.
Bottom line: the “best” method depends less on tech and more on context. If you’re on the go, speakerphone + a second device is fast and flexible.
If you’re at a desk, computer recording is tidy and reliable. And if your iPhone offers built-in call recording, that’s usually the smoothest daily driver.
No matter which method you choose, transparency and consent keep the whole thing stress-freeand let you focus on the call, not the legal fine print.


