Table of Contents >> Show >> Hide
- What counts as a “load-bearing post” (and why the repair is never just cosmetic)
- Before you “fix” anything: decide whether you’re repairing, reinforcing, or replacing
- Permits, codes, and the “please don’t skip this” part
- Tools and materials you’ll actually use (not the “I bought this for confidence” list)
- Step-by-step: the safe DIY sequence (the order matters more than the tools)
- Step 1: Confirm the load path and what’s actually bearing on the post
- Step 2: Build temporary support that can carry the load (not “sort of” carry it)
- Step 3: Lift only as much as you needand do it slowly
- Step 4: Remove the damaged post (hands out of the danger zone)
- Step 5: Fix what caused the failure (or you’ll be back here)
- Step 6: Install the new post correctly (plumb, centered, properly connected)
- Step 7: Transfer the load back and remove the temporary supports
- Two real-world examples (because houses love context)
- Base details that prevent rot (and keep inspectors calm)
- Common DIY mistakes (aka “things that look fine until they really don’t”)
- DIY vs. pro: a practical decision guide
- Experience section: what DIYers usually learn the hard way (so you don’t have to)
- Wrap-up: the safest DIY mindset
- SEO tags (JSON)
A load-bearing post is one of those home components that never asks for attention… until it does.
When it’s solid, nobody notices. When it’s rotted, rusted, split, leaning, or sinking, suddenly
every door in the house starts “expressing feelings,” your floors get bouncy, and you discover
new cracks you swear weren’t there yesterday.
Important safety reality check: This is a structural repair. Your goal isn’t “make it look nicer.”
Your goal is “keep the load path intact so your house stays a house.” If you’re not confident
about shoring and jacking, or if there’s major sagging, foundation movement, or extensive rot,
bring in a licensed structural pro. DIY is great; DIY + gravity is… picky.
What counts as a “load-bearing post” (and why the repair is never just cosmetic)
A load-bearing post (also called a structural post or column) transfers weight from abovebeams,
girders, porch roofs, or multi-story wallsdown into something that can carry it: a footing, pier,
foundation wall, or properly designed slab area.
When a post fails, the load doesn’t disappear. It simply finds the next-worst path, like joists that
were never meant to be heroes or a floor slab that’s suddenly doing an impression of a potato chip.
Common places you’ll find structural posts
- Basements and crawlspaces under a main beam (steel column, Lally column, or wood post)
- Porches supporting a header/beam and roof load (wood or composite-wrapped column)
- Garages where a beam spans a wide opening
- Interior “open concept” remodel areas (posts replacing removed walls)
Signs the post needs real attention
- Visible rot at the base, soft wood, insect damage, or punky fibers
- Rust at the bottom of a steel column (especially where it meets concrete)
- Crushing/splitting at the top where it meets the beam
- Post out of plumb, beam sagging, or floors sloping toward the post
- Cracks forming above (drywall, plaster, trim gaps, sticking doors/windows)
Before you “fix” anything: decide whether you’re repairing, reinforcing, or replacing
People say “repair” when they really mean one of three jobs. Pick the right one and you’ll sleep better.
Pick the wrong one and you’ll be re-doing the projectpossibly while whispering apologies to your
home inspector.
1) Repair (limited damage, structure still sound)
Example: a porch post that’s mostly solid but has localized rot at the bottom few inches from
splashback. In that case, you may be able to cut out the rot and patch/replace the base section,
then improve drainage and install a rot-resistant base detail.
2) Reinforce (post is intact but compromised or undersized)
Example: a wood post with splitting that’s stable, not rotted, and the load is modestreinforcement
can sometimes buy time. But for many structural posts, reinforcement is a “temporary peace treaty,”
not a forever solution.
3) Replace (rot, significant rust, wrong post type, or poor bearing)
Example: rusted or hollow steel columns in old basements, or a post sitting on a thin slab with no real
footing. Replacement often means adding proper support underneath (footing/pier) so the new post has
something worthy of its job description.
Permits, codes, and the “please don’t skip this” part
Many jurisdictions treat structural work as permit-required. Even if you’re swapping a post “in the same place,”
the work still affects the structural system. Check with your local building department before you start.
Also, code concepts matter for durability: wood posts in basements or exposed areas typically need protection
from moisture, either via preservative-treated wood or by keeping the wood separated from concrete with an
approved pedestal/standoff detail.
Tools and materials you’ll actually use (not the “I bought this for confidence” list)
Temporary support and lifting
- Adjustable steel support posts (for temporary shoring) and/or screw jacks
- Hydraulic bottle jack (common for porch work) or a heavy-duty jack where appropriate
- 4×4 or 6×6 temporary posts (straight, solid lumber)
- 2×10 or similar strong top plate/spreader board (to distribute load and avoid crushing finishes)
- Blocking/cribbing (stacked timbers) and steel plates or thick plywood to spread jack loads
- Level, plumb bob, and shims
Permanent repair/replacement
- New post/column: pressure-treated wood, engineered wood, or a rated steel column/Lally column
- Post base or standoff connector (keeps wood off concrete)
- Anchors/fasteners appropriate for concrete and connectors (and corrosion resistance where needed)
- Beam/post cap hardware or top connection method (as required for stability and uplift in some cases)
- Concrete mix (only if you’re building/repairing a pier or small patchfootings often need pro design)
- Moisture barrier materials and exterior-grade sealants/paint (for porch posts)
Step-by-step: the safe DIY sequence (the order matters more than the tools)
Whether you’re fixing a porch column or a basement post, the “safe” version of the job follows the same logic:
support first, lift slightly, remove/repair, install properly, then transfer load back.
Step 1: Confirm the load path and what’s actually bearing on the post
- Identify the beam/header above and where it carries load (roof framing, joists, walls above).
- Look at the bottom: is the post on a real footing/pier, or just sitting on a thin slab?
- If you find cracking, settling, or no clear footing under a major beam, pause and consider a pro consult.
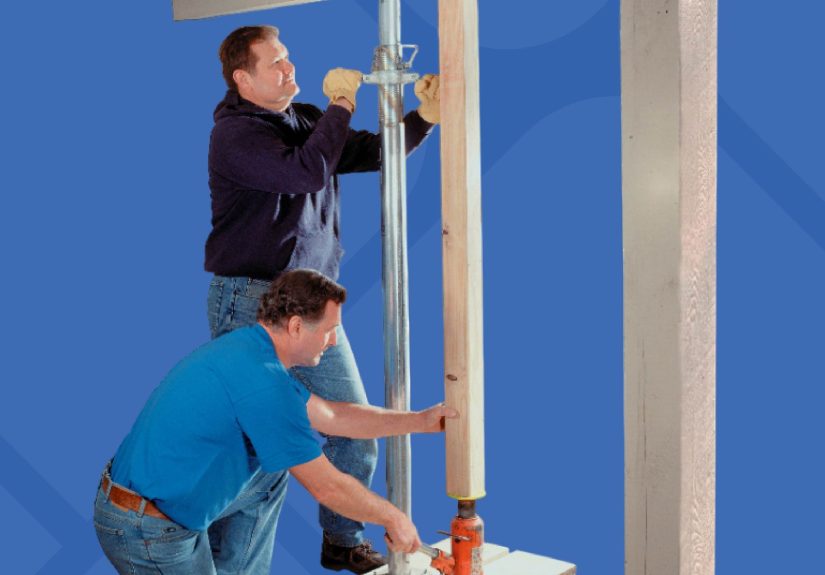
Step 2: Build temporary support that can carry the load (not “sort of” carry it)
The two common DIY approaches:
-
Temporary brace wall (great for interior/beam work): frame a short wall parallel to the load area,
using a strong top plate to spread the load and friction-fit studs so it’s snug and plumb. -
Cribbing + jacks + temporary posts (common in basements/crawlspaces): build stable blocking under jacks
so the load doesn’t punch into concrete or soil.
Tip that saves ceilings (and your nerves): Use a thick top plate/spreader so the temporary support doesn’t
crush drywall or dent wood fibers. Think “snowshoes,” not “stiletto heels.”
Step 3: Lift only as much as you needand do it slowly
The goal is usually to relieve pressure so the damaged post can be removed and replacedoften just enough
to loosen it. If you’re trying to correct sag, go slowly; rapid lifting can crack finishes and stress framing.
- Start with tiny lifts: you’re looking for “load off,” not “house levitation.”
- Watch for movement above: new cracks, popping sounds, doors binding.
- If you’re correcting sag, many pros advise gradual adjustments (small increments per day).
Step 4: Remove the damaged post (hands out of the danger zone)
Once the load is supported elsewhere and the post is relieved:
- Cut fasteners/connectors if present.
- Remove trim/wraps if it’s a decorative column.
- Cut out the damaged section (porch) or remove the full column (basement).
- Never reach under a loaded beam or between a jack and its bearing surface.
Step 5: Fix what caused the failure (or you’ll be back here)
Posts typically fail because of one of these: moisture, poor bearing/footing, wrong materials, or movement.
Your repair should include a prevention upgrade:
- Moisture: improve drainage, gutters, splashback control, and ventilation
- Concrete contact: add a standoff post base or pedestal detail
- Rust: keep steel out of chronic wet zones; address basement water intrusion
- Footing issues: don’t “upgrade the post” while leaving the bottom support inadequate
Step 6: Install the new post correctly (plumb, centered, properly connected)
- Measure carefullyposts should fit snugly without forcing the beam upward unexpectedly.
- Set the post plumb and centered under the beam.
- Use the correct base: wood should be separated from concrete with a standoff/connector when required.
- Secure top/bottom as appropriate for stability (especially in areas with lateral forces or uplift concerns).
Step 7: Transfer the load back and remove the temporary supports
- Lower jacks/supports gradually until the new post is carrying the load.
- Re-check plumb and contact points.
- Remove temporary walls/posts only after you’re confident the permanent support is stable.
- Monitor over the next days/weeks for new cracks or movement.
Two real-world examples (because houses love context)
Example 1: Rotted porch post at the base
Scenario: The porch column looks fine until you poke the bottom and it feels like wet cardboard.
The rot is localized near the base from splashback and trapped moisture.
Smart approach:
- Support the porch roof/header with temporary posts and a bottle jack on each side of the column.
- Lift slightlyjust enough to free the damaged section.
- Cut away the rotten portion cleanly, square, and level.
- Install a rot-resistant base detail and improve drainage/splash management so it doesn’t repeat.
The “secret” to porch posts is that water always wins unless you make it leave. Give it slope, air, and a path away.
Example 2: Rusted basement steel column under a main beam
Scenario: A steel support post shows heavy rust at the bottom. The beam above has a mild sag. The post appears to be sitting on an old slab,
and you’re not sure there’s a proper footing below.
Smart approach:
- Shore the beam with cribbing, jacks, and temporary posts set up on a stable base that spreads the load.
- Lift just enough to unload the column so it can be removed safely.
- Confirm what’s underneath. If there’s no proper footing, the “right” repair may include adding one (often a pro-designed step).
- Install a permanent-rated column, correctly seated and secured.
Base details that prevent rot (and keep inspectors calm)
The base is where posts go to dieespecially wood. Two best practices go a long way:
- Keep wood off concrete: use a standoff post base or pedestal detail.
- Control moisture: fix drainage, splashback, and basement water entry.
In many cases, code language focuses on protecting wood columns in basements and exposed locations, either by using preservative-treated wood or by
elevating the wood above concrete with an approved projection/standoff detail.
Common DIY mistakes (aka “things that look fine until they really don’t”)
-
Leaving temporary jack posts as permanent structure: some adjustable or “split” posts are intended only for temporary support.
If you need a permanent column, use a product rated and approved for permanent structural use. - Jacking too fast: fast lifts can crack walls and shift loads in unpredictable ways.
- Point-loading a slab: a jack on a small base can punch into concrete or soil. Spread the load with plates/cribbing.
- Fixing the post but ignoring the cause: if water caused rot, the “repair” must include water control.
- Guessing on footings: a strong post on a weak bearing surface is still a weak support system.
DIY vs. pro: a practical decision guide
| Situation | DIY-friendly? | Why |
|---|---|---|
| Minor porch base rot with solid post above | Often yes (with careful shoring) | Load is accessible and the repair can be localized |
| Basement post replacement with known, solid footing | Sometimes | Still structural, but straightforward if bearing is correct |
| Major sagging beam, unknown footing, foundation cracks | Usually no | Needs diagnosis and often engineered repair details |
| Multiple posts, wide spans, or remodel changes | Often no | Higher risk; sizing and load paths matter |
Experience section: what DIYers usually learn the hard way (so you don’t have to)
The first time you repair a load-bearing post, the weirdest part is how quiet the job looks compared to how important it is.
You’re not building a deck or tiling a backsplash. You’re basically negotiating a temporary truce with gravity.
One lesson that comes up again and again: prep is the project. The cutting, patching, and installing feels like the “main event,”
but the real success comes from how thoughtfully you shore the load, how stable your jack setup is, and how patient you are while lifting.
If you rush the support work, the rest of the job becomes a suspense movie you didn’t mean to rent.
Another big “aha” moment is realizing that the post isn’t always the villain. A lot of posts rot because water keeps landing in the same place,
or because the bottom of the post was installed in a way that traps moisture. Once you see it, it’s obvious: paint peeling at the base,
caulk lines that act like little dams, concrete that stays damp, or a porch roof that drips exactly where your post has to stand all day.
You can replace the post perfectly and still lose if you don’t change the conditions that caused the damage.
Basement posts have their own personality. You’ll often discover that what you thought was a “nice solid slab” is actually thin concrete with
mystery patchwork, or that the old column is sitting on something that looks suspiciously like “rocks somebody threw in a hole in 1958.”
That doesn’t mean you have to panicbut it does mean you should slow down, investigate, and be willing to upgrade the bearing surface.
The strongest column in the world won’t help if it’s standing on a weak base.
A practical tip from people who’ve done this more than once: lift less than you think. Most of the time, you only need to lift enough
to take the load off the damaged post so you can remove it. Going for “perfect level” can create new stress elsewhere, especially in older homes
that have settled into their own version of “normal.” The more you chase perfection, the more likely you are to create cracking, shifting,
or a door that suddenly won’t closeright when you’re already tired and covered in sawdust.
Finally, the emotional journey: you will have at least one moment where you stare at the temporary supports and think,
“Is this… actually enough?” That moment is useful. It’s your brain asking you to verify plumb, verify bearing, verify load spreading,
and double-check every point where something could slip. When you’re dealing with a structural column repair, confidence is greatbut
verification is better. And when you finish, the best feeling isn’t the new post. It’s the quiet: no creaks, no new cracks, and the
comforting sense that your house is once again standing on something you trust.
Wrap-up: the safest DIY mindset
Repairing a load-bearing post is absolutely doable for skilled DIYersif you treat it like a structural job, not a carpentry shortcut.
Support the load first, lift only what you need, install a permanent-rated post on proper bearing, and fix the moisture/footing issues that caused
the failure. Do that, and your house will go back to doing what houses should do: silently holding your life together.


