Table of Contents >> Show >> Hide
- First: What Wind Damage Looks Like on Asphalt Shingles
- Safety Reality Check (Yes, It Matters)
- Quick Triage: Repair vs. Replace vs. Call a Pro
- Tools and Materials for Asphalt Shingle Repair
- Step-by-Step: How to Seal Down Lifted Shingles (No Crease, No Tear)
- Step-by-Step: How to Replace a Missing or Damaged Asphalt Shingle
- Special Situations Wind Loves to Target
- How to Document Wind Damage (Helpful for Repairs and Insurance)
- Common Mistakes That Turn a Simple Repair Into a Leak
- Prevention: How to Make Wind Damage Less Likely Next Time
- Conclusion
- Real-World Experiences: What Wind Shingle Repairs Are Actually Like (and What People Learn Fast)
Wind has one job: to move air around. But when it gets ambitious, it tries a side hustle as a home remodelerstarting with your roof shingles. The good news: a lot of wind damage on an asphalt shingle roof is repairable without tearing off the whole thing. The not-so-fun news: roofs are high, slippery, and absolutely not the place to test your balance like it’s a video game.
This guide walks you through how to repair wind damaged asphalt roof shingles the smart wayby identifying what kind of damage you have, choosing the right repair (seal, replace, or call in the pros), and doing it in a way that doesn’t create new problems like leaks, cracked tabs, or “mystery nails” in your driveway.
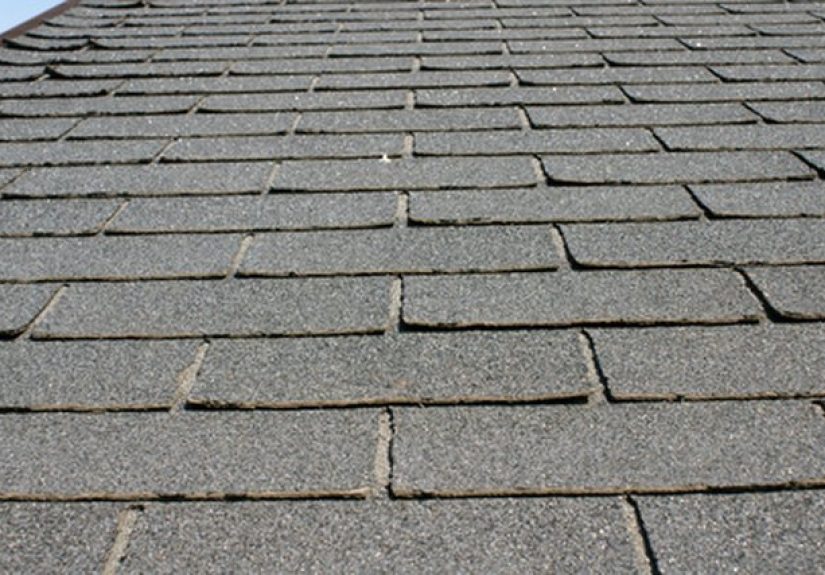
First: What Wind Damage Looks Like on Asphalt Shingles
Wind damage isn’t always dramatic. Sometimes it’s a single lifted tab. Sometimes it’s a missing shingle that’s now living in your neighbor’s yard like it pays rent. Here are the most common signs you’ll see:
Lifted or unsealed shingle tabs
The bottom edge of a shingle tab can lift when the seal strip doesn’t bond well (cold temps, dust, shade) or when wind sneaks under the edge and pries it up. A lifted edge exposes more surface area, which makes the next gust more effectivelike giving the wind a bigger handle to grab.
Creased, torn, or “flapped” tabs
If a tab bends up and then folds back down, it can crease. Creases are a big deal because they weaken the shingle mat and can let water in. Torn tabs are also a replacement situation, not a “let’s dab some goo and hope” situation.
Missing shingles or exposed underlayment
If you can see black underlayment, bare decking, or rows that look “bald,” that’s urgent. Wind-driven rain doesn’t need much of an opening.
Granule loss and bare spots
Some granules in gutters are normal over time. But obvious bald patches after a storm can mean the shingle took a beating, which shortens its life.
Safety Reality Check (Yes, It Matters)
Before we get into tools and steps, this is the part where we keep you out of the emergency room.
- Inspect from the ground first. Use binoculars or your phone’s zoom.
- Avoid roof work if it’s wet, icy, very steep, or windy.
- Use a stable extension ladder set at a safe angle and extending above the roof edge for a secure handhold.
- When in doubt, hire a licensed roofing contractor. Many roof problems look small until you get closer and realize the issue is flashing, underlayment, or deckingnot just a shingle.
Quick Triage: Repair vs. Replace vs. Call a Pro
You can usually repair (seal down) when:
- Tabs are lifted but not creased or torn.
- The shingle is still flexible (not brittle from age).
- The damage is limited to a small area.
You should replace shingles when:
- A shingle is missing, cracked, or torn.
- A tab is creased from bending (even if it looks “okay-ish” from far away).
- Nails are backed out, the shingle is sliding, or the mat is damaged.
You should call a pro (seriously) when:
- Damage is widespread across multiple slopes.
- You see damaged flashing near chimneys/vents/walls.
- The roof is steep, high, or you’re not comfortable up there.
- You suspect hail + wind combined (insurance and documentation get more complex).
Tools and Materials for Asphalt Shingle Repair
You don’t need a truck full of gear, but you do need the right basics.
Common tools
- Flat pry bar (or a shingle ripper)
- Hammer
- Utility knife with hook blades (handy for shingles)
- Caulk gun (if using roofing cement in a tube)
- Measuring tape and chalk line (optional but helpful)
- Work gloves + eye protection
Common materials
- Matching replacement shingles (same style/color if possible)
- Roofing nails (corrosion-resistant; match the type/length used on your roof)
- Asphalt roofing cement / plastic roof cement (use a product appropriate for shingles)
Pro tip: If you don’t have spare shingles, check your attic, garage, or shed. Many homes have leftovers from the last roof job. If not, you can often find a close matchjust know that sun-fading means “perfect” might be impossible.
Step-by-Step: How to Seal Down Lifted Shingles (No Crease, No Tear)
This is the fix for tabs that lifted but didn’t get folded or torn. Your goal is to restore the seal so wind can’t keep getting underneath.
- Choose the right day. Mild, dry weather is best. Extreme cold can make shingles stiff and easier to crack; extreme heat makes them soft and scuff-prone.
- Gently lift the tab. Use a flat bar carefully if needed, but don’t force it. You’re creating access, not starting a shingle origami hobby.
- Apply roofing cement under the tab. Use small spots rather than smearing a whole tube like you’re frosting a cake. Focus near corners/edges where wind gets leverage.
- Press the tab down firmly. Hold pressure for a few seconds. If you can safely place a small, flat weight for a short time, that can help (don’t leave objects that can slide off or damage granules).
- Seal only what needs sealing. Over-sealing can trap moisture and dirt. The goal is a secure bond, not a tar sculpture.
Important: If the tab is creased, replace the shingle instead of sealing it. Sealing a crease is like taping a cracked phone screen and calling it “waterproof.” It’s optimistic, but not reliable.
Step-by-Step: How to Replace a Missing or Damaged Asphalt Shingle
Replacing a single shingle is a classic DIY repairif the roof is safe to access and the surrounding shingles aren’t brittle.
1) Break the seal above the damaged shingle
Carefully lift the shingle tabs above the damaged one. Most asphalt shingles are sealed with a factory strip, so you’ll need gentle pressure to separate them without tearing.
2) Remove the nails holding the damaged shingle
Slide your flat bar under the shingle and locate the nail heads. Lift nails out carefully. You may also need to remove nails from the course above if they pin the damaged shingle in place.
3) Slide the old shingle out
Once nails are out, the shingle should pull free. Scrape off excess old adhesive if it’s creating a bump.
4) Slide the new shingle into position
Align it with the surrounding shingles. Make sure the bottom edge lines up with the course so the reveal matches.
5) Nail it correctly
Use the same nail pattern your roof uses (commonly four nails for standard conditions, more in higher-wind applications depending on the shingle and code). Place nails in the manufacturer’s nailing zone so they’ll be covered by the course above and will hold properly.
6) Reseal the tabs
Apply small dabs of roofing cement under the tabs you lifted earlier and press them down. This helps restore the wind-resistant seal, especially if conditions are cool or dusty.
Special Situations Wind Loves to Target
Ridge caps and hips
Wind often attacks ridges and hips because they’re the “edges” of the roof system. If ridge caps are loose, cracked, or missing, they should be repaired promptlythese areas can allow water in fast.
If ridge shingles are not sealing well due to weather or wind exposure, hand-sealing is often recommended by manufacturers using small spots of asphalt roof cement under corners/edges, following product guidance.
Rakes and eaves
Edges can be vulnerable if starter shingles, drip edge, or sealing is poorly installed. If damage repeats in the same edge area, the real issue may be the edge systemnot the individual shingle that keeps flying away like it’s late for an appointment.
Valleys and flashing transitions
If wind damage happens near a valley, chimney, wall, skylight, or vent, treat it like a higher-stakes repair. These areas rely heavily on flashing details. If you’re not experienced, this is where calling a roofer is usually the best money you’ll spend.
How to Document Wind Damage (Helpful for Repairs and Insurance)
Even if you plan to repair it yourself, documentation is smart. If you’re filing a claim, it’s essential.
- Take wide and close-up photos from multiple angles.
- Capture both exterior and any interior signs (ceiling stains, attic dampness).
- Save receipts for emergency materials or temporary fixes.
- Don’t throw away damaged materials immediately if you may need evidence.
Common Mistakes That Turn a Simple Repair Into a Leak
Using too much roofing cement
More isn’t better. Heavy blobs can telegraph through shingles, trap debris, and look like your roof grew warts.
Nailing too high or too low
Wrong nail placement can reduce wind resistance and cause blow-offs. Stick to the shingle’s intended nailing zone and pattern.
Trying to “fix” a crease
Creased shingles are structurally compromised. Replace them.
Working in bad conditions
Wet shingles are slippery. Cold shingles crack. Hot shingles scuff and tear. Pick your moment.
Prevention: How to Make Wind Damage Less Likely Next Time
- Keep the roof clean: Remove debris that can lift tabs or block drainage.
- Trim overhanging branches: Limbs become storm weapons.
- Check attic ventilation: Heat and moisture can age shingles faster, making them more wind-vulnerable.
- Use proper sealing techniques in marginal conditions: Cold, dust, shade, and high-wind exposures can delay sealinghand-sealing may be recommended depending on manufacturer guidance.
- Schedule periodic inspections: Especially after major storms.
Conclusion
Repairing wind damaged asphalt roof shingles is mostly about choosing the right response to the right damage. Lifted tabs without creases can often be resealed with care. Missing, cracked, or creased shingles should be replaced. And if the damage is widespreador involves flashing, steep slopes, or questionable safetygetting a professional roofer involved is the smartest “repair” you can make.
Do it promptly, do it safely, and don’t let one loose tab turn into a full-on leak. Because the only thing worse than wind damage is wind damage plus water damage. That combo is how home repair budgets learn to scream.
Real-World Experiences: What Wind Shingle Repairs Are Actually Like (and What People Learn Fast)
In the real world, wind shingle repair usually starts the same way: somebody notices a little something that looks “off” from the driveway, and then suddenly everyone in the household becomes a rooftop detective. People often expect wind damage to be obviouslike half the roof peeled back like a sardine can. But most of the time, it’s sneakier: a few tabs lifted along a rake edge, a ridge cap that’s shifted, or one lonely shingle missing that makes the whole roof look like it has a missing tooth.
A common experience is realizing that the damage you can see isn’t always the damage that matters most. Homeowners will spot one lifted tab, climb up (or call someone to climb up), and discover the real issue is that several tabs never sealed properlyespecially on shaded sections or areas that stay dusty. That’s when people learn why manufacturers talk so much about sealing and why repairs often include carefully re-sealing tabs instead of only swapping a shingle. It’s less “replace the broken piece” and more “restore the system.”
Another frequent lesson: matching shingles is harder than it sounds. Even if you know the brand and color name, sun and weather change the look over time. People who repair a roof that’s been baking in the sun for eight years often find that the “same” shingle looks noticeably newer. The roof isn’t ruined, but the patch can stand out. That’s why experienced roofers (and experienced DIYers) try to use leftover shingles from the original install when possible, or they harvest a few from a less-visible spot (like behind a chimney) and place the “newer-looking” shingles where they won’t be as obvious.
People also learn quickly that timing matters. Doing a small shingle replacement when it’s too cold can turn into a cracked-tab festival if the shingles are stiff. Doing it in the blazing heat can scuff granules and make shingles feel soft and easy to damage. Many homeowners describe the “perfect repair day” as mild, dry, and calmbecause wind plus wind-damage repair is like arguing with your opponent while they’re actively throwing your tools into the yard.
One of the most useful real-life habits is taking photos before touching anything. Even if you’re not sure you’ll file an insurance claim, photos help you remember what was wrong and where it was. People who skip this step often finish a repair and then wonder, “Wait… was that the only spot?” Photos also help when you call a roofer lateryou can show them exactly what the roof looked like right after the storm.
Lastly, many homeowners come away with a new respect for roof edges and ridges. Wind loves those areas, and repeat blow-offs often point to edge details, starter strips, or sealing problems rather than “bad luck.” Once people repair a couple of tabs and they stay down through the next storm, they realize something important: a good roof isn’t just shingles. It’s shingles installed, fastened, and sealed the way the whole system expects. And when that system is restored, wind usually goes looking for someone else’s loose tabs to bully.