Table of Contents >> Show >> Hide
- Before You Start: Pick Your Goal (and Your Layout)
- Your Shopping-and-Setup Checklist
- Step 1: Choose Your Main Listening Position (MLP)
- Step 2: Place the Front Stage (Left, Center, Right)
- Step 3: Place Surround Speakers (5.1 and 7.1)
- Step 4: Add Height Speakers (Optional, but Fun)
- Step 5: Put the Subwoofer Where It Sounds Best (Not Where It Looks Best)
- Step 6: Wire Everything (Cleanly, Safely, and Without Regret)
- Step 7: Connect Your TV and Sources (HDMI ARC/eARC Made Simple)
- Step 8: Configure the Receiver (Speaker Size, Crossover, Distances)
- Step 9: Run Auto-Calibration (Audyssey, YPAO, AccuEQ, DCAC, Dirac)
- Step 10: Do a Real-World Listening Test (and Fine-Tune)
- Room Acoustics: The “Free Performance Upgrade” People Ignore
- Troubleshooting: Fix the Most Common Surround Sound Problems
- Three Example Setups (Because Real Rooms Are Messy)
- Conclusion: Your Room, Your RulesBut Use the Rules That Work
- Real-Life Experiences: What Setup Day Actually Feels Like (and Why That’s Normal)
You don’t need a secret handshake (or a dedicated cinema room) to get legit surround sound at home. You need a plan,
a little patience, and the willingness to crawl on your floor at least once like you dropped a contact lens. (That’s
the subwoofer “crawl.” It’s real. It’s weird. It works.)
This guide walks you through choosing the right layout, placing speakers correctly, wiring everything cleanly,
running auto-calibration, and fixing the most common “why does it sound like dialogue is coming from the hallway?”
problems. By the end, you’ll have a home surround sound setup that feels immersive, balanced, and satisfyingly
cinematicwithout turning your living room into a cable museum.
Before You Start: Pick Your Goal (and Your Layout)
“Surround sound” is an umbrella term. The best system is the one that matches your room, your budget, and how much
you enjoy drilling holes. Here are the common home theater surround layouts:
Quick decoder: What the numbers mean
- 3.1 = Front Left + Center + Front Right, plus a subwoofer (great starter setup)
- 5.1 = 3.1 plus two surround speakers (most common “real surround sound” setup)
- 7.1 = 5.1 plus two rear surrounds (better wraparound effects if you have space behind seating)
- 5.1.2 / 5.1.4 = 5.1 plus overhead/height speakers for Dolby Atmos-style height effects
If you’re new: start with 5.1. It’s the sweet spot for immersion, cost, and room-friendliness.
You can often expand later if your receiver supports more channels.
Your Shopping-and-Setup Checklist
To set up a surround sound speaker system at home, you’ll typically need:
- AV receiver (AVR) with enough channels for your target layout (5.1, 7.1, 5.1.2, etc.)
- Speakers: front left/right, center, surrounds (and heights if using Atmos)
- Subwoofer (powered, almost always)
- Speaker wire (proper gauge for your run length) and optional banana plugs
- HDMI cable (especially if using HDMI ARC/eARC between TV and receiver)
- Mounts/stands if speakers need elevation or wall placement
- Calibration mic (usually included with the receiver) and ideally a tripod
Two “please don’t skip this” reality checks
- Choose the main listening position first. Surround placement is based on where your ears actually are.
- Room layout matters as much as gear. A modest system placed well can beat a fancy system placed badly.
Step 1: Choose Your Main Listening Position (MLP)
The main listening position is the seat you care about most. Pick one. This is the spot your system
will be timed and balanced around.
Ideal world: your couch is not smashed against the back wall, and your TV wall is centered. Real world: you have a
doorway, a dog bed, and a plant that refuses to move. That’s finejust be consistent and plan around the MLP.
Step 2: Place the Front Stage (Left, Center, Right)
The front three speakers do most of the heavy liftingmusic, effects, and especially dialogue. Get these right and
everything else becomes easier.
Front Left/Right
-
Make a triangle: Place the left and right speakers roughly equal distance from your seat, forming a
loose equilateral triangle with the MLP. - Toe-in gently: Angle them slightly toward your main seat for clearer imaging (don’t overdo it at first).
- Height: Aim for tweeters around seated ear height when possible.
Center speaker (the dialogue MVP)
- Put it as close to the TV as possible, ideally directly below or above the screen.
- Aim it at your ears. If it sits low in a console, tilt it up. If it’s above the TV, tilt it down.
- Don’t bury it in a cabinet behind a door or deep shelfdialogue will sound muffled and “boxy.”
Tip: If your center is on a media stand, pull it toward the front edge. Reflections off the shelf surface can mess
with clarity more than people expect.
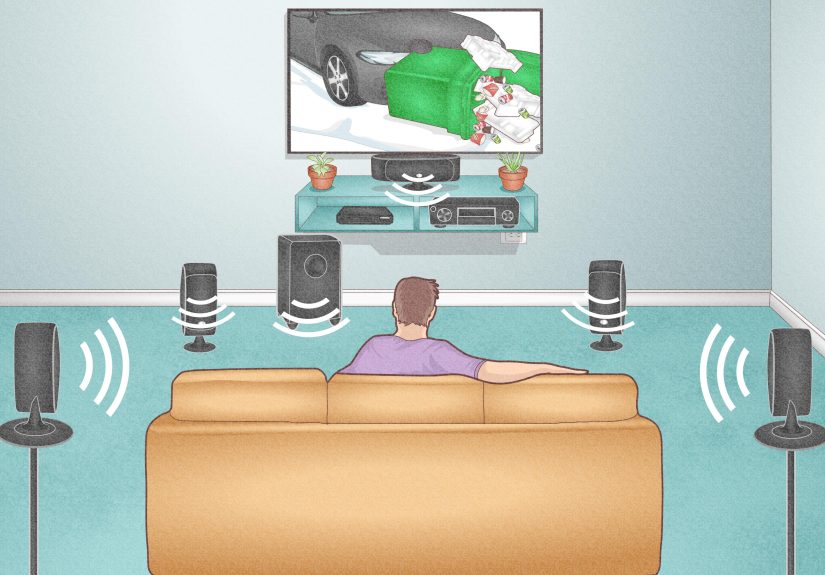
Step 3: Place Surround Speakers (5.1 and 7.1)
Surround speakers create the “you are inside the scene” effectwind, crowd noise, cars whooshing by, and that one
jump-scare sound designer who deserves a timeout.
For a 5.1 surround sound setup
- Best spot: To the left and right of your seating area, roughly even with (or slightly behind) the MLP.
-
Height: Ear level is good; 1–2 feet above ear level can be even better in many rooms to
help create a more diffuse surround field. - Angle: Aim them toward the listening area if possible.
For a 7.1 surround sound setup
- Side surrounds go left/right of the seating area (similar to 5.1).
- Rear surrounds go behind the seating area, spaced apart and angled toward the MLP.
If your couch is against the back wall, you can still do 5.1. Mount surrounds slightly above ear level and angle them
toward the seating area. For 7.1, rear surrounds become tricky when there’s no space behind youthis is where 5.1.2
(adding height speakers) can sometimes be a better upgrade than forcing 7.1 into a tight room.
Step 4: Add Height Speakers (Optional, but Fun)
If you’re building a Dolby Atmos-style system (like 5.1.2 or 5.1.4), you’ll add height channels.
These can be in-ceiling speakers, on-ceiling speakers, or upward-firing modules.
Height speaker placement basics
- Prioritize symmetry: keep left/right heights mirrored as much as possible.
-
Start with front heights if you only have one pair (5.1.2). Many setups place the first height pair
toward the front half of the room. - Avoid extremes: Don’t jam heights into corners. Keep them aligned to create a believable overhead image.
If your room can’t support ceiling speakers, upward-firing modules can work best with flat, not-too-high ceilings and
careful positioning. They’re a “physics compromise,” but still capable of a wow moment in the right room.
Step 5: Put the Subwoofer Where It Sounds Best (Not Where It Looks Best)
Subwoofer placement is the part where your room starts acting like a mischievous wizard. Bass doesn’t behave like
normal sound. The same subwoofer can sound tight in one spot and like a washing machine full of sneakers in another.
The subwoofer crawl (the weird trick that actually helps)
- Place the subwoofer at or near your main listening position (yes, your couch seat).
- Play a repeating bass-heavy track or familiar movie scene.
- Crawl around the perimeter of the room, listening for the most even, balanced bass (not just the loudest).
- Put the subwoofer in the spot that sounded best during the crawl.
Subwoofer setup knobs (quick starting points)
- Volume: Start around the middle (you’ll fine-tune after calibration).
- Low-pass / crossover on the sub: If your receiver handles bass management, set the sub’s crossover to max or “LFE.”
- Phase: Start at 0° (you can test 0 vs 180 later if bass feels “hollow”).
Step 6: Wire Everything (Cleanly, Safely, and Without Regret)
Speaker wire is not magical, but it is important to do correctly. The big goals are: correct polarity, appropriate
wire gauge, and tidy runs that won’t get yanked by a vacuum cleaner.
Polarity: Match + to + and – to –
Most speaker wire has a marked side (stripe, ridge, printing). Pick one conductor to be “positive” and keep it
consistent from receiver to each speaker. If you reverse polarity on a speaker, you can weaken bass and smear imaging.
Wire gauge: Don’t overthink it, but don’t underbuy it
- Short runs can often use 16 AWG comfortably.
- Medium runs are commonly done with 14 AWG.
- Long runs benefit from 12 AWG to keep resistance low.
If you’re running wire inside walls
Use in-wall rated cable (look for CL2/CL3 or other building-code rated markings). It’s about safety,
not sound qualityand it can matter for compliance in many homes and installations.
Quick pro habits
- Label both ends of every run (Future You will feel seen).
- Leave slack so you can reposition speakers without re-running wire.
- Keep signal and power separated when possible to reduce the chance of noise pickup.
Step 7: Connect Your TV and Sources (HDMI ARC/eARC Made Simple)
For most modern setups, the receiver is the hub: sources plug into the AVR, and the AVR sends video to the TV.
Audio comes from the AVR to the speakers. Easy.
Two common connection styles
-
Everything into the AVR (game console, streamer, Blu-ray), then one HDMI from AVR to TV.
Pros: often simplest, best format support, less TV audio setting drama. -
Use TV apps as sources (Netflix, Disney+, etc.) and send audio back to the AVR with ARC/eARC.
Pros: fewer devices, convenient streaming. Important: eARC is better for higher-quality formats.
If you can, use HDMI eARC on both the TV and receiver. eARC has higher bandwidth than ARC and is designed
to pass higher-quality audio formats more reliably. If you’re troubleshooting missing surround formats, this is one of
the first places to look.
Settings that usually matter
- Enable ARC/eARC in the TV’s audio settings.
- Set TV audio output to “Bitstream” or “Auto” (wording varies by brand).
- Enable CEC if needed for ARC to function (again: brand-specific naming).
Step 8: Configure the Receiver (Speaker Size, Crossover, Distances)
Your AV receiver setup menu is where the system becomes a system. You’ll tell it what speakers you have, where they are,
and who should handle deep bass.
Speaker size: “Small” is not an insult
In receiver settings, “Small” usually means “send deep bass to the subwoofer.” Even if you have big tower speakers,
many setups still benefit from setting speakers to Small so the sub can handle low-frequency work more cleanly.
Crossover: a practical starting point
A common starting crossover is around 80 Hz. Depending on your speakers, you might end up higher (small satellites)
or lower (large towers), but 80 Hz is a solid baseline for many home theater systems.
Distances and levels
You can enter distances manually, but most modern receivers do this automatically during calibration. Either way, the goal is
timing alignment so sound reaches you from every speaker at the right moment.
Step 9: Run Auto-Calibration (Audyssey, YPAO, AccuEQ, DCAC, Dirac)
Auto-calibration is where your receiver plays test tones, measures your room with a microphone, then adjusts speaker distances,
levels, and often equalization (room correction). It’s not “set and forget forever,” but it’s an excellent foundation.
Mic placement rules that make calibration work better
- Put the mic at seated ear height in your main listening position first.
- Use a tripod if possibledon’t hold the mic in your hand (your body is not acoustically invisible).
- Point the mic the way your system specifies (many common setups point it upward).
- Keep it away from walls and reflective surfaces when you can.
- Be quiet during sweeps: fans off, pets out, and no dramatic sighing in the middle of a test tone.
Multiple measurement positions: don’t “cheat” the process
If your calibration supports multiple positions, use them. Spread them around the main listening area (not across the entire house).
Think: where heads actually are on the couchnot where someone might stand to grab popcorn.
After calibration: what to check
- Distances: If one speaker distance is wildly off, re-check wiring and speaker placement.
- Levels: If surrounds are too aggressive or too shy, small trims (like ±1–2 dB) are normal.
- Crossover values: If your system set very low crossovers on small speakers, consider raising them to a safer, cleaner range.
Step 10: Do a Real-World Listening Test (and Fine-Tune)
Test tones are useful, but movies and music are the truth serum. Use scenes you know:
clear dialogue, steady bass, and obvious surround panning.
What “good” sounds like
- Dialogue seems locked to the screen, not floating above/below it.
- Surrounds feel immersive, not distractingmore “environment” than “speaker yelling at you.”
- Bass is even and punchy without one-note booming.
Small adjustments that often help
- Center channel up a touch if dialogue is buried (try +1 dB before doing anything dramatic).
- Subwoofer level slightly down if bass overwhelms voices.
- Surrounds slightly down if they draw attention to themselves during normal scenes.
Room Acoustics: The “Free Performance Upgrade” People Ignore
You don’t need to turn your living room into a recording studio. But a few choices can improve your surround sound system setup fast:
- Add soft surfaces: a rug, curtains, or fabric furniture can reduce harsh reflections.
- Mind first reflections: bare side walls can create glare; even a bookshelf can help break reflections up.
- Stabilize speakers: stands, isolation pads, or secure mounts prevent rattles and improve clarity.
Troubleshooting: Fix the Most Common Surround Sound Problems
“I don’t hear anything from the surrounds.”
- Confirm the content actually has surround audio (some shows are stereo).
- Check receiver sound mode (Auto/Direct vs Stereo).
- Verify speaker wiring and channel assignment in the AVR menu.
“Dialogue is hard to understand.”
- Aim the center speaker directly at ear level.
- Move the center to the front edge of the shelf (avoid reflections).
- Try a modest center level boost (+1 to +3 dB) and reduce sub level slightly.
“Bass is boomy in one seat and weak in another.”
- Try the subwoofer crawl method to find a more balanced location.
- Double-check crossover settings and phase (0° vs 180° test can help).
“There’s a delay between mouths and sound.”
- Use your receiver’s lip-sync/audio delay setting.
- Check TV audio settings if using ARC/eARC (some TVs add processing delay).
Three Example Setups (Because Real Rooms Are Messy)
1) Apartment living room (5.1, minimal drilling)
- Bookshelf speakers on stands for L/R, center on console angled up.
- Surrounds on wall mounts slightly above ear level, angled toward couch.
- Sub in a front corner alternative spot found by crawl (often not the prettiest spotworth it).
2) Couch against the back wall (still can be great)
- Keep 5.1 instead of forcing 7.1 with no rear space.
- Mount surrounds higher and aim toward the listening area.
- Consider 5.1.2 (height) as the next upgrade if your receiver supports it.
3) Dedicated room (7.1 or 5.1.4 “movie night flex”)
- Clear side surround placement, rear surrounds behind seating, symmetrical layout.
- Multiple seats benefit from multiple calibration mic positions around the seating area.
- Room treatment (even simple rugs/curtains) becomes a big payoff at this level.
Conclusion: Your Room, Your RulesBut Use the Rules That Work
Setting up a surround sound speaker system at home is equal parts science and “move it two inches and listen again.”
Start with a sensible layout (usually 5.1), place your front stage carefully, position surrounds based on your main seat,
find subwoofer placement with the crawl, and let auto-calibration do the first round of balancing.
Then do what the pros do: verify with real content and adjust lightly. If you can hear every word, feel the bass without
it swallowing everything, and the room seems to “disappear,” you nailed it.
Real-Life Experiences: What Setup Day Actually Feels Like (and Why That’s Normal)
Let’s talk about the part no one puts on the box: the “experience” of home surround sound setup is rarely a single, clean
checklist where you end on Step 10 and ride into the sunset. It’s more like cooking a new recipe the first timeeverything
is technically going fine, but somehow you’re still covered in flour and questioning your life choices.
One of the most common experiences people have is the instant gratification trap. You wire everything up,
hit play, and expect a movie trailer to explode into your living room like you’re at an IMAX. Sometimes it does. But just
as often, your first impression is: “Huh… that’s… different?” That’s because the brain needs a minute to recalibrate. A
well-balanced surround system often sounds more natural than “loud,” especially if you’re coming from TV speakers
or a soundbar that’s been tuned to sound exciting in a showroom.
Then comes the famous moment when someone says, “Wait, is the center speaker even working?” It is. It’s just doing its job
so well you don’t notice it until it’s off. A great center channel doesn’t sound like a speakerit sounds like actors live
inside your TV. If dialogue feels too low or muffled at first, the “experience” usually improves dramatically with two changes:
aiming the center at ear level and nudging its level up by a tiny amount. Those tiny tweaks feel almost insulting (“That’s it?”)
until you realize you just fixed 80% of what was bothering you.
The subwoofer experience is its own sitcom episode. People often start by placing the sub where it looks nice, then spend a week
wondering why bass is thunderous in one chair and missing in another. The first time someone tries the subwoofer crawl, there’s
usually a phase of denial (“I am not crawling around my living room”), followed by acceptance, followed by victory. It’s also the
moment you discover your room has opinions. The “best” sub spot might be two feet away from where you wanted it. That’s not failure;
that’s acoustics being acoustics.
Another very real experience: cable management regret. Almost everyone underestimates how many runs they’ll need or how
long they should be. The best emotional support you can give yourself is labeling wires and leaving slack. Nothing kills the joy of a
new surround sound system faster than realizing you’re three inches short of reaching the left surround, like a tragic audio-themed fairy tale.
Finally, there’s the “movie night reveal.” This is the payoff where someone who didn’t care about the setup suddenly goes,
“Okay… that helicopter sounds like it’s actually above us.” That’s when surround sound becomes less about gear and more about
the experience: immersion, clarity, and the room feeling bigger than it is. If you reach that moment, congratulationsyour speakers
are no longer furniture. They’re special effects.


