Table of Contents >> Show >> Hide
- Why Starting a Fire Pit Fire the Right Way Matters
- Before You Light Anything: The Safety Basics
- What You Need to Start a Fire in a Fire Pit
- Best Wood for a Fire Pit
- How to Start a Fire in a Fire Pit: Step by Step
- Step 1: Clean out old ash, but not all of it
- Step 2: Put tinder in the center
- Step 3: Add kindling in a teepee or log cabin shape
- Step 4: Add a few small logs, not the giant beasts
- Step 5: Light the tinder from more than one side
- Step 6: Let the kindling fully catch before adding more wood
- Step 7: Feed the fire slowly and keep airflow open
- How to Keep a Fire Pit Fire Burning Well
- Common Fire Pit Mistakes to Avoid
- How to Reduce Smoke in Your Fire Pit
- How to Put Out a Fire in a Fire Pit Properly
- Real-World Experiences and Lessons From Fire Pit Nights
- Final Thoughts
There are few backyard pleasures more satisfying than a fire pit done right. The flames are lively, the smoke is minimal, the marshmallows are only slightly endangered, and nobody is sprinting for the hose in a panic. But getting to that cozy moment takes more than tossing in a few logs and hoping for cinematic results.
If you have ever tried to start a fire in a fire pit and ended up with a sad puff of smoke, a pile of stubborn wood, and a bruised ego, you are not alone. The good news is that building a successful fire is not complicated. It just requires the right setup, the right fuel, and a little patience. In this guide, you will learn exactly how to start a fire in a fire pit safely, efficiently, and with far less drama.
Why Starting a Fire Pit Fire the Right Way Matters
A well-built fire does three important things: it lights faster, burns cleaner, and stays easier to control. That means less smoke in your face, fewer sparks wandering into the night, and a much better chance of actually enjoying your evening instead of babysitting a smoky wood pyramid that looks impressive but burns like a wet sandwich.
Learning the correct fire pit method also helps protect your yard, your guests, and your lungs. Using dry, seasoned firewood and a good airflow-friendly structure can make a huge difference in how much smoke your fire produces. That is good for comfort, good for your neighbors, and good for the overall outdoor experience.
Before You Light Anything: The Safety Basics
Before you reach for a match, do the boring grown-up stuff first. It is not glamorous, but it is what separates a charming fire pit night from a cautionary tale.
1. Check local rules and weather conditions
Always make sure backyard fires are allowed in your area. Some cities, counties, or homeowners associations restrict recreational burning. If there is a burn ban, poor air quality alert, or a Red Flag Warning for dangerous fire weather, skip the fire pit for the night. Your fire pit can wait. The neighborhood would prefer that.
2. Place the fire pit in a safe location
Your fire pit should sit on a stable, level, noncombustible surface and be well away from your house, shed, fence, overhanging branches, dry grass, or anything else that could ignite. A common minimum recommendation is 10 feet of clearance, though your manufacturer or local code may require more.
3. Keep emergency tools nearby
Have a garden hose, bucket of water, shovel, or fire extinguisher within reach before you light the fire. The best time to prepare for a small emergency is before the small emergency starts auditioning to become a big one.
4. Create a kid- and pet-safe zone
Make a clear boundary around the fire pit. A three-foot safety zone is a smart minimum for children and pets, and active supervision matters even after the flames appear to be out. Fire pits stay dangerously hot long after the “show” is over.
What You Need to Start a Fire in a Fire Pit
Here is the basic lineup for a successful wood-burning fire pit:
- Tinder: very small, easy-to-light material such as shredded paper, dry leaves, dry grass, wood shavings, or a commercial fire starter
- Kindling: small dry sticks, twigs, or split wood pieces about finger-width
- Firewood: seasoned logs, ideally hardwood if available
- Ignition source: long matches or a long-neck lighter
- Optional but useful: a spark screen, fire poker, heat-resistant gloves, and a metal ash bucket
The most important part of that list is not the lighter. It is the wood. If your logs are damp, green, or freshly cut, your fire is going to be moody, smoky, and deeply uncooperative. Dry, seasoned wood is the MVP of the whole operation.
Best Wood for a Fire Pit
If you want a cleaner, hotter, steadier burn, use seasoned hardwoods such as oak, hickory, maple, or ash. They tend to burn longer and produce less popping and excess smoke than wet or low-quality wood.
Softwoods such as pine and cedar can light quickly, which is helpful when getting started, but they often burn faster and may throw more sparks. They are not always the best main fuel for an evening fire if your goal is a long, calm burn.
Whatever wood you choose, never burn painted wood, pressure-treated lumber, plywood, particleboard, pallets of unknown origin, trash, plastic, cardboard with coatings, or yard waste. Those materials can release unpleasant or toxic fumes, create excess smoke, and leave behind debris you do not want anywhere near your fire pit or lungs.
How to Start a Fire in a Fire Pit: Step by Step
Step 1: Clean out old ash, but not all of it
If your fire pit is full of soggy ash and half-burned chunks from last weekend, remove most of it. Too much old ash can smother airflow. That said, a thin layer of ash on the bottom can actually help insulate the base and make it easier to establish a fire.
Step 2: Put tinder in the center
Start with a small pile of tinder in the middle of the pit. Keep it loose rather than compressed. Fire needs oxygen, and a tightly packed wad of material is basically a little suffocation chamber. Use enough tinder to catch easily, but do not overdo it to the point where you create a smoky paper mountain.
Step 3: Add kindling in a teepee or log cabin shape
Place your kindling over and around the tinder. Two reliable structures work especially well:
- Teepee: lean small sticks over the tinder in a cone shape; this lights quickly and encourages upward flame movement
- Log cabin: stack kindling in alternating layers around the tinder like a tiny square cabin; this promotes good airflow and stability
Both methods work. The best choice depends on your preference. Teepees are fast starters. Log cabins are a little neater and often easier for beginners to manage.
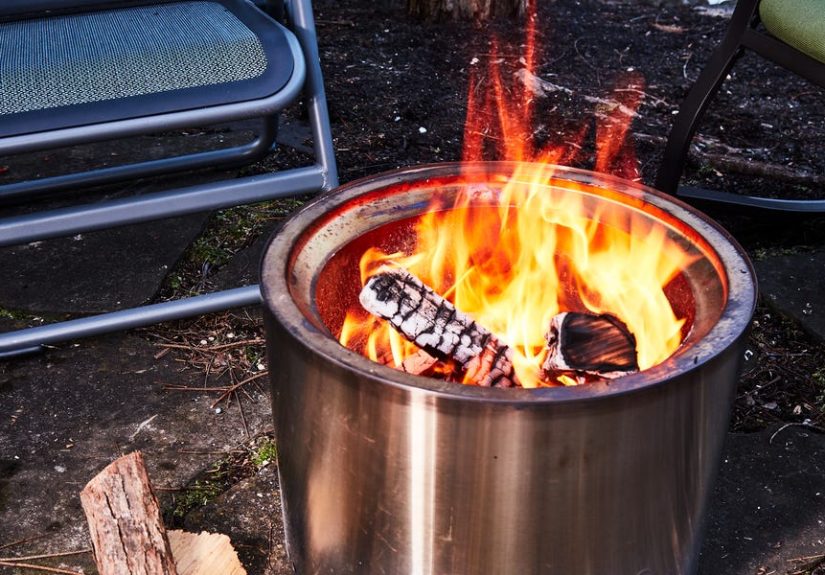
Step 4: Add a few small logs, not the giant beasts
Once the kindling is in place, add one or two small split logs above or beside the structure. Do not start with massive logs that look like they belong in a frontier reenactment. Thick logs need stronger heat to ignite, and if you pile them on too soon, they will crush airflow and smother the fire before it has a chance to grow.
Step 5: Light the tinder from more than one side
Use a long match or lighter to ignite the tinder at one or two points. Lighting from multiple sides can help the flame spread evenly through the tinder and into the kindling. Once it catches, resist the urge to immediately start poking everything like an anxious TV detective. Let the fire settle in and do its job.
Step 6: Let the kindling fully catch before adding more wood
This is where many people go wrong. They see one brave flame and decide the moment has arrived for three full-size logs. It has not. Wait until the kindling is actively burning and the first small logs are catching. Then add fuel gradually.
Think of the fire as climbing a ladder. Tinder lights kindling. Kindling lights small wood. Small wood lights larger logs. Skip a rung, and the whole thing gets cranky.
Step 7: Feed the fire slowly and keep airflow open
As the fire grows, add logs one at a time or in small amounts. Leave some space between pieces so oxygen can circulate. Overloading the pit is one of the fastest ways to create thick smoke and uneven burning.
If your fire pit has a spark screen, place it on once the fire is established. It helps reduce flying embers and makes the setup safer, especially on breezy evenings.
How to Keep a Fire Pit Fire Burning Well
Once the fire is going, maintaining it is simpler than starting it. The trick is to keep it balanced. Not too much wood, not too little airflow, and not too much enthusiasm from that one friend who thinks every fire should be visible from space.
- Add wood gradually instead of dumping in a stack
- Reposition logs only when needed, using a poker
- Use similarly sized logs for a more even burn
- Aim for glowing coals and steady flame, not towering flames
- Keep extra firewood dry and stored away from the pit
For cooking, remember that the best roasting and outdoor cooking usually happens over hot coals rather than aggressive flames. If your goal is perfect marshmallows or hot dogs instead of accidental charcoal sculptures, let the fire burn down a bit first.
Common Fire Pit Mistakes to Avoid
Using wet or green wood
This is the king of smoke problems. Damp wood burns poorly, produces more smoke, and makes starting the fire much harder than it needs to be.
Using gasoline, alcohol, or lighter fluid
Do not do it. Ever. Accelerants can cause flare-ups, dangerous flame behavior, and severe burns. If your wood will not light without a chemical rescue mission, the real problem is your setup or your fuel.
Building the fire too big too fast
A compact, controlled fire is safer and more effective than a giant roaring blaze. Start small and grow it with intention.
Ignoring wind direction
Even a decent fire can become annoying if the smoke blows straight into seating areas or if gusts start carrying sparks. Light wind is manageable; strong wind is your cue to postpone.
Burning the wrong materials
Trash, glossy paper, treated wood, and household debris are not “creative fuel solutions.” They are smoke machines and safety hazards.
How to Reduce Smoke in Your Fire Pit
If you want less smoke, the formula is refreshingly simple: dry wood, good airflow, moderate size, and patience. A smoky fire usually means one of four things: the wood is too wet, the fire is starved for oxygen, the logs are packed too tightly, or you added big wood before the base was hot enough.
Smokeless fire pits can reduce visible smoke by improving airflow and secondary combustion, but even with a standard fire pit, you can get excellent results by using seasoned wood and a proper fire-building method. In other words, technique still matters. Fancy gear helps, but it is not magic.
How to Put Out a Fire in a Fire Pit Properly
The end of the evening matters just as much as the beginning. A fire is not out because it looks sleepy. It is out when it is cold.
- Stop adding wood well before you plan to leave.
- Let the fire burn down to coals and ash.
- Pour water carefully over the embers.
- Stir the ashes and charred wood with a shovel or poker.
- Add more water as needed.
- Feel for heat only when safe to do so; the ashes should be cold to the touch before you leave them.
Do not rely on “it looks fine” as your final inspection method. Hidden heat can linger for hours. If you need a simple shutdown mantra, use this one: soak, stir, check, repeat.
Real-World Experiences and Lessons From Fire Pit Nights
Here is the funny thing about learning how to start a fire in a fire pit: most people do not really learn it from reading the word kindling. They learn it from one painfully smoky evening when everyone politely pretends they are “fine” while blinking through a cloud that smells like regret.
One of the most common first-time experiences is starting with logs that look dry because they are brown and log-shaped. They stack beautifully, they photograph well, and they absolutely refuse to light. Then someone suggests adding more paper. Then more paper. Then someone waves a plate at the fire as if oxygen can be bullied into cooperation. Eventually, the group realizes that dry-looking wood and seasoned wood are not always the same thing. That lesson tends to stick.
Another classic experience is the oversized-log mistake. Beginners often assume a bigger fire starts with bigger wood. In reality, a strong fire starts with small success. When you begin with tinder, then kindling, then small logs, the fire builds confidence along with heat. When you begin with giant logs, the fire pit just sits there looking offended.
Many people also discover that smoke has a weird emotional talent: it follows the person who least deserves it. You can have six chairs around the pit, a calm evening, and one gentle breeze, and somehow the smoke finds the one guest wearing a fresh white sweater. That is usually the moment everyone becomes deeply interested in airflow, log spacing, and wood quality.
There is also a big difference between a fire that is technically alive and a fire that is enjoyable. A struggling fire needs constant attention. A well-built fire settles into a steady rhythm. You add a log now and then, the coals glow, conversation gets easier, and the whole thing feels less like a project and more like an evening. That is really the goal: not just fire, but usable fire.
People who get good at fire pits usually become more relaxed, not more dramatic. They stop overfeeding the flames. They stop poking the logs every 20 seconds. They learn that a small, hot fire often outperforms a huge, messy one. They also learn to keep a chair far enough back that they can enjoy the warmth without feeling like a rotisserie chicken.
Then there is the shutdown lesson. Almost everybody has underestimated how long a fire pit stays hot. The flames disappear, the conversation ends, and the pit still radiates enough heat to remind you that physics is not taking the night off. Experienced fire pit owners know to start winding the fire down early, use water generously, stir thoroughly, and double-check before calling it done.
In the end, the best fire pit experiences are rarely about perfection. They are about creating a safe, simple ritual that works. You check the weather, set up properly, use the right wood, light the fire with patience, and let the evening do the rest. Once you have done it a few times, it becomes second nature. The smoke drops, the burn improves, and suddenly you are the calm person explaining to someone else why their giant damp log is not, in fact, a shortcut.
Final Thoughts
If you want to start a fire in a fire pit successfully, remember this simple formula: safe location, dry seasoned wood, smart layering, steady airflow, and no rushing. Build from small to large, keep the fire manageable, and put it out completely when you are done.
That is the entire secret. Not magic. Not luck. Just a little technique, a little patience, and a firm refusal to treat lighter fluid like a personality trait. Master those basics, and your fire pit nights will be warmer, safer, cleaner, and a lot more enjoyable.


