Table of Contents >> Show >> Hide
- First: What “Wipe” Actually Means (and Why It Matters)
- Before You Wipe: A 10-Minute Checklist That Saves Regret
- How to Wipe a Windows PC (Windows 10 or Windows 11)
- Option A (Recommended): Use “Reset this PC” and Clean the Drive
- Step-by-step
- Option B: Wipe a Secondary (Non-System) Drive in Windows
- Option C (More Secure for Many Scenarios): Encrypt First, Then Reset
- Option D (Advanced): DiskPart “clean all” from Recovery/Installer
- High-level workflow (careful!)
- Optional: Reinstall Windows after wiping
- How to Wipe a Mac
- External Drives (USB, External SSD/HDD): Wipe Them Too
- SSD vs. HDD: The “Best” Wipe Method Depends on the Drive
- How to Know You Actually Wiped It
- Common Mistakes (and How to Avoid Them)
- Conclusion
- Real-World Experiences: What Usually Trips People Up (and How to Sidestep It)
- Experience #1: “I reset it… but the next owner can still see my name.”
- Experience #2: “I wiped the computer… but forgot the external backup drive.”
- Experience #3: “My Mac doesn’t have the button everyone talks about.”
- Experience #4: “Secure erase options disappeared, so I panicked.”
- Experience #5: “DiskPart ate my other drive.”
- SEO Tags
Wiping a hard drive is basically the digital version of moving out: you don’t just shove everything into a closet and hope the next person never opens it.
If you’re selling, donating, recycling, or handing down a computer, you want your data gone-gonephotos, passwords, tax docs, that “temporary” folder from 2017… all of it.
This guide walks you through the safest, most practical ways to wipe a drive on Windows PCs and Macs, with clear choices depending on what you’re doing
(keeping the computer, selling it, or prepping it for a new owner). You’ll also learn what “wipe” really meansbecause “delete” is not a magic spell.
First: What “Wipe” Actually Means (and Why It Matters)
Delete vs. Format vs. Reset vs. Sanitize
A lot of people “wipe” a computer by dragging files to the Trash/Recycle Bin and hitting delete. That’s not wiping. That’s removing the table of contents
while leaving the book on the shelf.
- Deleting files: Removes references to files. Data can often be recovered.
- Quick format: Rebuilds the file system quickly. Still recoverable in many cases.
- Full format / overwrite: Writes over the drive (slower), making recovery much harder.
- Factory reset / OS reset: Reinstalls the operating system and can remove personal files. Often includes an option to “clean the drive.”
- Cryptographic erase: If the drive is encrypted, destroying the encryption key can make old data effectively unreadable.
- Physical destruction: When you need maximum assurance (or the drive is dead), you destroy it.
For most people selling or donating a computer, a built-in reset with “clean the drive” enabled is the best balance of security and sanity.
If you work with highly sensitive data, you may need stronger methods (including encryption-based approaches or destruction).
Before You Wipe: A 10-Minute Checklist That Saves Regret
1) Back up what you actually want to keep
Once you wipe a drive properly, there’s usually no “undo.” Copy important files to an external drive or cloud storage. If you’re unsure,
back up first and sort later (future-you will complain, but thank you).
2) Sign out of accounts and turn off device ties
This step prevents annoying lockouts for the next owner and protects your accounts. On Macs, sign out of cloud services and messages;
on Windows, make sure you know your Microsoft account login and recovery methods.
3) Gather what you’ll need after the wipe
- Wi-Fi password (you will need it again, yes)
- Software license keys (if applicable)
- A charger and any adapters
- For Windows: a USB drive (8GB or larger) if you plan to reinstall via installation media
4) If you’re selling: decide whether to reinstall the OS
Reinstalling the operating system is a nice courtesy and can increase resale value. If you’re recycling, you can wipe and stop at the setup screen.
How to Wipe a Windows PC (Windows 10 or Windows 11)
Option A (Recommended): Use “Reset this PC” and Clean the Drive
This is the simplest “I’m handing this computer to someone else” method and is built into Windows.
The important part is choosing Remove everything and enabling the drive-cleaning option.
Step-by-step
- Open Settings.
- Go to System → Recovery (Windows 11) or Update & Security → Recovery (Windows 10).
- Select Reset PC (or Get started under “Reset this PC”).
- Choose Remove everything.
- If asked, choose whether to remove files from just the system drive or all drives. If you’re selling/donating, pick all drives.
- Look for a setting like Clean data / Clean the drive / Remove files and clean the drive and turn it on.
- Follow the prompts and start the reset. Expect it to take a while (the “clean” option is slower for a reason).
When it’s done, the PC should boot to the initial setup experience. If you’re selling it, stop theredon’t sign back in.
That’s like wiping the counters and then immediately making spaghetti.
Option B: Wipe a Secondary (Non-System) Drive in Windows
If you’re keeping your computer but want to wipe an internal storage drive (like a second HDD/SSD), you can do it from Disk Management.
This is useful if you upgraded drives or want to repurpose storage.
- Right-click the Start button and choose Disk Management.
- Identify the correct drive/partition (triple-check capacity and label).
- Right-click the volume and choose Format.
- If you want a more thorough wipe than a quick pass, uncheck “Quick Format” (slower, better for data removal on HDDs).
Note: Formatting methods vary by drive type and Windows version. For highly sensitive situations, consider encryption + key destruction,
specialized secure erase utilities, or physical destruction.
Option C (More Secure for Many Scenarios): Encrypt First, Then Reset
If your drive is encrypted, wiping can be stronger because old data becomes unreadable without the key. On many systems,
Windows device encryption or BitLocker may already be enabled. If not, you can enable drive encryption first, then reset the PC.
- Turn on drive encryption (commonly BitLocker on supported Windows editions).
- Let encryption finish (don’t interrupt it).
- Then run Reset this PC with Remove everything and clean the drive enabled.
This approach is often practical for SSDs where traditional multi-pass overwrites can be less straightforward due to wear leveling.
Option D (Advanced): DiskPart “clean all” from Recovery/Installer
If you want a command-line wipe, DiskPart can overwrite a selected disk with zeros using clean all.
This is powerfuland it can also erase the wrong disk if you’re careless. Translation: measure twice, wipe once.
High-level workflow (careful!)
- Boot into Windows recovery or a Windows installer USB.
- Open Command Prompt.
- Run DiskPart and identify the disk by size.
Afterward, you can reinstall Windows or leave the drive empty for disposal. If you plan to reinstall, Windows installation media can help.
Optional: Reinstall Windows after wiping
You can reinstall Windows via built-in recovery or using installation media on a USB drive. The goal when selling is typically to leave the
computer at the “Hello/Welcome” setup screen for the new owner.
How to Wipe a Mac
Option A (Recommended for Newer Macs): “Erase All Content and Settings”
If your Mac has this option, it’s the easiest and cleanest method. It removes your data and resets the Mac without you needing to manually
erase volumes in Disk Utility.
Steps (macOS Ventura and later)
- Open System Settings.
- Go to General → Transfer or Reset.
- Click Erase All Content and Settings.
- Follow the prompts to sign out and erase.
When it finishes, the Mac returns to setup mode. Like Windows: stop there if you’re selling or giving it away.
Option B (Works on Older Macs Too): macOS Recovery + Disk Utility + Reinstall
If you don’t see “Erase All Content and Settings,” or you want the classic method, use macOS Recovery.
This is also useful when troubleshooting a Mac that won’t boot properly.
Step-by-step
- Restart the Mac into macOS Recovery (the key combo varies by Mac model).
- Open Disk Utility.
- In Disk Utility, select the drive (not just a volumeuse “Show All Devices” if needed).
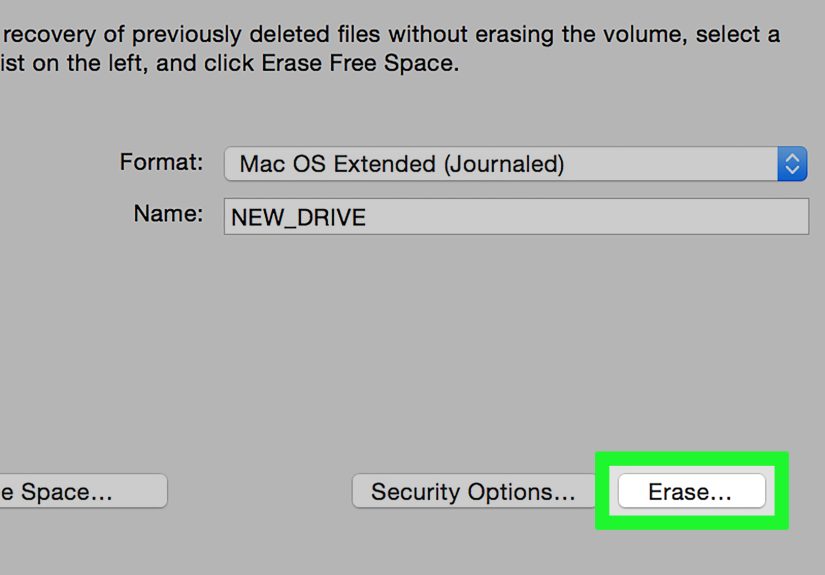
- Click Erase.
- Choose a format:
- APFS for most modern Macs
- Mac OS Extended (Journaled) for older systems that require it
- Erase, then quit Disk Utility.
- Choose Reinstall macOS from the Recovery window and follow the prompts.
Why “Secure Erase” Sometimes Disappears on Mac
On some drives, Disk Utility offers “Security Options” (like overwriting passes). On others, that button won’t show upespecially on many SSDs.
That’s not your Mac being rude; it’s because secure erase options depend on the storage type and what Disk Utility can safely do.
For SSDs, a common security strategy is to use encryption (like FileVault) during normal use, then erase/reset so the data becomes inaccessible.
For older spinning hard drives (HDDs), overwrite-style secure erase options can be more relevant.
Don’t skip sign-outs when preparing a Mac for sale
Before you hand it over, sign out of services and unpair devices so the next person isn’t greeted by your iMessage history
(and your Bluetooth headphones auto-connecting from across town).
External Drives (USB, External SSD/HDD): Wipe Them Too
Don’t forget the extras. External drives often hold backupsmeaning they can be even more sensitive than the computer itself.
On Mac (Disk Utility)
- Open Disk Utility.
- Choose View → Show All Devices.
- Select the physical external drive (not just the volume beneath it).
- Click Erase, pick a format, and confirm.
On Windows
- Open Disk Management.
- Right-click the external drive’s volume and choose Format (avoid quick format if you want a deeper wipe on HDDs).
If you’re wiping an external drive for disposal and want higher assurance, consider a dedicated secure erase method or encryption + key destruction.
SSD vs. HDD: The “Best” Wipe Method Depends on the Drive
HDD (traditional spinning hard drive)
Overwriting the whole disk is straightforward: write new data over old data. Full-drive overwrite (or reset options that include cleaning)
can be effective for most consumer situations.
SSD (solid-state drive)
SSDs are different. They use wear leveling, meaning the drive may not write to the same physical locations in a simple, predictable way.
That’s why encryption-based approaches (and manufacturer-supported secure erase tools when available) are often recommended for higher confidence.
If you’re in a situation that truly demands maximum assurancelike disposing of drives with highly sensitive dataindustry guidance often treats
cryptographic erase and, when appropriate, destruction as part of the toolkit.
How to Know You Actually Wiped It
- Windows: The PC boots to the “Let’s set things up” / out-of-box setup screen.
- Mac: The Mac boots to setup/activation screens, or Recovery prompts you to reinstall macOS.
- External drive: It shows as empty/unallocated, or freshly formatted with no personal folders.
If you’re paranoid (healthy trait when dealing with personal data), you can also spot-check by attempting recovery with basic tools.
But for most people, the correct reset + clean drive option is sufficient.
Common Mistakes (and How to Avoid Them)
- Mistake: “I deleted my files, so it’s fine.”
Fix: Use reset/erase methods that remove everything and clean the drive. - Mistake: Forgetting external drives and SD cards.
Fix: Wipe every storage device you plan to hand over or discard. - Mistake: Wiping the wrong disk with command-line tools.
Fix: Confirm drive size/model twice before any destructive command. - Mistake: Logging back in after the wipe “just to check.”
Fix: Stop at the setup screen for a new owner.
Conclusion
Wiping a hard drive doesn’t have to feel like defusing a bombjust follow the right method for your device.
For Windows PCs, “Reset this PC” with Remove everything and clean the drive is the go-to for most people.
For Macs, “Erase All Content and Settings” (when available) is the simplest, and macOS Recovery + Disk Utility is the dependable fallback.
If your goal is resale or donation, aim to leave the computer at the setup screen and walk away like a hero in an action movieno looking back,
no dramatic re-entry, no “did I leave my password in there?” panic. If your situation involves highly sensitive data, lean toward encryption-based
wiping or higher-assurance sanitization methods.
Real-World Experiences: What Usually Trips People Up (and How to Sidestep It)
In the real world, wiping a drive rarely fails because the steps are hard. It fails because life is messy and humans are creative in the worst ways.
Here are a few common “I didn’t think about that” moments people run into when wiping a PC or Macand what tends to work best.
Experience #1: “I reset it… but the next owner can still see my name.”
This often happens when someone resets a device but signs back in during setup to “make sure it worked.” The computer then syncs profile info,
browser data, or cloud settings back down. The fix is simple: after a wipe, stop at the setup screen. If you want to verify, verify by checking that
the setup screen appearsdon’t log in. Think of it like cleaning an apartment: you don’t move your couch back in to confirm the floor is vacuumed.
Experience #2: “I wiped the computer… but forgot the external backup drive.”
This one is surprisingly common. People do a careful reset on the PC or Mac, then hand over (or recycle) the external drive that held years of backups.
Backups are often a complete snapshot of your digital life, which makes them especially sensitive. The practical habit: before you wipe anything,
make a list of every storage device you’ve usedexternal drives, USB sticks, SD cards, even old “temporary” drives in a drawer. Then wipe or keep them.
Experience #3: “My Mac doesn’t have the button everyone talks about.”
Some Macs won’t show “Erase All Content and Settings,” depending on macOS version and hardware. People assume they’re stuck and give upor worse,
they erase only a volume and leave the drive structure messy. The steady fallback is macOS Recovery + Disk Utility + reinstall. It’s not flashy,
but it’s dependable. When Disk Utility looks confusing, “Show All Devices” is the trick that makes the physical drive visible so you’re erasing
the right thing, not just a slice of it.
Experience #4: “Secure erase options disappeared, so I panicked.”
On SSDs, secure overwrite options may not appear. People worry that they can’t wipe their drive securely. In many everyday cases, the better approach
is encryption-based: if the drive is encrypted during use, wiping or resetting removes access to the old encrypted data. The key lesson from these
situations is that SSDs don’t behave like old spinning drives, so the “7-pass wipe” mindset isn’t always the best fit.
Experience #5: “DiskPart ate my other drive.”
Command-line wipes are powerful, but the risk is human errorespecially on desktops with multiple drives installed. The people who avoid disaster
do two things: they physically disconnect drives they don’t intend to wipe (when possible), and they verify the disk by size/model before selecting it.
If that sounds overly cautious, remember: the fastest wipe is the one you don’t have to redo after realizing you erased the wrong drive.
The big pattern across these experiences is simple: wiping is less about fancy tools and more about disciplined stepsbackup first, sign out,
choose the correct wipe method, and don’t “undo” your own wipe by logging back in. Follow that, and you’ll hand over a clean machine
without leaving behind a digital breadcrumb trail.


