Table of Contents >> Show >> Hide
- The “Before”: A Kitchen With Great Potential… and One Very Loud Personality
- The Game Plan: Keep the Layout, Upgrade the Experience
- Budget Snapshot: Where the Money Went (and Why)
- The Cabinet Comeback: Paint, Prep, and a Little Bit of Patience
- Hardware: The Tiny Upgrade That Acts Like It Pays Rent
- Lighting: The Upgrade That Makes Everything Else Look Better
- Backsplash: Small Surface, Big Impact
- Countertops: The Budget Edition Reality
- Small Kitchen Tricks That Feel Custom in an Echo Park Way
- DIY vs. Pro: Where to Save, Where to Spend
- The Finished Look: Fresh, Functional, and Quietly Cool
- Conclusion: The Budget Edition Mindset That Actually Works
- Real-World Experiences From a Budget Kitchen Revival (The Part Nobody Mentions)
- 1) The Two-Day Paint Job That Takes Two Weeks
- 2) The “Tiny” Hardware Swap That Turns Into a Compatibility Puzzle
- 3) Lighting Is the Moment You Feel Like a Genius
- 4) The Backsplash Decision Paralysis Is Real
- 5) Small Kitchens Force You to Get Organized (Or Be Mad Forever)
- 6) The “Echo Park Touch” Happens at the End
Echo Park has a special talent: it can make a 1920s bungalow feel like a movie set and a storage unit at the same time.
Which is exactly why this week’s “Kitchen of the Week” is so satisfying. The goal wasn’t “gut it to the studs and
install a waterfall island the size of a studio apartment.” The goal was simpler (and honestly, more relatable):
keep the bones, keep the charm, and keep the budget from screaming.
What you’ll see here is a high-impact refresh built on a very unglamorous truth: most kitchens don’t need more square
footagethey need fewer bad decisions, better light, and hardware that doesn’t look like it came free with a fax machine.
The “Before”: A Kitchen With Great Potential… and One Very Loud Personality
The original kitchen had all the familiar Echo Park traits: compact footprint, older cabinets that were structurally fine,
and a layout that made you do a little side-step dance every time two people tried to exist in the same 30 square feet.
The finishes, though? They were doing the mostdated lighting, tired hardware, and surfaces that had seen enough
spaghetti sauce to qualify for witness protection.
And here’s the key: nothing was catastrophically broken. That’s the sweet spot for a budget revival. When the cabinet
boxes are solid and the plumbing isn’t auditioning for a disaster movie, you can spend your money where it actually
shows: the “face” of the kitchen.
Budget Revival Rule #1
If it’s not failing, don’t replace itrefresh it. A budget kitchen makeover is basically skincare for your house:
exfoliate (clean and prep), moisturize (paint), and stop picking at your face (aka “just one more upgrade”).
The Game Plan: Keep the Layout, Upgrade the Experience
Full remodels get expensive fast because they stack costs like pancakes: demolition, patching, electrical, plumbing,
cabinetry, counters, labor, surprises, more labor, and then a new surprise wearing a tiny hat. This plan avoids the
cost pile-up by keeping the existing layout and focusing on targeted upgrades that make the kitchen feel new.
Three Priorities That Guided Every Decision
- Light: Make it brighter, warmer, and more usefulwithout turning the ceiling into an operating room.
- Cabinet presence: Update the biggest visual surface in the room with paint and hardware (not a second mortgage).
- Easy-clean surfaces: Add a backsplash and smart countertop choices so daily life doesn’t feel like a cleaning internship.
The vibe target: “revived Echo Park” vintage soul, simple lines, a little artsy, and absolutely not afraid of color,
but not so trendy it will feel dated by next summer.
Budget Snapshot: Where the Money Went (and Why)
A budget makeover works best when you decide what gets to be “the star” and what gets to be “supporting actor.”
In this kitchen, cabinets and lighting got the spotlight; everything else was carefully upgraded without spiraling.
A Practical Budget Range (Not a Fantasy Budget)
- Cabinet paint + prep supplies: DIY-friendly; professional finishes cost more but can look factory-smooth.
- Hardware: One of the best cost-to-impact moves in any kitchen.
- Lighting: A mix of “better overhead” and “task lighting” (under-cabinet) makes a small kitchen feel bigger.
- Backsplash: A small area with huge visual payoffespecially behind the sink and range.
- Faucet + sink (optional): If yours is leaky or dated, this is a high-satisfaction upgrade.
- Styling + organization: The cheapest way to make the kitchen look intentional instead of accidental.
Notice what’s missing: new cabinet boxes, major layout changes, and “we moved the plumbing because we were feeling brave.”
On a budget, bravery is expensive. Strategy is cheaper.
The Cabinet Comeback: Paint, Prep, and a Little Bit of Patience
Painting cabinets is the budget classic for a reasonit changes the entire room without changing the floor plan or ripping
your life apart for six weeks. But the internet sometimes makes it look like you can slap on paint between brunch and
a nap. In reality, the magic is in the prep.
What Makes Painted Cabinets Look “Pro”
- Degrease like you mean it: Kitchens collect oils in a way that’s honestly impressive.
- Sand (yes, really): You’re not carving a sculptureyou’re helping primer grab the surface.
- Prime correctly: The right primer prevents stains and helps the finish cure hard.
- Thin, patient coats: Fewer drips, smoother finish, and less regret.
- Let it cure: Dry isn’t cured. Cured is “your cabinets won’t peel when you look at them.”
For this Echo Park revival, the cabinet color choice leaned calm and warmsomething that plays nicely with sunlight and
doesn’t fight the home’s older character. Think soft off-whites, muted greens, gentle taupes, or a grounded color on the
lowers with lighter uppers. The goal is “fresh,” not “dentist office.”
Paint vs. Reface vs. Replace: The Reality Check
If your cabinet boxes are in good shape, painting is typically the lowest-cost route. Refacing can be a strong middle
option if you want new doors and a cleaner style without full replacement. Full replacement is worth it when the layout
is broken, storage is dysfunctional, or the boxes are beyond savingbut it’s rarely the “budget edition” choice.
Hardware: The Tiny Upgrade That Acts Like It Pays Rent
If you want a kitchen glow-up that’s fast, affordable, and weirdly satisfying, change the hardware. It’s the kitchen’s
jewelryexcept it also helps you open drawers without doing finger yoga.
How to Choose Hardware That Looks Custom
- Pick one finish and commit: Mixed metals can work, but random metals look like a mistake.
- Scale matters: Tiny knobs on big drawers look like they gave up halfway through.
- Match existing holes when you can: Avoid filling and drilling unless you’re ready for extra labor.
- Think touch: You’ll grab these handles every daychoose shapes that feel good.
In this kitchen, a simple, modern pull shape made the cabinets feel instantly updatedlike they stopped living in the past
and started paying attention in the present.
Lighting: The Upgrade That Makes Everything Else Look Better
Lighting is the kitchen’s cheat code. You can spend a reasonable amount and suddenly your counters look cleaner, your
paint color looks richer, and your entire mood improves. Dramatic? Maybe. True? Absolutely.
A Budget-Friendly Lighting Stack
- Overhead ambient: Replace dated fixtures or harsh fluorescents with something warmer and more flattering.
- Task lighting: Under-cabinet lights stop you from chopping vegetables in your own shadow.
- Accent moments: A small pendant over a sink or a semi-flush with personality can carry the whole room.
Under-cabinet lighting is especially powerful in older, smaller kitchensbecause it makes the workspace feel larger and more
intentional. And if you’re trying to get that “high-end” look without the high-end bill, this is one of the cleanest wins.
Backsplash: Small Surface, Big Impact
A backsplash is the kitchen’s punctuation. Without it, the space can feel unfinished. With it, the whole room suddenly reads
as “designed.” The trick in a budget makeover is choosing something that looks elevated but won’t wreck the spreadsheet.
Budget Backsplash Ideas That Still Look Legit
- Classic ceramic subway tile: Affordable, timeless, and easy to style.
- Simple zellige-look tile: The texture reads artisanal even when the price isn’t.
- Peel-and-stick (selectively): Great for rentals or quick refresheschoose realistic finishes and install carefully.
- Tile only where it matters: Behind the range and sink can be enough if the budget is tight.
The Echo Park move here is restraint: let one surface be interesting, and let everything else be calm. That’s how you avoid
“Pinterest explosion” and land on “effortlessly cool.”
Countertops: The Budget Edition Reality
Countertops can be a budget buster, so the smartest approach is to choose based on your actual lifestyle, not your fantasy
lifestyle. (If you bake sourdough daily, tell the truth. If you mostly toast bagels, tell the truth louder.)
Smart Countertop Paths for a Budget Revival
- Keep what works: If your counters are in good shape, spend elsewhere and let them live another chapter.
- Consider butcher block: Warm, approachable, and often more affordable than stonejust be realistic about maintenance.
- Look for remnants: Smaller kitchens sometimes work with remnant pieces, which can reduce material cost.
- Laminate has leveled up: Today’s options can look surprisingly high-end when paired with good lighting and hardware.
The “budget edition” win is pairing a sensible countertop with an excellent backsplash and lighting. The eye reads the room
as upgraded even if you didn’t go full luxury on every surface.
Small Kitchen Tricks That Feel Custom in an Echo Park Way
Echo Park kitchens often live in older homes with charming quirksnarrow walkways, unusual corners, or original windows you
refuse to replace because they make the room feel alive. Instead of fighting the smallness, this makeover leaned into it.
Design Moves That Stretch a Tight Footprint
- Open shelving (with boundaries): One or two sections can lighten the room without turning it into a dust museum.
- One cohesive palette: Fewer competing finishes makes everything feel larger and calmer.
- Decluttered counters: The cheapest square footage you’ll ever gain is the space you stop filling.
- Vertical storage: Hooks, rails, and tall pantry moments can add function without adding cabinets.
- A little vintage: Thrifted or salvaged pieces add Echo Park character without boutique pricing.
The goal isn’t to make the kitchen look massive. It’s to make it feel intentionallike it was meant to be small and brilliant,
not small and apologetic.
DIY vs. Pro: Where to Save, Where to Spend
Here’s the honest budget rule: DIY is only “cheaper” if it doesn’t cost you your sanity, your weekends for three months,
and your relationship with sanding. Choose your DIY battles.
Great DIY Candidates
- Swapping hardware
- Installing peel-and-stick backsplash (or a small tile area if you’re handy)
- Adding simple under-cabinet lighting kits
- Painting walls and trim
- Styling, organizing, and storage upgrades
Often Worth Hiring Out
- Electrical changes (especially in older homes)
- Professional cabinet spraying for a factory finish
- Plumbing changes if you’re moving lines or replacing sinks in complicated setups
In this Echo Park refresh, the sweet spot was a hybrid approach: DIY the easy wins, hire help for the “don’t mess this up”
moments, and keep the overall scope tight.
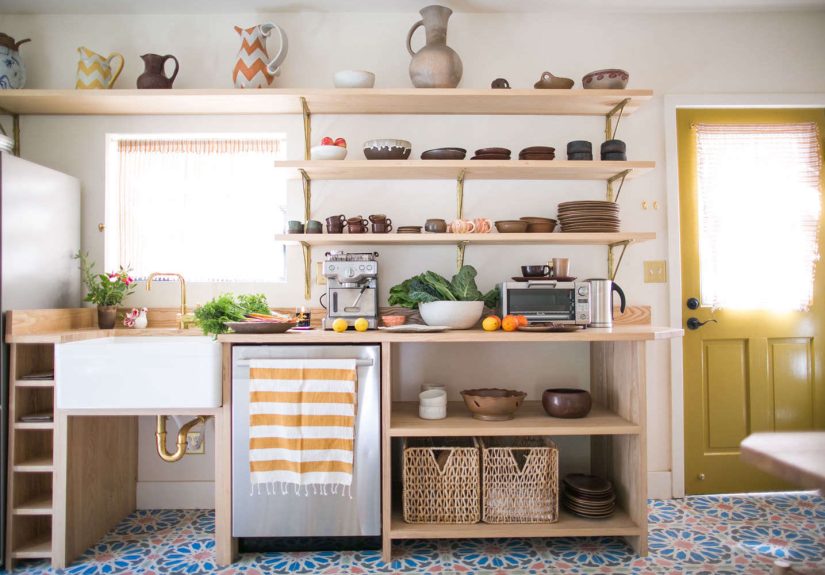
The Finished Look: Fresh, Functional, and Quietly Cool
After the refresh, the kitchen felt like it exhaled. The cabinets looked crisp and current. The lighting made nighttime cooking
feel cozy instead of chaotic. The backsplash provided a clean visual line and easier cleanup. And the small styling moves
a wooden cutting board here, a simple ceramic bowl theremade the kitchen look like someone lives here on purpose.
Best of all, the kitchen still felt like Echo Park: creative, warm, slightly imperfect in a charming way, and more about how
life feels than how life photographs. (Though yesit photographs nicely now. Because light and paint are sorcery.)
Conclusion: The Budget Edition Mindset That Actually Works
A budget kitchen revival isn’t about doing lessit’s about doing the right things first. Keep what’s solid. Upgrade what’s
visible. Invest in light. Choose finishes that make daily life easier. And remember: the most expensive kitchen is the one
you remodel twice because you chased trends instead of building a plan.
If you want your own Echo Park-style budget revival, start with one bold move (paint), one practical move (lighting),
and one “it’s the details” move (hardware). Get those right, and your kitchen will feel revivedeven if it still has the
same charmingly small footprint it had all along.
Real-World Experiences From a Budget Kitchen Revival (The Part Nobody Mentions)
A budget kitchen refresh sounds tidy on paper. In real life, it’s a mini-epicless “HGTV montage” and more “why is there
dust in places dust should not be.” If you’re planning an Echo Park kitchen revival (or any small, older-home kitchen),
here are the experiences people commonly run intoand how to stay sane while it happens.
1) The Two-Day Paint Job That Takes Two Weeks
Everybody starts optimistic. “We’ll paint the cabinets this weekend.” Then you meet prep: degreasing, labeling doors,
sanding, priming, drying, sanding again, painting, drying, painting again, curing. Suddenly it’s Wednesday and your
kitchen looks like a cabinet door witness-protection program. This is normal. The hack is to plan meals that don’t require
a kitchen (hello, salads and sheet-pan dinners at a friend’s place) and set up a “temporary snack station” so you don’t
keep opening the refrigerator with paint-covered hands like a raccoon in a crime scene.
2) The “Tiny” Hardware Swap That Turns Into a Compatibility Puzzle
Hardware feels like the easiest partuntil you discover your old pulls have a weird hole spacing from 1997, and your new
pulls are modern and gorgeous and absolutely unwilling to cooperate. People often go through a mini spiral here:
fill holes or don’t fill holes, drill new holes or don’t drill new holes, buy a jig or eyeball it and pray. The lived
experience: buying hardware that matches the existing hole spacing is the fastest path to peace. If you’re changing
spacing, a simple measuring jig saves you from the horror of slightly crooked pulls that will haunt you forever.
3) Lighting Is the Moment You Feel Like a Genius
Under-cabinet lighting is the upgrade that makes people genuinely happy. It’s not just “pretty.” It makes cooking easier,
reduces shadows, and makes even budget countertops look more refined. The emotional experience is immediate: you flip the
lights on at night and think, “Wait… my kitchen is kind of fancy?” This is the high point. Enjoy it. Take a photo.
Send it to someone who doubted you.
4) The Backsplash Decision Paralysis Is Real
Choosing a backsplash can be weirdly intense because it’s the part you stare at while doing dishes, contemplating life.
In budget revivals, people often bounce between “classic subway tile” and “something textured and cool” and “what if we do
a bold pattern” and “what if that ruins everything.” Here’s the most common experience: once you install something simple
and clean, the relief is enormous. If you crave personality, you can bring it in through accessories and artthings you
can change later without demolition.
5) Small Kitchens Force You to Get Organized (Or Be Mad Forever)
In compact kitchensespecially in older neighborhoods like Echo Parkstorage is both the problem and the solution. People
often realize mid-project that the makeover isn’t just visual; it’s behavioral. You start asking: Do we really need three
mismatched ladles? Why do we own four nearly identical cutting boards? The experience is part makeover, part gentle
reckoning. The payoff is huge: once the counters clear and everything has a home, the kitchen feels bigger without moving
a single wall.
6) The “Echo Park Touch” Happens at the End
The kitchen doesn’t feel finished when the paint driesit feels finished when the room gets its personality back. This is
usually the moment someone adds a thrifted vase, a vintage stool, a little piece of art, or a handmade ceramic bowl that
makes the space feel lived-in and local. The experience is subtle: you walk in, look around, and realize you like being
there now. That’s the real metric. Not perfectioncomfort.
The honest truth is that budget revivals are a mix of grit and delight. You’ll have a day where you question your choices
(usually while sanding). And you’ll have a day where you turn on the lights, see the new cabinet color in the afternoon sun,
and feel ridiculously proud. That’s the budget edition win: you didn’t buy a new kitchenyou brought your kitchen back.


