Table of Contents >> Show >> Hide
- Quick Navigation
- What “Spray Paint Marbling” Actually Is
- Materials & Supplies
- Best Pots for Marbling (and Which Ones Will Betray You)
- Step-by-Step: Water Marbling Flower Pots With Spray Paint
- Step 1: Choose a safe, smart workspace
- Step 2: Prep your pot (the unglamorous secret to “wow”)
- Step 3: Tape off clean lines (optional, but chef’s-kiss)
- Step 4: Fill your water bath
- Step 5: Spray paint onto the water (fast, light bursts)
- Step 6: Swirl the paint into marble veins
- Step 7: Dip the pot (or roll it) to transfer the pattern
- Step 8: Clear the surface paint before pulling your pot out (pro move)
- Step 9: Dry fully
- Step 10: Decide if you want to seal (hint: you probably do)
- Color Combos That Look Expensive (Even if Your Pot Cost $3)
- Troubleshooting & Fixes
- Sealing, Durability, and Outdoor Use
- Cleanup & Safe Disposal
- Bonus: of Real-World “I Learned This the Hard Way” Wisdom
- Conclusion
If you’ve ever looked at a $48 “artisan” planter and thought, I could absolutely ruin that myself for less,
you’re in the right place. Marbling flower pots with spray paint is basically hydro-dipping’s laid-back cousin:
you float paint on water, swirl it into a dreamy storm cloud, and dunk a pot like you’re baptizing it into the
Church of Cute Decor.
The best part? No fancy tools. No art degree. No need to pretend you “always loved marble.” Just a bucket,
a few cans of spray paint, and the willingness to accept that your first dip might look like a cosmic accident.
(That’s not failure. That’s “organic movement.”)
What “Spray Paint Marbling” Actually Is
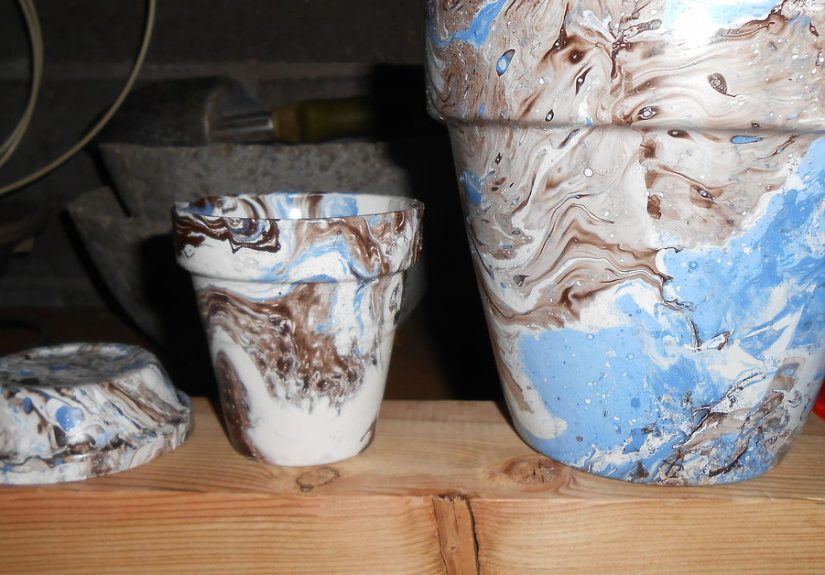
“Marbling flower pots with spray paint” usually means water marbling (also called
hydro dipping or water transfer). You spray paint onto the surface of a water bath.
Most traditional spray paints don’t mix with water, so they float. You swirl that floating paint into
veins and ribbons, then dip your pot through it so the pattern wraps around the surface.
The result: a one-of-a-kind marbled planter that looks like it came from a boutique that sells candles
named things like “Quiet Wealth.” And because every dip is different, you can’t really “mess it up.”
You can only make it… more you.
Why it works (in plain English)
Spray paint contains pigments and binders carried by solvents and propelled out of the can. When it hits water,
it spreads across the surface as a thin film. If you move quickly, that film stays flexible long enough to
grab onto your pot. If you move slowly, it starts to setlike a skinthen tears, clumps, or sticks to itself.
(This is the craft version of “hesitation is defeat.”)
Materials & Supplies
Here’s what you’ll need for DIY marbled flower pots that don’t look like a paint spill with ambition:
Must-haves
- Flower pots (terracotta, ceramic, plastic, or resinmore on what works best below)
- Spray paint in 2–4 colors (plus optional white as a “brightener”)
- Water container wide enough to fit your pot (bucket, storage bin, disposable aluminum pan)
- Gloves (unless you want marbled hands that scream “I make questionable choices”)
- Drop cloth/cardboard to protect the ground
- Painter’s tape (optional, but great for clean edges)
- Wooden skewer / craft stick (for swirling)
Nice-to-haves (that make you feel like a professional)
- Respirator or mask rated for paint fumes and eye protection
- Primer (especially for plastic/resin or glossy surfaces)
- Clear sealer/topcoat (recommended for durability, especially outdoors)
- Paper towels + rubbing alcohol for quick cleanup
- A “drying stand” (an upside-down cup, bottle, or small block to keep the pot off wet paint)
Best Pots for Marbling (and Which Ones Will Betray You)
Terracotta pots
Terracotta is a classic for marbled planters because it’s inexpensive, easy to find, and slightly texturedso
paint can grab on. The downside is it’s porous. If you want your marbling to last through watering and weather,
you’ll want to think about sealing (more on that later).
Ceramic or glazed pots
Gorgeous results, but slick surfaces can make adhesion trickier. Lightly scuff-sanding and using a primer can
help the marbling stick and stay put.
Plastic or resin planters
Totally doable and often very durable once painted correctly. The key is prep: wash well, lightly sand,
and use a primer made for plastic if your planter is glossy or super smooth. If you skip prep, you might
get a finish that scratches off like a bad sunburn.
Concrete pots
Concrete can look insanely good with marbling because the matte gray base makes bright colors pop. Just make
sure the pot is clean and dry, and be aware: concrete is thirsty, so sealing may help with longevity.
Step-by-Step: Water Marbling Flower Pots With Spray Paint
This is the core “marbling flower pots with spray paint” process. Read it once, set everything up, then work
fast. The paint on water has the patience of a toddler in a checkout line.
Step 1: Choose a safe, smart workspace
Work outdoors or in a very well-ventilated area. Lay down cardboard or a drop cloth, and keep spray paint away
from flames, sparks, and anything that gets hot. Also: don’t do this on your favorite patio table unless you
want a new patio table.
Step 2: Prep your pot (the unglamorous secret to “wow”)
- Wash the pot with mild soap and water; remove stickers and grime.
- Dry completely (water on the surface can interfere with adhesion).
- Lightly sand glossy surfaces (optional but helpful).
- Prime if the pot is slick plastic, glossy ceramic, or you want maximum durability.
If you want your marbling to look bright and “clean,” spray a quick base coat of white or a pale neutral and
let it dry. A light base can make colors pop, especially on darker terracotta.
Step 3: Tape off clean lines (optional, but chef’s-kiss)
Want a crisp unpainted rim? Or a two-tone “marbled top, solid bottom” look? Use painter’s tape. Press the tape
down firmly so paint can’t creep underneath like a sneaky little raccoon.
Step 4: Fill your water bath
Fill a container with enough water to dip or roll your pot (usually 4–8 inches, depending on pot size). The
container should be wide enough that your pot can move without scraping the sides.
Step 5: Spray paint onto the water (fast, light bursts)
Shake each can well. Then spray short bursts onto the water surface. Don’t hose it down like you’re putting
out a firethin layers float and transfer better.
- Start with your lightest color (often white) if you want brightness.
- Layer 2–3 colors in quick bursts for depth.
- Keep the can a short distance above the water so it doesn’t blast holes in your paint film.
Step 6: Swirl the paint into marble veins
Use a skewer or stick and gently drag through the floating paint. Think “latte art,” not “whisking eggs.”
A few swoops create elegant veins. Too much swirling can turn your marbling into… modern interpretive puddle.
Step 7: Dip the pot (or roll it) to transfer the pattern
This is where the magic happens. You have two common methods:
Method A: Straight dip (great for rims or partial coverage)
- Hold the pot steady and lower it into the water through the paint film.
- Pause briefly, then lift it out smoothly.
- For more coverage, spray a new paint film and repeat.
Method B: Side roll (best for full-pot marbling)
- Turn the pot sideways.
- Roll it slowly across the paint film so the pattern wraps around.
- Lift it out carefully, avoiding splashes.
Step 8: Clear the surface paint before pulling your pot out (pro move)
If there’s a thick layer of paint still floating, your pot can pick up extra globs when it exits the water.
Many DIYers skim the remaining paint off the surface with scrap cardboard or a spoon before lifting the pot out.
This can help keep edges cleaner and reduce random clumps.
Step 9: Dry fully
Place the pot on a stand (so it doesn’t glue itself to your drop cloth). Let it dry thoroughly. If you taped
sections, remove tape only after the paint is dry to the touch and less likely to smear.
Step 10: Decide if you want to seal (hint: you probably do)
Sealing is how you turn “cute for a weekend” into “cute for a season (or longer).” Let the paint dry first,
then apply a clear coat suited to your pot’s intended life: indoors, outdoors, or “my cat will definitely
knock this off a shelf.”
Color Combos That Look Expensive (Even if Your Pot Cost $3)
Marbling is basically color psychology with a splash zone. Here are combos that consistently look polished:
Classic marble vibes
- White + charcoal + a whisper of gold (instant “hotel lobby” energy)
- Ivory + warm gray + beige (soft stone look, great for neutral homes)
Modern and bold
- Black + teal + silver (dramatic and clean)
- Navy + white + copper (looks custom, photographs beautifully)
Soft and playful
- Blush + cream + sage (perfect for kitchens and patios)
- Lavender + pale blue + white (dreamy “spring brunch” aesthetic)
Desert tones (my personal favorite category of pretty)
- Terracotta + sand + off-white (pairs with succulents like they were born together)
- Rust + taupe + olive (organic, earthy, not trying too hard)
Tip: If your pot is dark (classic terracotta), include white in the marbling mix so the veins show up.
Otherwise, your gorgeous teal might read as “mysterious shadow.”
Troubleshooting & Fixes
If your first try isn’t Pinterest-perfect, congrats: you are doing crafts like a real human.
Here are common issues and how to fix them.
Problem: The paint clumps, tears, or looks “skinny” on the pot
- Cause: You waited too long; the paint started drying on the water.
- Fix: Work faster. Spray, swirl lightly, dip immediately. Use fewer swirls.
Problem: Bald spots where paint didn’t transfer
- Cause: Not enough paint film, moving too fast through the surface, or the film broke.
- Fix: Add another quick paint layer and re-dip just that area. Small touch-ups can look intentional.
Problem: Paint sinks instead of floating
- Cause: Some formulas behave differently; sometimes the water is too agitated or you sprayed too hard.
- Fix: Try a different spray paint line/finish, spray lighter bursts, and avoid blasting the water surface.
Problem: Too many bubbles or weird texture
- Cause: Spraying too close, splashing water into the paint film, or dunking too aggressively.
- Fix: Hold the can higher, dip slower, and keep the water calm. If a bubble forms on the pot, gently pop it while still tacky.
Problem: The finish scratches off easily
- Cause: Surface wasn’t prepped, no primer on slick material, or no clear coat.
- Fix: Clean + light sand + prime, re-marble if needed, then seal with a durable topcoat.
Problem: Your pattern looks “muddy”
- Cause: Too many colors, too much swirling, or mixing complements that turn brown.
- Fix: Limit to 2–3 colors plus white. Swirl less. Choose colors that look good together in a palette.
Sealing, Durability, and Outdoor Use
If you’re marbling flower pots for indoor decor only, you can sometimes get away without sealing.
But if the pot will be watered, handled, or left outdoors, a sealer helps your marbled finish last longer.
What to seal with
- Clear acrylic sealer (easy, common, good for many projects)
- Clear gloss topcoat if you want that shiny “wet marble” look
- Matte clear coat if you want a softer, stone-like finish
Should you seal the inside of the pot?
Here’s the honest answer: it depends on your goal.
- If you painted or marbled only the outside: sealing the exterior is usually enough for many decorative uses.
-
If you want maximum protection on porous terracotta: some DIYers seal more surfaces (including parts of the inside)
so moisture doesn’t migrate through the clay and lift the paint over time. -
If you love terracotta because it “breathes”: sealing everything can reduce that natural wicking effect.
For certain plants (like many succulents), breathable terracotta can be part of the charm.
A practical compromise: seal the outside thoroughly and seal just the upper inside lip (where water splashes and soil rubs),
leaving the deeper interior unsealed if you want some breathability.
Drying and curing (don’t rush this part)
“Dry to the touch” is not the same as “ready for water and weather.” Give your marbled planter time to cure.
For many clear sealers, waiting a couple of days before exposing the pot to moisture helps the finish hold up better.
Cleanup & Safe Disposal
Marbling is fun. Cleaning up is… less fun. But it’s also where you keep your pipes, pets, and planet happier.
How to clean the water bath without creating a bigger problem
- Skim the remaining paint film off the water surface with scrap cardboard or paper.
- Let the paint dry on the cardboard, then dispose of it according to local rules.
-
Avoid dumping paint residue down drains. If your container has paint bits floating around,
treat it like a messy craft chemical situationbecause it is.
What to do with empty or partially full spray cans
Aerosol cans are pressurized, and many communities treat them as household hazardous waste unless they’re completely empty.
If you’re not sure, check your local disposal guidelines or household hazardous waste drop-offs.
Cleanup tips that save your sanity
- Wear gloves. Seriously.
- Keep paper towels nearby for quick drips.
- Store spray paint away from heat and direct sun.
- When you’re done spraying, clear the nozzle (follow the can directions) so it works next time.
Bonus: of Real-World “I Learned This the Hard Way” Wisdom
After watching countless DIYers marble planters (and doing enough testing to permanently rename one pair of sneakers
“The Sacrificial Shoes”), a few patterns show upbesides the paint ones. If you want your marbling flower pots with
spray paint to look deliberate instead of like a mysterious marine organism attached itself to your planter, these
are the lessons that matter.
First: your setup determines your outcome. Most “fails” happen before the paint even hits the water.
If your water container is too small, you’ll bump the sides and smear the pattern. If your drop cloth is flimsy, it’ll
fold into wet paint and stamp a surprise texture onto the bottom rim. If your pot is dusty, oily, or still damp, the
paint may slide around like it’s trying to escape.
Second: speed is your friend, panic is not. The paint film on water gives you a short working window.
The trick is to move quickly but gently. Spray, swirl just a little, then dip. When people overthink the swirl,
the surface starts to set, and the film tears when the pot goes in. That’s when you get those jagged “shredded” edges.
(Sometimes cool! Often accidental!) If you want clean marbling, keep the swirl simple.
Third: fewer colors look more expensive. Two colors plus white can look like luxe stone.
Five colors can look like a funfair. Not always badjust different vibes. If you’re going for “modern marble,” pick a
tight palette: a base (white or cream), a dark (charcoal, navy, forest), and one accent (gold, copper, teal).
You’ll get definition without visual chaos.
Fourth: your spray distance matters more than you think. Too close and the paint blasts holes in the
film, making bubbles and chunky textures. Too far and you can end up with dry flecks that don’t melt into nice veins.
If you’re getting a lot of spatter, back off slightly and use shorter bursts.
Fifth: accept the first dip as a draft. A lot of gorgeous planters are actually “dip #2” or “dip #3.”
You can build coverage by re-spraying a fresh film and dipping again. Layering is not cheatingit’s strategy.
Just let the pot dry enough that you’re not smearing wet paint into new wet paint.
Sixth: sealing is the difference between art and heartbreak. Without a protective topcoat,
marbling can scuff when you move the pot, and moisture can find a way to lift edgesespecially on porous terracotta.
If your planter is going outside, seal it. If it’s going inside but will be handled a lot, seal it. If it’s going to
live near a curious cat, definitely seal it (and consider anchoring it like it owes you money).
Finally: keep one “practice pot.” The easiest way to get confident is to test your paint combo and
technique on a cheap little pot first. You’ll learn how fast the film dries in your weather, how much paint you need,
and what your swirling hand naturally does. After one practice run, your “real” pots will look like you meant to do
that all alongwhich is the highest compliment in DIY.
Conclusion
Marbling flower pots with spray paint is one of those rare DIY projects that’s equal parts easy and
high-impact. With a simple water bath and a few colors, you can create custom marbled planters that look
store-bought (in the flattering way, not the “mass produced and sad” way). Focus on prep, move quickly once the paint
hits the water, and seal your finished pots if they’ll face weather, watering, or heavy handling.
Most importantly: let the process be a little unpredictable. Marbling rewards experimentation. Every pot is a surprise,
and that’s kind of the point.


