Table of Contents >> Show >> Hide
If you have ever looked at a rugged field case, a cyberdeck, or a workbench that seemed ready to survive a sandstorm, a blackout, and a particularly moody forklift, you already know the appeal of the mil-spec look. It is practical, blunt, organized, and just a little dramatic. It says, “This device has a job to do,” even when that job is mostly holding a Raspberry Pi, a soldering iron, or enough adapters to confuse the average desk drawer.
The good news is that you do not need a government contract, a procurement officer, or a warehouse full of titanium to get that aesthetic. What most people really mean by “mil-spec looks” is not literal military certification. They mean gear that feels durable, purposeful, and built with zero interest in trendy fluff. The magic comes from design language: matte finishes, sturdy materials, exposed fasteners, foam-lined interiors, modular layouts, and colors that look like they belong on a flight line or in the back of a utility truck.
That means the look is surprisingly achievable on a civilian budget. You can build it with 3D-printed parts, off-the-shelf tool storage, affordable protective cases, powder-coated steel cabinets, and a handful of smart finishing choices. In other words, you can get the “issued by a serious person” vibe without needing to invoice the taxpayers.
What Actually Creates the Mil-Spec Aesthetic?
Before you spend a single dollar, it helps to understand what you are buying. Most rugged, military-inspired gear shares a handful of visual traits. The shapes are simple and blocky. Corners are reinforced or at least look reinforced. Surfaces are matte instead of glossy. Fasteners are visible on purpose. Handles, latches, vents, ribs, and labels feel like part of the design rather than decoration added afterward.
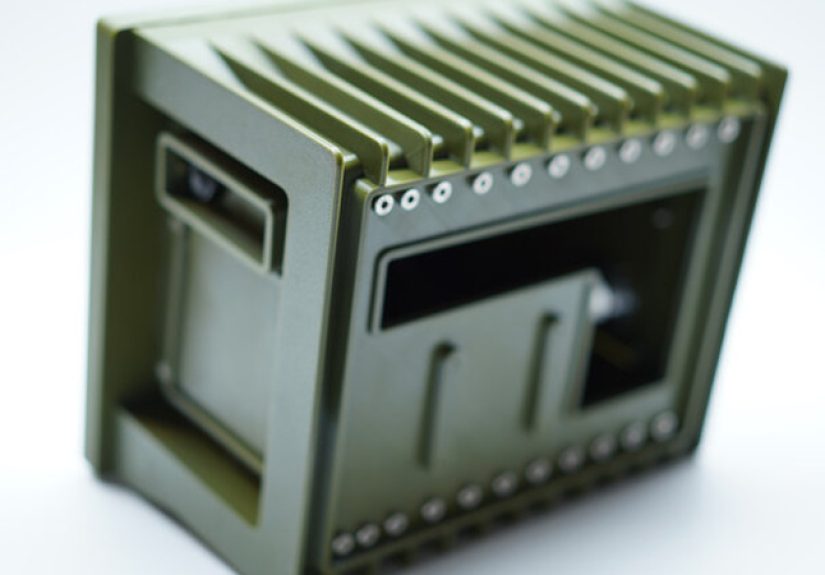
That is why a thoughtfully designed plastic enclosure can look more convincing than an expensive gadget wrapped in shiny black paint. In the maker world, one of the best examples of this idea is the kind of 3D-printed enclosure that uses faux cooling fins, low-profile stainless screws, segmented panels, and a muted olive color to mimic the “pulled from a vehicle bay” look. The trick is not pretending plastic is armor. The trick is borrowing the visual vocabulary of rugged equipment and using it honestly.
So if your goal is the look, focus on these cues:
- Low-glare color: matte black, olive, tan, gray, and subdued industrial blues
- Visible structure: screws, hinges, handles, rails, and framing that are not hidden
- Layered surfaces: ribs, fins, panel breaks, inset faces, and removable access doors
- Serious storage: drawers, foam inserts, dividers, cable routing, and labeled compartments
- Material honesty: steel looks like steel, plastic looks like durable molded plastic, aluminum looks engineered rather than polished for show
Once you start seeing these patterns, you realize the aesthetic is less about one expensive product and more about combining a bunch of sensible decisions. That is excellent news for your budget and terrible news for your ability to walk past a tool chest without squinting at it like an art critic.
Budget Materials That Punch Above Their Weight
PETG and Other Tough Plastics
If you are building an enclosure, PETG is one of the smartest budget-friendly materials to start with. It is popular because it balances strength, flexibility, and printability better than bargain-basement materials that look fine until they get bumped, warmed up, or treated like actual gear. For maker builds, that matters. A rugged-looking enclosure that cracks the first time it meets a table leg is not rugged; it is theater.
PETG also works especially well when you want a utilitarian finish. Print slowly, design parts to avoid support scars, and use surface textures intentionally. That is how some of the best 3D-printed rugged builds manage to look closer to molded hardware than to hobby plastic. If you are printing your own panels, handles, spacers, or brackets, PETG gives you a lot of room to experiment without making your wallet file a formal complaint.
Powder-Coated Steel
For workbenches, rolling cabinets, equipment carts, or permanent shop storage, powder-coated steel is where the budget mil-spec dream really starts flexing. You can buy all-welded steel tool cabinets from mainstream retailers for a fraction of what custom industrial furniture would cost, and many of them already come in the right visual language: matte finishes, heavy drawers, square profiles, locking hardware, and industrial casters.
The sweet spot is a cabinet or mobile bench that feels overbuilt for your actual needs. That extra sturdiness is not just practical; it instantly changes the vibe of the room. A lightweight shelf says “temporary solution.” A steel workbench with a wood top and a power strip says, “Yes, this station has procedures.”
Protective Cases and Foam
Hard cases are one of the fastest shortcuts to a military-inspired look because the silhouette is already doing half the work. Even budget weatherproof cases can deliver the essentials: impact resistance, dust protection, pressure valves, gasket seals, and interiors you can customize with foam. A simple case turns much more convincing when the inside is cut neatly, the accessories are restrained, and the cable mess has been forced into retirement.
Foam deserves more credit here than it usually gets. It is not glamorous, but it does two important jobs at once. It protects gear, and it makes the whole setup look intentional. Closed-cell or polyethylene foam, neoprene liners, and layered inserts can transform a random box of electronics into something that looks mission-ready, even if the mission is just surviving your commute and not losing the USB-C dongle again.
Aluminum Framing and Stainless Hardware
Modular aluminum framing is another secret weapon for this style. T-slot profiles look technical by default, and they make it easy to build shelves, monitor stands, equipment racks, or panel mounts that can evolve over time. That matters because the mil-spec vibe is not just rugged. It is also modular. The gear looks like it was designed to be opened, reconfigured, and put back to work before lunch.
Then there is hardware. Stainless bolts, hex fasteners, and low-profile machine screws are tiny decisions that make a build feel expensive without actually being expensive. Used sparingly, they add contrast, precision, and a “yes, these parts belong here” sense of order. Used recklessly, they make your project look like a robot porcupine. Restraint wins.
How to Build the Look Without Wasting Money
1. Start With a Strong Base
Do not begin with accessories. Begin with one solid anchor piece: a tool chest, a hard case, a steel cabinet, a printed enclosure, or a compact workbench. If the base already looks sturdy and organized, everything else gets easier. This is why a matte army green or black mobile workbench can do so much heavy lifting. It gives you mass, color, texture, and storage in one purchase.
2. Pick One Finish Family and Stick to It
The cheapest way to make a project look expensive is consistency. Choose one finish family and keep repeating it. Matte olive and black work well. Desert tan and black look equally convincing. Gray and stainless can feel more industrial and less tactical, which is useful if you want the rugged feel without making your home office look like it is waiting for a radio check.
Ultra-flat and non-reflective coatings help because they reduce the toy-like shine that cheap materials often have. Even modest parts look more serious when the finish absorbs light instead of bouncing it around like a disco ball for hex keys.
3. Use Exposed Fasteners Like Punctuation
Visible screws and bolts are one of the fastest signals in rugged design, but they work best when they appear to solve a real problem. Add them where they suggest access panels, reinforcement, hinge points, or modular connections. Do not scatter them around for decoration. That turns “field-ready” into “cosplay by hardware aisle.”
4. Add Handles, Latches, and Labels
A build starts looking serious when it clearly explains how it should be moved, opened, and organized. A sturdy side handle, a proper latch, a recessed pull, or a simple label strip can make a cheap case or cabinet feel much more deliberate. This is where budget gear often separates itself from junk. Junk stores things. Better gear communicates.
5. Treat Cable Management as Part of the Design
Nothing ruins a rugged aesthetic faster than a glorious armored shell opening to reveal a nest of loose adapters that looks like raccoons wired it overnight. Use clips, sleeves, channels, and foam cutouts. Group cables by job. Mount chargers where they stay hidden. Make every cord look like it has diplomatic clearance.
6. Fake Complexity the Smart Way
You do not need precision-machined panels to imply depth and structure. Layered printed parts, panel lines, inset brackets, stand-offs, vent covers, and external ribs all create visual complexity. The smartest version of this trick is when a decorative element also solves a design problem, like hiding seams, protecting edges, or spacing heat-producing components away from a shell.
Where This Style Works Best
The beauty of the mil-spec aesthetic is that it adapts well to projects that already need durability and order. A few especially strong use cases include:
- Cyberdecks and portable computer builds: 3D-printed shells, tactile controls, rugged cases, modular compartments
- Garage and workshop storage: powder-coated steel cabinets, drawer organization, magnetic accessories, thick worktops
- Camera and field kits: hard cases with foam, labeled pouches, compact power setups
- Home office setups: aluminum framing, low-glare finishes, industrial task lighting, lockable storage
- Electronics benches: stackable enclosures, labeled power distribution, removable access panels, cable discipline
In each case, the style works because it is backed by function. That is the whole point. The more your setup actually benefits from storage, protection, modularity, or durability, the more natural the look becomes.
What Not to Do
There is a fine line between rugged and ridiculous. To stay on the right side of it, skip the fake heroics. You do not need oversized bolts that do nothing, ten different textures fighting each other, or labels that sound like your coffee mug requires launch authorization. Keep the design calm. Let the materials speak. Let the layout do the showing off.
It is also smart to avoid claiming literal military performance unless your product has actually been tested that way. There is nothing wrong with saying “military-inspired,” “rugged,” or “field-case style.” Those phrases are honest. They also protect you from becoming the proud owner of a dramatic-looking box that still hates rain, dust, and gravity.
And finally, do not sacrifice usability for appearance. A cabinet that looks amazing but opens awkwardly, a handle that pinches, or a printed panel that blocks airflow is not premium. It is just stubborn.
Experience: What This Look Feels Like in Real Life
The most interesting thing about chasing a mil-spec look on a budget is that the experience becomes bigger than the objects themselves. At first, you think you are choosing a cabinet color or a case insert. Then, a few weeks later, you notice your whole workflow has changed. You stop tossing random parts into random drawers. You begin grouping tools by task. Chargers get assigned a home. Labels appear. The workspace starts acting less like a junk magnet and more like a station with a purpose.
That shift is probably why people love this style so much. It is not just visual toughness. It creates emotional neatness. A matte olive drawer cabinet with clean handles and foam-lined trays feels calmer than a pile of bargain bins, even when both setups contain the exact same screwdrivers and cable testers. One says “I might have what you need somewhere.” The other says “second drawer, left side, behind the crimper.” That confidence is addictive.
There is also a strange kind of satisfaction in using humble materials to suggest something more serious. A 3D-printed panel in the right color, printed slowly and assembled cleanly, can feel far more premium than a glossy mass-market accessory. A budget hard case with carefully cut foam can make ordinary gear feel worthy of travel. A steel workbench with a matte finish and a few smart accessories can make even simple weekend projects feel a bit more official, as though someone should probably stamp a clipboard before you begin.
And yes, there is humor in it too. The same person who swears they only wanted “practical storage” somehow ends up comparing shades of olive green with the intensity of a museum curator. One extra handle turns into two. A cable gland seems suddenly necessary. Then you are debating whether black oxide screws look more “serious” than stainless ones, which is a sentence no normal person expects to say out loud. But that is part of the charm. This style invites tinkering. It rewards detail.
In everyday use, the best budget builds share one trait: they feel reassuring. The case closes with authority. The drawer slides smoothly. The panel fits snugly. The finish does not glare under bright lights. The hardware feels intentional. Even when the entire setup cost a small fraction of true industrial or certified equipment, it delivers the same psychological benefit: trust. You trust it more because it looks organized, accessible, and ready for work.
That is why the mil-spec aesthetic keeps crossing over from workshops into offices, garages, studios, and hobby rooms. It turns ordinary equipment into something with presence. It makes a setup feel prepared. Not dramatic, not theatrical, just prepared. And in a world where half our devices look like slippery black soap bars, there is something deeply refreshing about gear that appears ready to take a hit, shrug, and ask what is next.
Conclusion
Getting mil-spec looks without a Defense Department budget is not about pretending your desk organizer is deployment-ready. It is about borrowing the best parts of rugged design: restrained colors, durable materials, visible structure, modular thinking, and practical organization. When you choose a strong base, use matte finishes, keep the hardware intentional, and make the layout genuinely useful, the result feels more expensive than it is.
That is the real win. You are not buying status. You are building confidence into the object. Whether it is a 3D-printed enclosure, a powder-coated workbench, a foam-lined hard case, or a whole garage wall of steel storage, the recipe stays the same. Function first, finish second, nonsense never. The result is clean, tough, and satisfying to use. Basically, it is the civilian version of competence in a box.


