Table of Contents >> Show >> Hide
- What Are “Glass Gems,” and Why Do They Make Great Coasters?
- Three Reliable Ways to Make Patriotic Glass Gem Coasters
- Patriotic Design Ideas That Don’t Feel Like a Costume Party
- Materials and Build Choices: What Matters for Real Use
- Safety Notes (Because Freedom Rings, Not Your Skin)
- How to Make Them Look “Boutique,” Not “Craft Table Aftermath”
- Troubleshooting Common Problems
- Gift and Party Uses (Where These Coasters Really Shine)
- Care and Cleaning
- Real-World “Experience” Section: What It’s Like to Use and Share Patriotic Glass Gem Coasters (About )
- Conclusion
Your coffee table has been through enough. It doesn’t need another iced-drink sweat ring, a mystery wine drip, or the dreaded “who put a hot mug directly on the wood?” moment. Enter: patriotic glass gem coastersthe little protectors that pull double duty as functional décor. They’re sparkly, sturdy, customizable, and they show up to a Fourth of July party dressed better than half the guests.
This guide walks you through several real-world ways to make glass gem coasters (mosaic-style, resin-encased, and hybrid approaches), with design ideas that feel festive without screaming “I bought the entire fireworks aisle.” You’ll also get practical advice on durability, slip resistance, sealing, cleaning, and safetybecause crafting should be fun, not a surprise chemistry exam.
What Are “Glass Gems,” and Why Do They Make Great Coasters?
“Glass gems” (often sold as flat marbles, glass pebbles, or vase fillers) are smooth, rounded pieces of glasstypically with a flatter back and a domed top. Crafters love them for mosaics and decorative fills, but they also happen to be coaster-friendly for a few simple reasons:
- They’re non-porous, so they don’t absorb spills or odors.
- They’re weighty, which helps a coaster stay put during normal use.
- They’re easy to wipe clean once properly sealed or set.
- They look fancy even when your “design plan” is mostly “red on this side, blue on that side.”
The trick is choosing a construction method that matches how you want to use them: do you want a slightly textured mosaic feel, or a smooth, glossy, wipe-and-go resin surface?
Three Reliable Ways to Make Patriotic Glass Gem Coasters
Method 1: Mosaic-Style Gems on a Base (Classic + Textured)
This is the “stained-glass window’s practical cousin” approach: you attach glass gems to a base (tile, wood blank, or sturdy coaster base), then fill gaps with grout or a clear filler, and finish by sealing. The result is durable and eye-catching, with a tactile surface that feels handmade (because it is).
What You’ll Need
- Coaster bases: ceramic tiles, pre-cut wood rounds/squares, or blank coaster bases
- Flat glass gems in red, white/clear, and blue
- Strong adhesive (clear-drying is ideal)
- Optional grout (sanded or unsanded depending on gap size)
- Grout sealer or appropriate top sealer
- Felt or cork backing (or adhesive felt pads)
Step-by-Step
- Plan a simple pattern. A star, stripes, or a “firework burst” works great at coaster scale. Dry-lay your gems first so you can adjust spacing without committing to chaos.
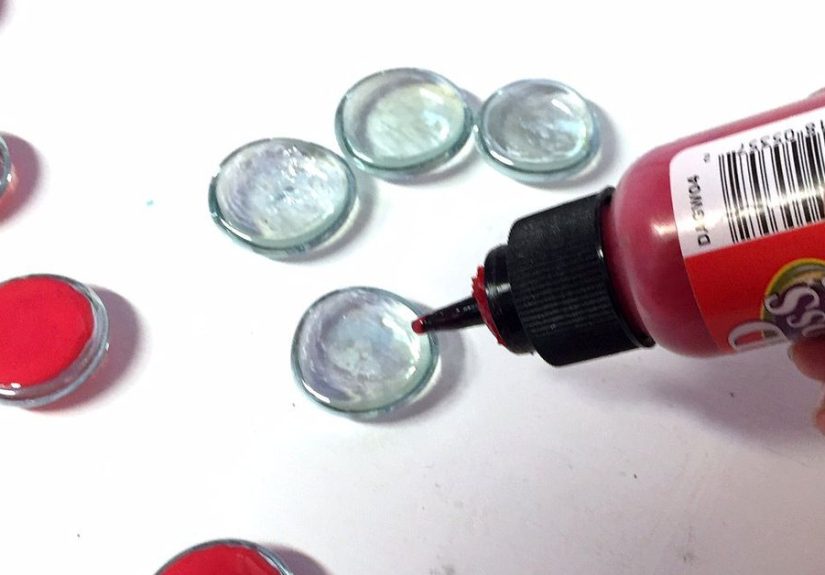
- Glue the gems down. Work in sections so adhesive doesn’t skin over. Press each gem firmly so it fully contacts the base and sits level.
- Let it cure fully. (Your future self will thank you when nothing slides around mid-grout.)
- Fill the gaps. If you’re using grout, spread it over the surface and work it into gaps, then wipe the excess from gem tops before it dries into a “cloudy regret.” Basic grout techniques apply: press into joints, then wipe in passes rather than smearing endlessly.
- Seal after curing. Grout generally needs time to cure before sealing. Follow the sealer’s directions closely. Seal helps reduce staining, especially if your gatherings include red wine, iced tea, or “mystery punch.”
- Add a backing. Felt/cork keeps coasters from scratching surfaces and helps them grip the table.
Best for: casual entertaining, rustic/patio vibes, and anyone who likes the “mosaic” look.
Trade-off: the surface won’t be perfectly flat like resin, and tiny crevices can collect grime if not sealed well.
Method 2: Resin-Encased Glass Gems (Smooth + Glossy + “Wow”)
Resin coasters are popular for good reason: they look sleek, they’re easy to wipe clean, and they let you embed designs so the surface stays smooth. You can arrange glass gems inside a silicone coaster mold, then pour resin over them to lock everything in place.
What You’ll Need
- Silicone coaster molds (round or square)
- Epoxy resin and hardener (follow the brand’s ratio exactly)
- Mixing cups, stir sticks, and a level work surface
- Nitrile gloves, eye protection, and good ventilation
- Optional: white pigment for “flag-white pop,” mica for sparkle, or fine glitter (use sparingly)
- Glass gems (washed and dried)
Step-by-Step
- Prep the mold and your design. Place gems in the mold. For a flag vibe: align red/white stripes, then cluster blue gems in one corner as a “field.”
- Mix resin carefully. Measure precisely, mix thoroughly, and scrape sides/bottom while stirring. “Close enough” is how you get sticky coasters that feel like they’re auditioning for a lint-collector role.
- Pour in layers if needed. A thin base layer helps prevent floating. Add gems, then pour the rest slowly to reduce bubbles.
- Pop bubbles and protect from dust. Use the recommended method for your resin (often gentle heat), and cover to keep pet hair and airborne glitter from joining the party uninvited.
- Cure completely. Most resins need a full cure window before they reach maximum hardness. If you demold early, you risk bends, fingerprints, and sadness.
- Finish the bottom. Add cork/felt backing or small adhesive feet for grip and table protection.
Best for: a polished look, easy cleaning, gifts, and people who love that glassy “bar-top” shine.
Trade-off: resin requires safety precautions and patience. Rushing resin is basically asking the universe for bubbles.
Method 3: Decoupage Center + Glass Gem Border (Fast, Cute, Very “Host Mode”)
If you want something quicker (and less grout/resin-intensive), do a decoupage center on cork or tile, then add a ring of red/white/blue gems around the edge. It’s like framing your coaster with tiny jewelsbecause you’re classy now.
How It Works
- Center: map/flag-inspired paper, scrapbook stars, vintage sheet music with a patriotic twist, or a subtle pattern
- Seal: a durable clear coat suitable for coasters
- Border: gems glued around the perimeter for a “sparkle rim”
This method is especially great if you’re making sets for party favors, because you can batch steps: cut all paper, glue all paper, seal all paper, then add gems assembly-line style.
Patriotic Design Ideas That Don’t Feel Like a Costume Party
Patriotic can mean “full flag,” but it can also mean subtle nodscolors, stars, stripes, and fireworks-inspired geometry. Here are designs that look intentional even if you’re crafting while a playlist screams “SUMMER ANTHEM” in the background.
1) The Modern Flag (Abstract)
Use blocks of red and white with a small blue corner. Keep lines clean; let the glass texture do the talking. Works best in resin molds for a crisp finish.
2) Starburst Fireworks
Place a cluster of white/clear gems in the center, then radiate red and blue outward like a firework. Add a few metallic flecks if using resinjust enough sparkle to feel festive without turning your drink into a disco ball.
3) Ombre Stripes
Fade from deep blue to pale blue, then to clear/white, then into pinkish red and deeper red. The gradient looks high-end and hides minor inconsistencies (a.k.a. “artistically forgiving”).
4) Negative-Space Stars
Instead of adding stars, create a star shape by leaving a star-shaped gap and filling around it with gems or resin tint. It reads “patriotic” in a clever, minimalist way.
5) Picnic-Table Pop
Use a gingham-style pattern in the center (paper or paint), then add a gem border in red/white/blue. It’s perfect for summer BBQs and looks great in photosyes, your coasters can be “content.”
Materials and Build Choices: What Matters for Real Use
Flatness vs. Texture
If you want your glass to sit perfectly stable, resin is the smoothest option. Mosaic-style coasters are slightly textured; most glasses will still sit fine, but thin-stemmed drinkware may wobble if the surface has big height differences. The fix is simple: keep gem sizes consistent and press them level during glue-up.
Condensation and Water Resistance
Coasters exist for condensation. That means your finish must handle moisture:
- Resin: naturally water resistant once fully cured.
- Grouted mosaic: needs a grout sealer to resist staining and moisture intrusion.
- Decoupage: needs a durable topcoat and sealed edges to prevent peeling.
Heat Tolerance Reality Check
Coasters are usually for cold drinks, but mugs happen. Many finishes can handle warm mugs, but “just pulled from the oven” is trivet territory. If you want true heat handling, consider a tile base with sealed grout (and still be cautious). When in doubt, treat coasters as drink guardiansnot cast-iron babysitters.
Backings: The Unsung Heroes
The best-looking coaster in the world still loses if it scratches your table. Add cork sheets, felt circles, or adhesive felt pads to the underside. Besides scratch protection, backings also reduce sliding and “clack” noisebecause nobody wants their living room to sound like a tiny cymbal concert.
Safety Notes (Because Freedom Rings, Not Your Skin)
Patriotic crafting should end with pretty coastersnot with irritated skin, headachey fumes, or a panic-Googling session at midnight. A few basics keep things safe:
- Wear nitrile gloves when handling resin, hardeners, and many sealers.
- Ventilate wellfresh air matters more than good intentions.
- Protect eyes when mixing, sanding, or working with gritty materials like grout.
- Use appropriate respiratory protection if your products or workspace call for it (especially in enclosed areas).
- Wash hands properly after finishing, even if you “barely touched anything.” Craft supplies are sneaky.
Also: read labels. I know, I knowreading instructions is not the American pastime we were promised. But it is the fastest path to coasters that cure, seal, and survive an actual party.
How to Make Them Look “Boutique,” Not “Craft Table Aftermath”
Keep a Tight Color Palette
Red, white/clear, and blue are already bold. Add one accent maxsilver, gold, or a tiny bit of pearl shimmer. Too many extras and your coaster starts looking like it’s campaigning for class president.
Use Uniform Gem Size
Mixing sizes can work, but it’s harder to keep the surface level. Uniform gems create that satisfying “professional mosaic” look.
Edge Finishing Is Everything
A clean edge reads “store-bought.” For mosaic coasters, wipe grout haze early and seal evenly. For resin coasters, consider a light sanding on sharp edges (once fully cured) for a comfortable hand feel.
Troubleshooting Common Problems
Problem: “My resin is cloudy or sticky.”
Cloudiness can come from moisture, aggressive mixing, or incompatible additives. Stickiness usually means inaccurate measuring, poor mixing, or cold curing conditions. Measure precisely, mix thoroughly, and cure on a level surface at the recommended temperature.
Problem: “My gems floated or shifted.”
Pour a thin base layer first, let it thicken slightly, then place gems and finish pouring. Or “tack” gems in place with a tiny dab of resin, then do the full pour.
Problem: “My grout looks hazy on the gems.”
That’s grout haze. Wipe earlier and in multiple gentle passes with clean water and a soft cloth. Avoid soaking; you want to clean the surface, not rehydrate the grout.
Problem: “My coasters slide around.”
Add backing. Cork sheets, felt circles, or small adhesive feet instantly improve grip and protect surfaces.
Gift and Party Uses (Where These Coasters Really Shine)
Patriotic glass gem coasters are tailor-made for summer hosting: Fourth of July cookouts, Memorial Day gatherings, Labor Day weekends, and “we’re just happy it’s warm outside” patio hangs. They also make thoughtful gifts:
- Host gifts: bundle 4 coasters with a ribbon and a handwritten note.
- Party favors: make small sets, each with a slightly different pattern.
- Family craft tradition: let kids design patterns (with safe materials), then adults handle sealing/resin steps.
- Care packages: include coasters with coffee or cocoa for a cozy “home” vibe.
Care and Cleaning
No matter the method, treat handmade coasters like handmade things:
- Wipe clean with a damp cloth; avoid abrasive scrubbers.
- Skip the dishwasher unless your materials explicitly say otherwise (most craft finishes won’t love it).
- Avoid prolonged soaking, especially for decoupage or grouted coasters.
- Re-seal if needed for mosaic/grout designs after heavy use over time.
Real-World “Experience” Section: What It’s Like to Use and Share Patriotic Glass Gem Coasters (About )
Here’s the fun part: once these coasters leave the craft table, they start collecting stories. Not in a spooky waymore like the “Oh wow, where did you get these?” way. Makers often notice that glass gem coasters do something regular coasters don’t: they become conversation starters. Someone picks up a drink, sees the sparkle, and suddenly you’re discussing design choices like you’re on a home décor makeover show. (“Yes, I went with a starburst. No, I will not apologize.”)
At summer gatherings, the practical benefit shows up fast. Condensation happens, but the coaster looks unfazed. People tend to trust coasters that feel substantial, and glass gems have that satisfying weight and “click” when you set them down. The best reactions usually come from guests who didn’t realize a coaster could be both useful and genuinely pretty. It’s a tiny upgrade, but it changes the vibelike swapping paper plates for real dishes, except nobody has to wash anything fragile.
If you make a set for a patriotic holiday, there’s also a sweet ritual to it: pulling them out every year. They become seasonal décor you actually use, not just something that sits on a shelf while you wonder why you own seven different flag-themed napkin rings. Over time, small “maker quirks” can become features. Maybe one coaster has a slightly off-center stripe, and that becomes “the lucky one” that someone always grabs. Maybe your sparkliest coaster becomes the default for iced tea because it photographs well andlet’s be honestsomeone is always taking a picture of the spread.
In gift-giving situations, these coasters tend to land especially well because they’re both personal and practical. People like handmade items they can actually use without feeling guilty. A four-pack tied with ribbon is an easy win: it feels thoughtful, it fits in a small bag, and it doesn’t require a speech to explain what it is. If you include a tiny care note (“wipe clean, don’t soak”), it feels professionallike you’re a small-batch artisan, not someone who panic-crafted at 11 p.m. (Even if you did. No judgment.)
For families, coasters can become a low-stress tradition: kids pick patterns with gems, adults handle the sealing or resin. That collaboration often becomes part of the memory. The coaster isn’t just red-white-and-blueit’s “the set we made before the backyard fireworks,” or “the ones we brought to Grandma’s,” or “the coasters that survived Uncle Dave’s enthusiastic lemonade pouring.” The best handmade home items earn their keep through use, and patriotic glass gem coasters tend to do exactly that: they show up, they sparkle, they protect the table, and they quietly make gatherings feel a little more intentional.
Conclusion
Patriotic glass gem coasters are a rare craft project that checks every box: fun to make, satisfying to customize, useful in daily life, and festive without being flimsy. Whether you go mosaic-style for texture, resin-encased for a sleek shine, or a quick decoupage-and-gem hybrid for speed, the key is the same: build for real useseal properly, add a protective backing, and keep your design bold but clean.
Make a set for your next summer gathering, keep one “showpiece” coaster for yourself, and don’t be surprised if guests ask to take one home. Your table will stay protected, and your décor will quietly say, “Yes, I host. And yes, I have coasters that sparkle.”


