Table of Contents >> Show >> Hide
- Quick Snapshot
- What Are Peanut Butter Blossoms?
- Ingredients That Actually Matter (and Why)
- Classic Peanut Butter Blossoms Recipe
- Pro Tips for Thick, Bakery-Style Blossoms
- Easy Variations (Because One Cookie Can Have Many Personalities)
- Fixes & Troubleshooting
- Make-Ahead, Storage, and Freezing
- Serving Ideas (a.k.a. How to Make Them Disappear Faster)
- of Real-World “Blossom Experiences” (What Bakers Notice After a Few Batches)
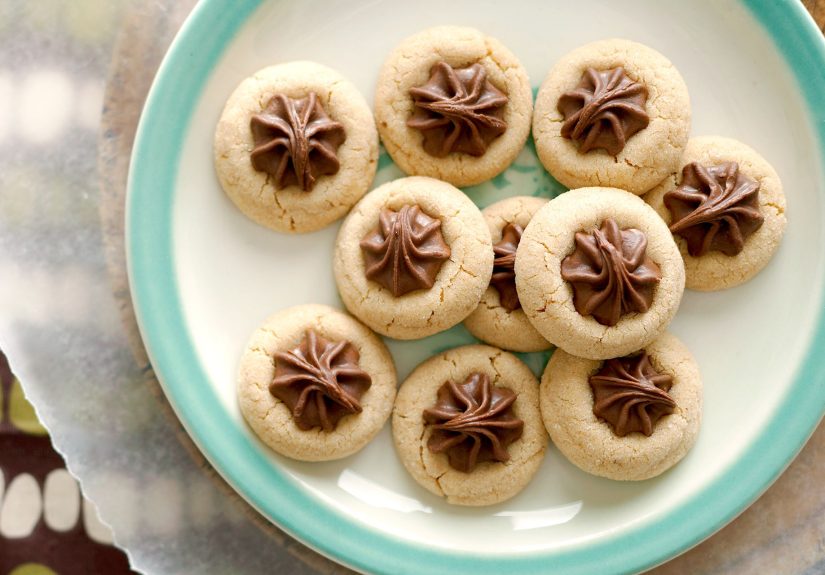
Peanut butter blossoms are the cookies that show up to every holiday party like the friend who always brings good vibes (and somehow never forgets the napkins).
You get a soft, peanut-buttery cookie rolled in sugar for a little sparkle, then topped with a chocolate kiss that looks fancy but requires exactly zero fancy skills.
They’re sweet-salty, nostalgic, and dangerously easy to “taste test” into disappearance.
This guide gives you a classic, reliable peanut butter blossoms recipe plus the small details that make a big differencelike how warm your butter should be,
when to add the kisses, and how to keep your cookies thick instead of turning into peanut butter pancakes.
Quick Snapshot
- Yield: About 36 cookies
- Time: 20 minutes prep + 30–60 minutes chill (recommended) + 8–10 minutes bake per batch
- Difficulty: Easy (cookie confidence booster level)
- Best for: Holiday cookie trays, cookie swaps, bake sales, and “I need a win today” baking
What Are Peanut Butter Blossoms?
Peanut butter blossoms (also called peanut butter kiss cookies) are classic American cookies: a tender peanut butter dough rolled in granulated sugar,
baked until just set, and finished with a chocolate kiss pressed into the center. The cookie cracks slightly around the edges when you add the kiss
that’s not a mistake; that’s the “blossom.”
Ingredients That Actually Matter (and Why)
Peanut butter
For the most consistent results, use creamy, no-stir peanut butter (the kind that doesn’t separate). Natural peanut butter can work, but it’s more likely to
make cookies dry, crumbly, or unpredictable because oil separation changes the fat-to-dry balance. If you only have natural peanut butter, see the “Fixes & Troubleshooting”
section for adjustments.
Butter (and optional shortening)
Butter gives flavor, but it also melts fastermeaning cookies can spread if the dough is warm. Some classic versions use a mix of butter and shortening to help cookies stay puffy.
This recipe uses butter only for taste, then relies on chilling and correct shaping for thickness. (Translation: you get rich flavor and pretty cookies.)
Brown sugar + white sugar
Brown sugar adds chew and a subtle caramel vibe; granulated sugar helps structure. Rolling the dough balls in sugar before baking adds sparkle and a light crunch that plays
nicely with the soft center.
Leaveners: baking soda and baking powder
Baking soda helps spread and browning; baking powder helps lift. Using a little of both tends to give that classic blossom shape: puffy but not cakey.
Flour measurement
Too much flour = dry, crumbly cookies. Too little flour = flat cookies. Spoon-and-level your flour, or weigh it if you can. Cookie math is real.
Classic Peanut Butter Blossoms Recipe
Ingredients
- 1 3/4 cups (210g) all-purpose flour
- 1 teaspoon baking soda
- 1/2 teaspoon baking powder
- 1/2 teaspoon fine salt
- 1/2 cup (113g) unsalted butter, softened (cool-room-temp, not melty)
- 1/2 cup (128g) creamy no-stir peanut butter
- 1/2 cup (100g) granulated sugar
- 1/2 cup (110g) packed light brown sugar
- 1 large egg, room temperature
- 2 tablespoons (30ml) milk
- 1 teaspoon vanilla extract
- 1/3 cup (about 65g) granulated sugar, for rolling
- 36 chocolate kiss candies, unwrapped (milk chocolate is classic, but use your favorite)
Step-by-step instructions
-
Prep your setup.
- Line 2 baking sheets with parchment paper (or use silicone baking mats).
- Unwrap the kisses and set them in the freezer while you make the dough. This helps them hold their shape longer when pressed into warm cookies.
- Preheat oven to 350°F (177°C).
-
Mix the dry ingredients.
In a medium bowl, whisk together the flour, baking soda, baking powder, and salt. Set aside. -
Cream butter, peanut butter, and sugars.
In a large bowl (or stand mixer), beat the softened butter, peanut butter, granulated sugar, and brown sugar for 2–3 minutes,
until fluffy and well combined. Scrape down the bowl once so nothing hides at the bottom like a little floury goblin later. -
Add egg, milk, and vanilla.
Beat in the egg, then mix in the milk and vanilla until smooth. -
Combine wet + dry.
Add the dry ingredients to the wet ingredients and mix just until no dry streaks remain. Don’t overmixcookies don’t need a cardio session. -
Chill (recommended).
Cover and refrigerate the dough for 30–60 minutes. If your kitchen is warm or your dough feels soft and sticky, lean toward the full hour.
Chilling helps prevent spreading and boosts that thick, chewy texture. -
Roll and sparkle.
Scoop dough into 1-inch balls (about 1 tablespoon each). Roll each ball in the extra granulated sugar and place on prepared baking sheets,
spacing them about 2 inches apart. -
Bake.
Bake for 8–10 minutes, or until the edges look set and the tops look slightly puffed. They should not look deeply browned.
(If you wait for “done” cookies, you’ll end up with “why are these crunchy” cookies.) -
Add the kisses.
Remove the cookies from the oven and immediately press a chocolate kiss into the center of each cookie. The cookie will crack around the edgesperfect.
Press straight down gently, just until the kiss is snug. -
Cool and set the chocolate.
Let cookies cool on the baking sheet for 5 minutes, then transfer to a wire rack. For faster “no-smear stacking,” move cookies to a plate and
chill for 10 minutes to firm the chocolate.
Pro Tips for Thick, Bakery-Style Blossoms
1) Use cool-room-temp butter (not shiny or greasy)
If your butter is too warm, the dough gets soft and cookies spread. Softened butter should dent easily when pressed but still hold its shape.
If it looks oily or half-melted, pop it in the fridge for 10–15 minutes before mixing.
2) Don’t grease the baking sheet
Extra grease encourages spread. Parchment paper or a silicone mat gives you easy release without turning the cookie into a thin skating rink.
3) Keep your baking sheets cool between batches
Putting dough on a hot baking sheet starts melting the fats before the oven even gets a chancehello, flat cookies. Rotate sheets and let them cool.
4) Press the kiss right away
The cookies need to be warm enough to accept the kiss, but not so hot that the chocolate slumps dramatically. Freezing the kisses helps them keep their shape,
and chilling the finished cookies briefly helps the chocolate set cleanly.
5) Measure flour like you mean it
If you scoop flour directly with the measuring cup, you can pack in extra flour and end up with dry, crumbly cookies. Spoon flour into the cup and level it off,
or use a kitchen scale.
Easy Variations (Because One Cookie Can Have Many Personalities)
Swap the candy
- Hugs: For that striped look and a little extra “ooh.”
- Dark chocolate kisses: Less sweet, more dramatic.
- Mini peanut butter cups: A richer center and a slightly softer top.
- Chocolate stars or seasonal shapes: Festive and easier to unwrap in bulk.
Switch the nut butter
- Almond butter blossoms: Mild, toasty flavor; consider chilling longer because texture varies by brand.
- Sunflower seed butter: A nut-free option for many classrooms. (Heads-up: it can turn green from a natural chemical reaction with baking soda. It’s harmless, just surprising.)
Make them holiday-party extra
- Roll dough balls in colored sanding sugar or holiday sprinkles.
- Add 1/2 teaspoon cinnamon to the dry ingredients for a warm “cookie tray” vibe.
- Dip half the baked cookie (after fully cooling) in melted chocolate for maximum chocolate commitment.
Fixes & Troubleshooting
“Why did my peanut butter blossoms turn out flat?”
- Dough too warm: Chill 30–60 minutes. If your kitchen is warm, chill between batches too.
- Butter too soft or melted: Start with properly softened butter, not melted.
- Old leaveners: Baking soda and powder lose strength over time. If they’re ancient, your cookies will act tired too.
- Greased pan or hot pan: Use parchment and cool your sheets.
- Not enough flour: Recheck measurements; weigh flour for best accuracy.
“Why are my cookies dry or crumbly?”
- Too much flour: Spoon-and-level or weigh.
- Overbaking: Pull them when edges are set and centers look slightly underdonethey finish as they cool.
- Natural peanut butter: If using it, add 1 tablespoon milk and consider reducing flour by 1–2 tablespoons.
“My kisses melted or smeared. Help.”
- Freeze the kisses while dough chills.
- Transfer cookies gently (they’re soft at first), then chill finished cookies for 10 minutes to set the chocolate.
- Don’t stack until the kisses are fully firm.
Make-Ahead, Storage, and Freezing
Make-ahead
You can make the dough ahead and refrigerate it for up to 2–3 days. Let it sit at room temperature for 10–15 minutes if it becomes too firm to scoop.
Storage
Store cookies in an airtight container at room temperature for 3–7 days (depends on your kitchen humidity and how “sealed” your container is).
Let cookies cool completely before storing so the chocolate doesn’t smear.
Freezing
- Freeze baked cookies: Up to 2–3 months. Thaw at room temperature.
- Freeze dough balls: Roll and sugar-coat first, freeze on a tray, then store in a freezer bag. Bake from frozen, adding 1–2 minutes.
- Best chocolate look: Press kisses in immediately after baking, then chill cookies briefly to set.
Serving Ideas (a.k.a. How to Make Them Disappear Faster)
- Cookie swap MVP: Pack them in a single layer or use parchment between layers once kisses are firm.
- Hot cocoa pairing: Peanut butter + chocolate + warm cocoa = winter happiness.
- Dessert board: Mix blossoms with pretzels, marshmallows, and fruit for a holiday snack board that looks fancy and feels fun.
of Real-World “Blossom Experiences” (What Bakers Notice After a Few Batches)
Peanut butter blossoms have a special talent: they turn “I’ll just bake a quick batch” into “why is my cookie tray empty already?”
And if you’ve ever made them for a party, you’ve probably seen the same pattern play out in kitchens everywhere.
Experience #1: The Cookie Swap Sprint. In a cookie swap situation, blossoms are the overachievers. They look festive without icing, they travel well,
and they’re instantly recognizable (people will grab them firstno offense to the oatmeal raisin crowd). The trick bakers learn quickly is that the kisses need a few minutes
to set before packing. If you’re rushing, the “freezer for 10 minutes” move feels like a cheat code. It’s the difference between neat little chocolate tops and a box that looks
like it survived a minor earthquake.
Experience #2: The Warm Kitchen Plot Twist. These cookies can be perfectly behaved in December and mysteriously chaotic in a warm kitchen. Butter softens faster,
dough gets sticky, and suddenly every cookie spreads like it’s trying to claim extra territory on your baking sheet. That’s why so many seasoned bakers chill the doughnot because
it’s “fancy,” but because it’s practical. If your dough starts feeling like peanut butter frosting, it’s not you. It’s physics. Toss it back in the fridge and you’ll be back in control.
Experience #3: Baking With Kids (or the Inner Kid in All of Us). Peanut butter blossoms are hands-on in the best way:
rolling dough balls, coating them in sugar, and giving each cookie a chocolate “button” at the end. It’s basically edible arts and crafts.
The only important grown-up job is handling the hot pan and timing the kiss press. A fun trick is to unwrap and freeze the kisses ahead of time,
then set up a “kiss station” so it’s easy to top each cookie quickly. That little assembly line makes the process smootherand cuts down on the “Where did all the kisses go?” mystery.
Experience #4: The Thickness Debate. Some people want a crisp peanut butter cookie with a kiss on top. Others want thick, soft, bakery-style blossoms.
If you’re Team Thick, chill time and portioning are your best friends. Use a tablespoon scoop, roll tight balls (don’t flatten), and pull the cookies when the edges are set but the centers
still look a bit soft. The cookies finish baking as they cool, and you’ll get that tender bite that feels like a warm hugexcept you can eat it.
Experience #5: The “These Are Better Tomorrow” Surprise. Like many peanut butter cookies, blossoms often taste even better the next day when the flavors settle
and the cookie softens slightly under the chocolate. That makes them ideal for planning ahead: bake the day before a party, store airtight, and show up looking like you have your life together.
(Even if your kitchen is covered in sugar. The cookie box doesn’t tell on you.)
![18 Best Types of Charts and Graphs for Data Visualization [+ How to Choose]](https://corkopencoffee.org/wp-content/uploads/2026/05/18-best-types-of-charts-and-graphs-for-data-visualization-how-to-choose-qKM1PBYG-thumb.jpg)


