Table of Contents >> Show >> Hide
- What “Photo Roboto” Is (and Why Everyone Lines Up to Use It)
- Why a Vintage TLR Camera Shell Works So Well
- Core Parts, Cost, and the “Weekend Build” Reality Check
- Build Overview: How Photo Roboto Comes Together
- How to Make Thermal Prints Look Better Than You’d Expect
- Reliability for Real Humans: Designing for Parties, Not Tutorials
- Thermal Paper Reality: Eco and Exposure Considerations
- Fun Upgrades That Make Photo Roboto Feel “Pro”
- Troubleshooting Cheat Sheet (Because the Party Won’t Wait)
- Conclusion: Build the Bot, Keep the Memories
- Bonus: of Real-World Photo Roboto Experiences (The Stuff You Only Learn After Build Day)
There are two kinds of party photos: the ones that live forever in someone’s camera roll… and the ones people actually
keep. Photo Roboto belongs in the second category. It’s a DIY snapshot booth that turns a vintage camera into a
lovable little “robot” that takes a picture when someone slaps a big arcade button, then spits out a lo-fi print on receipt
paper like a tiny nostalgia vending machine.
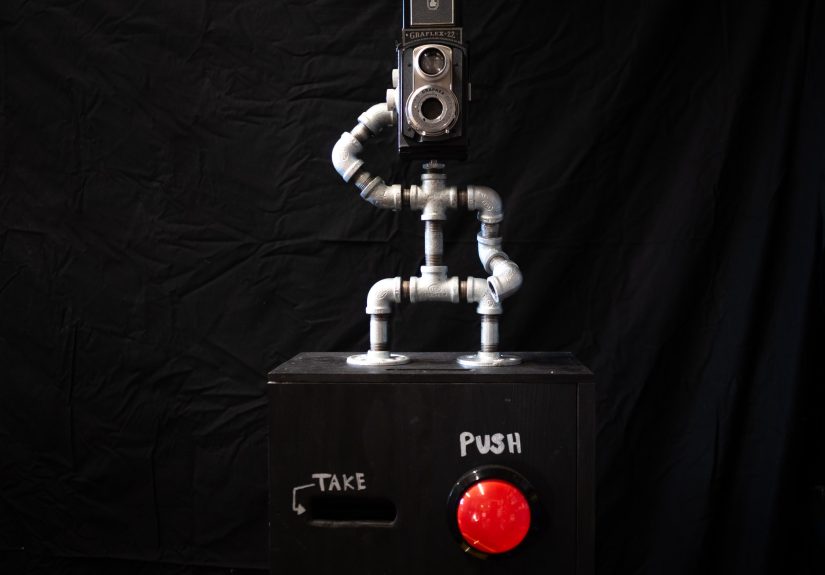
The magic trick is simple and brilliant: hide a modern Raspberry Pi camera inside an old twin-lens reflex (TLR) camera body,
pair it with a thermal receipt printer, and wrap the whole thing in a playful robot costumeoften made from plumbing pipe.
The results aren’t glossy studio portraits. They’re charming, high-contrast, slightly imperfect souvenirs that feel like a
throwback even though you built them with modern parts.
What “Photo Roboto” Is (and Why Everyone Lines Up to Use It)
Photo Roboto is a self-contained DIY photo booth designed for crowds: weddings, birthdays, maker faires, holiday parties, or
that one friend who hosts gatherings like it’s their full-time job. The user experience is intentionally brain-simple:
- Stand in front of the “camera.”
- Press the giant shiny button.
- Smile while an LED cues the moment.
- Receive a printed photo strip on receipt paperinstantly.
People love it because it’s tactile. Phones are infinite; prints are scarce. A thermal print is also weirdly flattering in the
way a good black-and-white filter is flattering: it turns messy backgrounds into bold shapes and makes everyone look a little
more like a character in a retro comic.
Why a Vintage TLR Camera Shell Works So Well
The vintage camera isn’t just a costumeit solves real design problems while also looking ridiculously cool. A TLR body
typically has enough internal space to mount a small camera module and route a ribbon cable. More importantly, many TLRs have
a time (“T”) shutter mode that can stay openuseful because a Pi camera module can’t “see” through a closed mechanical shutter.
In Photo Roboto-style builds, makers often remove the original lens and rely on the Pi camera optics instead, avoiding a whole
universe of alignment and optical engineering headaches.
Practical bonus: the camera’s tripod socket gives you a sturdy mounting point, and the whole thing instantly reads as “photo
booth” to guestseven before they see the printer slot.
Core Parts, Cost, and the “Weekend Build” Reality Check
A Photo Roboto build is usually labeled as a weekend project with moderate difficultyand that’s accurate if you’re comfortable
drilling holes, crimping connectors, and doing basic Raspberry Pi setup. Budget-wise, you’re commonly in the $200–$350 range
depending on what you already own and whether you score deals on the camera body and printer.
The essentials
- Raspberry Pi (any model with USB and GPIO access) plus SD card and power
- Raspberry Pi camera module (with an appropriate ribbon cable length)
- Thermal receipt printer (USB models are simplest; some builds use an Epson TM-series printer)
- Big arcade button (often with an LED ring) plus a smaller power/shutdown button
- Robot “body” materials (pipe fittings, brackets, or 3D-printed mounts)
- Wooden base to house the printer, power supply, cable management, and a clean paper exit slot
Nice-to-haves that save your sanity
- Auto-cutter printer so prints don’t become one long receipt scroll of human faces
- Extra paper rolls because parties are basically “unexpected load testing”
- Strain relief + cable routing to prevent the “someone tripped and now the booth is modern art” moment
Build Overview: How Photo Roboto Comes Together
You can build Photo Roboto in lots of styles, but the most successful versions follow the same architecture: camera shell + Pi
and sensor up top; printer and power down below; one “do the thing” button; and code that stays boring (boring code is reliable
code).
1) Pick and prep the camera
Choose a TLR camera body you’re not emotionally bonded to. You’re likely going to remove the taking lens and keep the shutter
open in time mode. Look for internal space for the camera module and a path for the ribbon cable. Go slowly during disassembly,
keep track of parts, and expect that “vintage” sometimes means “held together by optimism.”
2) Mount the Pi camera where the taking lens used to be
The Pi camera module typically sits behind the empty taking lens opening (not the viewfinder lens). Some makers 3D print a
bracket; others use the timeless engineering materials of cardboard and duct tape. Either way, you want it secure, aligned,
and protected from guests who believe every object at a party is a button.
3) Give your robot a body (maximum personality per ounce)
The classic Photo Roboto vibe is plumbing pipe: elbows, tees, flangesstuff that makes it look like a friendly industrial
helper. The camera mounts to the “neck” via the tripod socket using a bolt and adapter hardware. This is where you can lean
into your theme: steampunk, mid-century sci-fi, cute retro appliance, or “robot that definitely used to work in a library.”
4) Build the base to house the printer and power
The base is what makes the project feel finished. A compact wooden box (for example, roughly 14” × 12” × 8” in some builds)
can hold the thermal printer, power supply, and an internal power strip. You’ll cut:
- a front hole for the large arcade button,
- a rear hole for a power/shutdown button,
- a top pass-through for cables running up to the camera,
- and a narrow slot for printed photos to exit cleanly.
Position the printer as close to the exit slot as possible. Thermal prints don’t shoot out like a confetti cannon, so if the
printer is set too far back, guests will assume it’s broken and begin “fixing” it with aggressive curiosity.
5) Wire buttons and LEDs to the Pi (party-proof edition)
A typical wiring approach uses a simple harness: ground shared across components, and individual GPIO pins reading buttons or
driving an LED indicator. If your arcade button LED is rated for higher voltage, you may need to change the resistor (or use a
proper driver) so the LED can safely run from the Pi’s 5V or 3.3V systemdepending on your specific hardware.
The best “crowd feature” is a dedicated shutdown button. A booth that loses power mid-write can corrupt an SD card. A booth
that shuts down gracefully survives to party another day.
6) Keep the software simple: button → photo → print
The code is usually a small script that waits for a button press, cues an LED, captures an image, processes it for thermal
printing (contrast, resizing, dithering), then sends it to the printer. Many DIY booths use Python because it’s fast to iterate,
has friendly image libraries, and plays nicely with GPIO input.
The finishing touch is auto-start on boot. If the booth restarts, it should come back ready without anyone opening a terminal.
Your guests did not RSVP to watch Linux troubleshooting.
How to Make Thermal Prints Look Better Than You’d Expect
Thermal printers are not art critics. They’re enthusiastic stampers. If you feed them a full-resolution color selfie, you’ll
get a muddy gray rectangle that looks like a ghost trying to remember your face. The secret is to pre-chew the image so the
printer only has to do the final bite.
Lighting: your #1 quality upgrade
- Use even, frontal light. A soft ring light or diffused LED panel reduces harsh shadows.
- Separate subject from background. A small backdrop or a few feet of space prevents “wall texture soup.”
- Encourage faces in the center. Wide group shots look great on screens but turn into tiny heads on receipts.
Image processing tips that actually help
- Convert to grayscale, then boost contrast. Thermal prints love bold edges.
- Resize to printer width. Don’t let the printer guess; it will guess wrong.
- Dither intentionally. Floyd–Steinberg-style dithering can produce a satisfying “newspaper photo” look.
- Add a border + label. Event name, date, or a tiny “Photo Roboto” stamp makes it feel collectible.
Want an easy crowd-pleaser? Offer two print styles: “Classic” (high-contrast B&W) and “Dramatic” (extra contrast + grain).
You can map those to different buttonsor keep one button and rotate styles every few prints so people don’t form a committee.
Reliability for Real Humans: Designing for Parties, Not Tutorials
A DIY booth works perfectly in your workshop. Then you bring it to a wedding and discover a new law of physics: people will
press the button while the printer is still printing, ask if it’s done, then press it again “just to be sure.”
Make it tough
- Debounce the button in software so one press equals one photo.
- Lock out re-triggers while printing (use the LED to communicate “busy”).
- Keep a spare paper roll within reach, plus a small tool for opening the printer quickly.
- Hide cables and secure the base so the booth can’t be “repositioned” by enthusiastic dancers.
Use a printer built for volume
A POS-class thermal printer is designed for repetitive printing and, in many models, includes an auto-cutter rated for a large
number of cuts. That matters when your booth becomes the unofficial entertainment centerpiece and starts printing nonstop.
Thermal Paper Reality: Eco and Exposure Considerations
Receipt prints are part of the charmand part of the tradeoff. Thermal paper can be less eco-friendly than plain paper, and
many thermal receipts have historically used chemical developers (such as BPA, and later substitutes like BPS) that have raised
health concerns in exposure research. You don’t need to panic, but you should be thoughtfulespecially if your booth will run
for hours and people will handle lots of prints.
Practical ways to reduce downsides
- Look for phenol-free / BPA-free thermal rolls from reputable suppliers when compatible with your printer.
- Encourage quick handling (grab the print, don’t rub it like a magic lamp).
- Offer a digital gallery option so guests can keep photos without everyone needing a printed copy.
- Consider an ink-based printer if your priority is recyclable paper and longer-lasting prints.
Also note: thermal prints can fade with heat, sunlight, and time. That’s not a bug; it’s basically the medium’s personality.
If you want “frame it forever,” keep a digital backup.
Fun Upgrades That Make Photo Roboto Feel “Pro”
Upgrades guests notice immediately
- Preview screen (even a small HDMI display) so people can adjust before printing.
- Countdown animation so the photo happens when faces are ready, not mid-blink.
- Two-button mode: one for “take photo,” one for “print,” so people can retake if needed.
- Custom overlays: event name, a frame, or themed graphics.
Upgrades you’ll appreciate later
- Cloud or local backup (auto-save to USB drive or upload to a private gallery).
- Maintenance mode with a hidden key combo to reprint, test the printer, or check camera alignment.
- Better enclosure airflow so the base doesn’t become a warm electronics loaf after hours of use.
Maker community builds often remix these ideas: some use Arduino for lighting/countdowns and a Raspberry Pi for filters and Wi-Fi
slideshows; others go touchscreen-first for a polished kiosk feel. Photo Roboto sits in the sweet spot: physical, playful, and
surprisingly capable.
Troubleshooting Cheat Sheet (Because the Party Won’t Wait)
The button does nothing
- Check the ground/common wiring first (one loose ground breaks everything).
- Confirm the GPIO pin number matches your code.
- Test with a simple GPIO input script before debugging the full booth code.
The camera shows a black image
- Confirm the ribbon cable is fully seated and oriented correctly.
- Verify camera enablement and permissions on the Pi.
- Make sure the vintage shutter isn’t blocking the view (time mode should be open).
The printer feeds paper but prints faint/blank
- Check you loaded thermal paper the right way (yes, it matters).
- Increase contrast and dither strength in your image processing step.
- Confirm the correct driver/print path for your printer model.
It prints… but it’s ugly
- Add more light and reduce background clutter.
- Resize to printer width and apply dithering intentionally.
- Test a “portrait zone” marker on the floor so people stand where you expect.
Conclusion: Build the Bot, Keep the Memories
Photo Roboto is one of those rare DIY projects that hits three targets at once: it’s a fun build, it’s a functional tool, and
it becomes a social magnet wherever you set it down. The vintage camera shell gives it instant charm, the Raspberry Pi makes it
flexible, and the thermal printer delivers the kind of physical souvenir people actually take homeand rediscover later in a
pocket, a scrapbook, or the mysterious kitchen drawer where everyone keeps batteries and rubber bands.
Build it once, tweak it forever, and don’t be surprised if your “photo booth” becomes the most-photographed thing at the event.
Bonus: of Real-World Photo Roboto Experiences (The Stuff You Only Learn After Build Day)
The first time you run a Photo Roboto-style booth with actual guests, you’ll discover that your project has two phases:
engineering and crowd psychology. Engineering is the part where you carefully route cables,
align a camera module, and feel proud of your clean wiring harness. Crowd psychology is the part where someone presses the
button with their elbow while holding a drink, asks “Is it working?” three seconds later, and then tries to help by pressing it
again. If you build in a “busy” lockout and a bright LED cue, you’ll save yourself from becoming the booth’s full-time babysitter.
Lighting will surprise you. In a workshop, overhead light seems fine. At a party, lighting becomes a chaotic mix of warm bulbs,
colored LEDs, and whatever moody ambiance someone thought was “romantic.” Thermal prints amplify that chaos. The best experience
upgrade I’ve seen makers talk and write about is a simple, consistent light source near the camerasomething soft and frontal.
When you add it, prints go from “cryptid sighting” to “wow, that’s actually flattering.”
You’ll also learn that paper is a consumable… and a social object. Guests love the receipt print because it feels instant and
physical, but they also treat it like a collectible. People compare prints, trade them, and sometimes request “one more for my
friend,” which is how a photo booth turns into a tiny print shop. Bring extra rolls. Then bring one more. If you’re using an
auto-cutter printer, you’ll feel like a genius, because the booth will keep up with the line without producing a single
accordion-scroll of faces.
Expect maintenance moments. Thermal printers occasionally need a quick open-and-close to reseat paper. A camera ribbon cable
that’s slightly loose may behave perfectly for an hour, then act dramatic when the booth gets bumped. The best practice is to
design the base with easy accessnot “remove twelve screws,” but “open one panel and fix it in 20 seconds.” When you do,
you can handle small issues without killing the vibe.
The sweetest surprise is what people do afterward. You’ll see prints taped to mirrors, stuck on laptops, slipped into wallets,
and used as bookmarks. Digital photos disappear into the cloud. These little thermal snapshots show up later in the real world,
like friendly evidence that the party actually happened. That’s the whole pointand the reason you’ll keep improving the booth
long after the event is over.


