Table of Contents >> Show >> Hide
- What Is a Cane Chair Seat, Exactly?
- Should You Repair the Chair or Replace the Seat?
- Step One: Inspect the Chair Like a Detective
- Tools and Materials for Repairing a Cane Chair Seat
- How to Repair a Pressed Cane Chair Seat
- How to Repair a Hand-Woven Cane Chair Seat
- What About Loose Joints and Wobbly Frames?
- Finishing and Caring for a Repaired Cane Seat
- Common Mistakes to Avoid
- Is Repairing a Cane Chair Seat Worth It?
- Experiences People Often Have When Repairing a Cane Chair Seat
- Conclusion
A broken cane chair seat has a special talent for looking dramatic. One tiny hole appears, then another, and before long the chair looks less “vintage treasure” and more “do not sit unless you enjoy surprises.” The good news is that repairing a cane chair seat is absolutely doable when you know what kind of cane seat you have and what the repair actually involves.
If you start with the wrong method, however, this project can turn into a small domestic tragedy involving loose strands, mystery glue, and a chair frame that suddenly seems to have a personal grudge. The trick is simple: identify the seat type first, repair the chair frame second, and only then tackle the cane itself.
Whether you are restoring a family heirloom, saving a thrift-store find, or just refusing to let a beautiful chair retire before its time, this guide walks through the real process of repairing a cane chair seat. We will cover how to tell pressed cane from hand-woven cane, what tools you need, how to replace damaged material, and how to help your finished seat last longer without babying it like a museum artifact.
What Is a Cane Chair Seat, Exactly?
Before you begin repairing a cane chair seat, it helps to know what cane actually is. In furniture terms, cane is made from the outer skin of the rattan plant. It is flexible, durable, and commonly woven into open webbing for chair seats, chair backs, and decorative panels. That airy woven look is one reason cane furniture stays stylish decade after decade: it has texture, personality, and just enough “I know good design when I see it” energy.
But not every cane chair is built the same way. In fact, most repairs fall into one of two categories:
1. Pressed Cane or Pre-Woven Cane
This is the version most DIYers can handle with confidence. The cane comes as a woven sheet and fits into a groove around the seat opening. A reed spline is tapped into that groove to hold the cane in place. If your chair seat has a channel around the inside edge instead of individual drilled holes, you are likely dealing with pressed cane.
2. Hand-Woven or Strand Cane
This method uses individual strands woven through holes drilled all around the seat frame. It is beautiful, traditional, and much more labor-intensive. If your chair has visible holes around the perimeter, you are looking at hand caning.
That distinction matters because a pressed cane repair is usually a straightforward replacement project, while a hand-woven cane repair is closer to a craft discipline. Not impossible, but definitely not the same as swapping out a panel on a Saturday afternoon while wearing old jeans and pretending you are on a restoration show.
Should You Repair the Chair or Replace the Seat?
In many cases, repairing the cane chair seat is smarter than replacing the chair entirely. A quality wood frame can last for decades, and many older chairs are better made than inexpensive modern replacements. If the frame is solid and the damage is mostly in the seat, a cane repair is usually worth it.
However, do not focus so hard on the woven seat that you ignore the rest of the chair. A wobbly frame, loose spindles, cracked rails, or failed joints should be handled before you install new cane. Otherwise, you are putting a fresh seat into a structure that still behaves like a shopping cart with one bad wheel.
Step One: Inspect the Chair Like a Detective
Take a few minutes to study the chair before removing anything. Look for the following:
- Is the seat pressed cane or hand-woven cane?
- Are there loose joints in the legs, rails, or back?
- Is the wood frame cracked, split, or warped?
- Is the groove around the seat intact?
- Do you want the repaired seat to match the original color exactly, or are you fine with a natural fresh-cane look that deepens over time?
If the chair has sentimental or antique value, take clear photos before you start. They help you remember the original layout and may save you from staring at a half-disassembled chair later and whispering, “Well, that seems important.”
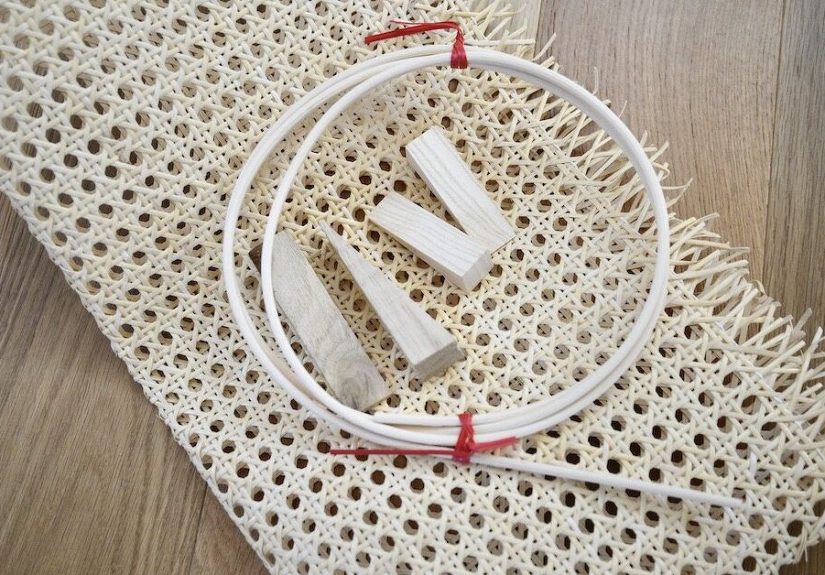
Tools and Materials for Repairing a Cane Chair Seat
The exact list depends on the seat type, but most repairs involve a small core of tools.
For Pressed Cane Repairs
- Replacement pre-woven cane webbing
- Reed spline in the correct size
- Utility knife with a fresh blade
- Wood chisel or spline-removal tool
- Awl or small pick
- Wood glue or PVA glue
- Soft mallet or small hammer
- Caning wedges or a cane webbing tool
- Medium and fine sandpaper
- Clean cloths and water
For Hand-Woven Cane Repairs
- Strand cane in the proper size
- Binder cane
- Caning pegs
- Awl
- Sharp scissors or nippers
- Water container for soaking
- Patience, snacks, and more patience
Yes, that last category is not technically a hardware-store purchase, but it is emotionally accurate.
How to Repair a Pressed Cane Chair Seat
Pressed cane is the most common and beginner-friendly repair. If your chair seat has a groove and spline, follow these steps.
Remove the Old Spline
Use a chisel or spline-removal tool to gently pry out the old spline. Work slowly so you do not gouge the wood. Once the spline is out, lift away the damaged cane webbing.
Clean the Groove Thoroughly
This step is not glamorous, but it matters. Remove every bit of old glue, stray cane fiber, and debris from the groove. Use an awl, scraper, or small chisel, then lightly sand the edges. Be careful not to change the groove’s size or depth, because the new spline needs a snug fit.
Measure Before You Order
Measure the seat opening and buy cane webbing with extra overlap. A little margin gives you room to line up the pattern and press the material into place without wrestling it like an octopus. Also measure the groove itself, not the old spline, when choosing replacement spline.
Soak the Cane and Spline
Soak the new cane webbing and spline in water for about 20 to 30 minutes so they become flexible. Do not soak them forever. You want them workable, not soggy and dramatic.
Center and Align the Pattern
Lay the webbing over the opening with the smooth side facing up. Center it carefully and line up the pattern so it looks square with the frame. Crooked alignment is one of those things you will absolutely notice forever once the chair is finished.
Press the Cane into the Groove
Start by securing the front center, then the back center, then the middle of each side. This helps keep the pattern straight. From there, continue pressing the cane into the groove a little at a time around the entire opening.
Trim the Excess
Once the cane is fully seated and aligned, trim the extra webbing with a fresh utility blade. Cut carefully just outside or slightly below the groove edge, depending on your method, so the spline can cover the edge neatly.
Glue and Install the Spline
Apply a narrow bead of glue in the groove, then tap the spline into place with a soft mallet. Work steadily, not violently. This is a chair repair, not a personal feud. When you reach the joint, cut the spline at an angle so the ends meet cleanly.
Let It Dry Completely
Wipe away extra glue and let the seat dry for at least 24 hours before using it. As the cane dries, it tightens. That is exactly what you want.
How to Repair a Hand-Woven Cane Chair Seat
Hand-woven cane seats are a different beast. They use individual strands woven through holes in the frame, usually in a traditional multi-step pattern. If only one strand is damaged and the rest of the seat is strong, a very small spot repair may be possible. But if the seat is brittle, sagging, or broken in several places, full replacement is usually the better move.
Remove the Old Cane
Cut the loops or knots on the underside, then remove the old woven strands from the holes. Pull out the binder cane around the edge. Clean every hole carefully.
Smooth the Inner Edge
This is a smart move that many beginners skip. If the inner seat edge is too sharp, it can wear through new cane over time. Lightly beveling or softening that inner edge helps prevent future breakage.
Choose the Correct Strand Size
The size of hand cane depends on the hole diameter and the spacing between holes. Too thick and the strands will fight you. Too thin and the finished seat may look weak or sloppy.
Weave the Pattern Methodically
Traditional hand caning follows an ordered pattern of vertical, horizontal, and diagonal passes, then finishes with binder cane. If you are new to it, use an instruction booklet, a kit, or a detailed tutorial from a caning supplier. This is one of those projects where “I’ll just freestyle it” usually leads to a seat that looks like it lost an argument with geometry.
For many homeowners, the practical choice is simple: repair pressed cane yourself, but consider a hand-caned seat either a slow craft project or a job for a professional.
What About Loose Joints and Wobbly Frames?
If the chair wobbles, deal with that before the new seat goes in. Quick fixes that force glue into already-failed joints often do not hold for long. The better repair is usually to disassemble the loose joint, remove old glue, apply fresh adhesive, and clamp it properly.
For minor spindle problems where the joint cannot be easily separated, a glue injector may help deliver adhesive into the joint from a hidden spot. If there are severe gaps, epoxy can be a better filler than standard yellow glue. The goal is not to make the chair “less bad.” The goal is to make it solid.
Finishing and Caring for a Repaired Cane Seat
Once the seat is repaired, resist the urge to overdo the finish. Natural cane often looks best with a light, appropriate treatment or no finish at all, depending on the product used. If you are refinishing the wood frame, sand away glue residue first so stain takes evenly. If you want added protection on the wood frame, a clear polyurethane or similar topcoat can help, especially on exposed wood edges and joints.
For routine care, keep the chair clean with a soft cloth or brush. Avoid soaking natural cane or natural rattan furniture, and do not leave it in harsh weather. Excess moisture, direct sun, and heavy use can all shorten the life of the weave. If unpainted natural wicker or related woven material looks dull, a light restoration treatment may help, but always make sure the chair is fully dry before anyone sits on it.
If the seat ever starts to sag slightly, a bit of moisture can sometimes help it tighten as it dries. The key word is slightly. This is not a hose-it-down situation.
Common Mistakes to Avoid
- Skipping the frame inspection: A perfect seat on a loose chair is still a bad chair.
- Buying the wrong spline size: Measure the groove, not the old material.
- Misaligning the cane pattern: Start centered and check your lines constantly.
- Using dull blades: Cane frays easily, and ragged trimming looks messy fast.
- Over-soaking the cane: Flexible is good. Waterlogged is not.
- Rushing dry time: Sit too soon and you may undo your own work.
- Ignoring moisture exposure: Natural cane and outdoor abuse are not best friends.
Is Repairing a Cane Chair Seat Worth It?
In most cases, yes. Repairing a cane chair seat can save a well-made chair, preserve a vintage piece, and cost far less than replacing quality furniture. It is also one of those repairs that feels deeply satisfying because the transformation is so obvious. One minute the chair says, “Please don’t trust me.” The next minute it is back in service looking elegant, light, and surprisingly expensive.
Pressed cane repairs are especially worthwhile for DIYers because the process is approachable, the materials are widely available, and the finished result can look professional with careful alignment and patience. Hand-woven cane repairs are more advanced, but still worth doing when the chair is valuable, sentimental, or just too beautiful to give up on.
Experiences People Often Have When Repairing a Cane Chair Seat
One of the most relatable experiences with repairing a cane chair seat is realizing that the job is less about brute force and more about rhythm. At first, many people assume the repair will be like replacing a broken board or tightening a loose screw: remove old part, add new part, done. Then they meet old spline, dried glue, and decades of dust packed into a tiny groove, and suddenly the chair becomes a history lesson with attitude.
Another common experience is surprise at how much the repair depends on alignment. A cane pattern that is even slightly off can make the finished seat look amateurish, even if the rest of the work is solid. Many first-time restorers discover that the hardest part is not tapping in the spline or trimming the webbing. It is stopping every few minutes to ask, “Is this straight?” and then having the honesty to adjust it before moving on.
There is also the strange satisfaction of cleaning the groove. Nobody begins the project dreaming about scraping out old glue, yet that step often becomes the turning point. Once the groove is clean and crisp, the whole chair suddenly feels repairable. It stops being a broken object and starts becoming a project with a real finish line.
People also tend to remember the first time they see the cane tighten as it dries. That is the magical moment in this repair. The fresh webbing that looked slightly soft or flexible begins to firm up, and the chair starts to look finished in a way that feels oddly impressive. It is a small reminder that good materials are supposed to work with you, not against you.
Of course, there are humbling experiences too. A lot of DIYers learn that old chairs often hide more than one problem. You start out planning to repair a cane seat, and the next thing you know, a loose rung, a cracked rail, or a badly repaired joint from twenty years ago enters the chat. It can be annoying, but it also explains why some chairs failed in the first place. The seat was not always the villain.
Then there is the emotional side. A repaired cane chair seat often changes how people see the chair itself. A thrift-store bargain becomes a real furniture piece. A grandparent’s chair stops looking fragile and starts feeling usable again. A forgotten accent chair in the corner suddenly becomes the one everyone notices. That emotional payoff is a huge reason so many people decide the repair was worth the effort.
In the end, the experience of repairing a cane chair seat is usually a mix of patience, problem-solving, minor muttering, and genuine pride. It is not the fastest furniture repair on earth, but it is one of the most rewarding. You are not just patching damage. You are bringing back structure, comfort, and style in one very satisfying project.
Conclusion
Repairing a cane chair seat is one of those projects that rewards careful work more than flashy skill. If the chair uses pressed cane, a methodical DIY repair can bring it back beautifully. If it uses hand-woven cane, the project takes more time and finesse, but the result can be stunning and absolutely worth it. Either way, success comes down to identifying the seat type, stabilizing the frame, choosing the right materials, and letting the repair dry and settle properly.
Do it right, and your chair will not just be usable again. It will have that rare, satisfying quality of looking both restored and original, like it somehow took a deep breath and remembered who it was.


