Table of Contents >> Show >> Hide
- Stock vs. Broth (and Why People Argue About It Like It’s a Sport)
- Why Homemade Stock Is Worth It
- The Building Blocks of Great Stock
- Equipment You Need (And What You Don’t)
- How to Make Stock: The Core Method (Works for Chicken, Beef, and “Mostly” Veg)
- Step 1: Prep Your Ingredients
- Step 2: Choose “White” vs. “Brown” Stock
- Step 3: Cover With Cold Water (Don’t Drown It)
- Step 4: Bring to a Bare Simmer, Then Stay There
- Step 5: Add Aromatics at the Right Time
- Step 6: Simmer Time Guidelines (Use These as Training Wheels)
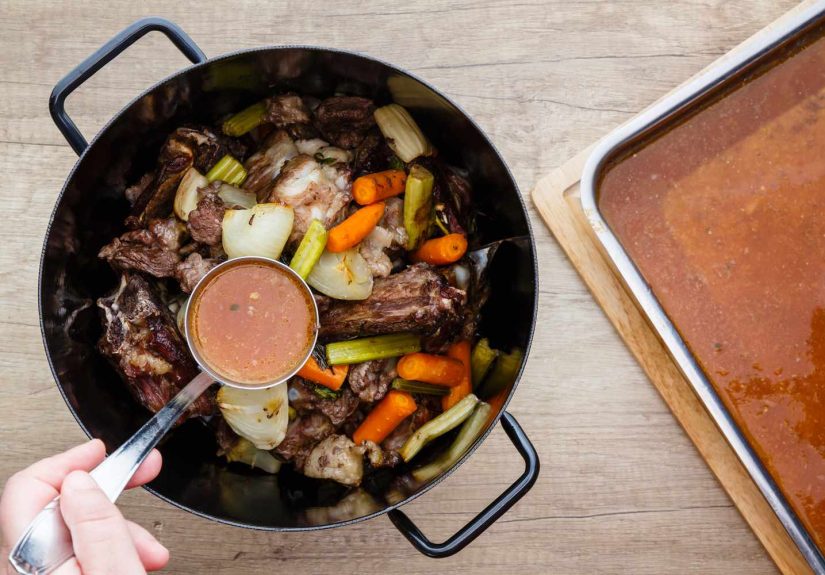
- Step 7: Strain, Then Cool Safely
- Step 8: Chill and Defat (Optional but Satisfying)
- Vegetable Stock: What to Use (and What to Avoid)
- Flavor Upgrades (That Don’t Turn Stock Into a Science Fair)
- Common Stock Problems (and How to Fix Them)
- How to Store Stock (Without Getting a Science Experiment in the Fridge)
- How to Use Stock Like You Know What You’re Doing
- of Real-Life “Stock Energy” (Experiences That Make It Stick)
- Conclusion
Stock is the background music of cooking: you don’t always notice it, but when it’s good, everything else suddenly sounds (and tastes) like it got upgraded. It’s the difference between “this soup is fine” and “whoa, what is in this?”
At its simplest, stock is water that’s been gently convincedover timeto borrow flavor and body from bones (or vegetables), aromatics, and herbs. You can buy it, sure. But making homemade stock is one of the highest return-on-effort moves in the kitchen: a handful of scraps turns into liquid gold that makes sauces silkier, grains tastier, and braises deeper.
Stock vs. Broth (and Why People Argue About It Like It’s a Sport)
Here’s the practical, cook-friendly distinction:
- Stock is usually made with bones and simmered longer, pulling out collagen that can turn gelatinous when chilled (that jiggle is a compliment).
- Broth is typically made with meat (sometimes bones too), often simmered a shorter time, and may be seasoned enough to sip.
Real life note: store-bought cartons don’t always follow these definitions consistently, and many recipes use the terms interchangeably. The winning move is to taste and season wisely.
Why Homemade Stock Is Worth It
- Flavor control: You decide what goes inno mystery “natural flavors” doing interpretive dance on your taste buds.
- Better texture: Collagen from bones creates body, helping soups and sauces feel richer without adding cream or starch.
- Less waste: Carrot ends, onion trimmings, chicken backsstock turns leftovers into a second act.
- Flexibility: Make it light for risotto, dark for gravy, or concentrated to save freezer space.
The Building Blocks of Great Stock
1) The “Main Ingredient”: Bones or Vegetables
For classic chicken stock, the best flavor and body often come from a mix of bony parts (backs, necks, wings, carcasses). For beef stock, use marrow and knuckle bones for richnessplus some meaty bones if you want more beefy flavor. For vegetable stock, think of it like a long-steeped vegetable tea: sturdy vegetables and aromatics shine.
2) Aromatics: Mirepoix Is Your Best Friend
The classic trioonion, carrot, celeryis the “sensible shoes” of stock making: not flashy, but it shows up and does the work. A rough guideline is to use enough aromatics to scent the pot, not to turn your stock into veggie soup.
3) Herbs and Spices: Keep It Subtle
Bay leaf, parsley stems, thyme, peppercornsgreat. A whole spice cabinetless great. Stock is a foundation, not a soloist. You can always season later depending on the final dish.
4) Water: Cold Start, Gentle Finish
Start with cold water and bring it up slowly. Cold water helps extract flavor and collagen more evenly. The key temperature rule is simple: maintain a gentle simmer, not a rolling boil. A boil can cloud stock and make flavors harsher.
5) Salt: Usually “Not Yet”
Many cooks keep stock unsalted so it can reduce without becoming a salt bomb. You’ll season the final dish instead. If you know you’ll use it as a sipping broth, you can season lightlyjust don’t overdo it early.
Equipment You Need (And What You Don’t)
- Big pot (stockpot or Dutch oven): the bigger the better, within reason.
- Fine-mesh strainer (and/or cheesecloth): for a cleaner stock.
- Large bowl or second pot: for straining safely.
- Containers for storage (quart containers, freezer bags, or silicone trays).
Helpful but optional: a skimmer, a thermometer, and a pressure cooker/Instant Pot if you want speed.
How to Make Stock: The Core Method (Works for Chicken, Beef, and “Mostly” Veg)
Step 1: Prep Your Ingredients
- Rinse? Not necessary for most home cooks. If you want a cleaner stock, you can briefly blanch bones and rinse themespecially for certain beef stocksbut it’s optional.
- Chop aromatics into large chunks. No need for tiny dice; this isn’t a knife-skills audition.
Step 2: Choose “White” vs. “Brown” Stock
White stock uses raw bones and a gentle simmergreat for light soups, risotto, and sauces where you don’t want roasty notes. Brown stock starts by roasting bones (and sometimes the aromatics) to build deeper flavor and colorperfect for gravy, French onion soup, and braises.
Quick roast tip: Roast bones at a high heat until nicely browned, then deglaze the roasting pan with water and add those browned bits to the pot. That’s free flavor. Don’t leave it behind like it owes you money.
Step 3: Cover With Cold Water (Don’t Drown It)
Add enough cold water to cover the bones and aromatics by a couple inches. Too much water = weak stock; too little = you’ll babysit it and top it off constantly. You want “comfortably covered,” not “swimming pool.”
Step 4: Bring to a Bare Simmer, Then Stay There
Bring the pot up slowly. Once you see small bubbles lazily rising, turn it down. A gentle simmer helps keep stock clearer and can reduce the need for constant skimmingthough skimming is still fine if foam appears.
Step 5: Add Aromatics at the Right Time
For bone-based stocks, many cooks simmer bones first, then add vegetables later so the aromatics don’t overcook into bitterness. A simple approach: add aromatics after the first 30–60 minutes once the initial foam is mostly done and the pot has settled.
Step 6: Simmer Time Guidelines (Use These as Training Wheels)
- Chicken stock: about 2–4 hours for great flavor; longer can be fine, but don’t chase perfection into “over-extracted” territory.
- Beef stock: 6–12 hours (or longer) for depth and gelatinespecially with collagen-rich bones.
- Vegetable stock: 45–90 minutes is usually enough; long simmering can push vegetables into muddy flavors.
- Fish stock (fumet): 20–45 minutesfish bones give up flavor quickly and can turn bitter if overcooked.
Step 7: Strain, Then Cool Safely
Strain the stock through a fine-mesh strainer into a clean pot or bowl. Now the important part: cool it quickly. Food safety guidance recommends refrigerating perishable foods within 2 hours (or 1 hour if it’s very hot out), and cooling in shallow containers or using an ice bath helps stock pass through the “danger zone” faster.
Step 8: Chill and Defat (Optional but Satisfying)
Refrigerate overnight. Fat rises and solidifies into a top layer you can lift off easily. Keep some fat if you likeit adds flavorbut removing excess makes the stock cleaner and more versatile.
Vegetable Stock: What to Use (and What to Avoid)
Vegetable stock is easiest when you think “balanced and savory.” Great additions include:
- Onions (or leeks), carrots, celery
- Mushrooms for umami depth
- Parsley stems, thyme, bay leaf, peppercorns
Avoid or limit vegetables that can overpower or turn bitter, especially with long simmering: cruciferous vegetables (like broccoli, cauliflower, cabbage), lots of leafy greens, and strongly colored items like beets if you don’t want pink stock. If you save scraps for stock, aim for mostly “sweet and savory” trimmings, not “sulfur and regret.”
Flavor Upgrades (That Don’t Turn Stock Into a Science Fair)
Roast for Depth
Roasting bones (and sometimes tomato paste for beef stock) builds Maillard flavor: deeper color, toastier aroma, bigger finish.
Add a Tiny Bit of Acid
A splash of apple cider vinegar or white wine can help extract minerals and deepen flavor. Keep it smallyou’re making stock, not salad dressing.
Pressure Cooker Shortcut
A pressure cooker can produce a rich stock faster because it cooks at a higher temperature than a stovetop simmer. It’s an excellent “weeknight stock” option when you want results today, not sometime during the next ice age.
Common Stock Problems (and How to Fix Them)
“My stock is cloudy.”
Cloudy stock usually comes from boiling too hard or stirring a lot. It still tastes good. Fix: keep a gentler simmer next time and strain through finer mesh (or cheesecloth).
“It tastes bitter.”
Common causes: overcooked vegetables, too many cruciferous scraps, too much herb stem action, or simmering vegetable stock too long. Fix: shorten the simmer time for vegetable stock and be more selective with scraps.
“It tastes weak.”
Causes: too much water or not enough bones/veg. Fix: reduce it gently (simmer uncovered) or make a concentrated “stock base” next time by using less water.
“It didn’t gel in the fridge.”
Gel is a bonus, not a moral judgment. If you want more body next time, use more collagen-rich parts (wings, feet, knuckles) and simmer gently long enough to extract gelatin.
How to Store Stock (Without Getting a Science Experiment in the Fridge)
- Refrigerator: use within a few days for best quality.
- Freezer: freeze in quarts for soups and in small portions (ice cube trays or silicone molds) for sauces and pan deglazing.
Portioning is the secret to actually using your stock instead of admiring it. Freezing in small cubes means you can grab “two tablespoons of flavor” whenever a pan looks lonely.
How to Use Stock Like You Know What You’re Doing
- Soups and stews: the obvious, and still undefeated.
- Rice, quinoa, farro: cook grains in stock for instant upgrade.
- Pan sauces: deglaze with stock, reduce, add butterrestaurant magic at home.
- Braises: short ribs, pot roast, chicken thighsstock makes the sauce taste like it had a plan.
- Vegetable cooking liquid: simmer beans or greens in stock for deeper flavor.
of Real-Life “Stock Energy” (Experiences That Make It Stick)
Stock-making has a funny way of turning into a small household eventeven when nobody officially agreed to it. It often starts with a bag in the freezer: chicken bones from a roast, the ends of carrots, celery leaves, onion pieces that were too stubborn to dice nicely. At first, that bag feels like a virtuous plan. Then it feels like a mysterious science sample. And eventually, it becomes a dare: “Okay… today we make stock.”
Many home cooks describe the first “aha” moment as the smell. Not the loud smell of garlic sizzling or cookies baking, but a gentle, slow aroma that sneaks out of the kitchen and makes the house feel warmer than the thermostat says it should. Stock smells like you’re taking care of future-you. It’s oddly comfortinglike meal prep, but with better PR.
The second moment usually happens when someone peeks into the pot and asks, “Is it supposed to look like that?” Yes. The foam? Normal. The sleepy bubbles? Perfect. The temptation to crank the heat because “faster is better”? Extremely relatable… and usually the exact move that makes stock cloudy. Learning to keep a pot at a bare simmer is a low-key kitchen life skill. It teaches patience without feeling like homework.
Then there’s the “bonus satisfaction” stage: straining. It’s not glamorous, but it feels like finishing a project. The liquid looks golden and somehow more expensive than water has any right to look. When the stock cools and you see that faint wobbleor the fat cap forming like a protective winter coatyou get a tangible reminder that something useful is happening. That’s when stock stops being an abstract cooking concept and becomes a tool you can reach for.
The most practical experience tip is portioning. People who love stock don’t necessarily make stock more oftenthey freeze it smarter. Small cubes or mini containers mean you can toss a bit into a pan sauce on a random Tuesday, stir it into rice, or rescue a soup that tastes like it needs “something.” Suddenly, stock isn’t a special occasion. It’s a quiet advantage you keep in the freezer.
And finally, there’s the unexpected emotional payoff: stock feels like kitchen confidence. You’re not just following a recipe; you’re making an ingredient that makes other things better. It’s the culinary equivalent of charging your phone before it hits 2%. Not thrillinguntil the moment you need it and you’re really glad you did.
Conclusion
The basics of making stock come down to a few core habits: start with good “building blocks” (bones or solid vegetables), keep the heat gentle, don’t over-season early, and cool/store it safely. Once you’ve done it a couple times, stock stops feeling like a project and starts feeling like a shortcutbecause it turns simple food into “how is this so good?” food with almost no extra effort in the moment.


