Table of Contents >> Show >> Hide
- Quick Rules for Storing a Kayak Without Ruining It
- 10 Kayak Storage Ideas That Give Your Garage Space Back
- 1) Ceiling Pulley Hoist (a.k.a. “Make the Kayak Disappear”)
- 2) Fixed Overhead Rack (Slide It Up, Slide It Out)
- 3) Wall-Mounted J-Cradles or Padded Hooks (Classic, Cheap, Effective)
- 4) Strap Slings on the Wall or Ceiling (Gentle Support With Minimal Hardware)
- 5) Folding Wall Rack Arms (When You Want Space Back and a Clear Wall)
- 6) Vertical Corner Storage (The “Tall and Proud” Method)
- 7) Freestanding Multi-Kayak Rack (No Drilling, Lots of Boats)
- 8) DIY 2×4 Wall Rack (Strong, Custom, and Weirdly Satisfying)
- 9) DIY PVC Floor Stand (Lightweight Rack That Won’t Scratch)
- 10) A “Kayak Zone” With Cover, Drain, and Gear Storage (Stop the Mess at the Source)
- How to Choose the Right Kayak Storage Setup
- Common Mistakes That Can Damage a Kayak
- Conclusion
- Experiences From Real Garage Life (The Part Where the Kayak Wins… Until It Doesn’t)
A kayak is basically a giant, aerodynamic sentence that reads: “I have hobbies!” Unfortunately, it also reads:
“I live in your garage now.” Between the length, the awkward handles, and the fact that it’s shaped like a
confident banana, a kayak can steal floor space faster than you can say “Where did I put the life jackets?”
The good news: you don’t need a bigger garageyou need a smarter plan. Below are 10 kayak storage ideas that
help you reclaim parking space, protect your boat from warping, and keep launch day from turning into a
wrestling match with plastic and gravity.
Quick Rules for Storing a Kayak Without Ruining It
Before we get to the fun stuff (pulley systems! wall racks! victory over clutter!), remember this:
storage is about support and protection. Do it right, and your kayak stays straight, clean,
and ready to hit the water.
- Keep it out of harsh sun and extreme weather. UV and temperature swings can age materials and fade finishes.
- Don’t hang it by the grab loops/handles. Those are for carrying, not for long-term suspension.
- Use wide straps or padded cradles. Narrow cords can create pressure dents (“oil canning”) and distortion.
- Support strong points. Many boats store best at bulkheads or near the cockpit rimcheck your manufacturer’s guidance.
- Clean and dry it first. Dirt and moisture invite mildew, funky smells, and hardware corrosion.
- Anchor into structure. Wall racks belong in studs; ceiling systems belong in joists/rafters (or properly braced supports).
10 Kayak Storage Ideas That Give Your Garage Space Back
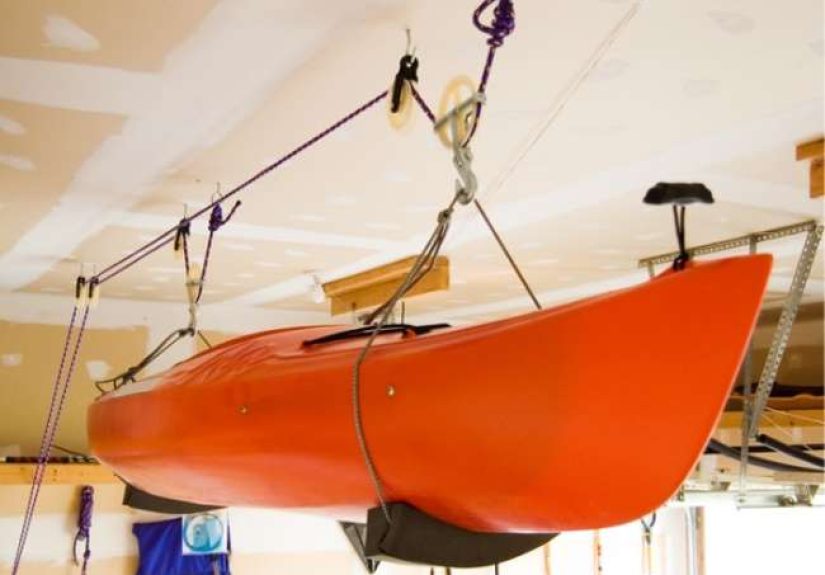
1) Ceiling Pulley Hoist (a.k.a. “Make the Kayak Disappear”)
A pulley hoist lifts the kayak overhead, where it politely stops taking up the space reserved for cars, strollers,
and your hopes and dreams. Look for a system with wide straps and an easy cleat/lock so you’re not “free-climbing”
to tie knots above your head. Install into ceiling joists (or add bracing boards across multiple joists) and keep
the lift path clear of garage door tracks and openers.
2) Fixed Overhead Rack (Slide It Up, Slide It Out)
If you prefer fewer ropes and more “set it and forget it,” a ceiling-mounted rack uses padded arms or rails to
hold the kayak overhead. It’s great for lighter boats and frequent paddlers because you can often slide the kayak
on and off rather than fully lifting it. Bonus: you can line up multiple boats like a tidy fleetjust leave enough
clearance so your roof rack and your head don’t make surprise contact.
3) Wall-Mounted J-Cradles or Padded Hooks (Classic, Cheap, Effective)
This is the “hello, studs” approach: mount sturdy, padded hooks or J-cradles directly into wall studs, then store
the kayak on its side. It’s budget-friendly and easy to access. Choose wide, foam-padded arms to avoid pressure
points, and space the supports far enough apart to distribute weight (many manufacturers recommend support near
bulkheads or major structural areas). Great for most garagesespecially if you like your kayak at “grab and go”
height.
4) Strap Slings on the Wall or Ceiling (Gentle Support With Minimal Hardware)
Webbing slings are basically hammock seats for your kayaksupportive, forgiving, and less likely to dent the hull
than narrow hooks. You install anchor points into studs/joists, then use two wide straps to cradle the boat. Many
paddling experts recommend wide straps that wrap around the body (not the handles) to prevent bending. If you’re
storing long-term, this method is especially kind to rotomolded plastic hulls.
5) Folding Wall Rack Arms (When You Want Space Back and a Clear Wall)
Folding racks mount like a standard wall rack, but the arms hinge down when you’re not using themhandy if your
garage doubles as a workshop, gym, or “place where projects go to multiply.” Install into studs, use padded arms,
and choose a weight rating that comfortably exceeds your kayak’s weight. For two kayaks, consider stacking a
second set vertically with enough clearance to avoid bumping one boat into the other.
6) Vertical Corner Storage (The “Tall and Proud” Method)
Short on wall length? Go vertical. Store the kayak upright in a corner using a padded floor cradle and a top strap
or wall anchor to keep it stable. This works best with lighter recreational kayaks and garages with decent ceiling
height. Protect the bow and stern with padding where the boat contacts the floor or wall. Pro tip: keep it slightly
off the concrete with a mat or foam block to reduce moisture contact.
7) Freestanding Multi-Kayak Rack (No Drilling, Lots of Boats)
Renting, allergic to stud-finding, or storing a small armada? A freestanding rack is your friend. These typically
use padded crossbars or sling supports and can hold two to four kayaks depending on design. Place it along a side
wall to keep the “parking lane” clear, and add locking casters if you need occasional mobility. It’s also a smart
option if your garage walls are already crowded with shelving or cabinets.
8) DIY 2×4 Wall Rack (Strong, Custom, and Weirdly Satisfying)
If you can drive screws straight and measure twice (or at least once with confidence), a DIY 2×4 rack can be
tailored to your exact kayak size and wall layout. Build a simple ledger into studs, add angled arms, and pad them
with carpet remnants or foam pipe insulation. This approach is especially useful for heavier fishing kayaks because
you can overbuild for stability and widen the contact area exactly where your hull is strongest.
9) DIY PVC Floor Stand (Lightweight Rack That Won’t Scratch)
A PVC stand is a great weekend project for lighter kayaks: it’s inexpensive, corrosion-resistant, and easy to
customize. The key is to add padding at contact points (foam, pool noodles, or carpet) and to build the stand wide
enough to prevent tipping. It’s ideal if you want to keep the kayak low, stable, and easy to liftwithout drilling
into anything. Consider this the “apartment-friendly garage solution,” even if you live in a house.
10) A “Kayak Zone” With Cover, Drain, and Gear Storage (Stop the Mess at the Source)
Sometimes the best storage idea isn’t a rackit’s a system. Create a dedicated kayak zone that includes:
(1) a rack (wall or ceiling), (2) a simple cover or sheet to block dust/UV, (3) a small drip tray or mat under the
boat after paddling, and (4) nearby hooks for paddles and PFDs. If your kayak lives near a sunny window or your
garage door stays open often, a protective cover helps reduce fading and keeps grime off the hull.
How to Choose the Right Kayak Storage Setup
- Daily/weekly paddlers: Wall racks or strap slings at shoulder height make loading faster.
- Seasonal paddlers: Ceiling racks or hoists free up floor space for months at a time.
- Heavy fishing kayaks: Think wide support, strong anchors, and minimal overhead lifting.
- Multiple boats: Freestanding racks, stacked wall systems, or a long ceiling rack keep the fleet organized.
- Low ceilings or garage door tracks: Wall-mounted options usually beat overhead ones for clearance.
Common Mistakes That Can Damage a Kayak
- Hanging by handles/loops: convenient today, regret tomorrow.
- Using skinny ropes or wire: pressure dents happen fast, especially in warm conditions.
- Mounting into drywall only: your kayak deserves better than “hope” as a fastener.
- Leaving it wet and sealed: mildew loves a closed cockpit like a cat loves a cardboard box.
- Storing on bare concrete long-term: moisture, scuffs, and temperature swings can take a toll.
Conclusion
Taking back your garage doesn’t require a dramatic reality-show montagejust a smart storage plan that respects
your kayak’s shape and your garage’s limited square footage. Whether you go overhead with a hoist, keep it simple
with padded wall hooks, or build a DIY rack that makes you feel like the hero of your own workshop, the goal is the
same: support the boat well, protect it from sun and moisture, and make it easy enough to grab that you actually
paddle more often.
Experiences From Real Garage Life (The Part Where the Kayak Wins… Until It Doesn’t)
Let’s talk about the “lived experience” side of kayak storagethe part nobody warns you about until you’ve
accidentally clotheslined yourself with a paddle at 6:30 a.m. on a Saturday. Because the truth is, kayak storage
isn’t only about racks and straps; it’s about how you move through your garage when you’re tired, late, or holding
three bags of groceries and a coffee that has strong opinions.
One common scenario: the floor kayak era. It starts innocently“I’ll put it here for a day.” Then
“a day” becomes “the whole season,” and suddenly your garage has a new hallway obstacle like an indoor canoe museum.
People usually notice this problem the first time they try to carry a laundry basket past the kayak and do an
involuntary side-step shuffle. The win here is almost always a wall rack at shoulder height. As soon as the kayak
goes up, the garage stops feeling like a storage unit and starts feeling like a place you can actually use again.
Another classic: the ceiling-hoist confidence curve. Day one, you install it and feel unstoppable.
Day two, you realize your garage door opener and the hoist want the same airspace. After a few adjustments, the
hoist becomes a dreamespecially for people who like their garage floor clear for workouts, woodworking, or the
noble pursuit of parking a car indoors. The biggest quality-of-life improvement folks report isn’t just spaceit’s
friction reduction. If lowering the kayak takes 30 seconds instead of 10 minutes of rearranging, you’re more likely
to paddle on a random weekday. Convenience is an underrated fitness plan.
Then there’s the two-kayak householdoften the result of a partner, a teenager, or a “great deal”
that was absolutely necessary at the time. This is where storage stops being “a rack” and becomes “a system.”
People tend to succeed with either a stacked wall setup (two levels, well padded, properly anchored) or a
freestanding rack that keeps both boats stable without turning the garage wall into Swiss cheese. The moment the
boats have assigned spots, the arguments about “who left it there” tend to mysteriously disappear.
And finally: the wet kayak dilemma. After a great day on the water, the kayak comes home with sand,
drips, and that unmistakable lake smell. The garages that stay tidy usually have a simple ritual: quick rinse,
drain, towel-off, then onto the rack over a mat. It’s not fancyjust consistent. Add a nearby hook for your PFD and
paddle, and suddenly your gear dries neatly instead of forming a damp pile that looks like it lost a fight with a
washing machine. The best part? On the next outing, everything is where it should be, dry, and ready. That’s the
kind of “organized” that actually feels relaxing.
Bottom line: the best kayak storage setup is the one you’ll use when you’re in a hurry, when it’s raining, and
when you’re a little bit over it. If your storage method makes paddling easier, your kayak gets more water timeand
your garage gets to be a garage again.


