Table of Contents >> Show >> Hide
- Why Make a DIY Paper Cocktail Umbrella?
- What You Need Before You Start
- Method 1: The Classic Cut-and-Overlap Paper Cocktail Umbrella
- Method 2: The Accordion-Fold Mini Parasol
- Tips for Better Results
- Creative Ways to Use Paper Cocktail Umbrellas
- Common Mistakes to Avoid
- Which Method Is Best?
- Real-Life Experiences: What I Learned Making Paper Cocktail Umbrellas
- Final Thoughts
Note: Clean HTML body only, with SEO tags in JSON format at the end.
Few party decorations work harder than a paper cocktail umbrella. It is tiny, cheerful, slightly dramatic, and somehow manages to make even a glass of lemonade look like it has vacation plans. The good news is that you do not need a tropical resort, a fancy bar cart, or a mysterious degree in miniature engineering to make one. You just need paper, a stick, a little patience, and the willingness to embrace a craft project that is delightfully extra.
In this guide, you will learn two easy ways to make a paper cocktail umbrella at home. The first method creates a classic umbrella shape with a neat, polished look. The second uses an accordion-fold style that feels playful, handmade, and perfect for party tables, mocktails, dessert toppers, or summer decorations. Both versions are beginner-friendly, inexpensive, and easy to customize with bright colors, stripes, florals, polka dots, or whatever pattern says, “Yes, this drink deserves flair.”
Whether you are planning a luau-themed birthday, dressing up a fruit punch station, making party props for photos, or just refusing to let your iced tea live a boring life, this step-by-step tutorial will help you create a DIY paper drink umbrella that looks charming without becoming a frustrating mess of glue and regret.
Why Make a DIY Paper Cocktail Umbrella?
Store-bought drink umbrellas are cute, but making your own has a few obvious perks. First, you control the size, color, and pattern. That means you can match your umbrellas to a party theme, a wedding palette, a baby shower, or a backyard cookout. Second, homemade versions are great for paper crafting leftovers. If you have scrapbook paper, tissue paper, wrapping paper, or printed sheets hanging around, this is their moment to shine.
A homemade paper umbrella also gives you more styling options. You can make tiny versions for cupcakes, medium ones for mocktails, or larger ones for centerpieces and buffet-table decor. In other words, this is not just a cocktail garnish craft. It is a tiny paper accessory with big overachiever energy.
What You Need Before You Start
Basic Supplies
- Lightweight cardstock, scrapbook paper, or tissue paper
- Scissors
- Glue stick, craft glue, or double-sided tape
- Toothpicks or thin wooden skewers
- Ruler
- Pencil
- Compass, round lid, or cup for tracing circles
- Optional: hole punch, scoring tool, decorative scissors, washi tape, small beads
Best Paper for Paper Drink Umbrellas
If you want a sturdier umbrella, choose lightweight cardstock or decorative scrapbook paper. It holds shape well and is easy to print on if you want custom patterns. If you want a softer, floatier look, tissue paper works beautifully, especially for the accordion-fold method. Just remember that tissue paper tears more easily, so use a gentle hand and less glue than your heart may suggest.
For most DIY cocktail umbrellas, paper around the size of a standard craft sheet works perfectly. Bright colors, tropical prints, fruit patterns, and metallic accents are all fun choices. This is one of the few crafts where “too festive” is not really a problem.
Method 1: The Classic Cut-and-Overlap Paper Cocktail Umbrella
This method creates the traditional umbrella look you probably picture when someone says “paper cocktail umbrella.” It is tidy, beginner-friendly, and ideal when you want a polished result for drinks, dessert garnishes, or party decor.
Step 1: Cut a Paper Circle
Trace a circle that is about 3 to 4 inches wide on your paper, then cut it out. A smaller circle makes a tiny umbrella for cupcakes or mini glasses. A larger circle gives you a fuller canopy for taller drinks or decorative use.
Once the circle is cut, draw a small dot in the center. Then cut one straight slit from the outer edge to that center point. This slit lets you overlap the paper into a cone shape, which forms the umbrella canopy.
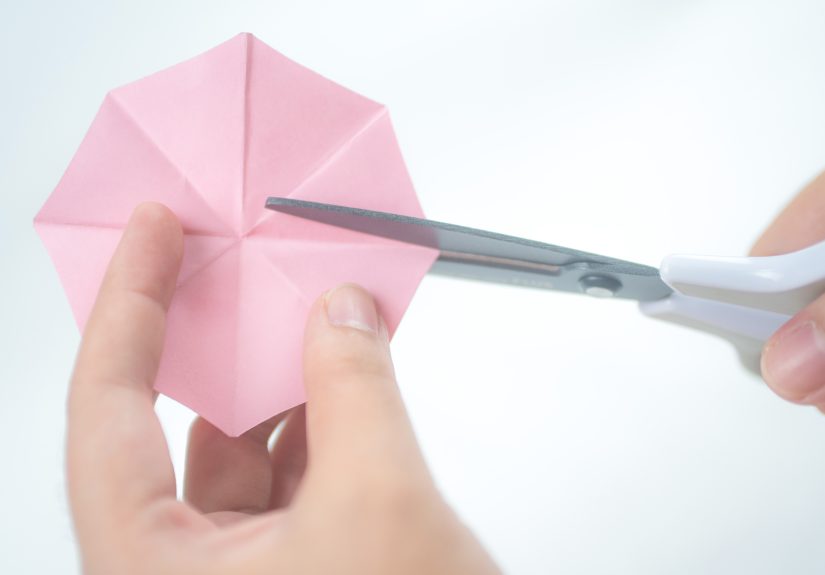
Step 2: Add Gentle Pleat Lines
If you want the umbrella to look more realistic, lightly score or crease several lines radiating from the center outward, like pizza slices but far less delicious. Six to ten sections usually work well. These shallow folds help the paper resemble the ribbed shape of a real umbrella without making the project complicated.
Do not fold too deeply. You want a hint of structure, not a paper fan that has suddenly forgotten its career goals.
Step 3: Form the Umbrella Shape
Overlap the cut edges slightly until the flat circle becomes a shallow cone. The more you overlap, the steeper the umbrella will look. A small overlap usually creates the prettiest shape. Secure the underside with glue or a piece of double-sided tape.
Hold the canopy in place for a few seconds so it sets properly. This is the part where patience pays off. If you let go too early, the umbrella may spring open like it is protesting the assignment.
Step 4: Attach the Stick
Take a toothpick or thin skewer and carefully poke it through the underside of the center point. Push it upward just enough to anchor the canopy without tearing through the top. If needed, add a tiny dot of glue where the stick meets the paper underneath.
For a more finished look, you can add a tiny paper circle, bead, or rolled scrap at the top where the stick exits. This little detail makes the umbrella look more intentional and helps hide small imperfections.
Step 5: Curve the Top for a Real Umbrella Look
Gently press the top center down with your fingertip while nudging the pleat lines outward. This creates a more natural umbrella profile instead of a sharp cone. Small shaping makes a big difference here. The goal is “mini beachside charm,” not “paper wizard hat.”
Why This Method Works
The classic cone method is fast, clean, and dependable. It is great for party hosts who want consistent results and for crafters who like a simple template. It also works well with printed designs, so if you want striped, floral, fruit-themed, or patriotic umbrellas, this is your best option.
Method 2: The Accordion-Fold Mini Parasol
This second method has more texture and a softer handmade feel. It is especially cute for tropical party decorations, cupcake toppers, dessert tables, and nonalcoholic drinks. If you like paper fans, folded rosettes, or tissue-paper crafts, this one is your new tiny obsession.
Step 1: Cut a Paper Strip or Circle
You can make this umbrella in two ways. The easiest version starts with a paper strip about 1.5 inches tall and 6 to 8 inches long. The prettier version starts with a circle about 3 inches wide. For beginners, the strip is easier to control. For crafters who want a rounder canopy, use the circle.
Step 2: Accordion Fold the Paper
Fold the paper back and forth in small, even sections, just like making a paper fan. Try folds around 1/4 inch wide. Keep them as even as possible so the finished umbrella opens neatly. Uneven folds still work, but they tend to give the umbrella a “survived a windstorm” personality.
If you are using tissue paper, press lightly. If you are using thin cardstock, crease more firmly so the folds hold their shape.
Step 3: Shape the Canopy
For the strip version, fold the accordion piece in half and secure the inner edge so it spreads into a fan shape. Then wrap or glue the center around a toothpick or skewer and fan it into a rounded parasol. For the circle version, accordion-fold the full shape from one side to the other, pinch the middle point, and carefully spread the paper into a domed form.
This style is less about perfect geometry and more about texture. As long as it opens attractively and stays put, you are winning.
Step 4: Secure It to the Stem
Attach the folded center to a toothpick or skewer with a dot of glue or a narrow strip of tape. Let it dry before opening the canopy all the way. Once secure, gently fan out the top and adjust the folds until it resembles a tiny parasol.
Step 5: Add Finishing Details
This is the method that loves embellishment. Add a fringe edge, trim the bottom into scallops, use ombre tissue paper, layer two colors together, or wrap the stem with washi tape. You can even glue a tiny circle to the center top for a finished look.
Why This Method Works
The accordion-fold paper umbrella is perfect when you want a softer, more decorative craft. It is forgiving, fun, and especially good for party decor where a handmade look adds charm. It may not look exactly like a factory-made umbrella, but honestly, that is part of its appeal.
Tips for Better Results
Choose the Right Stick
Toothpicks work for cupcakes and short glasses. Thin skewers work better for taller drinks or decorative centerpieces. If you are using the umbrellas in actual beverages, make sure the stick is clean, smooth, and an appropriate length.
Use Less Glue Than You Think
Too much glue wrinkles paper and turns crisp folds into soggy disappointment. Use tiny amounts and let each join set before moving to the next step.
Test One First
Before cutting twelve umbrellas for a party, make one test version. This helps you check the size, shape, and paper weight. It is a lot easier to tweak one umbrella than to stare at a dozen crooked ones and negotiate emotionally.
Match the Umbrella to the Occasion
Try citrus prints for summer drinks, pastels for baby showers, red-white-and-blue patterns for patriotic parties, metallic paper for New Year’s Eve, or bright tropical florals for poolside mocktails. Mini paper parasols are small enough to make a statement without hijacking the whole table.
Creative Ways to Use Paper Cocktail Umbrellas
- Dress up mocktails, lemonade, iced tea, and fruit punch
- Top cupcakes, mini cakes, or dessert jars
- Create tropical drink station decor
- Use them as place-card markers for outdoor parties
- Add them to charcuterie boards for a playful touch
- Decorate summer wreaths, gift toppers, or party favors
- Use larger versions in centerpieces or buffet displays
Common Mistakes to Avoid
Using Paper That Is Too Thick
Heavy paper can be tough to crease and may fight against the umbrella shape. If your paper feels like it belongs in a corporate binder, it is probably too thick for this craft.
Making the Center Hole Too Large
A giant hole at the top makes the canopy wobble. Pierce carefully and keep the opening small so the umbrella stays centered on the stick.
Skipping the Drying Time
Freshly glued paper likes to drift, unwrap, and generally ignore your plans. Let each piece rest before shaping or inserting it into food and drinks.
Which Method Is Best?
Choose Method 1 if you want a classic paper cocktail umbrella with a clean, traditional shape. It is the better choice for printable patterns, event matching, and polished party styling.
Choose Method 2 if you want a more playful, textured umbrella with a handmade look. It is excellent for craft nights, kids’ party decorations, cupcake toppers, and colorful summer themes.
If you cannot decide, make both. Tiny umbrellas are not exactly known for creating household conflict.
Real-Life Experiences: What I Learned Making Paper Cocktail Umbrellas
The first time I made a paper cocktail umbrella, I assumed it would be one of those charmingly simple crafts that takes five minutes and makes you feel instantly competent. That was a hilarious misunderstanding. My first version looked less like a festive umbrella and more like a paper satellite dish attached to a toothpick. It leaned dramatically to one side, the glue refused to behave, and the top had a hole so wide it looked like the umbrella had gone through a tiny tornado.
Oddly enough, that failure was useful. It taught me that scale matters more than people expect. When a project is miniature, small differences become huge. A little too much overlap changes the umbrella shape. A tiny extra drop of glue wrinkles the canopy. A slightly off-center hole makes the whole thing tilt like it is emotionally exhausted. Once I slowed down and treated the folds carefully, the project became much easier.
I also learned that paper choice changes everything. Thin decorative scrapbook paper gave me the cleanest classic umbrellas because it held a curve without collapsing. Tissue paper created prettier soft folds, but only when I handled it gently and used very little glue. One afternoon, I tried making a batch from paper that was too thick. Every umbrella looked like it was prepared to survive a hurricane. Sturdy? Absolutely. Elegant? Not even a little.
The most fun experiment was making a set for a summer snack table with lemonade, fruit skewers, and cupcakes. Suddenly the umbrellas were doing more than just sitting in glasses. They became cupcake toppers, garnish picks, and conversation starters. People noticed them immediately. That is the charm of a paper cocktail umbrella: it is a tiny detail, but it changes the mood of the whole setup. A plain drink says, “Here is your beverage.” A drink with a tiny umbrella says, “Please enjoy your glamorous two-minute vacation.”
I found that kids and adults react to them differently, and both reactions are delightful. Kids usually want the brightest possible colors and treat the umbrellas like tiny toys with jobs. Adults tend to laugh, pick one up, and say something like, “Why does this make everything better?” That is because it does. It is impossible to take a mini parasol too seriously, and somehow that is exactly why it works at parties.
Another thing I noticed is that homemade umbrellas look best when they are not too perfect. The classic cone version can be polished, but the accordion-fold parasols have more personality when they keep a little handmade texture. Slightly uneven folds can feel charming instead of flawed. A visible paper pattern can make the umbrella look custom. A tiny top knot made from a paper scrap can turn a simple piece into something that looks thoughtfully designed.
My favorite batch was a tropical set made from leftover floral paper, pale pink tissue, and a few citrus-patterned scraps. None of the umbrellas matched exactly, but together they looked intentional and cheerful. That experience changed how I think about paper crafts. Not every project needs to be perfectly uniform to look good. Sometimes a bit of variation is what makes the final result feel lively.
So yes, making a paper cocktail umbrella is easy, but it is also the kind of easy craft that teaches you small useful things: how paper behaves, how scale changes design, how details affect presentation, and how a tiny decorative element can completely transform a table. And honestly, any project that turns leftover paper into instant party energy is doing excellent work.
Final Thoughts
Learning how to make a paper cocktail umbrella is one of those wonderfully low-stakes crafts that gives an outsized reward. With a few simple supplies and either of these easy methods, you can create a DIY paper drink umbrella that makes beverages, desserts, and party tables look instantly more festive. The classic cut-and-overlap style is neat and traditional. The accordion-fold parasol is playful and creative. Both are affordable, customizable, and surprisingly fun to make.
So grab your paper, pick your patterns, and let your drinks enjoy a little flair. Because sometimes the smallest decorations do the heaviest lifting.


