Table of Contents >> Show >> Hide
- Before You Cut: What Kind of Polycarbonate Are You Working With?
- Safety and Setup (Because Fingers Don’t Grow Back)
- Method 1: Score-and-Snap (Best for Thin, Straight Cuts)
- Method 2: Circular Saw or Table Saw (Fast, Straight Cuts on Thicker Sheet)
- Method 3: Jigsaw (and Friends) for Curves, Cutouts, and Awkward Shapes
- How to Get Cleaner Edges (Without Overthinking It)
- Common Mistakes (and the Fixes Pros Use)
- Quick Decision Guide: Which Method Should You Use?
- FAQ: Fast Answers to Common Polycarbonate Cutting Questions
- Conclusion
- Real-World Cutting Experiences (500+ Words): What DIYers Actually Notice
Polycarbonate is the “tough kid” of the plastic worldclear, impact-resistant, and annoyingly good at surviving things that would shatter acrylic. The catch? When it’s time to cut it, polycarbonate can punish sloppy technique with chipped edges, melted spots, or stress marks that look like tiny lightning bolts.
This guide covers three practical, common ways to cut polycarbonate (solid sheets and many panel styles), plus the real-world details that make the difference between a clean cut and a “why did I start this project at 9 p.m.” cut. You’ll also get a quick decision guide, edge-finishing tips, and a 500-word section on what people actually experience when cutting polycarbonate in the wild.
Before You Cut: What Kind of Polycarbonate Are You Working With?
“Polycarbonate” is a family name, not a single personality. A few details change how you should approach cutting:
- Solid polycarbonate sheet (often called “Lexan” generically): Great for machine guards, storm panels, shelving, and clear protective barriers.
- Multiwall (twinwall) polycarbonate panels: Hollow channels inside; popular for greenhouses, patio covers, and roofing. Cutting creates chips that can hide in the channels.
- Corrugated polycarbonate panels: Wavy profile, often used for roofing. The ridges affect how you support the cut.
- Hard-coated or UV-coated products: Designed for scratch/UV resistance; can have special handling recommendations.
If your sheet came with a protective film, treat it like a free bodyguard: keep it on during layout and cutting whenever possible, then peel later. It helps reduce scratches and makes your markings easier to see.
Safety and Setup (Because Fingers Don’t Grow Back)
Cutting polycarbonate can involve sharp blades and power tools. If you’re not trained on the tool you’re using, get help from a qualified adult or a pro, and follow the tool and material manufacturer instructions. (This isn’t me being dramatic. This is me being team “10 fingers forever.”)
Prep habits that help almost every method
- Support the sheet well so it can’t vibrate, bounce, or sag near the cut line.
- Clamp securely (especially for saws). Vibration is a common cause of rough edges and cracking.
- Mark clearly using a straightedge for straight cuts. For curves, use a template or flexible curve guide.
- Test on a scrap piece if you can, especially with coated products.
- Wear eye protection and avoid loose clothing. Plastic chips are small, fast, and extremely rude.
Method 1: Score-and-Snap (Best for Thin, Straight Cuts)
Score-and-snap is the quiet, low-drama optionno sawdust storm, no extension cords, no “why is the garage humming.” It’s mainly for thin solid polycarbonate and short, straight cuts. It’s also common for certain panel products where a manufacturer-approved scoring tool is used.
Why people like it
- Minimal equipment: A scoring tool/utility knife and a straightedge are the basics.
- Cleaner work area: Fewer airborne chips than sawing.
- Convenient for small jobs: Trimming a small piece for a craft project, a simple window insert, or a quick repair.
Where it struggles
- Thickness limits: As the sheet gets thicker, snapping cleanly gets harder and less predictable.
- Edge quality: The snap edge can be rougher than a saw cut and may need sanding.
- Not for curves: This is a straight-line-only lifestyle.
The key idea is simple: you create a controlled “weak line” (a score) and then break along it. Many DIYers get better results by focusing on consistencysteady pressure, multiple passes, and stable supportrather than trying to brute-force it.
Practical example: If you’re cutting a thin polycarbonate sheet for a picture frame-style cover, score-and-snap can be a fast solutionespecially if you don’t want power tool marks on your weekend.
Method 2: Circular Saw or Table Saw (Fast, Straight Cuts on Thicker Sheet)
When you need long, straight cutsespecially on thicker solid sheet or multiple panelssaws are the workhorse. This method is popular for greenhouse builds, storm panel prep, and clean rectangular pieces for DIY projects.
What makes a saw cut “good” on polycarbonate
- The right blade: Blades designed for plastics (often carbide-tipped) are commonly recommended because they reduce chipping and help produce a cleaner edge.
- Stable support: Supporting the sheet near the cut helps avoid vibration and stress marks.
- Heat management: Polycarbonate can soften from heat; too much friction can cause melting or edge “gumming.” A smooth, controlled cut is usually cleaner than an aggressive one.
For multiwall panels, saw cutting is extremely common. A big difference compared with solid sheet: you’ll want to remove chips from the channels after cutting (people typically use clean compressed air or careful vacuuming) so the panel stays clear and doesn’t trap debris.
Practical example: Cutting multiwall polycarbonate panels for a backyard greenhouse roof is usually a saw-friendly job. You’ll typically make long, straight cuts and want the edges neat so end caps and tapes fit properly.
When to consider “cut-to-size” instead
If you need a lot of identical pieces, super-straight edges, or you’re working with pricey coated panels, ordering custom-cut sizes from a plastics supplier can save timeand can reduce the risk of ruining a sheet that costs more than your last three lunches combined.
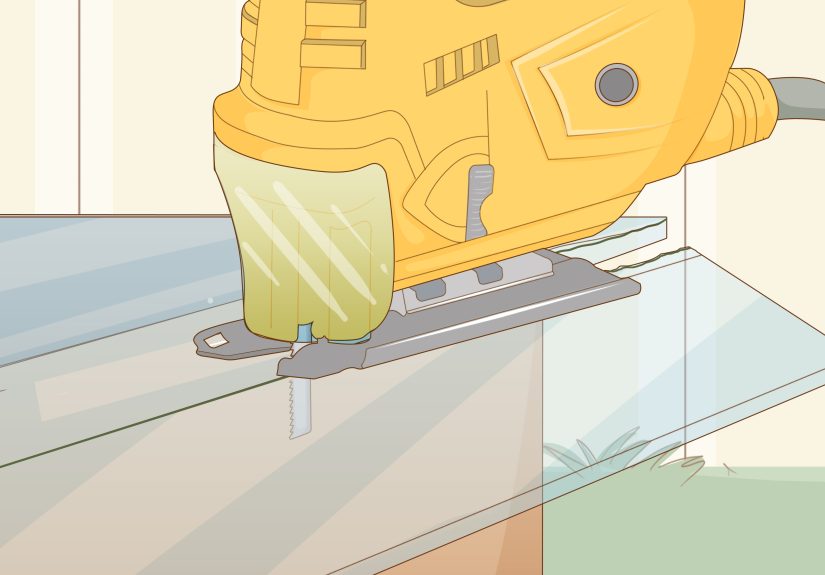
Method 3: Jigsaw (and Friends) for Curves, Cutouts, and Awkward Shapes
Sometimes your project isn’t a rectangle. (Wild, I know.) A jigsaw is a common choice for curved cuts, interior cutouts, and shapes that would make a table saw cry.
Why jigsaws work well
- Curves and notches: Great for cutting around brackets, posts, vents, and weird corners.
- Control: Useful when you need to “steer” through a line rather than bulldoze straight ahead.
- Shop-friendly: Many DIYers already own one, and it’s easier to set up for one-off shapes.
What to watch for
- Chatter and vibration: Polycarbonate can chip if the sheet vibrates or if the blade grabs. Strong support near the cut line helps a lot.
- Heat buildup: Some people notice melting on the edge if friction and heat spike. A smoother, more controlled approach often reduces that problem.
- Finish quality: Jigsaw edges often need a little cleanup for a “finished” look.
If you need ultra-clean edges or production-style repeatability, a router (with the right bit and setup) or CNC cutting is often used in professional fabrication. For many home projects, though, a jigsaw plus edge-finishing is a solid combo.
A quick note on lasers
Laser cutting is popular for acrylic, but polycarbonate often reacts poorly to laser heatdiscoloration and stress cracking are common concerns, especially with thicker sheet. For most DIY and shop scenarios, sawing/routing is usually the safer bet for the material.
How to Get Cleaner Edges (Without Overthinking It)
Even a good cut can look “fresh off the saw.” If the edge will be visible or needs to fit tightly, finishing matters. Many fabricators improve the look and feel with gradual sanding and deburringstarting with a coarser grit and moving fineruntil the edge feels smooth.
Edge finishing habits that tend to work well
- Remove burrs so the edge doesn’t feel sharp or catch on seals/tape.
- Sand progressively rather than trying to fix everything with one aggressive pass.
- Keep heat low during finishing. Too much friction while sanding can haze or soften plastic edges.
For multiwall panels, also remember the “invisible mess”: clearing chips from channels helps keep panels clearer over time and helps tapes/caps adhere properly.
Common Mistakes (and the Fixes Pros Use)
Mistake: The cut edge looks melted or wavy
This often points to friction/heat or a blade that isn’t ideal for plastics. Many guides recommend using sharp blades intended for plastic and avoiding techniques that create excess heat at the edge.
Mistake: Chipping on the cut line
Chipping is frequently linked to vibration, poor support, or the sheet “chattering.” Better support and clamping near the cut line can help.
Mistake: Stress marks or cracks near holes/corners
Polycarbonate is impact-resistant, but it can still develop stress issues if it’s forced, bent sharply, or cut with too much vibration. When a project needs tight corners or interior cutouts, many fabricators use gradual curves or drilled relief points instead of sharp inside corners.
Mistake: Scratches all over the surface
Polycarbonate can scratch more easily than you’d expect from something so tough. Keeping the protective film on, supporting the sheet on a clean surface, and avoiding gritty debris under clamps can prevent a lot of “mystery scratches.”
Quick Decision Guide: Which Method Should You Use?
- Score-and-snap: Thin sheet, short straight cuts, low mess, simple tools.
- Circular saw / table saw: Long straight cuts, thicker sheet, larger projects, repeatable results (with proper setup).
- Jigsaw (or routing): Curves, cutouts, odd shapes, on-site trimming, projects that refuse to be rectangles.
FAQ: Fast Answers to Common Polycarbonate Cutting Questions
Can I cut polycarbonate with a utility knife?
For thin sheet and straight cuts, scoring can work. For thicker sheet or long cuts, many people switch to saws for cleaner, more consistent results.
Do big-box stores cut polycarbonate for you?
Some stores offer cutting services for certain sheet goods, but policies and equipment vary. For precision sizing, many plastics suppliers offer cut-to-size services that are specifically designed for plastic sheet products.
Should I remove the protective film first?
Usually, leaving it on during cutting helps reduce surface scratches. If your process requires removing it (or it’s already off), protect the surface with clean padding and keep debris away from the face of the sheet.
What about cutting multiwall polycarbonate panels?
Saw cutting is common, but the extra step is cleaning out the channels afterward. Chips trapped inside can reduce clarity and make sealing/finishing harder.
Conclusion
Cutting polycarbonate doesn’t have to be a gamble. If you match the method to your sheet type and cut style, support the material well, and keep heat/vibration under control, you’ll get cleaner edges and far fewer “why is this edge crunchy?” moments.
Use score-and-snap for thin straight cuts, reach for a circular saw or table saw when you need fast, straight lines on thicker material, and grab a jigsaw when curves and cutouts enter the chat. Finish the edges thoughtfully, and polycarbonate will reward you by looking professional while being practically indestructible.
Real-World Cutting Experiences (500+ Words): What DIYers Actually Notice
Here’s the part most guides politely skip: polycarbonate cutting has vibes. Not just “cut line, tool, done”real sensations that tell you whether things are going well or about to go sideways.
First, there’s the layout phase, which feels easy until you realize polycarbonate is so clear it can turn your pencil line into a magic trick (“Now you see it… now you don’t”). Many DIYers end up using a bold marker on the protective film, or they put a strip of painter’s tape down and mark on that. It’s less elegant, but it’s readablelike subtitles for your cut line.
Then you get the support-and-clamp moment. This is where people either win or start collecting weird edge defects like Pokémon. Polycarbonate’s toughness can make you underestimate how much vibration matters. If the sheet can flex near the cut, it tends to chatter. And chatter doesn’t just look uglysometimes it leaves tiny chips or stress marks that weren’t part of your vision board.
When sawing, one of the most common “oh, that’s happening” signals is the edge sound. A smoother cut often sounds consistent a steady hum rather than a stuttering rattle. If it starts to sound like the blade is arguing with the plastic, many experienced DIYers pause and check support, blade sharpness, and whether the sheet is vibrating. (In other words: the tool is giving feedback, and it’s not five stars.)
Next comes the chip situation. Polycarbonate chips can be surprisingly clingythanks to static. People often describe finishing a cut and then realizing the “confetti” is everywhere: stuck to the sheet, the table, your sleeves, and somehow the dog (even if the dog was never in the garage). If you’re cutting multiwall panels, chips can also hide inside channels and reappear later like a jump scare. That’s why folks commonly blow out channels or vacuum carefully before sealing the ends.
Another frequent experience is the heat clue. If a cut edge looks slightly smeared, glossy in a weird way, or leaves tiny melted beads, DIYers often interpret that as “too much friction” and adjust by focusing on a smoother, more controlled cut rather than forcing the tool. It’s not about rushing or crawlingmore like finding a steady rhythm that keeps the plastic from heating up at the edge.
Finally, there’s the edge-finishing reality. Many people expect a perfect, glassy edge straight off the tool. In practice, a light cleanup step is normalespecially for jigsaw cuts or anything visible. The “experience” here is surprisingly satisfying: after a few careful passes smoothing the edge, the piece suddenly looks intentional, like it belongs in a finished build instead of a prototype.
The overall takeaway from real projects is simple: polycarbonate rewards patience and good support more than brute force. When DIYers treat it like a premium materialmeasure carefully, stabilize it, choose a sensible cutting method, and finish the edgespolycarbonate looks sharp and lasts a long time. When they treat it like “just another plastic,” it usually finds a way to remind them it’s tougher than that… and also pickier.


