Table of Contents >> Show >> Hide
- Why People Still Use Microsoft Paint for Quick Image Combos
- Before You Start: Two Tiny Prep Steps That Save a Lot of Pain
- Method 1: Place Two Images Side by Side on an Expanded Canvas
- Method 2: Overlay One Image on Top of Another
- Method 3: Resize and Crop First, Then Combine for a Cleaner Layout
- Method 4: Use Layers in the Newer Windows 11 Paint App
- Common Mistakes to Avoid When Combining Images in Paint
- Which Method Is Best?
- Real-World Experiences With Combining Two Images in Microsoft Paint
- Final Thoughts
Need to combine two images in Microsoft Paint without downloading a giant design program that looks like it was built to edit the next superhero movie poster? Good news: Paint is still the friendly neighborhood tool for quick image mashups. It may not wear a fancy cape, but it can absolutely place two pictures side by side, stack one on top of another, clean up awkward edges, and even do smarter layered edits if you are using the newer Windows 11 version.
If your goal is simple, like making a before-and-after comparison, creating a small collage, adding a logo to a photo, or putting two screenshots into one file, Microsoft Paint can get it done faster than many people expect. The secret is not “advanced design talent.” The secret is knowing which method fits the kind of image combo you want.
In this guide, you will learn four easy ways to combine two images in Microsoft Paint, when each method works best, and how to avoid the classic Paint disasters: stretched photos, accidental white boxes, and the sudden realization that you pasted something in the wrong spot and now your blood pressure has entered the chat.
Why People Still Use Microsoft Paint for Quick Image Combos
Paint has survived for decades for one very simple reason: it is fast. You open it, drop in an image, make a few changes, save, and move on with your life. For quick visual tasks, that matters. You do not need a subscription. You do not need a tutorial playlist. You do not need to pretend you understand 87 tiny icons in a professional editor.
Microsoft Paint is especially useful when you want to combine images for everyday jobs such as:
- Putting two screenshots into one file
- Making side-by-side comparisons
- Creating a simple collage
- Placing a logo over a photo
- Building a quick step-by-step image for instructions or schoolwork
The newer Paint app in Windows 11 also adds more flexibility with layers, transparency support, and background removal. That means the old-school methods still work, but newer versions of Paint can also handle cleaner overlays and more organized edits. In other words, Paint quietly got smarter while the rest of us were busy ignoring it.
Before You Start: Two Tiny Prep Steps That Save a Lot of Pain
1. Check the size of both images
If one image is huge and the other is tiny, your final result may look awkward. Before combining them, resize or crop them so they feel more balanced. You do not need identical dimensions, but wildly different sizes can make your final image look like a giraffe standing next to a hamster in a passport photo.
2. Decide how you want the final image to look
Ask yourself one question: do you want the images next to each other or on top of each other? That answer determines whether you should expand the canvas, use an overlay approach, or work with layers.
Method 1: Place Two Images Side by Side on an Expanded Canvas
This is the easiest and most reliable way to combine two images in Microsoft Paint. It works best for comparison graphics, before-and-after pictures, two screenshots in one file, or simple collage layouts.
How it works
You open one image in Paint, make the canvas larger, then paste the second image into the empty space. Simple, practical, and gloriously low drama.
Steps
- Open the first image in Microsoft Paint.
- Resize the canvas so there is blank space to the right or below the image.
- Use Paste from or copy and paste the second image into Paint.
- Drag the second image into the blank space.
- Adjust the placement so the two images line up neatly.
- Crop away extra blank areas if needed.
- Save the final combined image.
Best use cases
- Before-and-after edits
- Two screenshots in one image
- Visual product comparisons
- Simple school or office collages
Example: Let’s say you have one screenshot of a website’s old homepage and another of the redesign. Place them side by side on a wider canvas, and suddenly you have a clean comparison image without needing anything more complicated than Paint and a little patience.
Why this method works so well
Because it avoids complexity. Instead of forcing two images to overlap, you give them room to breathe. It is the visual equivalent of not seating two grumpy relatives next to each other at Thanksgiving dinner.
Method 2: Overlay One Image on Top of Another
If you want one picture to sit over another, such as a logo on a photo, a cutout over a background, or a sticker-style element on top of another image, this method is the one to use.
How it works
Open the base image first. Then bring in the second image and position it on top. In older versions of Paint, this can be a little clunky, especially if you need a transparent-looking effect. In newer versions, this gets easier thanks to transparency support and more modern image handling.
Steps
- Open your background image in Paint.
- Bring in the second image using Paste from or standard copy and paste.
- Move the pasted image into position.
- Resize it if needed so it fits the layout.
- Turn on Transparent selection if the pasted image has a simple background you want to blend more naturally.
- Save the final image once everything looks right.
When this method shines
- Adding a logo to a photo
- Putting a badge, icon, or label on an image
- Making a meme-style image
- Creating a quick social graphic
Important reality check: Transparent selection in classic Paint is useful, but limited. It works best with simple shapes or images that have a plain, solid background. If your second image has a messy background, soft shadows, or lots of color variation, Paint may not give you the clean blend you imagined in your head at 2:14 a.m.
Pro tip
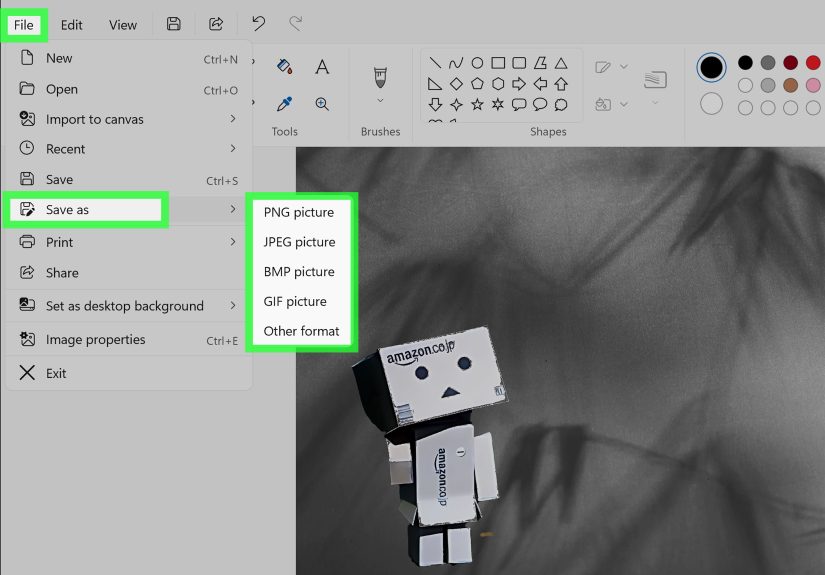
If you are overlaying text-heavy or logo-style graphics, save the final image as PNG when possible. PNG is usually the better choice when you want sharper edges, cleaner text, and better quality. JPEG is fine for photos, but it can soften hard lines and introduce compression artifacts. Translation: your nice crisp logo may come out looking like it just woke up from a nap.
Method 3: Resize and Crop First, Then Combine for a Cleaner Layout
This method is less flashy, but honestly, it is one of the smartest ways to combine two images in Microsoft Paint. Instead of pasting first and panicking later, you prepare both images before merging them.
How it works
You crop away unnecessary parts of each image, resize them to similar dimensions, and then combine them using either the side-by-side or overlay method. This gives you a more polished final result.
Steps
- Open the first image in Paint.
- Use the Select tool and Crop to remove unwanted areas.
- Use Resize to adjust the image dimensions.
- Save the edited version if needed.
- Repeat the same process for the second image.
- Once both images are cleaned up, combine them using Method 1 or Method 2.
Why this method matters
Because combining messy images usually creates a messy final product. If one image has a giant empty sky and the other is tightly cropped, the composition will feel off. Taking a minute to crop and resize first makes the finished result look far more intentional.
Example: Imagine combining two portraits for a birthday graphic. If one person is tiny in the frame and the other is zoomed in like a passport application photo, the finished image will look strange. Crop first, resize second, combine third. Suddenly it looks like you knew what you were doing all along.
Best use cases
- Photo comparisons
- Simple collages
- Social media graphics
- Printable image layouts
Method 4: Use Layers in the Newer Windows 11 Paint App
If you are using the newer Microsoft Paint on Windows 11, you may have access to layers and transparency support. This is where Paint stops being “just Paint” and starts casually acting like it took a few design classes behind your back.
How it works
Instead of flattening everything into one canvas immediately, layers let you place image elements on separate levels. That means you can move, reorder, hide, duplicate, or merge parts more easily while building your composition.
Steps
- Open Paint and load your base image.
- Open the Layers panel.
- Add a new layer or import another image to the canvas.
- Position the second image where you want it.
- Reorder layers if one image should appear above the other.
- Use background removal if needed for cleaner overlays.
- Merge layers or save the final image when finished.
Why this is a big deal
Classic Paint has always been good for quick edits, but layers make it far easier to build a proper image composition. Want text on top of a photo? Easier. Want a cutout image over a background? Better. Want to avoid ruining the whole layout every time you nudge the wrong element? Welcome to a slightly less chaotic life.
Best use cases
- Overlaying one image on another more cleanly
- Combining graphics with transparent backgrounds
- Creating simple promotional images
- Building polished collages without extra software
Note: Feature names and layout can vary depending on your version of Paint. If you do not see layers, you are likely using an older version or a device that does not yet have the newer feature set.
Common Mistakes to Avoid When Combining Images in Paint
Forgetting to expand the canvas
If you paste a second image into a space that is too small, it can cover the first image or feel cramped. Give yourself room first.
Skipping crop and resize
Uncropped images often carry lots of dead space. Resize and crop before combining if you want a cleaner result.
Saving the wrong file type
Use PNG when you want cleaner lines, crisp screenshots, or better support for transparent-style elements. Use JPEG when the final image is mostly photographic and you want a smaller file.
Expecting Paint to behave like Photoshop
Paint is charmingly simple, but it is still Paint. It is great for quick compositions, not advanced retouching, complex masking, or pixel-perfect fantasy wizardry.
Which Method Is Best?
Here is the easy rule:
- Use Method 1 for side-by-side images.
- Use Method 2 for overlays and logo-style placement.
- Use Method 3 when image prep matters more than speed.
- Use Method 4 if your Windows 11 Paint app supports layers and you want more control.
If you only remember one thing, remember this: most Paint image-combining problems are really size and layout problems. Fix the size, fix the crop, and the rest becomes much easier.
Real-World Experiences With Combining Two Images in Microsoft Paint
One of the funniest things about Microsoft Paint is how often people underestimate it until they actually need it. Nobody brags about opening Paint. There is no dramatic movie montage where the hero whispers, “Launch Microsoft Paint,” and then epic music starts. But when you need to combine two images quickly, Paint suddenly becomes the most useful tool in the room.
A lot of people first discover this while working with screenshots. Maybe you are showing a bug report, comparing two versions of a webpage, or sending a visual explanation to a teacher, client, or coworker. You take one screenshot, then another, and suddenly realize sending them separately is annoying. Combining them in Paint makes the message much clearer. It is one file, one glance, one less back-and-forth.
Another common experience is the “tiny logo on giant photo” problem. Someone wants to place a badge, watermark, or small graphic on top of a photo and assumes it will take advanced software. Then they try Paint, paste the graphic in, move it around, maybe turn on transparent selection, and realize the job is basically done. It may not be gallery-worthy digital art, but it is efficient, and efficient wins a lot of battles.
Students and office workers also tend to use Paint for quick visual documents. A side-by-side comparison for class, two charts in one image for a report, or a rough draft of a flyer can all come together surprisingly well. The trick is learning that Paint rewards simple planning. When users run into trouble, it is usually because they skipped the boring setup steps. They did not crop first. They did not resize first. They pasted everything into a tiny canvas and hoped for the best. Paint, in its own quiet way, punishes chaos.
There is also a certain satisfaction in using a built-in tool to solve a problem without downloading anything else. That matters more than people admit. You save time, avoid random software clutter, and get your image out the door. Sometimes “good and done” is better than “perfect but still not finished three hours later.”
The newer Windows 11 Paint experience adds another layer of usefulness, literally. People who try the updated version often realize that layers and background removal take Paint from “basic helper” to “surprisingly capable backup editor.” It is still not trying to replace professional design tools for complex work, but for everyday image combinations, it now feels much less limited.
So the real experience of combining two images in Microsoft Paint is this: it starts with low expectations, includes one moment of mild confusion, and usually ends with a better result than expected. That is not a bad reputation for a free app that has been quietly hanging around Windows for generations. Paint may never be glamorous, but it is dependable, and sometimes dependable is exactly what you need.
Final Thoughts
Combining two images in Microsoft Paint is easier than it sounds once you know the right approach. If you want a quick side-by-side image, expand the canvas. If you want one image on top of another, use an overlay method. If you want a cleaner result, crop and resize first. And if you are lucky enough to have the newer Windows 11 Paint features, layers can make the whole process smoother.
The beauty of Paint is not that it does everything. The beauty is that it does enough for everyday image work without turning a five-minute task into a full production. And honestly, that is the kind of software energy we should all respect more.
Note: Menu names, button labels, and newer features such as layers, transparency, and background removal can vary slightly depending on your version of Microsoft Paint and Windows.


