Table of Contents >> Show >> Hide
- Quick Table of Contents
- 1) Add a Russian keyboard in Windows (fastest daily option)
- 2) Add a Russian input source on macOS
- 3) Add a Russian keyboard on iPhone & iPad
- 4) Add Russian typing on Android with Gboard
- 5) Type Russian on a Chromebook (ChromeOS input methods)
- 6) Use a phonetic/transliteration layout (great for beginners)
- 7) Use character pickers, copy/paste, and online keyboards (best for one-offs)
- Conclusion
- Real-World Experiences: What Typing Russian Actually Feels Like (500+ Words)
Want to type Russian characters (Cyrillic) but your keyboard is stubbornly stuck in QWERTY mode like it’s a personality trait?
Good news: your keyboard isn’t “English-only.” It’s just waiting for you to introduce it to ЙЦУКЕН (the standard Russian layout)
like a new friend at a party.
In this guide, you’ll learn seven practical ways to type Russian letters on the devices people actually useWindows laptops,
Macs, iPhones, Android phones, and Chromebooksplus beginner-friendly phonetic layouts, copy/paste tricks, and real-world tips
that’ll save you from accidentally turning your homework into a mysterious cipher.
Quick Table of Contents
- 1) Add a Russian keyboard in Windows (fastest daily option)
- 2) Add a Russian input source on macOS
- 3) Add a Russian keyboard on iPhone & iPad
- 4) Add Russian typing on Android with Gboard
- 5) Type Russian on a Chromebook (ChromeOS input methods)
- 6) Use a phonetic/transliteration layout (great for beginners)
- 7) Use character pickers, copy/paste, and online keyboards (best for one-offs)
1) Add a Russian keyboard in Windows (fastest daily option)
If you plan to type Russian more than once in your life, Windows’ built-in language and keyboard settings are the cleanest solution.
You can install Russian and then switch layouts on demandno extra apps required.
How to add a Russian keyboard layout (Windows 10/11)
- Open Settings.
- Go to Time & language → Language & region.
- Select Add a language and choose Russian.
- In the Russian language options, add a keyboard layout (such as the standard Russian layout or a mnemonic/phonetic option, if available).
How to switch between English and Russian while typing
-
Use the shortcut Windows key + Space to cycle through installed keyboards.
(It’s also how many people accidentally switch languages mid-sentencemore on that in the “experiences” section.) -
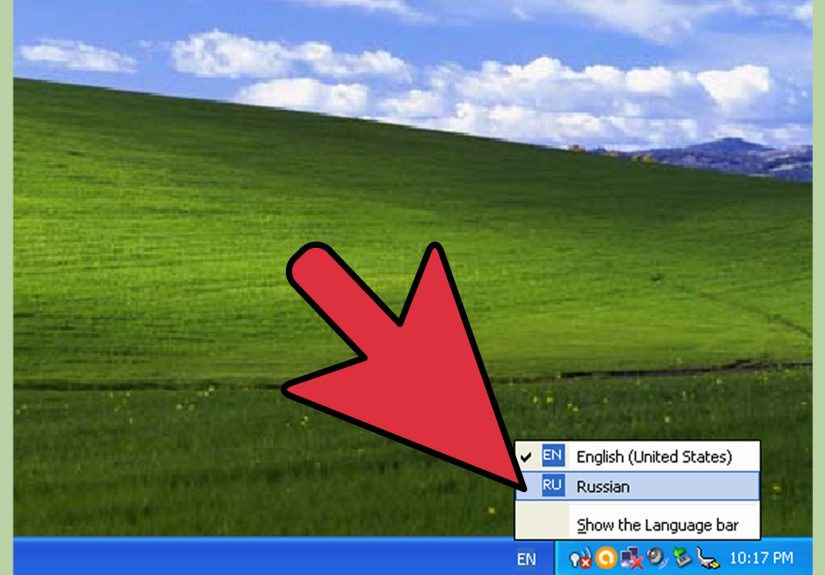
Or click the language indicator in the taskbar (often showing something like ENG)
and choose Russian.
A quick confidence boost
Once enabled, you can type a simple test line in any text field:
Привет! (That’s “Hi!”) If you see boxes or question marks, the issue is usually the fonttry a common font like
Arial, Calibri, or any modern system font that supports Cyrillic.
2) Add a Russian input source on macOS
macOS treats languages as “input sources.” You can add Russian, preview the layout, and switch on the flywithout changing your physical keyboard.
(Your Mac doesn’t care what letters are printed on the keys. It cares what input source is selected. Very Zen.)
How to add Russian on macOS
- Open System Settings.
- Go to Keyboard.
- Find Text Input and select Edit (or “Input Sources” depending on macOS version).
- Click the + button and add Russian (you may also see variants like “Russian – Phonetic”).
How to switch quickly
- Turn on “Show Input menu in menu bar” (if available), then switch from the menu bar.
-
Many Macs let you toggle input sources via keyboard shortcuts. You can also enable an option to use Caps Lock
to switch between your last Latin input source and a non-Latin onehandy if you bounce between English and Russian often.
Pro tip: preview the layout before you panic
In Keyboard settings, you can often view a layout preview. This matters because the standard Russian layout is not a Cyrillic version of QWERTY.
It’s a different arrangement entirely (ЙЦУКЕН), so a preview saves you from typing what you think is “M” and getting “Ь.”
(Russian doesn’t judge you. But your spellchecker might.)
3) Add a Russian keyboard on iPhone & iPad
iOS and iPadOS make this surprisingly simple: add Russian once, then switch keyboards with the globe key.
Great for messaging, travel, language study, or leaving dramatic Cyrillic comments on your own Notes app for no reason.
How to add Russian on iPhone/iPad
- Open Settings.
- Go to General → Keyboard.
- Tap Keyboards → Add New Keyboard.
- Select Russian.
How to switch while typing
- Tap the globe key on the keyboard to cycle through languages.
- Press and hold the globe key to pick a specific keyboard if you have several installed.
Specific example you can try right now
Add Russian, open Messages or Notes, switch to Russian, and type:
Я люблю кофе (“I love coffee”). Even if you don’t, it makes you sound interesting.
4) Add Russian typing on Android with Gboard
On Android, the most common route is Google’s Gboard. It supports Russian with multiple layouts, including standard and phonetic options,
and makes switching languages painless once it’s set up.
How to add Russian in Gboard
- Open your phone’s Settings.
- Go to System → Keyboard → On-screen keyboard.
- Select Gboard → Languages.
- Pick Russian, then choose the layout you want, and tap Done.
Pick the right layout for your goals
- Standard Russian (ЙЦУКЕН): best if you want to learn how Russians actually type.
- Phonetic/transliteration: best if you think in QWERTY sounds first.
- Handwriting: surprisingly useful when you know what a letter looks like but can’t remember where it lives on the keyboard.
Once it’s enabled, you can usually switch languages from the keyboard itself (often via a globe icon or a long-press on the space bar, depending on your setup).
5) Type Russian on a Chromebook (ChromeOS input methods)
Chromebooks are built for switching input methods. If you use Google Docs, Gmail, or any browser-based writing, enabling Russian is quick and reliable.
How to add a Russian keyboard on ChromeOS
- Click the time in the bottom-right corner.
- Open Settings.
- Under Device, go to Keyboard and then Change input settings (wording may vary).
- Under Input methods, add Russian (or a Russian variant you prefer).
How to switch while typing
ChromeOS typically shows an input indicator near the system tray. Click it to switch keyboards, or use the keyboard shortcut your Chromebook provides for input switching.
(Once you set it up, it feels like flipping a light switchexcept the light is Cyrillic.)
6) Use a phonetic/transliteration layout (great for beginners)
The standard Russian keyboard layout is efficient, but it’s also a little like moving to a new city: you’ll get lost at first.
A phonetic (also called mnemonic or transliteration) layout maps Cyrillic letters to the closest-sounding Latin keys.
That means you can type in “QWERTY brain mode” while still producing Russian text.
Where you’ll see phonetic options
- Windows: you may see layouts like “Russian – Mnemonic” depending on your system options.
- macOS: often offers a “Russian – Phonetic” input source.
- Some university language labs: recommend phonetic layouts for beginners because the learning curve is gentler.
Common phonetic combinations (cheat sheet)
Exact mappings can vary by layout, but these are common transliteration habits that phonetic keyboards tend to support:
| Sound you type | Often becomes | Example |
|---|---|---|
| ya | я | ya → я (e.g., ya in “я”) |
| yo | ё | yo → ё (e.g., “ёлка”) |
| zh | ж | zh → ж (e.g., “журнал”) |
| sh | ш | sh → ш (e.g., “школа”) |
| sch / shch | щ | shch → щ (e.g., “щука”) |
When phonetic layouts shine (and when they don’t)
- Best for: beginners, occasional typing, messaging, and study notes.
- Not ideal for: advanced typing speed on Russian-only work, where standard ЙЦУКЕН is usually faster long-term.
7) Use character pickers, copy/paste, and online keyboards (best for one-offs)
Sometimes you don’t need a full Russian keyboard. You just need one lettermaybe “Ж” for a joke, “Я” for a tattoo mockup,
or “ь” because Russian loves tiny letters that change everything.
For those moments, character tools and online keyboards are your best friends.
Windows: Character Map (copy and paste Cyrillic)
- Search for Character Map in Windows.
- Select a font that supports Cyrillic (most modern fonts do).
- Click the character you need, copy it, then paste into your document or message.
macOS: Character Viewer (Emoji & Symbols)
- In many apps, open the Character Viewer (often via Edit → Emoji & Symbols).
- Search for characters or browse categories.
- Double-click to insert.
Any device: online Russian keyboards
If you’re on a borrowed computer, locked-down work device, or a public library machine that won’t let you install anything, online Russian keyboards can help.
You type in a web page, then copy/paste your Cyrillic output where you need it.
It’s not glamorous, but neither is trying to install a keyboard layout during a job interview.
Best use cases for this “toolbox” approach
- Filling out forms that only need a name in Cyrillic
- Adding Russian characters into design projects, captions, or titles
- Checking spelling of a single word (copy/paste into a dictionary or translator)
- Typing on devices where you can’t change system settings
Conclusion
Typing Russian characters doesn’t require a new keyboardjust the right setup for your device and your goal.
If you type Russian often, install a dedicated Russian layout on your main device. If you’re learning, a phonetic keyboard can feel like training wheels
(the good kindfast, stable, and not embarrassing). And if you only need a few letters now and then, character pickers and online keyboards are the quickest fix.
Pick one method today and try a tiny practice line. Your future self will thank you the next time you need to type “Здравствуйте”
and your keyboard tries to give you “Plfdhcndeqnt” instead.
Real-World Experiences: What Typing Russian Actually Feels Like (500+ Words)
Here’s the part nobody warns you about: learning to type Russian characters is less about “finding the setting” and more about surviving the first week
without yelling at your keyboard. In real life, people tend to go through a few predictable stageskind of like assembling IKEA furniture, but with fewer screws
and more sudden appearances of “Ъ.”
First comes the “Wait… where did my letters go?” moment. You switch to Russian, you press a key that your hands swear is “A,”
and your screen responds with something that looks like a secret code. That’s normal. The standard Russian layout (ЙЦУКЕН) is optimized for Russian,
not for your muscle memory. Many learners solve this by keeping a layout image open on their phone for a few days, using on-screen keyboard hints,
or turning on a keyboard viewer/preview tool so they can see what each key produces.
Next is the “I’m typing Russian… but I’m typing it slowly enough to grow a beard” phase. This is where phonetic layouts shine.
People who mostly need Cyrillic for chatting, class assignments, or travel often prefer phonetic because it feels immediately usable. The trade-off is that
you may need a moment to remember multi-letter combinations (“sh” vs “sch/shch”), and you might type “yo” when you meant “e” if you’re not thinking about
spelling carefully. Still, for day-to-day practicality, phonetic can be a sanity saver.
Then comes the classic: accidental keyboard switching. On Windows especially, lots of people discover the language-switch shortcut by mistake.
You’re writing in English, you hit a shortcut without realizing it, and suddenly your essay starts looking like a villain’s monologue. The quickest fix is to
learn your system’s switch method intentionally (taskbar indicator on Windows, input menu on Mac, globe key on mobile). Once you know how to flip back instantly,
the panic disappears. This is also why people who type bilingually often keep just two layouts installedEnglish and Russianso switching is predictable.
Another real-world detail: autocorrect. Phone keyboards are helpful… until they aren’t. If your iPhone or Android device thinks you’re typing
English when you’re actually typing Russian, it may “correct” perfectly good Cyrillic into nonsense. Many users solve this by setting Russian as an additional
language in keyboard settings (not just adding the keyboard), enabling bilingual suggestions, or turning off aggressive autocorrect for the Russian keyboard
specifically when they’re practicing.
People also run into punctuation surprises. On Russian layouts, the locations of punctuation marks can differ, and some symbols you use all the
time in English may move. The experience is usually: you try to type a period, and you get something unexpected, followed by a small pause where you question your
life choices. A simple workaround is to switch back to English for heavy punctuation, or learn the punctuation positions gradually as you get comfortable.
Finally, there’s the “I only needed one letter and now I’ve changed my entire operating system language” mistake. If you just need a couple
of Cyrillic charactersfor a username, a design mockup, or a single worduse character tools or online keyboards instead of fully adding the language pack.
It’s faster, less disruptive, and won’t make your settings menus suddenly speak fluent Russian while you’re trying to find the Wi-Fi password.
The takeaway from all these experiences is simple: pick the method that matches your real needs. Daily typing? Install the full layout.
Learning? Consider phonetic first, then graduate to standard. One-off characters? Use a picker and move on with your day like the efficient language wizard you are.
![18 Best Types of Charts and Graphs for Data Visualization [+ How to Choose]](https://corkopencoffee.org/wp-content/uploads/2026/05/18-best-types-of-charts-and-graphs-for-data-visualization-how-to-choose-qKM1PBYG-thumb.jpg)


