Table of Contents >> Show >> Hide
- What Is Granola Bark, Exactly?
- Why Maple, and Why Sweet + Salty?
- Ingredients for Sweet and Salty Maple Granola Bark
- Step-by-Step: How to Make Sweet and Salty Maple Granola Bark
- Flavor Variations You’ll Want to Try
- How to Serve Sweet and Salty Maple Granola Bark
- Storage, Shelf Life, and Make-Ahead Tips
- Troubleshooting: When Things Don’t Go Perfectly
- Extra of Real-Life Maple Granola Bark Experience
If your ideal snack is somewhere between “I want dessert” and “I should be an adult and eat something with fiber,” sweet and salty maple granola bark is your new best friend. Think of it as granola that put on its party clothes: shatteringly crisp, packed with toasty oats, nuts, and seeds, kissed with pure maple syrup, and finished with a sprinkle of flaky sea salt. It’s the snack you can serve at brunch with yogurt and also secretly eat straight from the container at midnight. No judgment.
This guide walks you through exactly how to make maple granola bark at home: what ingredients to use, how to get those big crunchy shards, and how to tweak the recipe for your own snack personality. We’ll also talk about storage, serving ideas, and real-life tips learned from many batches (including the one that turned into “granola dust,” a cautionary tale we’ll get to later).
What Is Granola Bark, Exactly?
Granola bark is basically granola baked in one big, compact sheet, then broken into chunks. Traditional granola is stirred during baking so it crumbles into loose clusters. Bark skips the stirring and presses everything into a tight slab so it bakes into a thin, crunchy sheet you can snap like chocolate bark.
Why is this brilliant?
- Big shards, maximum crunch: You get those satisfying, snackable pieces that feel more like cookies than cereal.
- Perfect for gifting and meal prep: Break it into pieces, wrap, and you’re the hero of the bake sale or office snack table.
- Endlessly customizable: Change up nuts, seeds, spices, and mix-ins to fit seasons or cravings.
Why Maple, and Why Sweet + Salty?
Pure maple syrup is the star of this recipe and does double duty:
- Flavor: It adds a deep, caramelized sweetness that regular sugar just can’t match.
- Function: Maple syrup helps bind the oats, nuts, and seeds into a cohesive sheet as it bakes and concentrates in the oven.
The salty part comes from a combination of lightly salted nuts in the mix and a final sprinkle of flaky sea salt on top. That sweet-salty contrast is what makes the bark addictive. The maple brings warmth and sweetness, and the salt sharpens all the flavors so one bite almost automatically leads to another. (Sorry.)
Ingredients for Sweet and Salty Maple Granola Bark
Here’s a solid base recipe you can tweak to your taste. It’s designed for a standard half-sheet pan (about 13 x 18 inches).
Dry Ingredients
- Old-fashioned rolled oats (3 cups): The backbone of the bark. Use rolled, not quick oats, for the best texture.
- Chopped nuts (1½ cups): Almonds, pecans, or walnuts are classic. Use salted roasted nuts for built-in savory flavor.
- Seeds (½–¾ cup): Sunflower seeds, pepitas, or a mix add crunch and nutrition.
- Almond flour or finely ground nuts (¼ cup): Helps bind the mixture and adds a rich, toasty note.
- Unsweetened shredded coconut (¼–½ cup, optional): Adds texture and a subtle coconut flavor.
- Ground flax or chia (2–3 tablespoons): Extra fiber and a little binding power.
- Cinnamon (1–1½ teaspoons): For warmth and aroma.
- Fine sea salt (½ teaspoon in the mix): Enhances flavor from the inside out.
Wet Ingredients
- Pure maple syrup (⅔ cup): Use real maple syrup, not pancake syrup, for best flavor and consistency.
- Neutral or mild-tasting oil (½ cup): Olive oil, avocado oil, or melted coconut oil all work.
- Egg white (1 large): Whisked until frothy, it helps the bark hold together and crisp up. For a vegan version, you can skip it and rely on flax, but the texture is a bit looser.
- Vanilla extract (2 teaspoons): Rounds out the sweetness.
Finishing Touch
- Flaky sea salt: Sprinkled on while the bark is warm for that bakery-level sweet and salty finish.
- Optional extras: Mini chocolate chips or chopped dark chocolate (added after baking, while the bark is warm), dried fruit, or a light drizzle of melted chocolate.
Step-by-Step: How to Make Sweet and Salty Maple Granola Bark
1. Prep the Pan and Oven
Preheat your oven to 325°F (165°C). Line a rimmed half-sheet pan with parchment paper, leaving some overhang on the long sides for easy lifting later. Don’t skip the parchmentthis bark is clingy in the best way and will stick to bare metal.
2. Mix the Dry Ingredients
In a large bowl, combine the oats, nuts, seeds, almond flour, coconut, ground flax or chia, cinnamon, and salt. Toss everything together so you don’t end up with a cinnamon avalanche in one corner and a bland patch in another.
3. Whisk the Maple Mixture
In a separate bowl or large measuring cup, whisk together the maple syrup, oil, and vanilla. In a small bowl, lightly whisk the egg white until frothy (you’re not making meringuejust a few seconds with a fork is enough) and stir it into the maple mixture.
The egg white essentially acts as edible glue, helping the bark bake into a solid sheet rather than a pan of chaos.
4. Combine and Coat
Pour the maple mixture over the oat mixture. Stir really wellthis is not the time for lazy mixing. Scrape from the bottom of the bowl to make sure every oat and nut gets a bit of syrup and oil on it, because those are the ingredients that caramelize and turn crisp.
5. Press into a Thin, Even Sheet
Transfer the mixture to your prepared pan. Spread it out into an even layer, then press it down firmly. Use the back of a spoon, a spatula, or even another parchment-lined sheet pan to really compact it. The more tightly it’s packed, the better the bark will hold together.
Aim for a thickness of about ¼ inch. Too thick and it may be chewy in the center; too thin and it could over-brown before it fully sets.
6. Bake Low and Slow
Bake at 325°F for about 35–45 minutes, rotating the pan halfway through. You’re looking for a deep golden-brown color around the edges and a uniform color across the center. If your oven runs hot, start checking around 30 minutes.
Resist the urge to stir. This is the biggest difference between granola and granola bark. No stirring = big, dramatic shards.
7. Add the Flaky Sea Salt
When the bark comes out of the oven, immediately sprinkle the top with flaky sea salt. The warmth helps the salt stick, and you get that perfect pop of salt in each bite.
8. Cool Completely Before Breaking
Let the bark cool on the pan completelyat least 45–60 minutes. As it cools, it will firm up and become crunchy. If you try to break it while it’s still warm, it may just bend or crumble.
Once cool, lift the bark out of the pan using the parchment and break it into pieces. Make big, dramatic slabs for gifting, or smaller bite-size bits for snacking and topping yogurt.
Flavor Variations You’ll Want to Try
Chocolate-Dipped Maple Granola Bark
Melt dark chocolate and drizzle it over the cooled bark, or dip one side of each piece. Let it set on parchment. This leans fully into “dessert” territory and is amazing with coffee.
Fruit & Nut Trail Mix Bark
Stir in ½–⅔ cup dried fruit (cranberries, chopped apricots, cherries, or raisins) after the bark comes out of the oven while it’s still warm, pressing the fruit into the surface. This keeps the fruit from drying out or burning in the oven.
Coco-Crunch Maple Bark
Use melted coconut oil, add extra shredded coconut, and dust the warm bark with a bit of cocoa powder and cinnamon. It tastes like an island vacation disguised as a sensible snack.
How to Serve Sweet and Salty Maple Granola Bark
- As a snack: Pack in airtight containers or small bags for grab-and-go fuel.
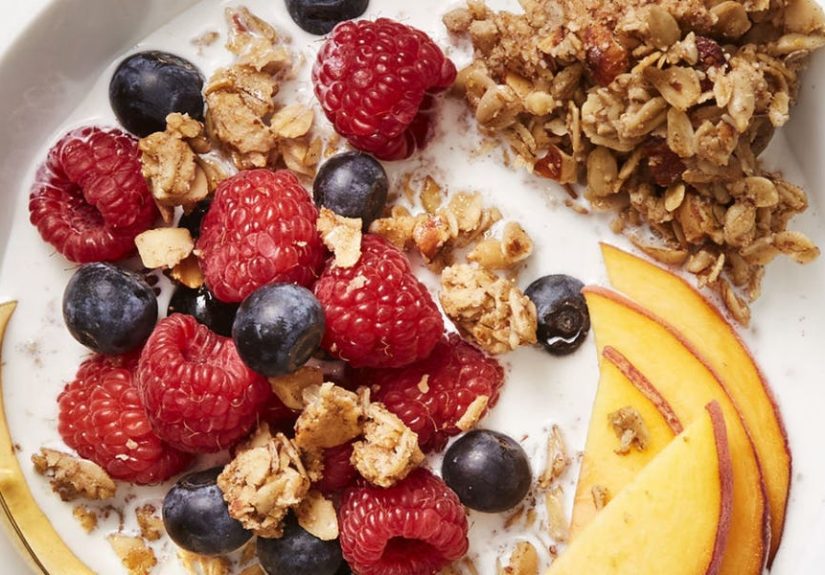
- With yogurt: Snap a big shard on top of a bowl of Greek yogurt and berries for a crunchy breakfast.
- Over ice cream: Crumble it over vanilla or salted caramel ice cream for an instant “I totally planned this” dessert.
- As a gift: Wrap a stack of pieces in parchment and tie with twine. Add a handwritten label and people will assume you own a small-batch snack company.
Storage, Shelf Life, and Make-Ahead Tips
Once completely cool, store your maple granola bark in an airtight container at room temperature for up to 1 week. In a warm or humid kitchen, it may soften slightly over time. If that happens, you can re-crisp it by spreading the pieces back on a parchment-lined pan and baking at 300°F for 5–8 minutes, then cooling again.
For longer storage, freeze the bark in zip-top bags or freezer-safe containers for up to 2 months. It thaws quickly at room temperature and is surprisingly delicious straight from the freezer, especially if you’ve added chocolate.
Troubleshooting: When Things Don’t Go Perfectly
“My bark fell apart into loose granola.”
- You may not have pressed the mixture firmly enough into the pan.
- The mixture might have been too drynext time, add a tablespoon or two more maple syrup or oil.
- If you skipped the egg white, expect a slightly more fragile texture.
“My bark is too dark or tastes bitter.”
- Your oven may run hot. Try reducing the temperature to 300°F and baking a bit longer.
- Check it earlier next timeevery oven is a little dramatic in its own way.
“The center is soft but the edges are done.”
- Push any thicker areas toward the edges next time so the layer is even.
- After the initial baking time, turn off the oven and leave the pan inside with the door cracked open for 5–10 minutes to gently finish drying.
Extra of Real-Life Maple Granola Bark Experience
Let’s talk about what actually happens when you start making sweet and salty maple granola bark in a real-life kitchen, not in a perfectly staged food studio. After a few rounds of testing, a few truths emerge.
First, this bark is a “disappearing snack.” You will swear you made enough for the week. You will confidently put the container on the counter. Then someone wanders by, breaks off “just a small piece,” and suddenly half the pan is gone. If you’re making this for a brunch, holiday morning, or road trip, just go ahead and double the batch. It freezes well, and you will never be sad that you have extra.
Second, pressing the mixture is not optional. The first time a lot of home cooks try granola bark, they treat it like standard granolaspread loosely in the pan and call it good. That’s when you end up with crunchy, tasty granola…but not bark. When you really lean your weight onto a spatula or use the bottom of another pan to flatten it, you can actually feel the mixture compress. That pressure helps the maple syrup, oil, and egg white form a cohesive matrix as it bakes. It’s the difference between “oh, this is nice” and “wow, these are like granola candy bars.”
Third, your mix-ins tell a story. Maple granola bark is a great way to use up those “orphan” ingredients lingering in your pantrythe last handful of pepitas, the half-bag of pecans, the dried cherries that never made it into cookies. Over time, many people end up with a “house blend,” a combination of nuts, seeds, and spices that feels like their signature. Maybe you’re the person who always adds sesame seeds and cardamom; maybe your bark always gets a hit of orange zest and dark chocolate. The base recipe is flexible enough to showcase those little personal quirks.
Fourth, the sweet-salty balance is personal. Some folks like just a whisper of salt; others live for that dramatic little crunch of Maldon salt on top. Start with a light sprinkle of flaky salt on the warm bark, taste a piece once it cools, and adjust next time. If you use heavily salted nuts, you may need slightly less salt in the base mixture. If your nuts are unsalted, you might bump the salt up a bit. The good news: even “too salty” granola bark tends to vanish anyway, especially when crumbled over yogurt or ice cream.
Fifth, this bark is a travel MVP. Packed in a small container, sweet and salty maple granola bark travels well on flights and road trips. It holds up better than cookies in a backpack, and it feels more substantial than candy when you need a quick energy boost. Pair it with a coffee or a bottle of water from the gas station and you suddenly feel less like you’re traveling on chaos and vibes, and more like you had a plan all along.
Finally, it makes mornings nicer. There’s something about knowing there’s a jar of homemade maple granola bark waiting in the kitchen that makes getting out of bed a little easier. Break a piece over yogurt, add a handful of berries, and you have a breakfast that feels like it came from a café, not your half-awake self. On rushed weekdays, a couple of pieces plus a banana is still far better than skipping breakfast entirely.
Once you’ve made this recipe a few times, you’ll start to adjust it without even thinkingmaybe a little more cinnamon in the fall, some chopped dried apricots in spring, a full-on chocolate drizzle situation for holiday tins. That’s the beauty of a solid base recipe: it bends to your mood, your pantry, and your people. And in the case of sweet and salty maple granola bark, it does it all while staying crunchy, snackable, and dangerously hard to stop eating.


