Table of Contents >> Show >> Hide
- Why You Need a Safe DIY Eclipse Viewer
- How a Pinhole Eclipse Viewer Actually Works
- What You’ll Need for a Cereal Box Eclipse Viewer
- Step-by-Step: How to Build Your DIY Cereal Box Eclipse Viewer
- How to Use Your DIY Eclipse Viewer on Eclipse Day
- Alternative DIY Eclipse Viewer Ideas
- Non-Negotiable Safety Rules for Solar Eclipses
- Make It a POP Project: Turn Your Viewer into an Eclipse Event
- Real-World Experiences with DIY Eclipse Viewers
- Conclusion: Bring the Cosmos Down to Cardboard Level
A solar eclipse is one of those rare “drop everything and look up” momentsexcept, of course, you should absolutely not look up with your bare eyes. While eclipse glasses sell out fast and fakes are a real problem, you can still enjoy the show with a simple, safe, and surprisingly fun solution: a DIY eclipse viewer you build yourself from cardboard, tape, and a tiny pinhole.
This POP Projects–style guide walks you through how to make a classic cereal box eclipse viewer, plus a few alternative pinhole projector designs, how to use them safely, and clever ways to turn your backyard into a mini observatory. No fancy tools, no special lensesjust physics, cardboard, and a good view of the sky.
Why You Need a Safe DIY Eclipse Viewer
During a solar eclipse, the Sun is still powerful enough to damage your eyes, even when it looks dimmer or is partially covered by the Moon. Looking directly at the Sun without proper solar filters can burn the light-sensitive tissue in the back of your eye, a condition called solar retinopathy. The scary part? You won’t feel pain while it’s happening, and the vision loss can be permanent.
That’s why eye-health organizations and astronomy groups keep repeating the same message: regular sunglasses, darkened glass, or camera lenses without approved filters are not safe for solar viewing. A DIY eclipse viewer solves this by letting you see a projection of the Sun instead of the Sun itself. You’re looking at an image formed by light, not staring into the source of that light.
In other words, a homemade eclipse viewer gives you:
- Safety – Your eyes never point directly at the Sun.
- Simplicity – Uses easy-to-find materials from around the house.
- Science – It’s a live demo of optics and geometry in action.
- Fun – Kids (and adults) love seeing the Sun shrink down to a tiny crescent on a piece of paper.
How a Pinhole Eclipse Viewer Actually Works
A DIY eclipse viewer is basically a portable version of a camera obscuraa “dark box” that has been used for centuries to project images of bright scenes onto a surface. Light travels in straight lines. When sunlight passes through a small hole, it projects an upside-down image of the Sun onto the surface opposite that hole.
During a solar eclipse, the shape of the Sun changes as the Moon moves in front of it. The pinhole projection faithfully shows that changing shape: first a small bite out of the Sun, then a deep crescent, andif you’re in the right place at the right timea nearly complete ring of light or a thin sliver before totality.
The smaller and cleaner the hole, the sharper the projected image. The longer the distance between the pinhole and the projection surface, the larger the image becomes. Your cereal box viewer takes advantage of this distance in a compact, easy-to-hold design.
What You’ll Need for a Cereal Box Eclipse Viewer
This classic POP Projects–style eclipse viewer uses basic supplies you probably already have:
- 1 empty cardboard cereal box (or similar tall box)
- 1 sheet of white paper or white cardstock
- Aluminum foil
- Clear tape or masking tape
- Scissors or a craft knife (adults should handle the cutting)
- A push pin, needle, or thumbtack (for the pinhole)
- Marker or pen (for tracing)
- Optional: stickers, markers, paint, or colored tape to decorate the outside
The cereal box design is popular because it’s light, easy to hold, and keeps excess light out so the projection is easier to seeeven in a bright backyard.
Step-by-Step: How to Build Your DIY Cereal Box Eclipse Viewer
Step 1: Create the Projection Screen
1. Stand the cereal box upright and trace the outline of the bottom of the box onto your white paper.
2. Cut out the traced rectangle so it matches the size of the inside bottom of the box.
3. Open the top flaps of the box and gently slide the white paper rectangle inside, pressing it flat onto the bottom. Tape it in place if needed.
This white surface will be your “screen” where the tiny image of the Sun appears. The brighter and smoother the paper, the easier it will be to see the projected eclipse.
Step 2: Make the Viewing Windows
1. At the top of the cereal box, where the flaps are, cut off or fold back any extra cardboard so the top opens flat.
2. On the top panel, cut two rectangular openings side by sideone on the left and one on the rightleaving a strip of cardboard between them. Each opening should be about 1–2 inches wide.
You’ve just created two top windows: one will be where sunlight enters through the pinhole, and the other will be where you look inside to see the projection on the white paper at the bottom of the box.
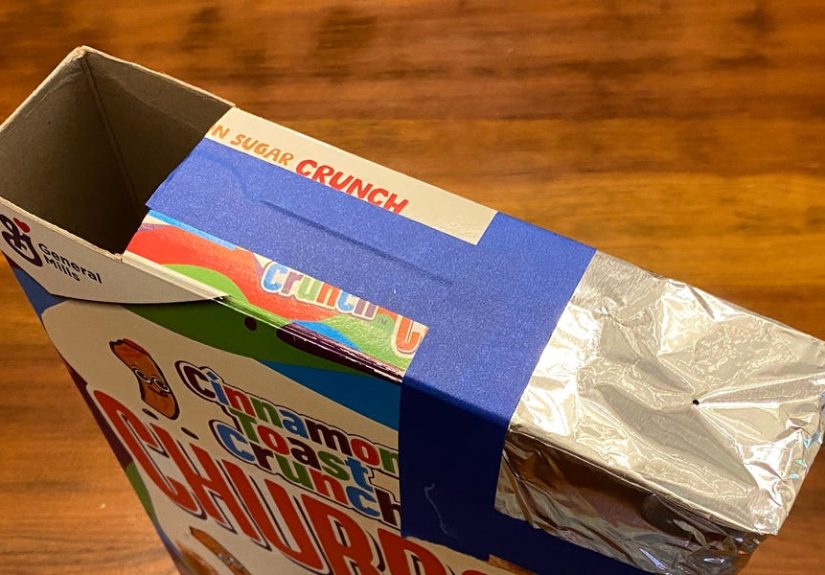
Step 3: Add the Foil and Pinhole
1. Cut a piece of aluminum foil slightly larger than the left opening at the top of the box.
2. Tape the foil securely over that left opening so it covers it completely and lies flat.
3. Using a push pin or needle, carefully poke a single, clean pinhole in the center of the foil. The hole should be tinythink pin-sized, not pencil-sized.
If you accidentally make a large or messy hole, just tape a fresh piece of foil over it and try again. A smaller hole gives you a sharper image of the Sun.
Step 4: Seal the Box and Block Stray Light
1. Close and tape the top flaps around the two openings so there are no big gaps that let light leak in.
2. Tape any seams or cracks on the sides of the box where daylight might sneak through.
You want the inside of the box as dark as possible. The only major light source should be the beam of sunlight entering through that tiny pinhole in the foil.
Now decorate the outside if you likeadd stars, a goofy eclipse mascot, your name, or the date of the eclipse. You’ve just built a personalized, portable eclipse projector.
How to Use Your DIY Eclipse Viewer on Eclipse Day
Your DIY eclipse viewer is only as useful as how you use it. Here’s the correct way to see the eclipse safely:
- Face away from the Sun. Stand with your back to the Sun so you’re never tempted to look directly at it.
- Hold the box in front of you. Lift the cereal box so the foil-covered opening at the top is pointed toward the Sun, while the viewing opening is closer to your face.
- Look through the open window. Peek into the right-hand opening (the one without foil) and look down toward the white paper at the bottom of the box.
- Adjust the angle. Slowly tilt and turn the box until you see a small bright circle appear on the white paper. As the eclipse progresses, that circle will turn into a crescent or ring shape.
- Check your surroundings. Make sure you’re standing somewhere safe, away from traffic, curbs, or obstacles. You’ll be focused on the inside of the box, not what’s at your feet.
Remember: the eclipse viewer shows the Sun as a projected image. You should never look through the pinhole, never point the viewer’s opening at your eyes, and never use it in combination with binoculars or a telescope.
Alternative DIY Eclipse Viewer Ideas
No cereal box? No problem. These simple variations also let you project the eclipse without direct viewing:
1. Two-Card Pinhole Projector
- Use two pieces of stiff white cardstock.
- Poke a small pinhole in the center of one card.
- Hold that card so sunlight shines through the hole onto the second card, held a few feet away.
- Move the cards closer or farther apart until the image looks sharp and clear.
This is the simplest versioneasy for classrooms, parks, or anywhere you’ve got a sunny spot and open space.
2. Pringles Tube or Mailing Tube Viewer
- Use an empty chip can or mailing tube.
- Cover one end with foil and add a pinhole.
- Line part of the inside with white paper to create a projection surface.
- Cut a small side viewing window near the white paper so you can see the image inside.
The long tube lets the image of the Sun spread out more, so the projected crescent can appear larger than in a short cereal box.
3. Natural Pinhole Patterns
Don’t forget the most low-effort option: stand under a leafy tree. As sunlight filters through tiny gaps between leaves, the ground beneath fills with dozens of crescent-shaped mini-eclipses. You can also use a colander, straw hat, or anything with many small holes to cast similar eclipse-shadow patterns on the sidewalk or a sheet of paper.
Non-Negotiable Safety Rules for Solar Eclipses
Whether you use a DIY eclipse viewer, eclipse glasses, or both, a few rules are non-negotiable:
- Never stare directly at the Sun during a partial or annular eclipse, even if it looks dim.
- Never use regular sunglasses, smoked glass, exposed film, or tinted plastic as eye protection.
- Only use eclipse glasses or handheld solar viewers that meet the ISO 12312-2 standard and come from reputable vendors.
- Do not look through a camera, binoculars, or telescope at the Sun unless they have a certified solar filter firmly attached to the front.
- Inspect eclipse glasses before use. If the lenses are torn, scratched, or damaged, don’t use them.
- Supervise children closely. Make sure they understand they should never try to “peek” around or over the viewer.
A pinhole projector doesn’t replace eclipse glasses for those brief moments of safe direct viewing during totality, if you are in the path. But for most peopleespecially during partial phasesit’s the simplest and safest way to enjoy the entire event.
Make It a POP Project: Turn Your Viewer into an Eclipse Event
A DIY eclipse viewer isn’t just a piece of cardboard; it’s a built-in excuse for a tiny science festival. Try these ideas:
- Decorate your viewer with planets, rockets, and eclipse artwork. Let kids name their viewers: “Sun Snacker 3000,” “Cosmic Cardboard Cam,” or “Moon Chomp Box.”
- Build multiple designsa cereal box viewer, a two-card projector, and a tube viewerand compare which one gives the sharpest or biggest image.
- Measure the eclipse by taking a photo of the projected image every few minutes (photo of the screen, not the Sun itself) to create a time-lapse collage later.
- Start a sky journal where each person sketches what they see on the projection at different times, then notes the time, weather, and where they were watching from.
By the end of the day, your group will have not just watched an eclipsethey’ll have built tools, tested designs, collected data, and turned the event into hands-on science.
Real-World Experiences with DIY Eclipse Viewers
If you talk to people who’ve watched eclipses using DIY viewers, you quickly learn that the cardboard is only half the story. The other half is the experience: the conversations, the “wow” moments, and the fact that you built your own way of looking at the sky.
Picture a school playground on eclipse day. A teacher has spent the week helping students build cereal box viewers. They’ve traced, cut, taped, and decorated each box with glittery stars and hand-drawn suns. When the eclipse begins, the playground goes quiet in that special way that only happens when a hundred people are all focused on one thing. Kids line up, take turns peeking into their boxes, and shout, “It’s a crescent now!” or “It’s getting skinnier!” You can almost see the concept of orbits and shadows snap into focus in real time.
Families report something similar at home. Instead of just stepping outside for a quick glance with eclipse glasses, they turn it into a backyard project. Someone builds cereal box viewers, someone else tries a tube viewer, and another person discovers that a colander can cast dozens of tiny eclipse shadows on the patio. Between each check of the projections, they talk about where the Moon is in its orbit, share eclipse myths from different cultures, and debate which viewer design works best.
DIY viewers also solve a very practical problem: not everyone has access to eclipse glasses, and even when they’re available, it’s easy to feel unsure whether they’re genuine. A well-built pinhole projector removes that stress. There’s a small sense of relief that comes from knowing you don’t have to judge whether a pair of glasses is realyou’re simply not looking at the Sun directly at all.
People who’ve tried multiple eclipses also say that indirect viewing actually helps them notice details they might miss when they’re just glancing quickly through glasses. On the projection surface, you can watch the shape of the Sun change slowly and steadily. You can take measurements, see how fast the crescent shrinks, and even compare the timing with eclipse predictions from astronomy websites. Some eclipse chasers bring graph paper or rulers and treat the projection like data from a tiny experiment.
There’s also the emotional side of doing a DIY eclipse project. For many parents, guardians, and group leaders, helping others build viewers becomes part of the memory. Years later, people don’t just say, “I saw an eclipse.” They say, “We built these goofy cereal box viewers in the kitchen, taped them up on the dining table, and then watched the Sun turn into a crescent in our driveway.” That hands-on part can be the difference between a moment you vaguely remember and an experience you never forget.
And finally, there’s a quiet thrill in using something so humble to observe something so grand. Eclipses depend on precise celestial mechanics: the Earth’s orbit around the Sun, the Moon’s orbit around the Earth, and the exact alignment of all three. Yet all you need to witness that cosmic choreography is a cardboard box, a scrap of foil, and a pin. That’s classic POP Projects energyusing everyday materials to bring big science down to human scale.
Conclusion: Bring the Cosmos Down to Cardboard Level
A solar eclipse might be a rare, high-drama event in the sky, but enjoying it doesn’t have to involve expensive gear or complicated gadgets. A DIY eclipse viewer gives you a safe, creative, and surprisingly powerful way to watch the Moon slide in front of the Sun, all while keeping your eyes protected.
With a simple cereal box or a pair of cardstock sheets, you can turn your driveway, rooftop, or schoolyard into a tiny observatory. You get to build something, learn some science, share the experience, and come away with a project you can reuse for future eclipses. When the next one comes around, you won’t be scrambling for last-minute glassesyou’ll already have your own POP Projects–worthy eclipse viewer waiting in the closet, ready to bring the cosmos back down to cardboard level.


