Table of Contents >> Show >> Hide
- Why Make a 3D Paper Heart Garland?
- Materials You Will Need
- Choosing the Best Paper for Your Garland
- How Many Hearts Should You Make?
- Step-by-Step DIY 3D Paper Heart Garland Tutorial
- Step 1: Create or Print a Heart Template
- Step 2: Trace and Cut the Hearts
- Step 3: Fold Each Heart in Half
- Step 4: Glue the Heart Layers Together
- Step 5: Attach the Hearts to String
- Method One: Glue the String Inside the Fold
- Method Two: Punch Holes at the Top
- Method Three: Clip the Hearts to Twine
- Step 6: Space the Hearts Evenly
- Step 7: Let Everything Dry
- Step 8: Hang and Fluff
- Creative Design Ideas for Your Paper Heart Garland
- Tips for Making the Garland Look Professional
- Common Mistakes and How to Fix Them
- Where to Display a DIY 3D Paper Heart Garland
- Kid-Friendly Version
- Eco-Friendly and Budget-Friendly Options
- How to Store and Reuse Your Garland
- Personal Experience: What I Learned While Making a DIY 3D Paper Heart Garland
- Conclusion
Note: This original article is written for web publishing, inspired by real DIY paper garland methods using cardstock, scrapbook paper, twine, ribbon, folding, gluing, stapling, and layering techniques commonly used by American craft publishers and home-decor makers.
If your home is looking a little too “I forgot what season it is,” a DIY 3D paper heart garland is here to rescue the room with scissors, paper, and a tiny bit of crafty drama. This cheerful handmade decoration is simple enough for beginners, cute enough for Valentine’s Day, and customizable enough for weddings, anniversaries, baby showers, classroom parties, or that random Tuesday when your wall needs emotional support.
The best part? You do not need expensive supplies, a professional craft studio, or the patience of a saint. A few sheets of paper, string, glue, and a basic heart template can become a dimensional paper garland that looks charming on a mantel, window, party backdrop, bedroom wall, classroom bulletin board, or dessert table. This tutorial walks you through each step clearly, including materials, measurements, design options, troubleshooting tips, and creative styling ideas.
Why Make a 3D Paper Heart Garland?
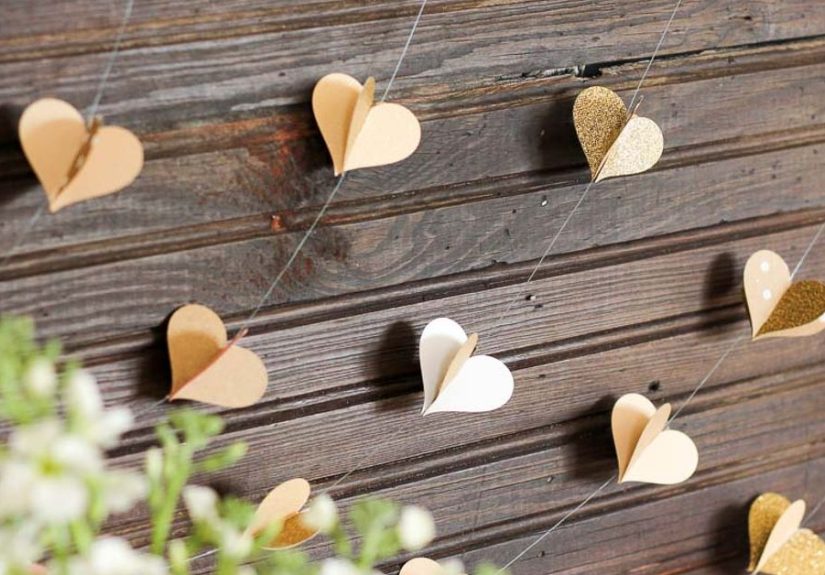
A flat paper garland is sweet, but a 3D paper heart garland has movement, shadow, and personality. The hearts gently open like tiny paper sculptures, giving the decoration more depth than standard cutouts. When hung near a window, doorway, or party table, the hearts catch light and create a soft handmade look that feels warm without screaming, “I spent three paychecks at the craft store.”
This project is also wonderfully flexible. You can make it romantic with red, blush, and rose-gold paper; modern with black, white, and kraft cardstock; playful with rainbow scrapbook paper; or rustic with old book pages and twine. It works for adults, teens, and supervised kids, making it a great family craft or weekend decorating project.
Materials You Will Need
Before you begin, gather your supplies. A little preparation keeps the project fun instead of turning your dining table into a paper tornado.
Basic Supplies
- Cardstock, scrapbook paper, construction paper, or lightweight patterned paper
- Heart template, heart punch, or cutting machine
- Scissors or craft knife
- Glue stick, craft glue, double-sided tape, or hot glue
- Twine, baker’s twine, yarn, ribbon, or clear fishing line
- Hole punch or needle, depending on your hanging method
- Pencil for tracing
- Ruler for spacing hearts evenly
Optional Extras
- Glitter paper for accent hearts
- Metallic marker for edging
- Mini clothespins
- Beads or tassels
- Sticker letters or small printed messages
- Recycled book pages, maps, sheet music, or gift wrap
For the cleanest 3D effect, medium-weight cardstock usually works best. Thin paper folds easily but may droop. Very thick paper looks sturdy but can be harder to fold neatly. Think of cardstock as the Goldilocks option: not too floppy, not too stubborn, just right.
Choosing the Best Paper for Your Garland
The paper you choose will shape the entire mood of your 3D heart garland. Solid red and pink paper gives the classic Valentine’s Day look. Patterned scrapbook paper adds texture and visual interest. Kraft paper creates a farmhouse or rustic style. Book pages feel vintage and literary, perfect for readers who want their decor to whisper, “Yes, I own too many novels, and no, I will not apologize.”
If you want the garland to be visible from both sides, use double-sided scrapbook paper or glue two sheets back-to-back before cutting. This is especially helpful if you plan to hang the garland in a window, archway, classroom, or party space where people will see both sides.
How Many Hearts Should You Make?
The number of hearts depends on the length of your garland and the spacing between each piece. For a small mantel garland, 10 to 14 hearts may be enough. For a large party backdrop, you may want 25 to 40 hearts. A good starting point is to space hearts 3 to 4 inches apart on the string. This gives each 3D heart room to shine without looking lonely.
For each 3D heart, you will need three to five flat paper hearts. Three layers create a simple dimensional look. Four or five layers make the heart fuller and more sculptural. If you are making a long garland, three-layer hearts are faster. If you are making a statement piece for a party backdrop or wedding table, five-layer hearts look extra polished.
Step-by-Step DIY 3D Paper Heart Garland Tutorial
Step 1: Create or Print a Heart Template
Start with a heart shape that is symmetrical and easy to cut. You can draw one by folding a piece of paper in half, sketching half a heart along the fold, and cutting it out. When opened, you will have a balanced template. If drawing hearts makes yours look like a confused strawberry, do not panic. Print a simple heart outline or use a heart-shaped cookie cutter as a guide.
For a standard garland, hearts between 2.5 and 4 inches tall work well. Smaller hearts look delicate but take more time to assemble. Larger hearts make a bolder display and are easier for beginners to handle.
Step 2: Trace and Cut the Hearts
Place your template on the back of your chosen paper and trace around it lightly with pencil. Cut out multiple hearts, keeping the edges as smooth as possible. If you have a heart punch or cutting machine, this step becomes much faster and more consistent.
For one 3D heart, cut three to five identical hearts. For a garland with 12 finished 3D hearts, you will need 36 to 60 flat hearts, depending on how full you want each one. Yes, this sounds like a lot, but once you get into the rhythm, it becomes surprisingly relaxing. Put on music, make tea, and let the paper hearts multiply like tiny festive rabbits.
Step 3: Fold Each Heart in Half
Fold every paper heart vertically down the center, from the top dip to the bottom point. If your paper has a “pretty side,” fold with the pretty side facing inward. This helps the decorative side show when the heart is opened later.
Run your fingernail, ruler edge, or bone folder along the crease to make it crisp. A sharp crease helps the heart hold its shape and gives the finished garland that clean 3D look.
Step 4: Glue the Heart Layers Together
Take two folded hearts and glue one half of the first heart to one half of the second heart. Align the edges carefully before pressing them together. Add a third folded heart by gluing one half to the open side of the second heart. Continue until you have three, four, or five hearts connected in a stack.
When the glue dries, gently fan out the layers. The heart should open into a dimensional shape with folded “wings.” If the edges are slightly uneven, trim them carefully with scissors. Handmade does not mean messy; it means charming with boundaries.
Step 5: Attach the Hearts to String
There are several ways to attach your 3D hearts to the garland string. Choose the method that fits your style and supplies.
Method One: Glue the String Inside the Fold
Before closing the final heart layer, place the string inside the center fold and glue the last two halves together around it. This creates a clean floating look. It is ideal if you want the hearts to hang vertically from a single line.
Method Two: Punch Holes at the Top
Use a small hole punch to make two holes near the top curves of each heart. Thread twine or ribbon through the holes. This method is sturdy and easy to adjust, especially for larger hearts.
Method Three: Clip the Hearts to Twine
Use mini clothespins to attach the hearts to a length of twine. This creates a casual farmhouse look and lets you rearrange the hearts whenever you want. It is also helpful if you are crafting with kids because no one has to wrestle with glue strings.
Step 6: Space the Hearts Evenly
Lay your string flat on a table or floor and arrange the hearts before securing them permanently. A spacing of 3 to 4 inches usually looks balanced. Use a ruler if you want a polished, symmetrical garland. Or use your eyes and trust the process if you prefer a more relaxed handmade look.
Leave extra string at both ends for hanging. A good rule is to leave at least 8 to 12 inches on each side so you can tie loops, attach tape, or adjust the garland later.
Step 7: Let Everything Dry
If you used liquid glue or hot glue, give the hearts time to dry completely before hanging. Wet glue can cause paper to curl or shift, and nobody wants a garland that slowly gives up on life halfway through the party.
Step 8: Hang and Fluff
Hang your DIY 3D paper heart garland on a mantel, shelf, mirror, window, wall, doorway, headboard, or dessert table. Once it is in place, gently open and fluff each heart so the layers are evenly spread. This final step makes the garland look full, intentional, and photo-ready.
Creative Design Ideas for Your Paper Heart Garland
Classic Valentine’s Day Garland
Use red, pink, white, and blush cardstock. Alternate colors along the string for a cheerful Valentine’s Day decoration. Add a few glitter hearts for sparkle, but use them like seasoning. A little glitter says festive; too much says the craft drawer exploded.
Vintage Book Page Garland
Cut hearts from old book pages, dictionary pages, or sheet music. Pair them with natural twine for a soft vintage look. This style is beautiful for weddings, anniversaries, libraries, reading corners, or neutral home decor.
Rainbow Heart Garland
Choose paper in every color of the rainbow and arrange the hearts in gradient order. This version is perfect for classrooms, kids’ rooms, birthday parties, Pride-inspired decor, or spring celebrations.
Elegant Wedding Garland
Use ivory, champagne, pearl, or soft metallic paper. Hang the garland behind a dessert table, sweetheart table, photo booth, or guest book station. For a refined look, use fishing line so the hearts appear to float.
Farmhouse Neutral Garland
Combine kraft paper, cream cardstock, gingham prints, and jute twine. This version looks cozy on a mantel, especially when paired with wood beads, candles, or greenery.
Tips for Making the Garland Look Professional
Use a consistent heart template so every piece matches. Keep folds sharp and centered. Test your glue on scrap paper before assembling the hearts, especially if using thin paper. Too much glue can wrinkle the surface, while too little glue may cause the layers to separate.
Also, consider your color pattern before gluing. Lay everything out first so you can see the full design. A repeated pattern such as red, pink, white, red, pink, white creates order. A random pattern can look playful, but it still helps to spread colors evenly.
If your garland will be photographed, hang it against a simple background. Busy wallpaper or cluttered shelves can make the hearts disappear. A plain wall, mirror, window, or mantel gives the garland room to be adorable without competing for attention.
Common Mistakes and How to Fix Them
The Hearts Look Flat
Add more layers. Three hearts create light dimension, but five hearts create a fuller 3D effect. Also, make sure each fold is crisp and each layer is gently opened after hanging.
The Paper Is Curling
You may be using too much liquid glue. Switch to a glue stick, double-sided tape, or a thinner layer of craft glue. Heavier cardstock also helps prevent curling.
The Garland Looks Uneven
Measure the spacing between hearts before attaching them. If you already glued them and one heart is awkwardly far away from the others, call it “organic spacing” and move onor carefully reattach it if your inner perfectionist is holding a clipboard.
The String Shows Too Much
Use clear fishing line for a floating look, or choose string that matches your paper color. You can also hide the string inside the center fold when assembling each heart.
Where to Display a DIY 3D Paper Heart Garland
This garland works almost anywhere that needs a little charm. Hang it across a fireplace mantel for Valentine’s Day, above a bed for a cozy romantic touch, in a classroom for a cheerful bulletin board, or behind a dessert table for a party backdrop. It also looks sweet across windows because the 3D hearts move slightly with air and light.
For a party, layer multiple garlands at different heights to create a fuller display. Combine paper heart garlands with balloons, fabric banners, pom-poms, or fairy lights. For everyday decor, keep the colors subtle and hang one strand across a shelf or mirror.
Kid-Friendly Version
If you are making this craft with children, simplify the process. Pre-cut the hearts or use a large heart punch. Let kids fold the hearts, choose color patterns, and help glue layers together with a glue stick. Avoid hot glue for younger children and supervise scissors carefully.
Kids can also write names, kind words, or short messages on the hearts before assembly. This turns the garland into a gratitude display, classroom kindness activity, or family Valentine project. The finished decoration becomes more meaningful because every heart carries a tiny message.
Eco-Friendly and Budget-Friendly Options
A 3D paper heart garland is already budget-friendly, but you can make it even more affordable by using materials you already have. Try leftover wrapping paper, magazine pages, paper shopping bags, old calendars, outdated maps, or scrap cardstock. The key is to choose paper that folds cleanly and has enough structure to hold its shape.
Recycled materials can make the garland more interesting. Map hearts are great for travel-themed parties. Sheet music hearts work beautifully for weddings or anniversaries. Magazine pages create bold color combinations. Paper bags make rustic hearts that pair nicely with twine and natural decor.
How to Store and Reuse Your Garland
When the season or party ends, do not crush the garland into a box unless you want next year’s decor to look like it fought a raccoon. Instead, gently fold the hearts flatter and wrap the garland around a piece of cardboard. Store it in a large envelope, plastic bin, or shallow box.
If you used sturdy cardstock, the garland can last for several seasons. Keep it away from moisture and direct sunlight to prevent fading or warping. For delicate paper such as book pages or tissue-thin scrapbook paper, handle with extra care.
Personal Experience: What I Learned While Making a DIY 3D Paper Heart Garland
The first time I made a 3D paper heart garland, I confidently told myself it would take “maybe twenty minutes.” This was adorable. Optimistic, but adorable. The cutting alone took longer than expected because I wanted the hearts to match, and apparently my scissors had chosen that day to develop a personality. Still, once the first few hearts came together, the process became calming. Fold, glue, press, repeat. It felt like crafting therapy, except with more paper scraps on the floor.
One lesson I learned quickly is that paper weight matters. Thin paper is easy to fold, but it can look limp once hung. Heavy cardstock looks beautiful but needs stronger glue and more careful creasing. My favorite result came from medium-weight scrapbook paper because it had enough structure to hold the 3D shape while still folding neatly. Patterned paper also made the garland look more expensive than it was, which is always a satisfying little craft victory.
I also discovered that color planning saves time. In my first attempt, I cut random red, pink, and white hearts, then tried to arrange them later. The result was fine, but one section looked like all the red hearts had formed a committee meeting. Now I lay the pieces out before gluing. A simple repeating pattern makes the final garland look intentional, even if the rest of the table looks like a confetti storm.
Another helpful trick is to make one sample heart before cutting dozens of pieces. That test heart tells you whether the size is right, the paper folds well, and the glue holds properly. It also helps you decide whether three layers are enough or whether you want a fuller five-layer heart. Testing first may feel like an extra step, but it prevents the classic craft tragedy of realizing too late that you have created 48 hearts in the wrong size.
Hanging the garland taught me one more important thing: leave extra string at both ends. The first garland I made had almost no extra twine, so attaching it to the mantel involved tape, hope, and a small negotiation with gravity. Now I leave generous tails on both sides. It makes hanging easier and gives room for adjustments.
My favorite way to display a 3D paper heart garland is across a mirror or window. The reflection and natural light make the hearts look fuller, and the slight movement gives the decoration a soft, handmade charm. For photos, I like placing it above a simple dessert table with cupcakes, candles, or wrapped gifts underneath. It instantly turns a basic setup into something festive without requiring professional event-planner energy.
The biggest surprise is how versatile the garland is. With red and pink paper, it becomes Valentine’s Day decor. With ivory and gold, it looks wedding-ready. With rainbow paper, it becomes cheerful party decor. With book pages, it feels vintage and cozy. The same basic tutorial can create completely different looks just by changing paper, string, and spacing.
In the end, this DIY 3D paper heart garland is one of those projects that proves handmade decor does not need to be complicated to be beautiful. It is affordable, forgiving, customizable, and genuinely fun. Even the imperfect hearts add character. Actually, especially the imperfect hearts. They remind you that someone made this with their own hands, a pair of scissors, and probably a tiny pile of paper scraps hiding under the chair.
Conclusion
A DIY 3D paper heart garland is simple, affordable, and surprisingly stylish. With basic supplies and a little folding magic, you can create a decoration that works for Valentine’s Day, weddings, anniversaries, classrooms, parties, or cozy everyday decor. Whether you choose bold red cardstock, vintage book pages, soft neutrals, or rainbow scrapbook paper, the result is a handmade garland full of charm and personality.
The key is to use a consistent heart shape, fold cleanly, layer the paper carefully, and space the hearts evenly along your string. From there, you can customize the project endlessly. Make it romantic, rustic, modern, playful, or elegant. The paper may be simple, but the finished garland brings warmth, texture, and a whole lot of heart to any space.


