Table of Contents >> Show >> Hide
- What “Live Edge” Really Means (And What It Doesn’t)
- Budget Game Plan: Where the Money Actually Goes
- Step 1: Find a Slab Without Paying “Instagram Furniture” Prices
- Step 2: Choose a Budget-Friendly Base That Still Looks Custom
- Step 3: Flatten the Slab Without Buying a Giant Machine
- Step 4: Deal With Cracks and Knots the Budget-Smart Way
- Step 5: Sanding Without Losing Your Weekend (Or Your Will to Live)
- Step 6: Finish Choices That Look Great and Don’t Cost a Fortune
- Step 7: Attach the Top Correctly (So Wood Movement Doesn’t Crack It)
- Example: A Budget Build Recipe (That Looks High-End)
- Common Mistakes (And How to Avoid Them)
- How to Keep It Budget-Friendly Without Looking Cheap
- Real-World Experiences and Lessons (Add-On)
- Conclusion
A live edge table is basically nature’s way of showing off: one side looks like a polished piece of furniture, and the other side looks like it just wandered in from the forestconfident, rugged, and slightly dramatic. The problem? Store-bought live edge tables can cost “new appliance” money. The good news is you can build a DIY live edge table on a budget that still looks like you hired someone with a cool apron and a YouTube channel.
This guide walks you through the most budget-friendly ways to source a slab, flatten it without fancy machines, attach a base correctly (so your table doesn’t crack like a bad joke), and finish it so it survives real life: hot mugs, spilled drinks, and that one friend who believes coasters are “a suggestion.”
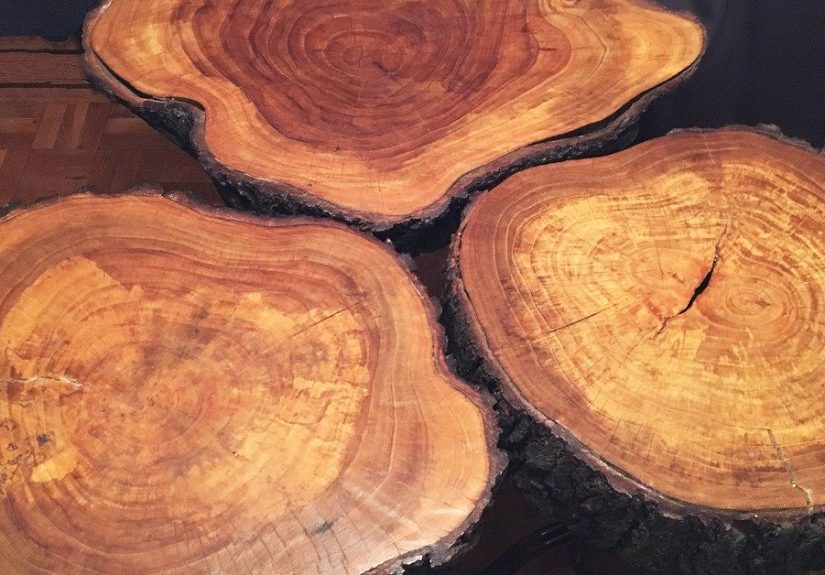
What “Live Edge” Really Means (And What It Doesn’t)
“Live edge” usually means at least one edge of the tabletop follows the tree’s natural shape instead of being cut perfectly straight. That edge may be lightly cleaned up and smoothed, but it keeps the original characterundulations, bark pockets, and all.
- Live edge does not mean you must keep bark on. Bark often falls off and can trap moisture and bugs.
- Live edge does mean you’ll need to sand and seal irregular surfaces a bit more thoughtfully.
- Budget reality: “Perfect” slabs cost more. “Character” slabs are your wallet’s best friend.
Budget Game Plan: Where the Money Actually Goes
A DIY live edge table budget usually breaks down into four buckets: the slab, the base, the flattening method, and the finish. Your goal is to spend where it matters (stable, reasonably dry wood and a secure base) and save where you can (tool hacks, smart sourcing, simple finishes).
Example Budget Breakdown (Coffee Table or Small Desk)
| Item | Budget Range | Notes |
|---|---|---|
| Live edge slab (or half-slab) | $60–$250 | Reclaimed/“seconds” slabs can be a steal. |
| Legs / base | $40–$180 | Hairpin legs are often the cheapest “looks good fast” option. |
| Flattening supplies | $0–$60 | Router sled (DIY), hand plane, or belt sander approach. |
| Sandpaper + abrasives | $15–$45 | Don’t cheap out too hardgood paper saves hours. |
| Finish | $20–$70 | Wipe-on poly, oil/varnish blend, or hardwax oil. |
| Fasteners for wood movement | $8–$30 | Z-clips, figure-8 fasteners, or tabletop buttons. |
Step 1: Find a Slab Without Paying “Instagram Furniture” Prices
The cheapest slabs are the ones that don’t ship across the country. Shipping for a thick hardwood slab can cost as much as the slab itself, so local is the budget move.
Best Budget Sources
- Local sawmills and small lumberyards: Ask for “shorts,” “offcuts,” or “seconds.”
- Urban lumber: Wood milled from city trees (storm-felled, removed for safety). Often unique and local.
- Marketplace listings: Look for “live edge slab,” “wood slab,” “mantel slab,” or “cookies” (with caution).
- Reclaimed wood shops: Sometimes you’ll find thick reclaimed planks with a natural edgecheaper than a big slab.
- Builder leftovers: Contractors occasionally sell or toss thick hardwood from stair treads/countertop projects.
What to Look For (So You Don’t Buy a Future Problem)
- Moisture content: For indoor furniture, drier is better. Kiln-dried or well air-dried wood is ideal.
- Cracks: Small checks can be stabilized/fillable; giant splits might mean more work than savings.
- Twist/cup: Some warp is fixable, but extreme warping can eat your thickness during flattening.
- Thickness: Around 1.5″–2″ is a sweet spot for a sturdy top without “boulder-table” weight and cost.
Budget pro tip: A slightly ugly slab can become a gorgeous table after flattening, sanding, and finishing. You’re not buying looks; you’re buying potential.
Step 2: Choose a Budget-Friendly Base That Still Looks Custom
Your base choice can save (or destroy) your budget. The cheapest route is usually buying ready-made legs and letting the slab be the star.
Affordable Base Options
- Hairpin legs: Typically the lowest-cost “modern” look. Great for coffee tables and desks.
- Trapezoid steel legs: More “dining table” vibe; cost varies but often reasonable.
- DIY 2×4 base: Surprisingly good if done cleanly. Paint it black for a modern look, stain for rustic.
- Repurposed base: Old metal table frames, vintage sewing machine bases, or sturdy thrifted legs.
Base Sizing Rule of Thumb
For stability, keep the legs inset from the table edge (often 2″–6″), and make sure the footprint is wide enough that the table doesn’t feel tippy when someone leans on it. For longer tops (like dining tables), consider a sturdier base or legs that support near the ends.
Step 3: Flatten the Slab Without Buying a Giant Machine
Many woodworkers use a jointer and planer. Your budget build can still get flat using slower but cheaper methods. “Flat” matters because finishing won’t hide wobbleyour coffee mug will rat you out immediately.
Option A: DIY Router Sled (Best Budget/Best Results)
A router sled is basically a controlled way to skim the high spots off the slab.
- Build two straight rails (MDF or straight 2x lumber) slightly longer than your slab.
- Set the slab between rails, shim it so it doesn’t rock, and hot-glue/shim in place.
- Use a router on a sled carriage with a flattening bit to remove material in passes.
- Flip and repeat until both faces are flat and parallel (or flat enough for your project).
Budget note: If you don’t own a router, see if a friend has one. Borrowing a router for a weekend is cheaper than buying a table that costs four digits.
Option B: Hand Plane + Straightedge (Cheapest, Most Skill-Based)
If you have a hand plane (or can borrow one), you can flatten by working diagonally across the grain, checking with a straightedge. This takes patience, but it’s possibleespecially for smaller slabs.
Option C: Belt Sander (Okay for “Close Enough”)
A belt sander can help reduce mild cup or unevenness, but it’s easier to accidentally create dips. It’s better as a “refinement tool” after rough flattening, not the whole planunless the slab is already pretty close.
Step 4: Deal With Cracks and Knots the Budget-Smart Way
Live edge wood often has knots, voids, and cracks. You can either celebrate them or stabilize them. Either way, the key is: don’t ignore structural cracks that can grow with seasonal movement.
Budget-Friendly Fixes
- Epoxy (selective use): Great for filling voids. Use it only where neededepoxy can get pricey fast.
- CA glue + sawdust: A quick fix for small checks and gaps. Sand flush after it cures.
- Wood filler: Works for tiny imperfections, but can look obvious on big voids.
- Butterflies (bowties): A classic crack-stabilizer. It can be budget-friendly if you make them from scrap.
Reality check: “River table” style epoxy pours look amazing, but they’re rarely the cheapest option. For a true DIY live edge table on a budget, think “minimal epoxy, maximum wood.”
Step 5: Sanding Without Losing Your Weekend (Or Your Will to Live)
Sanding is where a table becomes furniture. It’s also where many DIYers learn the true meaning of patience.
A Simple Sanding Progression
- Start at 60–80 grit if the surface is rough or has router/plane marks.
- Move to 120 grit to refine.
- Finish at 180–220 grit for most film finishes and oils.
For the live edge, use a combination of sanding discs and hand sanding to follow the curves. Knock down sharp areas (no one wants a table that bites).
Budget Tip: Don’t Skip Grits
Skipping grits seems like a time-saver until you spend an hour trying to remove scratches you could’ve avoided. Sanding is like laundry: you can ignore it, but it comes back louder.
Step 6: Finish Choices That Look Great and Don’t Cost a Fortune
The finish determines how your table looks and how it survives daily abuse. For a budget build, choose something forgiving, easy to apply, and repairable.
Best Budget Finishes for Live Edge Tables
- Wipe-on polyurethane: Affordable, durable, and beginner-friendly. Multiple thin coats look better than one thick coat.
- Oil/varnish blend (like Danish oil style): Easy to apply, brings out grain nicely, moderate protection.
- Hardwax oil: Often pricier per can, but a little goes a long way and it’s easy to refresh later.
Finish Tip: Seal the Underside Too
One of the biggest “why is my tabletop warping?” moments comes from finishing only the top. Sealing both sides helps slow moisture exchange more evenly. It won’t make wood stop moving (wood always moves), but it can reduce drama.
Step 7: Attach the Top Correctly (So Wood Movement Doesn’t Crack It)
This is where DIY tables often fail: the slab expands and contracts across the grain with seasonal humidity changes. If you screw the top down like it’s a drywall panel, the wood may split or the screws may loosen.
Budget-Friendly Fastening Methods That Allow Movement
- Figure-8 fasteners: Inexpensive and simple. They pivot slightly as the top moves.
- Z-clips: Great with aprons/rails. They slide as the wood moves.
- Tabletop buttons: Classic woodworking method; easy to DIY if you have scrap.
- Slotted holes: If you must use screws through a base, elongate holes so the top can move.
Rule of thumb: Let the wood move across its width. Don’t fight nature; nature has more time than you.
Example: A Budget Build Recipe (That Looks High-End)
Scenario
You want a 48″–54″ live edge desk or small dining table. You have basic tools: a drill, sander, and a circular saw (or can borrow a router).
Materials
- One local hardwood slab (maple, walnut, oak, or even elm depending on region and availability)
- Hairpin legs or simple steel legs
- Figure-8 fasteners
- Sandpaper (80/120/180/220)
- Wipe-on poly (or oil/varnish blend)
Build Steps
- Inspect and clean: Remove loose bark and debris; trim ends square if desired.
- Flatten: Use a router sled or plane method until stable and flat.
- Stabilize: Fill small checks with CA glue; use epoxy only for deeper voids you want smooth.
- Sand: Work through grits; don’t rush the last 20%that’s the “wow” factor.
- Finish: Apply thin coats, sand lightly between coats if needed, and seal the underside too.
- Attach base: Use figure-8 fasteners or movement-friendly hardware.
You end up with a table that looks custom, feels solid, and costs dramatically less than retail. Plus, you get to casually say, “Oh, this? I made it,” which is basically free dopamine.
Common Mistakes (And How to Avoid Them)
Mistake 1: Using Wet Wood Because It’s Cheap
Green or insufficiently dried slabs are often cheaperbut they’re cheaper for a reason. As they dry indoors, they can warp, crack, and shift. If you buy a slab that’s not dry, plan for extra movement and imperfections, or consider letting it dry longer before final flattening and finishing.
Mistake 2: Over-sanding the Live Edge Until It’s Not “Live” Anymore
You want smooth, not “erased.” Keep the natural profile; just remove sharp bits and splinters. The goal is “touchable,” not “looks like it came from a CNC machine.”
Mistake 3: Screwing the Top Down Rigidly
This is the classic crack starter. Use hardware that accommodates wood movement, especially on wider tops.
How to Keep It Budget-Friendly Without Looking Cheap
- Let the slab be imperfect: Small voids and knots are character, not failure.
- Choose a simple base: Clean lines look intentional and modern.
- Use a reliable, simple finish: Wipe-on finishes reduce the odds of drips and brush marks.
- Spend time, not money: Careful sanding and good prep beat expensive materials.
Real-World Experiences and Lessons (Add-On)
If you browse enough DIY live edge table projects, you’ll notice a pattern: most people don’t regret building the tablethey regret exactly one thing, and it’s always something like “I thought sanding would be quick.” In practice, building a live edge table on a budget is less about owning the fanciest tools and more about managing expectations, making smart compromises, and knowing where “good enough” is actually good enough.
One of the most common experiences first-timers share is the emotional roller coaster of the slab hunt. You start out thinking, “I’ll just grab a slab,” and two days later you’re learning phrases like “kiln-dried,” “cup,” and “checking” like you’re cramming for a woodworking final. The budget win usually comes from being flexible: maybe the slab isn’t walnut; maybe it’s maple or oak. Maybe it has a crack that looks scary at firstbut once stabilized and filled (or highlighted), it becomes the detail everyone compliments. Budget builds often look best when you stop treating every flaw as a disaster and start treating it like a design decision you made on purpose.
Another shared “aha” moment is realizing the live edge itself is the time sink. The flat surface is straightforwardflatten, sand, finish. The organic edge is where you slow down. DIYers often describe switching between tools: sanding discs for broad areas, hand sanding for curves, and careful touch-ups where the grain changes direction. You might discover that the edge is smooth in one spot and splintery in another, because trees aren’t built for your convenience. The good news is that progress is obvious: every pass removes sharpness, and the edge becomes something you actually want to touch.
Plenty of budget builders also talk about the “finish choice” dilemma. Film finishes (like wipe-on poly) feel safer because they protect better against spills, but they require patience with multiple coats. Oils are easier to apply, but they may need more frequent refreshing depending on use. A very common experience is applying the first coat and immediately seeing the grain pop like it just got upgraded to HD. That’s usually when people stop worrying about the money saved and start feeling proud of the result. The practical lesson, though, is that finish can’t hide poor prep. If sanding scratches are still visible before the finish, they’ll be even more visible afterwardlike your table is highlighting your shortcuts with a neon sign.
There’s also a recurring story about attaching the base: someone mounts legs quickly, flips the table, and thinks they’re done until they learn about wood movement. DIYers who build in dry months sometimes notice subtle changes later: tiny gaps, slight shifts, or (in the worst cases) a crack that follows a screw line. The experience teaches a surprisingly useful principle: wood is strong, but it’s not static. Budget or not, movement-friendly fasteners are one of the best “cheap insurance” upgrades you can make.
Finally, many people describe a funny side effect of building a live edge table: after finishing one, you begin seeing slabs everywhere. A fallen tree becomes “potential furniture.” A rough board at a hardware store looks like a “future project.” That’s the real payoff of a budget buildskills compound. Even if you spend a little extra time figuring out flattening or perfecting a finish, you’re learning techniques you’ll reuse on cutting boards, shelves, desks, and future tables. So yes, the table saves you money. But the bigger win is that the next project gets easierand your home quietly starts filling with things you can proudly say you built.
Conclusion
A DIY live edge table on a budget is absolutely doable if you shop local, choose a simple base, flatten smartly, and attach the top in a way that respects wood movement. You don’t need a professional shopjust a good plan, careful sanding, and a finish that matches how you’ll actually use the table. Start with a “character” slab, keep the design clean, and let the natural edge do what it does best: make your table look like it cost way more than it did.


