Table of Contents >> Show >> Hide
- What Is Texture Paste (and Why It Works So Well on a Clock)?
- Before You Start: Plan the Look Like a Designer (Without Becoming One)
- Materials and Tools
- Step-by-Step: How to Make a Texture Paste Clock
- Step 1: Prep your clock base
- Step 2: Find the center and drill the hole
- Step 3: Protect the center hole (future-you will thank you)
- Step 4: Apply the texture paste
- Step 5: Let it dryreally dry
- Step 6: Sand and refine (optional, but makes it look intentional)
- Step 7: Paint (the fun part)
- Step 8: Seal it
- Step 9: Install the clock movement
- Step 10: Hang it and set the time
- Design Ideas That Look High-End (But Are Totally DIY)
- Troubleshooting: Fix the Most Common Problems
- Safety and Clean-Up (Quick, Not Scary)
- FAQ
- Real-World Experiences: What Makers Learn After Their First Texture Paste Clock (and Wish They Knew Earlier)
If your walls could talk, they’d probably ask for two things: more personality and something that actually tells time.
Enter the DIY texture paste clockpart wall art, part functional decor, and part “I made that!” bragging rights.
With a little acrylic texture paste (think: frosting for grown-ups), a clock movement kit, and a few design choices,
you can create a modern, sculptural clock that looks like it came from a boutique home storewithout the boutique price tag.
This guide walks you through materials, design planning, step-by-step building, and the little details that keep your clock hands from
dragging like they just ran a marathon. We’ll also cover common mistakes (because we learn from them… usually) and finish with real-world
maker insights so your first try looks like your third.
What Is Texture Paste (and Why It Works So Well on a Clock)?
“Texture paste” usually refers to acrylic modeling paste or molding paste: a water-based acrylic medium designed to build raised texture.
Once dry, it creates a firm surface you can paint, sand, and seal. It’s a favorite for modern “plaster” looks and sculptural wall art
because you can make everything from soft waves to crisp geometric ridges.
Quick paste glossary
- Acrylic modeling paste: A thick acrylic “putty” often made with fillers (like marble dust) for a stone-like finish.
- Molding paste / texture medium: Similar ideabuilds texture and dries hard; different brands vary in grit, weight, and sheen.
- Lightweight paste: Easier on large clock faces; less likely to feel like you mounted a manhole cover on your wall.
Why it’s perfect for clocks: texture paste turns a flat clock face into dimensional decor. The raised surface catches light and shadow all day,
so your clock looks different at 9 a.m. than it does at 9 p.m.even if your schedule doesn’t.
Before You Start: Plan the Look Like a Designer (Without Becoming One)
A texture paste clock can go minimalist, bold, or “I found this in a gallery and pretended it was normal.” Before you open the paste,
decide these three things:
1) Size and placement
- 12–14 inches: Great for bedrooms, offices, and small gallery walls.
- 16–20 inches: A statement piece for living rooms and kitchens.
- 24+ inches: Dramatic… and you’ll want a sturdy base and a movement rated for longer hands.
2) Hand style and readability
Texture is the star, but the hands still need to move freely and be visible. High-contrast hands (black on light, gold on deep color)
tend to read best. If you skip numbers, add subtle hour markers (raised dots, gold leaf ticks, or painted dashes) so guests don’t have to
guess whether it’s 2:00 or “mid-afternoon-ish.”
3) Texture pattern
- Soft swirl: Easy and forgivinggreat for first-timers.
- Arches / scallops: Trendy and graphic, especially with a matte finish.
- Geometric ridges: Modern, crisp, and best done with painter’s tape guides.
- Terrazzo-inspired: Add flecks (painted or embedded) for playful texture.
Materials and Tools
You can keep this project beginner-friendly or go full workshop mode. Here’s the practical listno mystery supplies required.
Must-haves
- Rigid clock base: MDF round, birch plywood circle, wood plaque, or hardboard (12–20 inches is a sweet spot).
- Texture paste: Acrylic modeling paste / molding paste (white is easiest to paint over).
- Clock movement kit: Quartz movement + hands + hardware (check shaft/post length for your clock thickness).
- Palette knife or putty knife: A few sizes make patterns easier.
- Drill + drill bit: For the center hole (your movement instructions may specify the diameter).
- Sandpaper: 150–220 grit for smoothing edges and texture peaks (optional but helpful).
- Acrylic paint: For tinting, washes, dry-brushing highlights, and/or markers.
- Sealer: Clear acrylic varnish (matte is popular for a plaster look).
Nice-to-haves (make it easier or fancier)
- Painter’s tape (for crisp shapes and to protect the center hole)
- Gesso or primer (helps paint adhesion, especially on raw wood/MDF)
- Stencils (numbers, Roman numerals, or repeating patterns)
- Gold leaf or metallic paint pen (instant “expensive”)
- Hanging hardware (D-ring hangers or a sawtooth hanger, depending on the base)
Time and cost estimate
- Hands-on time: 60–120 minutes (plus drying time)
- Drying time: Often 24–48 hours depending on thickness and humidity
- Budget: Typically $25–$60 depending on base size and whether you already own a drill and sealer
Step-by-Step: How to Make a Texture Paste Clock
Step 1: Prep your clock base
Start with a rigid surface. Texture paste can crack if applied thickly on flexible surfaces, so wood, MDF, and hard panels are your best friends.
Lightly sand the front and edges, then wipe off dust. If your base is raw wood/MDF, prime with gesso or primer so paint and paste grip evenly.
Step 2: Find the center and drill the hole
Mark the exact center of your circle. Drill the center hole before you add texturecleaner, easier, and less likely to chip your finished design.
Common DIY clock projects drill around 5/16″ to 3/8″ depending on the movement’s shaft, so follow your kit’s specs.
Pro tip: If your texture design will add thickness around the center, choose a movement with a longer threaded shaft/post.
The shaft has to pass through your clock face with enough thread left for the washer and nut.
Step 3: Protect the center hole (future-you will thank you)
Place a small circle of painter’s tape over the hole on the front. You can also insert a short dowel, straw piece, or rolled paper tube
to keep paste from clogging the hole while you work.
Step 4: Apply the texture paste
Use a palette knife to spread paste in thin layers. If you want dramatic depth, build it in stages rather than slapping on one giant mound.
Thin layers dry more predictably and reduce cracking risk.
Easy patterns you can do on your first try
- Swirl: Spread a smooth layer, then pull the knife in gentle arcs like you’re icing a cake (but don’t lick the knife).
- Scallops: Press the knife edge in repeating half-moons around the face.
- Ridges: Drag a notched spreader or the edge of your knife in straight lines for a modern look.
- Raised markers: Add small dots or short dashes at 12, 3, 6, and 9 for subtle time cues.
Keep the texture lower near the center so the clock hands won’t scrape. Think of it as creating a “runway” for the hands to spin.
Step 5: Let it dryreally dry
Texture paste can feel dry on the surface while still soft inside, especially if you built thick ridges. Let the clock face dry flat and undisturbed.
If you’re unsure, wait longer. The goal is a firm, non-cool, non-tacky feel throughout.
Step 6: Sand and refine (optional, but makes it look intentional)
Once dry, you can sand down sharp peaks or smooth edges. This is also where you fix “oops” momentslike a ridge that looks less like modern art
and more like a tiny mountain range.
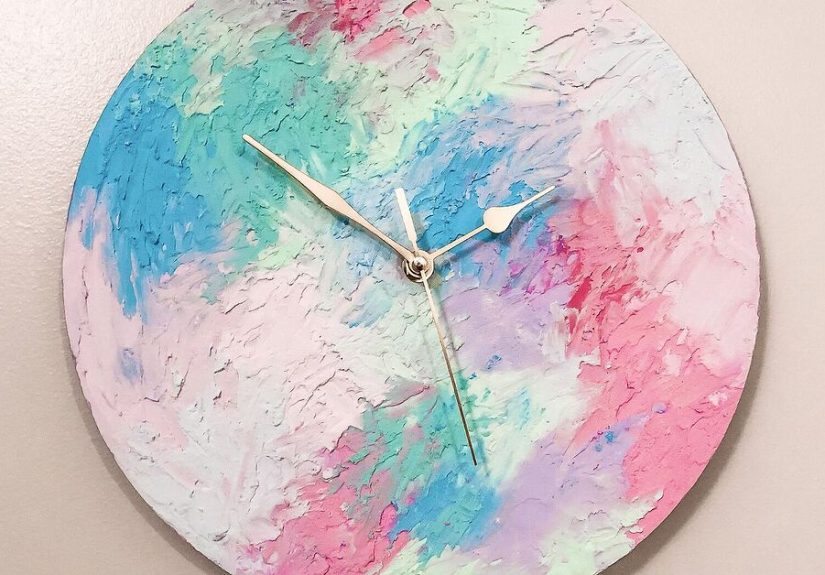
Step 7: Paint (the fun part)
You have three popular routes:
- Plaster minimal: Leave it white, then add black or brass hands for contrast.
- Tinted paste look: Paint the whole surface a single color (warm white, sand, clay, or charcoal).
- Highlight the texture: Use a wash (thin paint + water) to settle into grooves, then dry-brush a lighter shade on peaks.
If you want crisp geometric color blocks, painter’s tape is your best friend. For clean lines, press tape edges firmly, paint with a foam brush,
and peel tape before the paint fully cures so it doesn’t tear.
Step 8: Seal it
Seal the painted surface with a clear acrylic varnish. Matte varnish keeps the plaster vibe; satin adds a soft glow. Sealing helps protect
the surface from fingerprints and dustbecause people will touch texture.
Step 9: Install the clock movement
Flip the clock over. Insert the movement from the back so the threaded shaft comes through the front. Then add the hardware on the front
(often a washer and a nut) to secure it snuglydon’t over-tighten.
Next, attach the hands in order: hour hand first, then minute hand, then second hand (if included). Align them straight at 12:00 before setting the time.
Spin the minute hand gently to check clearanceif it rubs, you’ll need to adjust the hand height or smooth the center area more.
Step 10: Hang it and set the time
Add hanging hardware suited to your base weight. Insert a battery, set the time, and step back. Congratulations: you now own a clock that
looks like artand also shames your phone for stealing all the timekeeping attention.
Design Ideas That Look High-End (But Are Totally DIY)
Modern plaster + black hands
Keep the paste white or warm cream. Add thin black hands and minimal raised markers. This works beautifully in Scandinavian, modern, and Japandi spaces.
“Faux concrete” with metallic accents
Mix gray tones with subtle speckling. Add gold markers or a metallic minute hand. The contrast screams “designer,” without screaming “I spent designer money.”
Boho rainbow arches
Create raised arches with paste, paint them in muted desert tones (clay, blush, sand), and use simple hands. This is a great way to add color without chaos.
Terrazzo pop
After your base coat dries, add scattered “chips” with paint or tiny embedded bits (kept shallow so hands don’t snag). Seal well for durability.
Troubleshooting: Fix the Most Common Problems
Problem: Cracks in the paste
- Why it happens: Layer too thick, surface flexing, or drying too fast.
- Fix: Fill cracks with a thin skim coat of paste, let dry, sand lightly, repaint, reseal.
- Prevent: Use a rigid base and build texture in thinner layers.
Problem: Clock hands drag or stop
- Why it happens: Texture is too tall near the center, hands aren’t seated correctly, or the shaft is too short for your thickness.
- Fix: Sand down the center “runway,” re-seat hands, or swap to a longer-shaft movement.
- Quick check: Spin the minute hand slowlyif it scrapes, it’s a clearance issue, not a battery issue.
Problem: The movement feels loose
- Fix: Ensure the washer and nut are snug and that the hole isn’t oversized. If needed, add a washer or thin spacer to stabilize.
Problem: Paint looks blotchy on texture
- Fix: Prime first, use thin coats, and consider a wash + dry-brush technique to make texture look intentional.
Safety and Clean-Up (Quick, Not Scary)
- Ventilation matters: Work in a well-ventilated area, especially when sealing.
- Skin/eye care: Avoid getting paste in your eyes; wash off skin and clean tools promptly with water.
- If sanding: Sanding creates fine dust. Wear a well-fitting particulate mask and wipe surfaces afterward instead of dry sweeping.
FAQ
Can I use spackle or joint compound instead of acrylic modeling paste?
You can, but it’s not the same. Acrylic pastes are designed to stay durable and adhere as an art surface. Joint compound can crack more easily,
especially on thinner bases, and it may need extra sealing. If you want predictable results, use acrylic modeling/molding paste.
Can I make this on a stretched canvas?
It’s possible, but less ideal because canvas flexes. If you love the canvas idea, use a rigid canvas panel or mount the canvas to a hardboard backing first.
How thick can I go?
Thicker texture can take much longer to dry fully (even if it feels dry on top). For clocks, keeping most texture relatively lowespecially near the center
makes the mechanism and hands happier.
Real-World Experiences: What Makers Learn After Their First Texture Paste Clock (and Wish They Knew Earlier)
If you scroll enough DIY feeds, it looks like everyone’s first texture paste clock comes out flawlessperfect swirls, crisp edges, and hands that spin like
a luxury watch commercial. In reality, most makers have a “version one” that teaches a few important lessons. The good news: those lessons are easy to steal
(legally, creatively, and with zero jail time).
One of the most common surprises is how much drying time controls the final look. Many crafters report that a clock face can feel dry to the
touch, but sanding too soon reveals soft areas underneath. The fix is simplewait longerbut patience is not always a default setting. A helpful habit is to
build texture in stages: do a base layer, let it dry, then add raised details. The clock looks more intentional, and you reduce cracking.
Another real-world takeaway: the center zone is sacred. People love dramatic texture (and you should!), but tall peaks near the center can turn
your clock hands into a tiny off-road vehicle. Makers who get the cleanest results often create a subtle “hand runway” by smoothing a small circle around the
center hole. It’s invisible from a distance, but it keeps the mechanism from stalling. If you want heavy texture everywhere else, go for itjust keep that
inner ring calm and civilized.
Then there’s the “I didn’t know clock movements had options” moment. A lot of DIYers buy the first clock kit they see, only to realize later that
shaft length matters. If your base is thick (wood + paste + paint + sealer), you may need a movement with a longer threaded post so the washer
and nut can secure it properly. Makers who plan this up front tend to have fewer “why won’t this tighten?” headaches, and fewer emergency runs to the craft store.
On the design side, crafters often discover that texture plus one great detail beats texture plus ten random details. A single metallic accent
(gold markers, a painted rim, or a thin brass hand set) can make the whole piece look elevated. Meanwhile, adding too many decorative elements can compete with
the texture and make the clock feel visually busy. The sweet spot is usually: bold texture, restrained color palette, and hands that clearly stand out.
Painting is another area where experience shows up fast. Beginners sometimes try to paint textured surfaces like a flat wallthick coats, lots of brushing,
and repeated passes. Experienced makers tend to use thin layers, washes, and dry-brushing so the shadows stay visible. A wash settles into
grooves, a dry-brush catches peaks, and suddenly your texture looks like it belongs in a styled living room photo shoot. If you want a truly modern plaster look,
many makers keep the palette simple: warm white or soft gray with matte sealer, then let the daylight do the decorating.
Finally, there’s the practical, lived-in truth: clocks attract hands. Not the clock handsthe human ones. People touch texture. They just do.
Makers who seal their piece well find it stays cleaner and holds up better over time, especially in kitchens, entryways, and kids’ rooms. If you hang your
clock where dust collects, a soft microfiber cloth (instead of a wet wipe) is usually the gentlest way to keep the texture crisp without snagging.
The overall pattern is encouraging: a DIY texture paste clock doesn’t need perfection to look amazing. In fact, tiny variations in ridges and curves are what
make it feel handmade. Plan the movement thickness, protect the center, build texture in layers, and finish with a sealand your “first try” will look like
you’ve been casually making gallery-worthy clocks all along.