Table of Contents >> Show >> Hide
- Can a Pull-Up Bar Really Help Stretch Your Lower Back?
- Before You Start: Quick Safety Rules
- Easy Ways to Stretch Your Lower Back with a Pull Up Bar: 9 Steps
- Step 1: Warm Up for 5 to 10 Minutes
- Step 2: Set Up at a Height You Can Control
- Step 3: Start with a Supported Hang
- Step 4: Let Your Lower Body Relax
- Step 5: Breathe Like You Mean It
- Step 6: Add a Gentle Knee-Bend Variation
- Step 7: Progress to a Light Full Hang Only If It Feels Good
- Step 8: Pair the Bar Stretch with Floor Mobility
- Step 9: Be Consistent, Not Heroic
- Common Mistakes to Avoid
- Who Should Not Try Lower Back Hanging Stretches Right Away?
- What Results Can You Realistically Expect?
- Real-Life Experiences with Pull-Up Bar Lower Back Stretching
- Conclusion
- SEO Tags
If your lower back feels like it has been negotiating with gravity all day and losing badly, a pull-up bar can be a surprisingly useful tool. No, it is not magic. No, it does not turn you into a spine whisperer. But used carefully, a pull-up bar can help you create a gentle, lengthened feeling through your torso, hips, and low back while giving your body a break from hours of sitting, slouching, driving, or pretending your desk chair is ergonomic when it clearly has other plans.
The key word here is carefully. A lower back stretch with a pull-up bar is not about yanking your body into a dramatic dead hang like you are starring in an action movie trailer. It is about controlled movement, light decompression, steady breathing, and pairing hanging work with proven lower back mobility drills. In other words: less circus, more strategy.
In this guide, you will learn how to stretch your lower back with a pull-up bar in 9 simple steps, who should skip it, and how to make the movement actually feel good instead of instantly regrettable.
Can a Pull-Up Bar Really Help Stretch Your Lower Back?
Sometimes, yes. A pull-up bar can help create a temporary sense of space through the spine and ribs, especially after long periods of compression from sitting, lifting, or standing. For some people, even a light supported hang feels like the body is finally getting to exhale. That can make the lower back feel less stiff and more mobile.
That said, a bar hang is not a cure for back pain, a replacement for physical therapy, or a wise move for every body. If your pain shoots down your leg, feels sharp and worsening, or comes with numbness, weakness, or bowel or bladder changes, this is not the time to “stretch it out and hope for the best.” That is your sign to stop and get medical advice.
Before You Start: Quick Safety Rules
- Use a sturdy, properly installed pull-up bar.
- Start with a supported hang, not full bodyweight.
- Warm up first so you are not stretching cold muscles.
- Stretch to the point of tension, not pain.
- Skip this if gripping overhead bothers your shoulders, elbows, wrists, or neck.
- Choose floor-based stretches instead if you do not feel stable.
If you have a history of serious back injury, osteoporosis, recent surgery, severe sciatica, major shoulder problems, or you are considering aggressive inversion-style hanging, talk to a qualified clinician before trying it.
Easy Ways to Stretch Your Lower Back with a Pull Up Bar: 9 Steps
Step 1: Warm Up for 5 to 10 Minutes
Do not walk up to the bar cold and expect your body to applaud. Warm up first with easy walking, marching in place, a few bodyweight squats, or gentle cat-cow motions. The goal is simple: get blood flowing and reduce stiffness before you ask your back, hips, shoulders, and grip to cooperate.
This step matters because cold muscles are cranky muscles. A short warm-up makes the stretch feel smoother, safer, and a lot less like your body filed a complaint.
Step 2: Set Up at a Height You Can Control
Stand under the bar and make sure you can reach it without jumping wildly. If needed, use a step or sturdy box so you can grip the bar and still keep some weight through your feet. For most people, this is the smartest way to begin.
A supported setup lets you explore the stretch without dumping your full bodyweight into your shoulders and hands. Think “easy glide into the position,” not “surprise, now my entire skeleton is hanging from my fingers.”
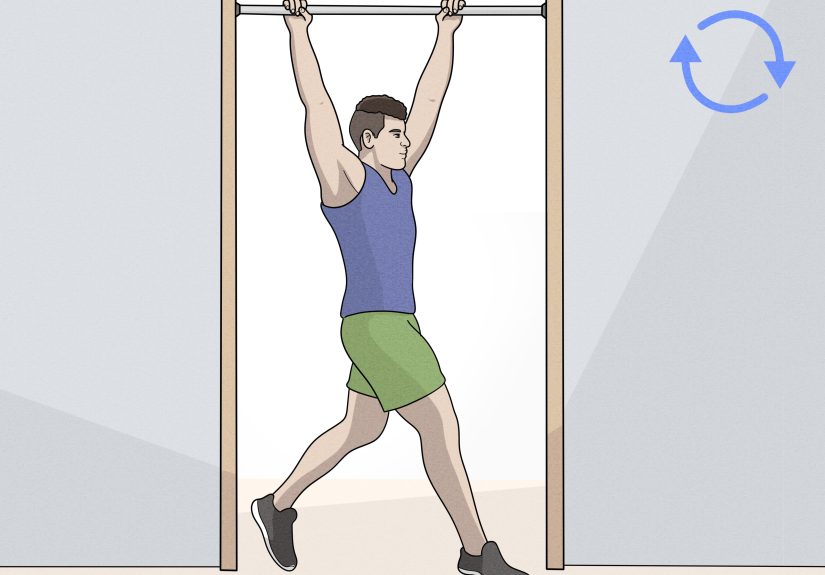
Step 3: Start with a Supported Hang
Grab the bar with both hands about shoulder-width apart. Keep one or both feet lightly on the floor, step, or box. Then slowly let your hips sink down just enough that you feel your torso lengthen.
You are not trying to collapse. You are trying to create a gentle traction-like feeling from your armpits through your ribs and into your lower back. For a first round, hold this for about 10 to 20 seconds while breathing normally.
Step 4: Let Your Lower Body Relax
Once you are in position, soften your knees and let your pelvis feel heavy. This is where many people accidentally overdo it by stiffening everything from their jaw to their toes. Try the opposite.
Relax your glutes. Loosen your hips. Let your lower back “unclench” instead of forcing it to stretch. Often the best version of this move looks boring. That is a compliment.
Step 5: Breathe Like You Mean It
Take slow breaths in through your nose and out through your mouth. With each exhale, imagine your ribs settling and your low back becoming less guarded. This is not wellness fluff. Guarded muscles often relax better when you stop bracing like you are defending your honor.
Try 3 to 5 slow breaths per hold. If your body feels safer, your stretch usually gets better.
Step 6: Add a Gentle Knee-Bend Variation
Once a supported hang feels comfortable, try slightly bending your knees and letting your hips drop a bit more. This often changes the angle enough to make the lower back feel less compressed and more mobile.
You can also shift a tiny bit side to side to notice whether one hip or one side of your low back feels tighter than the other. Keep the movement small. This is a stretch, not a jungle gym audition.
Step 7: Progress to a Light Full Hang Only If It Feels Good
If you have healthy shoulders, good grip strength, and the supported version feels excellent, you can experiment with taking a little more weight off your feet. Notice the phrase a little. You do not need a dramatic full dead hang to get benefit.
Hold for 10 to 30 seconds, then rest. Start with 2 to 3 rounds. If you feel shoulder pinching, hand numbness, sharp back pain, or pain that travels down the leg, stop immediately.
Step 8: Pair the Bar Stretch with Floor Mobility
A pull-up bar works best as part of a team, not as a solo act. After hanging, add one or two floor-based stretches that commonly help the lower back and surrounding muscles:
- Knee-to-chest stretch: Great for a stiff low back after sitting.
- Cat-cow: Helpful for gentle spinal mobility.
- Hamstring stretch: Tight hamstrings can increase tension around the lower back.
- Hip flexor stretch: Especially useful if you sit a lot.
This combination works well because the lower back rarely acts alone. Hips, hamstrings, abdominals, and glutes all influence how the low back feels and moves. If you only hang from the bar and ignore everything below your ribs, you are leaving money on the table.
Step 9: Be Consistent, Not Heroic
The best lower back stretching routine is usually the one you can repeat without annoying your body. A few short sessions during the week beat one dramatic session followed by two days of walking like a folding chair.
Try this simple routine:
- Warm up for 5 to 10 minutes
- Supported or light hang for 2 to 3 rounds of 10 to 30 seconds
- Finish with 2 floor stretches for 30 seconds each
- Repeat several times per week
Consistency builds confidence, mobility, and better body awareness. Heroics mostly build stories that start with, “So anyway, I should have stopped sooner.”
Common Mistakes to Avoid
Going Straight to a Full Dead Hang
This is the classic mistake. Full bodyweight hanging can be too intense for beginners, especially if you have stiff shoulders or poor grip endurance. Start supported.
Pushing Into Pain
Tension is normal. Sharp pain, nerve pain, or numbness is not. If your body is sending you a flashing neon “no,” listen.
Skipping the Warm-Up
Stretching cold muscles is a fast way to make a simple movement feel terrible. Warm first, always.
Ignoring the Hips and Hamstrings
If your hip flexors are tight and your hamstrings feel like old guitar strings, your lower back may keep doing extra work. Pairing the bar with floor mobility usually gives better results.
Treating the Bar Like a Medical Device
A pull-up bar can be useful, but it is not a substitute for evaluation when symptoms are severe, persistent, or neurological. If your back pain is getting worse or acting weird, get it checked.
Who Should Not Try Lower Back Hanging Stretches Right Away?
Skip or modify this movement if you have:
- New or worsening pain shooting below the knee
- Numbness, weakness, or tingling in the legs
- Loss of bowel or bladder control
- Numbness in the groin or inner thigh
- Fever, unexplained weight loss, or pain after a fall or major injury
- Significant shoulder, elbow, wrist, or hand pain when hanging
Those symptoms call for proper medical attention, not improvised “decompression therapy” in your doorway.
What Results Can You Realistically Expect?
If this stretch suits you, the biggest benefit is usually a short-term feeling of relief, length, and decreased stiffness. You may stand up straighter, move a little easier, and feel less locked up after long periods of sitting. Over time, when combined with walking, core work, and hip mobility, it may become a useful part of your broader lower back routine.
What it probably will not do is fix every cause of back pain by itself. Most stubborn low back problems respond better to a bigger plan: movement, strength, flexibility, better pacing, and sometimes help from a physical therapist.
Real-Life Experiences with Pull-Up Bar Lower Back Stretching
The most common experience people describe is not dramatic pain relief. It is something more subtle and, honestly, more believable. They feel “unstuck.” After sitting for hours, the low back can feel compressed, the hips feel glued on, and standing upright seems weirdly negotiable. A gentle supported hang often gives a momentary sense that the torso has more room. Breathing feels easier. The back does not necessarily become “healed,” but it stops acting like it is carrying the emotional burden of every chair you have ever sat in.
Office workers often notice the biggest difference after long stretches at a desk. They grab the bar, keep their toes on the floor, sink lightly into the position, and feel a gradual release through the sides of the waist and the low back. The relief is usually best when they do not rush. The people who hate it most are usually the ones who try to muscle through it, tense their shoulders, hold their breath, and transform a mobility drill into a test of survival.
People who lift weights sometimes like the bar stretch after leg day, especially after squats, deadlifts, or long standing sessions. In that case, the stretch can feel less like “fixing pain” and more like restoring normal motion. They often report that pairing the hang with knee-to-chest stretches or hip flexor work makes the effect much better. Hanging alone helps a little; hanging plus hip mobility helps a lot more.
Taller people also seem to appreciate this movement, perhaps because they are constantly folding themselves into cars, desks, sofas, and airline seats clearly designed by someone who thinks humans are all 5-foot-6 and cheerful about it. For them, the pull-up bar can feel like a reset button after being compressed all day.
On the flip side, some people quickly realize this stretch is not for them. If they have touchy shoulders, weak grip strength, nerve symptoms, or pain that travels down the leg, the bar may feel awkward or aggravating. That is not failure. It is useful feedback. A smarter routine may use floor stretches, walking, and targeted strengthening instead. The “best” stretch is not the coolest-looking one; it is the one your body tolerates and benefits from.
Perhaps the most helpful real-world lesson is this: the pull-up bar works best when it becomes one small habit rather than one grand event. Ten or twenty seconds here and there, done consistently, often feels better than turning it into a full performance. People who get the most from it usually stay patient, keep the movement gentle, and stop well before pain starts. Glamorous? No. Effective? Much more often.
Conclusion
If you want an easy way to stretch your lower back with a pull-up bar, start small, stay controlled, and think of the bar as a support tool rather than a miracle machine. A supported hang, relaxed breathing, and a few smart follow-up stretches for the hips and hamstrings can go a long way. The trick is not to force the movement. Let the stretch happen. Your lower back generally responds better to patience than theatrics.
And if your symptoms include weakness, numbness, pain below the knee, bowel or bladder changes, or anything that makes you think, “This seems a little beyond ordinary stiffness,” trust that instinct and get medical advice. A healthy back routine should make you feel safer in your body, not more uncertain.


