Table of Contents >> Show >> Hide
- What “Perfect Hash Browns” Actually Means
- Ingredients and Tools That Matter (and a Few That Don’t)
- The Science-y Secret: Remove Moisture Like You Mean It
- How to Make Perfect Hash Browns: Step-by-Step
- Step 1: Shred the potatoes (and keep them from turning gray)
- Step 2: Rinse or soak to remove excess starch
- Step 3: Dry the potatoes like you’re training for the Olympics
- Step 4: Season smartly
- Step 5: Heat the pan properly
- Step 6: Add potatoes in a thin, even layer (thickness matters)
- Step 7: The hardest step: don’t touch
- Step 8: Flip once, then finish crisping
- Step 9: Drain and serve immediately
- Two Foolproof Methods (Pick Your Adventure)
- Pro Moves for Next-Level Crispiness
- Troubleshooting: Why Hash Browns Go Wrong (and How to Fix Them)
- Flavor Upgrades (Without Ruining the Crisp)
- Serving Ideas That Make Hash Browns Feel Like the Main Character
- of Real-World Hash Brown “Experience” (a.k.a. What Usually Happens in Kitchens)
- Conclusion: Your Perfect Hash Browns Checklist
Hash browns should be simple: potato + heat = crispy joy. And yet, somehow, they can turn into a steamy pile of
sadness that tastes like “wet sweater, but make it breakfast.” The good news? Perfect hash browns aren’t a mystery.
They’re a system: pick the right potato, remove the right moisture, use the right pan heat, and thenthis is
the hard partleave them alone.
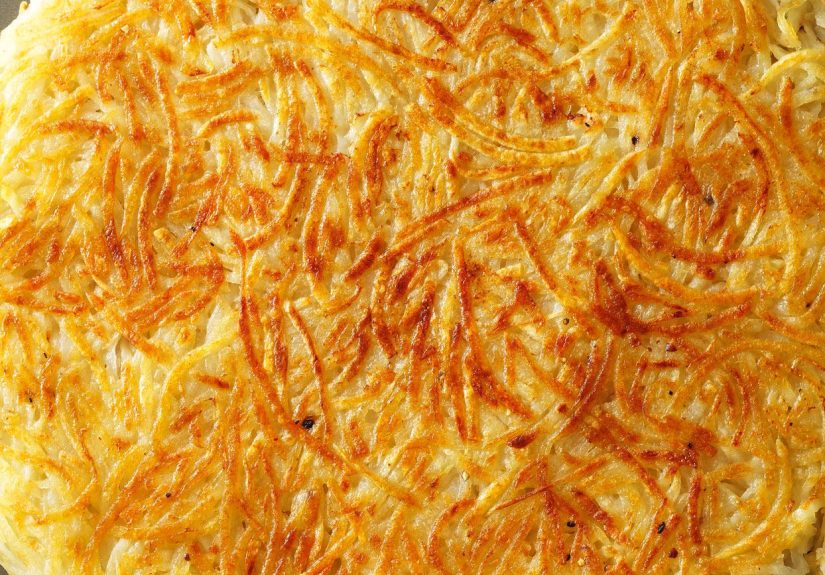
This guide walks you through diner-style shredded hash browns that are crisp and golden on the outside, tender in
the middle, and sturdy enough to support a fried egg like it’s wearing a tiny breakfast tuxedo.
What “Perfect Hash Browns” Actually Means
Great hash browns hit three goals at once:
- Deep golden crust (not pale, not burned, not “lightly toasted.”)
- Tender interior (cooked through, no crunchy raw shreds).
- Separated, not gluey (crisp strands that don’t fuse into one gummy potato blanket).
To get all three, you need to control two things: water and contact with heat. Water
creates steam, and steam is the sworn enemy of crispiness. Direct contact with a hot pan builds crust. Your entire job
is to help those two realities meet in a peaceful, crunchy agreement.
Ingredients and Tools That Matter (and a Few That Don’t)
The best potatoes for crispy hash browns
Choose russet (Idaho) potatoes. They’re starchy, which helps create that classic crisp-and-tender
texture. Waxy potatoes (like red potatoes) hold their shape nicely, but they don’t crisp the same way and can lean
toward “breakfast dice” energy instead of “diner hash brown” glory.
Fat: oil + butter is the power couple
Oil brings higher heat; butter brings flavor. Use both. If you’ve ever burned butter and then tried to pretend it’s
“toasty,” you’re not alone. You can also use clarified butter or ghee if you want buttery flavor with fewer burn
worries.
Pan choice: wide and heavy wins
A 12-inch skillet gives you room to spread potatoes in a thin layer. Cast iron is great for crust.
Nonstick can be easier for flipping a large “hash brown pancake.” Either works if you manage heat and don’t rush the flip.
Tools that make life easier
- Box grater or food processor shredding disk
- Colander
- Clean kitchen towel (or cheesecloth) for wringing out moisture
- Spatula (a thin metal spatula is excellent for getting under the crust)
The Science-y Secret: Remove Moisture Like You Mean It
Potatoes are basically delicious water balloons. If shredded potatoes hit a pan while still wet, they steam themselves.
That means pale, limp, or mushy hash brownsaka the culinary equivalent of wearing socks in the shower.
So you’ll do two things: rinse off excess surface starch and then dry thoroughly.
Yes, it’s annoying. Yes, it’s worth it.
How to Make Perfect Hash Browns: Step-by-Step
Step 1: Shred the potatoes (and keep them from turning gray)
Peel the potatoes (optional, but classic diner-style usually does). Shred using the large holes of a box grater or a
food processor. If you’re working slowly, drop the shreds into a bowl of cold water to prevent browning.
Step 2: Rinse or soak to remove excess starch
Put the shreds in a colander and rinse under cold water, tossing with your hands. Or soak in a bowl of cold water,
swish aggressively, then drain. Repeat until the water is closer to clear than cloudy.
This helps prevent gluey clumps and encourages crisp strands that brown evenly.
Step 3: Dry the potatoes like you’re training for the Olympics
Transfer the rinsed shreds to a clean kitchen towel. Gather the towel into a bundle and twist hard to squeeze out water.
Open, fluff, and squeeze again. You want the shreds to feel damp-but-not-wetmore “fresh laundry” than “rainstorm.”
Quick hack: After towel-wringing, spread the shreds on a sheet pan lined with paper towels for 3–5 minutes while you
heat the pan. Every minute of air-drying helps.
Step 4: Season smartly
Salt draws moisture. That’s great if you’re trying to make potatoes sweat… and not great if you’re trying to keep a hot
pan from turning into a steam room.
Two solid options:
- Option A (classic): Season the shreds lightly with salt and pepper right before they hit the pan.
- Option B (extra crisp insurance): Season with pepper/garlic/onion powder first, then add salt after
the first flip or once the crust is set.
Step 5: Heat the pan properly
Put the skillet over medium-high heat. Add enough oil to coat the bottom generously. When the oil
shimmers, add a tablespoon of butter. When the butter melts and foams, you’re ready.
Step 6: Add potatoes in a thin, even layer (thickness matters)
Scatter the potatoes in the pan and spread them evenly. Then press gently with a spatula so the shreds make good contact.
Aim for about 1/3 to 1/2 inch thick. Too thick and the middle steams before the outside browns.
Too thin and it turns into potato confetti (delicious, but less “hash brown”).
Step 7: The hardest step: don’t touch
Let the potatoes cook undisturbed until a deep golden crust formsusually 5–8 minutes, depending on
your stove and pan. You should hear a steady sizzle. If it’s silent, increase heat slightly. If it’s screaming and
smoking, reduce heat (your smoke alarm is not your sous-chef).
Step 8: Flip once, then finish crisping
Flip in sections or slide a spatula under the whole “pancake” if it holds together. Press gently again. Cook another
4–6 minutes until the second side is browned.
Step 9: Drain and serve immediately
Move hash browns to a paper towel-lined plate. Taste and adjust salt. Serve hothash browns wait for nobody.
Two Foolproof Methods (Pick Your Adventure)
Method 1: Classic diner-style shredded hash browns (raw potato)
This is the method above: shred → rinse/soak → squeeze dry → hot pan → press → don’t touch → flip once.
It’s the most “authentic” diner vibe and gives those lacy crisp edges everyone fights over.
Method 2: Make-ahead hash browns using pre-cooked potatoes
If you’ve ever thought, “I want perfect hash browns, but I also want to keep my morning sanity,” this method is for you.
The idea: pre-cook potatoes (boil, bake, or microwave until just tender), chill them, then grate and fry.
Pre-cooking reduces surface moisture and helps the interior cook through without over-steaming.
- Cook whole potatoes until barely tender (not falling apart).
- Cool completely, then refrigerate uncovered (even overnight).
- Grate the chilled potatoes, season, and fry in oil + butter until crisp.
This method is especially great for brunch: you can prep the potatoes the day before and cook hash browns fast while you
juggle eggs, coffee, and the human experience.
Pro Moves for Next-Level Crispiness
Use the “microwave jump-start” (optional, but powerful)
Some recipe testing shows that briefly microwaving the wrung-out shreds helps start cooking the potatoes so they brown
faster and more evenly in the skillet. If you try it, microwave the squeezed shreds in a bowl for a short burst, then
spread them out to release steam before frying.
Keep the layer wide, not piled high
If you want more hash browns, cook in batches. Crowding the pan traps steam and robs you of crust. Think “golden lake,”
not “potato mountain.”
Press gently, not violently
Pressing improves contact with the pan (hello, crisp). But smashing too hard can compact the potatoes into a dense cake
that takes longer to cook through. Gentle pressure is the sweet spot.
Troubleshooting: Why Hash Browns Go Wrong (and How to Fix Them)
Problem: They’re soggy
- Cause: Not dry enough; pan not hot enough; layer too thick.
- Fix: Squeeze harder, heat oil until shimmering, and keep the layer under 1/2 inch. Cook in batches.
Problem: The center is undercooked
- Cause: Outside browned before inside cooked (too high heat or too thick).
- Fix: Lower heat slightly and cook a thinner layer; consider pre-cooking potatoes for consistency.
Problem: They fall apart when you flip
- Cause: Crust hasn’t formed yet; you moved them too early.
- Fix: Give it another 1–2 minutes. When the crust is ready, it releases more easily.
Problem: They stick to the pan
- Cause: Not enough fat; pan not preheated; delicate crust.
- Fix: Use a bit more oil, preheat properly, and slide a thin spatula under the crust gradually.
Problem: They taste greasy
- Cause: Oil wasn’t hot enough, so the potatoes absorbed it.
- Fix: Preheat the oil, keep a steady sizzle, and drain briefly on paper towels.
Flavor Upgrades (Without Ruining the Crisp)
Hash browns are a crispy blank canvas. Just don’t add watery ingredients too early.
Easy add-ins
- Onion: Finely grate or mince, then squeeze it dry (onion carries water too).
- Spices: Black pepper, garlic powder, onion powder, smoked paprika.
- Herbs: Chives or parsley sprinkled after cooking.
Cheese, but make it strategic
Add shredded cheddar in the last minute or two, or sprinkle on after flipping. Cheese can slow crisping if mixed in too early,
but melted cheese on a crisp crust is… well, it’s basically a breakfast love story.
Serving Ideas That Make Hash Browns Feel Like the Main Character
- Classic plate: hash browns + fried eggs + bacon or sausage
- Breakfast sandwich base: use a square of crispy hash browns as the “bread” (chaotic good)
- Brunch board: pile on avocado, hot sauce, and a dollop of sour cream
- Leftover magic: top with reheated chili or sautéed veggies and call it “breakfast nachos”
of Real-World Hash Brown “Experience” (a.k.a. What Usually Happens in Kitchens)
Making perfect hash browns tends to follow a predictable emotional storyline. First comes optimism: you shred potatoes and
think, “How hard can this be?” Then comes disbelief when the pan fills with steam, the potatoes turn pale, and you realize
you’ve invented a new dish called Sad Potato Tangles.
The biggest “aha” moment most people have is learning that hash browns aren’t won by fancy ingredientsthey’re won by
prep. The first time you rinse the shreds until the water runs mostly clear, then squeeze them until your forearms feel
like you just did a gym session, you’ll notice something immediately: the potatoes hit the pan and actually sizzle
instead of quietly weeping.
Another common kitchen lesson is the “don’t touch it” rule. It’s weirdly hard. Humans love fiddling. We stir soup, we flip
pancakes early, we poke brownies to see if they’re done (they are not). Hash browns punish this behavior. If you keep
moving them, they never get enough uninterrupted contact to build a crust, and the whole thing stays soft. The moment you
finally walk awayset the table, fry an egg, scroll for exactly one minuteyou come back to the smell of browning potatoes
and think, “Oh. That’s what restaurants are doing.”
The flip is its own mini drama. On your first attempts, you might try to flip the entire hash brown at once like it’s a
heroic pancake. Sometimes it works, and you feel like a breakfast wizard. Sometimes it cracks into pieces and you learn to
flip in sections, which is less cinematic but just as tasty. Either way, the real victory is noticing the crust: when it’s
deep golden and the edges look lacy, you’re in the crisp zone.
Over time, people also develop their “house style.” Some like thin, shattery hash browns with maximum crunch. Others like a
thicker layer that eats like a crispy-topped potato pillow. Some swear by a cast iron skillet; others choose nonstick for
stress-free flipping. Many keep a bag of frozen shredded hash browns as a weekday shortcutbecause life is busy and breakfast
should not require a dissertation on moisture control every single day.
The best part is that once you nail the fundamentalsstarchy potatoes, rinse, squeeze dry, hot fat, thin layer, patience
hash browns stop being a gamble. They become a reliable, repeatable win. And that’s the kind of confidence you can carry
into the rest of your day… or at least into your second cup of coffee.
Conclusion: Your Perfect Hash Browns Checklist
- Use russet/Idaho potatoes for classic crispiness.
- Rinse or soak to reduce surface starch, then squeeze very dry.
- Heat oil until shimmering; add butter for flavor.
- Spread potatoes in a thin layer and press gently.
- Don’t touch until the crust forms; flip once and finish.
- Serve immediatelycrispy waits for no one.
Research basis (no outbound links):


