Table of Contents >> Show >> Hide
- What Peel-and-Stick Wallpaper Is (and Why It’s Different)
- Tools and Materials You’ll Actually Use
- Step 1: Measure Like You Mean It
- Step 2: Prep the Wall (The “Future You” Step)
- Step 3: Plan Your Layout (Straightness Is a Lifestyle)
- Step 4: Cut and Label Your Panels
- Step 5: Apply the First Strip (Slow Is Fast)
- Step 6: Add More Strips (Seams Without Tears)
- Step 7: Trim Like a Pro (Clean Edges = Expensive Look)
- How to Work Around Outlets, Windows, and Corners
- Fixing Common Problems (Because Wallpaper Is a Drama Queen)
- Aftercare: Keep It Looking Sharp
- How to Remove Peel-and-Stick Wallpaper Without Wrecking Your Wall
- Quick FAQ
- Real-World Experiences (500+ Words of “Wish I Knew This Earlier”)
- 1) The wall “looked clean” until the wallpaper arrived
- 2) The first strip decides your fate
- 3) Handling the backing paper is its own mini workout
- 4) A helper isn’t optional in tall rooms
- 5) Bubbles aren’t a moral failing
- 6) Pattern matching takes longer than the internet admits
- 7) Removal success starts on installation day
- Conclusion
Peel-and-stick wallpaper is the rare home upgrade that’s equal parts “weekend DIY” and “why does this room suddenly look expensive?”
It’s renter-friendly, low-mess, and it delivers a big visual payoff without turning your living room into a paste-and-prayer situation.
But here’s the secret: the “stick” part is easy. The prep and the layout are where beautiful accent wall dreams either
come true… or end in a crooked floral that slowly haunts you from across the room.
This guide walks you through exactly how to apply peel and stick wallpaperstep by stepwith practical tips for measuring, wall prep,
pattern matching, trimming, and fixing bubbles. You’ll also get real-world lessons learned at the end (the kind you only discover after
you’ve wrestled a 27-inch-wide sticky noodle near a ceiling fan).
What Peel-and-Stick Wallpaper Is (and Why It’s Different)
Peel-and-stick wallpaperalso called self-adhesive wallpaper or removable wallpapercomes with adhesive already on the back.
Instead of mixing paste, soaking paper, and hoping your walls forgive you, you simply peel off the backing and press the wallpaper onto a prepared surface.
Most peel-and-stick products are designed to be repositionable during installation, which is great because nobody lines up the first panel perfectly on the first try.
(If you do, congratulations on being secretly employed by a wallpaper company.)
Where it works best
- Smooth drywall in good condition
- Painted walls with an eggshell, satin, or semi-gloss finish (better adhesion than ultra-matte walls)
- Low-moisture rooms like bedrooms, offices, hallways, and powder rooms
Where it gets tricky
- Heavy texture (orange peel, knockdown, skip trowel): the paper can lift, and bumps show through
- Fresh paint that hasn’t fully cured: adhesive can pull paint or create bubbles later
- High-humidity zones (especially full bathrooms or shower areas): edges may peel faster depending on product quality
Tools and Materials You’ll Actually Use
You don’t need a warehouse of fancy gear, but the right tools make the job cleaner, straighter, and dramatically less rage-inducing.
Must-haves
- Peel-and-stick wallpaper (buy a little extra)
- Measuring tape
- Level (or laser level if you have one)
- Pencil (light marks only)
- Utility knife with fresh blades (dull blades tear wallpaper)
- Straightedge or metal ruler (for clean trimming)
- Wallpaper smoothing tool/squeegee (felt-edged is ideal)
- Step ladder
- Microfiber cloth or sponge + mild cleaner
Nice-to-haves
- Drop cloth (especially if you’re trimming a lot)
- Painter’s tape (handy for temporary alignment)
- Pin (for stubborn bubblesused carefully)
- Spackle + sandpaper (for wall repairs)
Step 1: Measure Like You Mean It
Measuring is the least glamorous part of wallpapering, which is exactly why it’s the part people rush.
Don’t. Wallpaper punishes impatience.
How to calculate how much wallpaper you need
- Measure the height and width of each wall you plan to cover.
- Multiply width × height to get square footage per wall.
- Add walls together for total coverage area.
- Subtract large windows/doors if you wantbut still plan for waste.
Then add a buffer. A common recommendation is ordering about 10% extra for mistakes, pattern matching, and tricky cuts.
If your wallpaper has a bold repeat (think large florals or geometric grids), you may want even more.
Pro tip: check panel width and pattern repeat
Many peel-and-stick rolls are around 20.5 to 27 inches wide, but not all. Pattern repeat affects waste because you may need to start
each strip at a specific point so the design lines up across seams.
Step 2: Prep the Wall (The “Future You” Step)
Great wallpaper jobs are made on boring dayswhen you clean, patch, sand, and wait for things to dry.
The adhesive can’t bond well to dust, grease, or flaking paint. And peel-and-stick is unforgiving: it highlights every bump you ignored.
Clean first
- Remove outlet and switch plates (turn off power first for safety).
- Wipe the wall with a mild cleaner and water. For extra de-greasing, many DIY guides suggest water with a small amount of rubbing alcohol.
- Let the wall dry completely. If you washed the wall, give it real timethink hours, not minutes.
Repair and smooth
- Fill nail holes and dents with spackle.
- Sand repairs flush so you can’t feel edges with your hand.
- Dust again after sanding (dust is the enemy of adhesion).
Important: paint cure time matters
If you recently painted, wait. Some installers warn that applying peel-and-stick too soonespecially within about a monthcan lead to bubbling
and can pull paint during repositioning or removal. If you’re in doubt, test a small piece in a hidden area before committing to a full wall.
Optional: prime for smoother adhesion
Not every wall needs primer, but priming can help seal porous drywall and improve release later. Always follow the wallpaper manufacturer’s guidance
different adhesives behave differently.
Step 3: Plan Your Layout (Straightness Is a Lifestyle)
Peel-and-stick wallpaper is basically a giant sticker, which means it will happily stick down crooked if you let it.
Your job is to give it a straight path from the start.
Pick a starting spot
A smart strategy is starting in a less noticeable cornerlike behind a doorso if your first seam isn’t museum-perfect, it’s not the first thing you see.
For certain patterns (especially symmetrical or geometric ones), you may prefer starting from the center and working outward for a balanced look.
Draw a plumb line
Corners and ceilings are rarely perfectly square. Instead of trusting them, use a level to draw a vertical plumb line
from ceiling to baseboard. That line is your “truth,” and your first panel should follow it.
Keep pencil marks lightsome wallpapers are thin enough to show dark lines through the material.
Dry fit your strips
If you can, unroll your wallpaper and preview how the pattern will land near corners, windows, or a focal point like a bed.
This saves you from “Why is the giant peony chopped in half right at eye level?” later.
Step 4: Cut and Label Your Panels
Cutting first gives you controlespecially if your wall has obstacles. Many how-to guides recommend adding a little extra length (overhang)
at the top and bottom so you can trim cleanly after the strip is on the wall.
How to cut
- Measure wall height.
- Cut each strip a bit longer (often 1–3 inches extra is enough).
- If the pattern needs matching, align the next strip to the first before cutting so the repeat will line up.
- Label strips in order so you don’t accidentally install “Strip 4” as “Strip 2.”
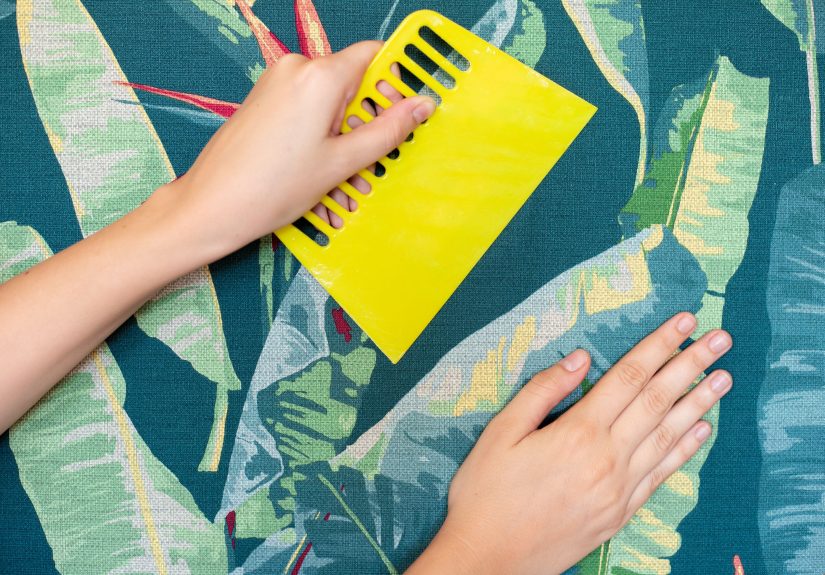
Step 5: Apply the First Strip (Slow Is Fast)
The first strip sets the tone for everything that comes after. If it’s straight, the rest of the wall feels easier.
If it’s crooked, you’ll spend the day trying to “fix” math with hope.
How to hang peel-and-stick wallpaper
-
Peel a small section of backingdon’t remove it all.
Start with about 6–12 inches exposed at the top so you can place and adjust. -
Align the top edge and your plumb line.
Leave a slight overhang at the ceiling if needed (you’ll trim later). -
Press the top into place, then peel and smooth in sections.
Work downward, peeling the backing a little at a time. -
Smooth from the center outward.
Use your smoothing tool to push air out as you go. Think “windshield wiper,” not “aggressive scrubbing.” -
Don’t stretch the wallpaper.
Pulling can distort patterns and make seams misbehave later.
Best section size to work in
Different pros suggest different increments, but a reliable approach is working in small, controlled sections
(around 12–20 inches at a time) so the strip stays aligned and bubble-free.
Step 6: Add More Strips (Seams Without Tears)
Once the first strip is down, you’ll repeat the same processbut now you’re also doing pattern alignment and seam management.
Pattern matching
- Line up the design at eye level first (where mistakes are most noticeable).
- Use painter’s tape temporarily if you need a third hand to hold alignment.
- Double-check alignment before pressing the seam firmly.
Overlap vs. butt seams
Many peel-and-stick wallpapers recommend a slight overlapoften around 1/4 inchso you don’t get gaps if the wall is uneven
or the room temperature changes. Other products are designed for edge-to-edge seams.
Always follow the manufacturer’s instructions for your specific wallpaper.
Smooth the seam
After the strip is aligned, run your smoothing tool along the seam to help it lay flat. The goal is a seam that looks intentionalnot like it’s trying
to lift off and start a new life.
Step 7: Trim Like a Pro (Clean Edges = Expensive Look)
Trimming is what turns “DIY project” into “wait, did you hire someone?” Use a straightedge and a sharp blade for crisp lines.
Trimming tips
- Use a fresh blade. Change it more often than you think you need to.
- Press the wallpaper into the ceiling/baseboard joint with your smoothing tool first, then trim.
- Cut in one steady motion when possible to avoid jagged edges.
How to Work Around Outlets, Windows, and Corners
Outlets and switches
Remove cover plates first. When you reach an outlet, a practical method is making a small opening in the center of the outlet area,
laying the wallpaper flat, then carefully trimming outward to the edges. The cover plate will hide minor imperfections once reinstalled.
Windows and doors
Let the wallpaper run over the trim slightly, then trim flush with a straightedge and sharp knife. Take your time herecrooked cuts around trim
are the kind of thing your eyes find immediately, even if nobody else notices.
Inside corners
Walls are rarely perfectly square. Instead of forcing a full-width strip around a corner, many DIYers wrap just a small amount into the corner,
then start a new plumb line on the next wall. This helps prevent lifting and keeps your next wall straight.
Fixing Common Problems (Because Wallpaper Is a Drama Queen)
Bubbles
- Small bubble while installing: lift the wallpaper back to that spot and smooth again from the center outward.
- Stubborn bubble after installation: prick a tiny hole with a pin and gently push the air out with your smoothing tool.
Wrinkles or creases
Wrinkles usually happen when you peel too much backing at once or stretch the paper. Lift the section, reapply slowly, and smooth in smaller increments.
Seams lifting
- Make sure the wall was clean and fully dry.
- Press seams firmly with a smoothing tool.
- If temperature swings are common (drafty rooms, seasonal shifts), a slight overlap may help reduce seam splitting.
Pattern drift
If your pattern slowly “walks” out of alignment, your first strip may be slightly off-plumb. That’s why the plumb line matters.
For the current wall, prioritize alignment at eye level and accept minor drift near the baseboard where it’s less visible.
Aftercare: Keep It Looking Sharp
Most peel-and-stick wallpaper is low maintenance, but it appreciates a little respect.
- Avoid scrubbing seams with harsh chemicals.
- For dust, use a dry microfiber cloth.
- For smudges, spot-clean gently (test first in an inconspicuous area).
- In humid rooms, run ventilation to help edges stay put.
How to Remove Peel-and-Stick Wallpaper Without Wrecking Your Wall
Removal is usually straightforwardespecially if the wallpaper was installed on a properly prepped wall and the product is truly removable.
Still, go slowly. Fast peeling is how you end up holding a long strip of wallpaper… plus a surprise layer of drywall paper.
Removal steps
- Start at a corner and peel slowly.
- Pull at a low angle (more parallel to the wall than straight out).
- If adhesive feels stubborn, try gentle warmth (like a blow dryer) or a little warm water to soften the glue.
- Wipe the wall afterward with a mild cleaner to remove residue.
If you’re wallpapering a rental, test a small section before doing a full wallboth for adhesion and for clean removal.
Quick FAQ
Can you put peel-and-stick wallpaper over textured walls?
You can, but results vary. Texture can show through and reduce adhesion. If the wall is lightly textured, thorough cleaning and firm smoothing may work.
For heavier textures, consider smoothing the wall first or choosing a product made for rougher surfaces.
Do you need to prime the wall?
Not always, but primer can help seal porous surfaces and improve adhesion and removability. Follow your wallpaper brand’s guidance, especially for new drywall.
Do you overlap peel-and-stick wallpaper?
Many products recommend a small overlap (often around 1/4 inch), while others are designed for butt seams. Check the roll instructions and do a quick test fit.
Real-World Experiences (500+ Words of “Wish I Knew This Earlier”)
Let’s talk about what actually happens when you apply peel-and-stick wallpaper in a real house, with real corners, real outlets, and real gravity.
These are the lessons people tend to learn the hard wayso you don’t have to.
1) The wall “looked clean” until the wallpaper arrived
A wall can look perfectly fine from across the room and still be coated in invisible dust, cooking film, or that mysterious hallway grime that appears
out of nowhere. When peel-and-stick starts lifting at the seams, the culprit is often surface prepnot the wallpaper. Wiping with a cleaner,
then letting the wall fully dry, is one of those unsexy steps that saves you from re-pressing seams every week.
2) The first strip decides your fate
People are often tempted to “just start in the corner” and hope for the best. Then the design slowly tilts, and by strip four you’re quietly negotiating
with geometry. Drawing a plumb line feels like overkilluntil you see how much easier pattern matching becomes when your panels are truly vertical.
If you only do one “extra” step, do the plumb line.
3) Handling the backing paper is its own mini workout
The backing paper can flop, stick to itself, brush your baseboard, and generally behave like it’s auditioning for a slapstick comedy.
The trick is peeling it gradually and keeping it folded back behind the panel instead of letting it swing free. Working in smaller increments
(rather than ripping the entire backing off at once) gives you control and reduces creases.
4) A helper isn’t optional in tall rooms
Even if you’re a confident DIYer, peel-and-stick gets dramatically easier with two peopleone to align and hold the panel, the other to peel backing and smooth.
This is especially true for large prints or murals where a tiny misalignment at the top becomes a big problem by the time you hit the baseboard.
If your ceilings are high or your wallpaper is wide, recruit help. Offer snacks. Promise they can choose the next accent wall.
5) Bubbles aren’t a moral failing
Bubbles happen. Sometimes you trap air while smoothing, sometimes the wall has a tiny bump, and sometimes the adhesive grabs faster than expected.
The practical fix is usually simple: lift the wallpaper back to that spot and smooth again from the center out. If a tiny bubble shows up later,
a pinhole and a gentle pass with a smoothing tool can make it disappear. The key is not panicking and overworking the area until the paper stretches.
6) Pattern matching takes longer than the internet admits
The most common “surprise” is how much time gets spent making the pattern line up perfectlyespecially with bold repeats.
Many people find it helpful to align the pattern first, then press the seam, and only after that do the firm smoothing.
This prevents you from locking a strip in place and realizing the design is off by half an inch (which is exactly the kind of half inch your brain will notice forever).
7) Removal success starts on installation day
The removability of peel-and-stick wallpaper isn’t just about the productit’s also about the wall condition, paint cure time, and how aggressively you repositioned it.
When people report damage during removal, it’s often because the wall wasn’t sealed well, the paint was fresh, or the adhesive bonded too strongly to a porous surface.
If you’re nervous, do a small test panel behind a piece of furniture and remove it after a day or two. That quick experiment can tell you a lot about how the full wall will behave.
Bottom line: peel-and-stick wallpaper is absolutely DIY-friendly, but it rewards patience and prep. Take your time, work in manageable sections, and remember:
nobody has ever regretted using a level. Lots of people regret trusting a corner.


