Table of Contents >> Show >> Hide
- Quick Supplies Checklist
- Step 1: Pick a “Plan,” Not Just Pretty Flowers
- Step 2: Match the Vase to the Job
- Step 3: Prep the Vase Like You Mean It
- Step 4: Condition the Flowers (Yes, This Matters)
- Step 5: Start With Greenery to Build the “Frame”
- Step 6: Add Focal Flowers, Then Layer in the Rest
- Step 7: Finish Strong (And Make It Last)
- Common Mistakes (So You Can Skip the Pain)
- Conclusion
- Bonus: of Real-World Flower-Arranging Experiences (The Kind Nobody Warns You About)
Flower arranging is basically home improvement… for your table. You’re taking a pile of parts (stems, leaves, a vase you found in the back of a cabinet)
and turning them into something that looks intentional. And unlike installing a ceiling fan, you don’t need to shut off the breakeror call your cousin who
“totally knows wiring.”
The best part: you don’t need expensive blooms or formal training to make a gorgeous floral arrangement. You just need a simple plan, a clean vase, and a
willingness to trim a stem twice because you definitely cut it too long the first time. (We’ve all been there.)
Below are seven easy, practical steps for arranging flowers like a prowhether you’re working with grocery-store roses, garden clippings, or a mixed bouquet
that looked “smaller online.” We’ll keep it simple, slightly witty, and very doable.
Quick Supplies Checklist
- Vase or container (clean, stable, and sized for your flowers)
- Sharp snips or scissors (dull blades crush stemsyour flowers will hold a grudge)
- Floral tape (optional, for a simple tape-grid support)
- Flower food (the little packet that comes with bouquets is actually useful)
- Greenery + flowers (a mix of focal, accent, and filler works best)
Step 1: Pick a “Plan,” Not Just Pretty Flowers
Before you start snipping, decide what you’re making. A casual kitchen bouquet? A low centerpiece that won’t block anyone’s face at dinner? A tall,
dramatic arrangement that says “I have my life together,” even if your laundry is living in a chair?
Choose a simple color story
A foolproof approach is to pick two main colors plus one neutral (white, green, or soft cream). If your bouquet is already mixed,
you can still “edit” itpull out a few stems that clash or overpower the palette.
Think in roles: focal, accent, filler, greenery
- Focal flowers: the stars (roses, peonies, dahlias, lilies)
- Accent flowers: support the stars (spray roses, ranunculus, carnations, tulips)
- Filler: adds softness and texture (waxflower, baby’s breath, statice)
- Greenery: structure and shape (eucalyptus, ruscus, ferns)
A beginner-friendly “ratio” that looks balanced
If you want an easy framework, try something like: a few types of “big” blooms, a handful of greenery, and more stems of smaller accents. It creates a
natural rhythm without looking like you dumped a bouquet into a vase and walked away.
Step 2: Match the Vase to the Job
The vase isn’t just a container; it’s the foundation. If it’s too tall, flowers disappear. Too short, stems flop like they’re tired of being perceived.
Choose a vessel that supports your goal:
- For a mixed bouquet: a medium vase with a slightly narrower opening keeps stems from splaying outward.
- For tulips: a straighter-sided vase helps them stand up (at least for a whilethey’re dramatic by nature).
- For top-heavy blooms (hydrangeas, big roses): use a heavier base so the arrangement doesn’t tip.
- For dinner tables: go lower and wider so guests can see each other.
If you’re unsure, grab the vase first, then shop (or clip) flowers to fit. That one decision prevents 80% of “why does this look weird?” moments later.
Step 3: Prep the Vase Like You Mean It
If flowers could talk, they’d beg for a clean vase. Bacteria in cloudy water shortens vase life fast, and it also makes your arrangement smell like
a science experiment.
Clean + fill
- Wash the vase with soap and water, rinse well, and dry (or at least rinse thoroughly).
- Add fresh water (often lukewarm is a safe bet for mixed bouquets).
- Add flower food if you have it.
Add a simple “mechanic” so flowers don’t flop
Wide-mouth vases are beautiful… and also the reason many arrangements look like a floral traffic accident. A quick fix is a
tape grid:
- Stretch parallel strips of tape across the top opening, evenly spaced.
- Repeat in the opposite direction to form squares.
- Press tape firmly to the rim so it stays put.
Each square becomes a “parking spot” for stems, helping you place flowers intentionally instead of chasing them around the vase like they owe you money.
Prefer foam? It can work, especially for structured designs. Just remember: if you use floral foam, hydrate it correctly (don’t force it under waterlet it
soak fully) so it can actually support your flowers.
Step 4: Condition the Flowers (Yes, This Matters)
This is the unglamorous part that makes your arrangement last. Conditioning is basically giving flowers the best chance to drink water and stay perky.
Skip it and your bouquet may look tired before you even post the photo.
Strip the stems
- Remove leaves that would sit below the waterline (submerged foliage = bacteria).
- Remove any mushy petals or damaged outer “guard petals” on roses.
Re-cut stems the right way
- Cut stems at an angle (more surface area for water uptake).
- Use sharp toolscrushed stems don’t drink well.
- If possible, cut and place stems into water quickly so they don’t dry out at the cut end.
Special cases you’ll run into
- Woody stems (like lilac or hydrangea): fresh cuts and plenty of water helpkeep them well-hydrated.
- Thirsty blooms: if something looks droopy early, hydration and cooler placement often help more than “encouraging words.”
Step 5: Start With Greenery to Build the “Frame”
Think of greenery like framing a wall before you hang cabinets. It sets the shape, creates support, and hides the mechanics (tape grid, foam, awkward stem
intersectionsyour secrets are safe).
Create a loose “collar”
Add a few greenery stems around the rim area to establish your outline. Aim for a shaperounded and airy is easiest for beginners. Keep turning the vase as
you work so one side doesn’t become the “good side” and the other side becomes “the side that faces the wall.”
Set your height
A helpful rule is to keep the overall arrangement roughly one-and-a-half to two times the height of the vase for a classic, balanced look.
For centerpieces, go shorter so guests can see across the table.
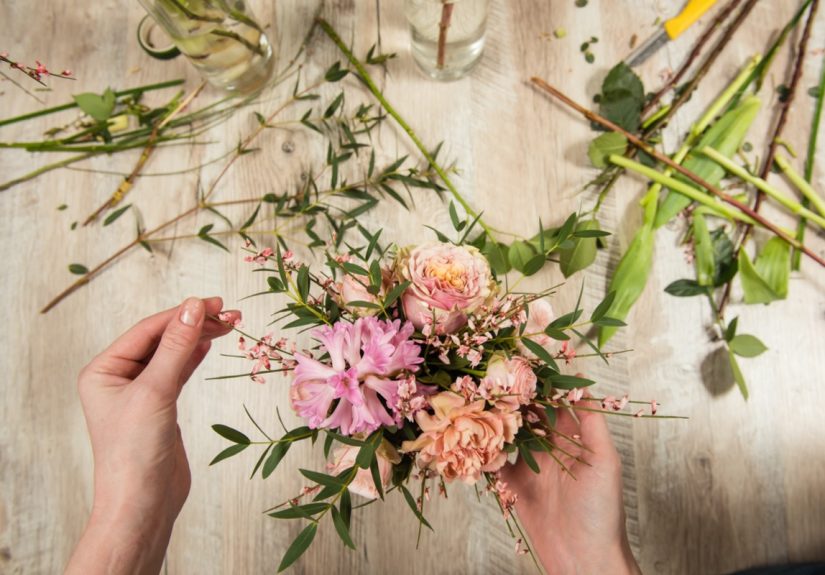
Step 6: Add Focal Flowers, Then Layer in the Rest
Here’s where it starts looking like an arrangement instead of a vase of “ingredients.”
Place the focal flowers first
Insert your biggest, showiest blooms (roses, peonies, dahlias) spaced around the design. Many florists prefer an odd number of focal flowers because it tends
to look more natural than perfectly paired symmetry.
Build shape with line or accent flowers
Next, add slightly taller stems or directional blooms (snapdragons, stock, delphinium) to guide the eye upward and create movement. Keep a few stems a bit
taller, a few shorter, and a few tucked invaried height creates depth.
Fill gaps with smaller blooms and texture
Now add your filler flowers and smaller accents to soften edges and connect the “big moments.” The goal is a cohesive look, not a floral game of Tetris where
every inch is packed. Leave some breathing room.
A concrete example (easy grocery-store recipe)
- 3 focal blooms (e.g., 3 large roses)
- 5 greenery stems (e.g., eucalyptus + ruscus)
- 8 accent/filler stems (e.g., spray roses + waxflower)
That structure tends to land you in the “full but not stuffed” zonegreat for beginners and small-to-medium vases.
Step 7: Finish Strong (And Make It Last)
Professional arrangements look polished because someone did a final pass. This is the “tighten the cabinet hinges” moment.
Do the 30-second walkaround
- Rotate the vase and check for holes, heavy spots, or stems crossing awkwardly.
- Make tiny adjustments: raise one stem, shorten another, tuck in greenery to hide mechanics.
- Remove any bruised petals or leaves that distract.
Place it in the right spot
- Keep flowers away from direct sun, heat vents, and drafty areas.
- Keep them away from ripening fruit (ethylene gas speeds aging).
Simple maintenance schedule
- Top off water daily (flowers drink more than you think).
- Change water every couple days (or sooner if cloudy), and clean the vase if needed.
- Re-trim stems when you refresh the water for better hydration.
Want the “wow” to last longer for a party or big day? Cool temperatures help. Some people even pop arrangements in a cool spot overnight to slow wilting.
Common Mistakes (So You Can Skip the Pain)
- Using a dirty vase: bacteria wins, flowers lose.
- Leaving leaves underwater: turns water cloudy fast and shortens vase life.
- Cutting stems with dull scissors: crushed stems drink poorly.
- Overcrowding: “full” becomes “stressed.” Give stems space.
- Designing from one angle: rotate as you go so it looks good all around.
Conclusion
Arranging flowers isn’t about perfectionit’s about structure, a little technique, and thoughtful layering. Start with a plan, prep your vase, condition your
stems, build a greenery frame, then add focal flowers, accents, and fillers in that order. Finish with a quick walkaround and basic care so your bouquet looks
fresh for days, not hours.
And if something feels “off,” don’t panic. Flower arranging is surprisingly forgiving: move one stem, add one sprig of greenery, snip an inch, rotate the vase,
and suddenly it looks like you meant to do that all along.
Bonus: of Real-World Flower-Arranging Experiences (The Kind Nobody Warns You About)
Let’s talk about the part of flower arranging that never makes it into the dreamy lifestyle photos: the tiny chaos moments that happen in real homes. Like the
first time you bring home a bouquet, set it on the counter, and realize your “favorite vase” is… two inches too short. Suddenly you’re improvising with a
pitcher, a mason jar, or that glass vase you swear you bought for “future entertaining.” (Future entertaining has arrived. It’s today. And it’s floral.)
Or the classic: you trim every stem, step back, admire your workand then the arrangement starts leaning like it’s exhausted. That’s when the tape grid feels
less like an optional craft trick and more like a life skill. Wide-mouth vases are beautiful, but they’re also the reason many bouquets slump into a
“sad fireworks” shape. A few strips of tape turns the whole experience from wrestling match to something closer to calm competence.
Then there’s the “one flower that refuses to cooperate.” You know the one: a tulip that insists on doing its own thing, or a heavy bloom that keeps sliding
down into the vase like it’s trying to hide. This is normal. Flowers are natural materials, not identical parts. Instead of fighting it, you learn to work with
itshorten the stem, change the angle, or place it where its weirdness looks intentional. The trick is remembering that “perfectly symmetrical” usually looks
stiff anyway. A little asymmetry reads as relaxed and designer-ish, like the bouquet casually rolled out of bed looking fabulous.
Another very real experience: you’ll discover how much flowers drink when you’re not looking. You go to bed with a full vase, wake up, and the waterline has
dropped like it paid rent somewhere else. That’s why topping off water daily makes such a difference. It also explains why arrangements sometimes look tired
“all of a sudden.” They’re not being dramatic (okay, maybe a little). They’re thirsty.
And yes, everyone eventually learns the hard way about leaves underwater. It doesn’t seem like a big dealuntil your vase water turns cloudy and your bouquet
starts smelling like a biology lab. Once you’ve had that happen, you become the person who strips stems with the seriousness of a surgeon. You’ll be at a
friend’s house, notice leaves in the water, and feel the urge to gently intervene. (Resist, unless asked. Be strong.)
Finally, there’s the best experience of all: the moment you realize you can “rescue” a bouquet. Maybe it’s grocery-store flowers that looked just okay in the
plastic sleeve. But you clean the vase, add fresh water, re-cut stems, build a little greenery base, and suddenly it looks like something you paid triple for.
That’s the magicflower arranging is part technique, part editing, and part confidence. And once you’ve nailed it a couple times, you stop feeling like you’re
guessing and start feeling like you’re designing. Which is a very fun upgrade for something that began with, “I just wanted my kitchen to look nicer.”


