Table of Contents >> Show >> Hide
- Start Here: The 3 Variables That Decide Everything
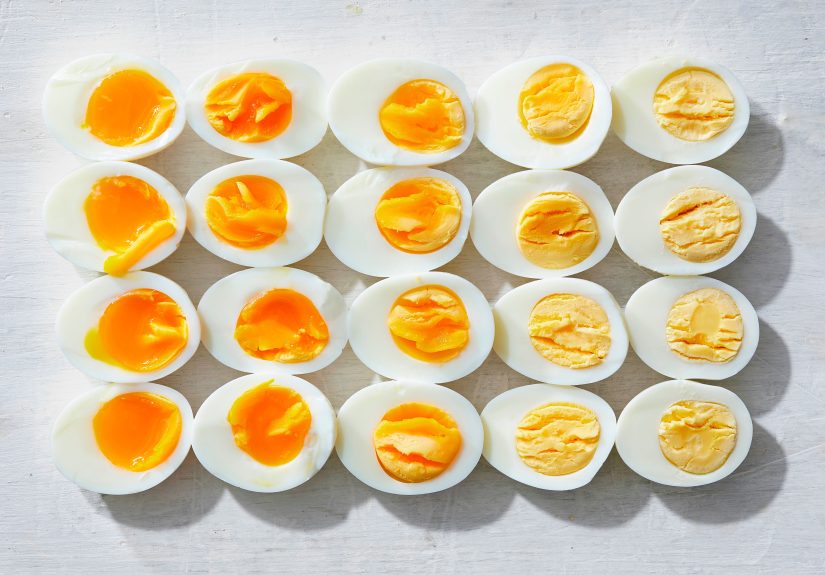
- The Quick Texture Guide (What You’re Actually Aiming For)
- Method #1: Boiling-Water Start (Most Precise for Texture)
- Method #2: Cold-Start + Covered-Off-Heat (Low Drama, Very Hands-Off)
- Method #3: Steaming (The Secret Weapon for Easy Peeling)
- The Ice Bath Rule (How to Lock in Your Ideal Texture)
- Peeling Without Tears (Or: How to Avoid Egg Craters)
- Common Problems (And the Fixes That Actually Work)
- High Altitude? Your Pot Is Not Broken
- Egg Safety and Storage (Because Eggs Don’t Come with a User Manual)
- How to Choose the Right Method for Your Life (Not Just Your Egg)
- Serving Ideas for Every Texture
- of Real-World Egg-Boiling Experiences (So You Don’t Have to Learn the Hard Way)
- Conclusion
Boiling an egg sounds like it should be the culinary equivalent of tying your shoes. And yetsomehoweggs have the audacity to come out rubbery, chalky, impossible to peel, or (my personal favorite) mysteriously green-ringed like they joined a sci-fi cult.
The good news: you don’t need fancy gadgets, a culinary degree, or a whispered family secret passed down at dawn. You need two things: repeatable timing and a cool-down strategy. This guide gives you both, plus three reliable methods (boil-start, cold-start, and steaming) so you can choose the one that fits your kitchen mood: “I love precision,” “I hate babysitting,” or “I just want the shell to come off without a court order.”
Start Here: The 3 Variables That Decide Everything
1) Egg size and starting temperature
Most timing charts assume large eggs straight from the fridge. Smaller eggs cook a little faster; jumbo eggs need a bit more time. Room-temperature eggs cook slightly quicker than cold ones, but “leave eggs out” is not required for great resultsespecially if you want consistency. Fridge-cold eggs are the same kind of cold every time. That’s a rare gift.
2) Your heat level (rolling boil vs gentle simmer)
A wild, angry boil jostles eggs around, increases cracking, and can overcook the outer layers before the center catches up. For most stovetop methods, you want water that’s barely simmering once the eggs go in: small bubbles, steady heat, calmer vibes.
3) Cooling (a.k.a. “carryover cooking is real”)
Eggs don’t stop cooking the second you remove them from hot water. If you want a truly jammy yolk, you need to stop the heat quickly. That’s why the ice bath isn’t a trendy cold plunge for your breakfastit’s the difference between “perfect” and “why is this yolk suddenly solid?”
The Quick Texture Guide (What You’re Actually Aiming For)
- Runny: set whites, liquid yolk. Great for toast soldiers, ramen, dramatic breakfast photos.
- Soft: fully set whites, warm yolk that flows but isn’t watery.
- Jammy: custardy, spoonable yolklike lemon curd’s savory cousin.
- Medium: mostly set yolk with a tender center; ideal for salads when you want richness without drips.
- Hard: fully set yolk, still tender (not chalky). Deviled eggs and egg salad’s best friend.
Method #1: Boiling-Water Start (Most Precise for Texture)
If you want the most control over yolk textureespecially soft and jammystart with already-hot water. This method makes timing cleaner because the clock starts when the egg hits the heat.
What you need
- A saucepan or pot
- A slotted spoon (or spider strainer)
- A bowl of ice water (lots of ice)
- Eggs (large, cold from the fridge is the “standard model”)
Step-by-step
- Boil water first. Bring enough water to cover your eggs by about 1 inch to a boil.
- Lower eggs in gently. Use a slotted spoon to lower cold eggs into the water. (Dropping eggs is how you create “egg confetti” in your pot.)
- Reduce to a gentle simmer. After the water returns to a boil, reduce heat so it’s simmering steadily.
- Start the timer. Use the timing chart below.
- Ice bath immediately. Transfer eggs to ice water to stop cooking.
- Peel (or don’t) based on your plans. If eating soon, peel after chilling; if storing, keep shells on.
Timing chart (large eggs, fridge-cold, gentle simmer)
| Texture Goal | Cook Time | What It Looks Like Inside | Best Uses |
|---|---|---|---|
| Runny | 5:00–5:30 | Set whites, liquid yolk | Toast, ramen, dipping |
| Soft | 6:00 | Fully set whites, flowing yolk | Breakfast bowls, salads |
| Jammy | 6:30–7:00 | Creamy, custardy yolk | Grain bowls, ramen eggs, avocado toast |
| Medium | 8:00–9:00 | Mostly set with a tender center | Nicoise salad, snack eggs |
| Hard (tender) | 10:30–11:30 | Fully set, not chalky | Deviled eggs, egg salad |
| Very firm | 12:00+ | Fully set, drier yolk | If you like it that way (no judgment) |
Important: Pots, stoves, and egg sizes vary. Use the chart as your baseline, then adjust by 15–30 seconds next time. Once you hit your personal “ideal,” write it down. Future-you will be grateful.
Method #2: Cold-Start + Covered-Off-Heat (Low Drama, Very Hands-Off)
This is the “set it up, then pretend you’re busy” method. You start eggs in cold water, bring it to a boil, then turn off the heat and let the eggs finish by steepingkind of like tea, except your tea is oval and has a shell.
Step-by-step
- Put eggs in a pot in a single layer.
- Cover with cold water by about 1 inch.
- Bring to a full boil over high heat.
- Turn off the heat, cover the pot, and start your timer.
- When time’s up, move eggs to an ice bath.
Steeping times (after turning heat off)
- 4–5 minutes: soft/runny
- 6–7 minutes: jammy
- 9–10 minutes: medium
- 12 minutes: hard but still tender
Why people love this method: fewer cracked eggs, less splashing, and the temperature change is gentler. Why some people don’t: it’s slightly less precise for very soft eggs, because “boil achieved” can vary by stove and pot thickness. If you’re chasing that exact jammy center for ramen eggs, Method #1 is your best friend.
Method #3: Steaming (The Secret Weapon for Easy Peeling)
Steaming eggs uses less water, heats them efficiently, and many cooks swear it improves peelability. It also scales nicely when you don’t want to wait for a huge pot of water to boil.
Step-by-step
- Add about 1 inch of water to a pot and bring it to a boil.
- Place eggs in a steamer basket/insert, cover, and keep at a steady steam.
- Steam based on your target texture (see below).
- Transfer eggs to an ice bath.
Steaming times (large eggs)
- 6 minutes: soft
- 7 minutes: jammy
- 12 minutes: hard
If your household is an “egg salad and deviled eggs” factory, steaming is worth trying at least once. It’s efficient, repeatable, and doesn’t require a swimming pool for your eggs.
The Ice Bath Rule (How to Lock in Your Ideal Texture)
The ice bath does three important jobs:
- Stops carryover cooking so your yolk doesn’t keep firming up.
- Helps the egg pull slightly away from the shell, making peeling less tragic.
- Cools eggs fast so they’re easier to handle (and safer to store).
For soft and jammy eggs: chill in ice water at least 2–3 minutes so they’re comfortable to peel but still warm inside. For hard eggs you plan to peel: chill 10–15 minutes so they’re fully cooled and shrink slightly away from the shell.
Peeling Without Tears (Or: How to Avoid Egg Craters)
Peeling is where boiled eggs go from “simple” to “why am I sweating.” Use these strategies to improve your odds:
Use slightly older eggs (yes, this matters)
Super-fresh eggs tend to cling to their shells more stubbornly. Eggs that have been in the fridge for about a week are often easier to peel because the air pocket inside grows slightly and helps separate the membranes.
Start at the wide end
The wider end usually has an air pocket. Crack there first, then slide a spoon or your thumb under the membrane. If you get under the membrane, peeling becomes weirdly satisfying instead of emotionally damaging.
Peel under running water
A thin stream of cool water can slip under the membrane and help lift shell pieces away cleanly. It also rinses off tiny shell shards so you’re not crunching your snack like it’s a tortilla chip.
Crack, roll, then peel
Tap the egg all over, then gently roll it on the counter to create a network of cracks. The goal is to loosen the shell evenly so it comes off in larger pieces.
Common Problems (And the Fixes That Actually Work)
“My eggs cracked in the pot.”
- Cause: Rough handling, rapid boiling, or eggs bouncing on the pot bottom.
- Fix: Lower eggs gently with a spoon and reduce heat to a simmer. Cold-start methods can also reduce shock.
- Bonus tip: If one egg cracks, don’t panic. It may look a little wild, but it’s usually still edible.
“My yolks have a green ring. Did I summon something?”
That greenish-gray ring is a harmless chemical reaction: sulfur from the egg white meets iron in the yolk when eggs are cooked too long or too hot. It’s not spoilage; it’s overcooking. The fix is simple: use gentler heat and cool the eggs quickly in an ice bath.
“The whites are rubbery.”
- Cause: High heat or overcooking.
- Fix: Aim for a gentle simmer, and use a timer you trust (not your “vibes”).
“The yolk is chalky.”
- Cause: Too much time, especially past the 12-minute zone.
- Fix: Pull earlier next batch, and always cool promptly.
“They’re impossible to peel.”
- Cause: Very fresh eggs, not cooled enough, or membrane stuck tight.
- Fix: Try slightly older eggs, ice-bath longer, peel under water, and start at the wide end.
- Try this once: Steaming can improve peelability for many kitchens.
High Altitude? Your Pot Is Not Broken
At higher elevations, water boils at a lower temperature. That means boiling water is literally less hot, so eggs can take longer to reach the same doneness. If you’re in the mountains and your “12-minute hard egg” is still soft, it’s not youit’s physics.
Start by adding 1–3 minutes to your usual timing (depending on altitude), or switch to steaming, which can be more consistent. The best approach is to run a quick “egg calibration” test once, then record your personal timing.
Egg Safety and Storage (Because Eggs Don’t Come with a User Manual)
Eggs are wholesome, but they’re still a perishable food. A few practical safety rules keep things simple:
- Refrigerate eggs promptly and keep your fridge at 40°F or below.
- Cook eggs to your risk comfort. If you’re serving kids, older adults, pregnant people, or anyone with a weakened immune system, fully set yolks are the safest bet.
- Hard-cooked eggs keep about a week in the fridge (in shell or peeled). Store peeled eggs in a covered container; if they seem dry, add a damp paper towel.
- Don’t leave cooked eggs out too long. If they sit at room temp for hours, it’s time to say goodbye.
How to Choose the Right Method for Your Life (Not Just Your Egg)
- Want perfect jammy eggs for ramen? Choose boiling-water start for clean timing.
- Want easy weeknight hard eggs? Choose cold-start + steep so you can multitask.
- Want better peeling and less water? Choose steaming.
Serving Ideas for Every Texture
Runny
Slice over buttered toast, add to a rice bowl with chili crisp, or float one in ramen and act like your kitchen is a tiny bistro.
Jammy
The “luxury egg.” Halve it over a salad, tuck it into a sandwich, or marinate it (soy, mirin, a little sugar) for that ramen-shop vibe without leaving your house.
Hard (tender)
Deviled eggs, egg salad, Cobb salads, snack boxes, road trips, picnic basketshard eggs are the Swiss Army knife of protein.
of Real-World Egg-Boiling Experiences (So You Don’t Have to Learn the Hard Way)
If you’ve boiled eggs more than, say, twice, you’ve probably lived through at least one of these classic egg eras. Think of them as small kitchen “experience points” you earn on the way to becoming someone who can boil an egg without checking three different blogs and texting a friend.
The Great Egg Crackening: You put cold eggs into aggressively boiling water like you’re launching tiny submarines. A few minutes later, you look over and see one egg has split open and is leaking wispy white ribbons into the pot. It’s not ruinedit’s just loud. Next time, lower eggs in with a spoon and reduce to a gentle simmer. Your eggs don’t need to audition for a washing machine commercial.
The “Jammy…Oops, It’s Hard Now” Moment: You aimed for that dreamy custardy yolk. You nailed the timing. Then you got distracted (someone called, your phone buzzed, your dog stared at you like you owe rent). You left the eggs on the counter. Without an ice bath, carryover heat keeps cooking the yolk, and your jammy center quietly graduates into “medium.” The fix is hilariously simple: ice bath first, life decisions second.
The Peel That Went Rogue: You crack the shell, start peeling, and suddenly the egg looks like it fought a lawnmower. Big craters. Shredded whites. You consider giving up and becoming a cereal person. This is usually a freshness and cooling issue: very fresh eggs cling tightly, and warm eggs tear. Try older eggs, chill longer, and peel under running water. Also: start at the wide end where the air pocket lives. That air pocket is basically your “easy mode” button.
The Green Ring Panic: You slice a hard egg and the yolk has a greenish edge. You stare at it like it’s about to ask for your Wi-Fi password. The ring is harmlessjust a reaction from cooking too long or too hot. The emotional lesson: eggs are dramatic. The practical lesson: gentler simmer + ice bath = prettier yolks.
The Batch-Cook Sunday Glow-Up: At some point, many people discover that boiling eggs in batches is a cheat code. A few eggs become grab-and-go breakfasts, salad upgrades, and “I’m hungry but I’m not trying to cook” solutions. The experience trick is storage: keep shells on if you can, label the container with a date, and treat peeled eggs like the sensitive souls they are (covered container, a little moisture so they don’t dry out).
The Altitude Plot Twist: You travel, move, or visit someone in the mountainsand suddenly your usual time is wrong. Your “hard-boiled” egg comes out soft, and you feel betrayed by your own skills. Nothing changed about you; the boiling point did. Add time, test one egg, and write down the new timing. Consider it your egg passport stamp.
The overarching experience: once you pick a method and lock in your personal timing, boiling eggs becomes easy in the boring, reliable, blissful way. And that’s the real flexmaking “simple” food actually simple.
Conclusion
Your ideal boiled egg isn’t a myth. It’s just a matter of choosing a method that fits your kitchen, timing it like you mean it, and finishing with an ice bath to stop the cooking exactly where you want it. Use the chart as your baseline, adjust in tiny increments, and you’ll get eggs that match your mood: runny, jammy, medium, or perfectly hardwithout the peeling heartbreak.


