Table of Contents >> Show >> Hide
- Start With a Coop Plan (Because “Wing It” Is a Bad Pun)
- Pick the Right Location (Your Future Self Will Thank You)
- Materials That Make a Coop Last (and Keep Predators Out)
- Step-by-Step: Building the Coop Structure
- Ventilation: The Make-or-Break Feature Most Coops Get Wrong
- Inside Layout: Roosts, Nesting Boxes, and the Art of Keeping Eggs Clean
- Predator-Proofing: Build Like Something Wants In (Because It Does)
- Make It Easy to Clean (Because Future You Deserves Nice Things)
- Comfort and Safety Extras (Worth It, Not Fluff)
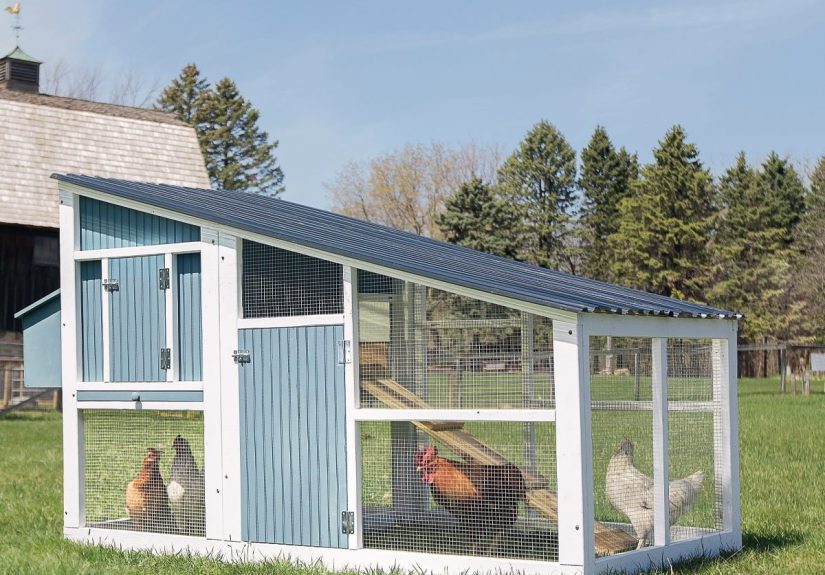
- Quick Build Example: A Simple 6-Hen Backyard Chicken Coop
- Common Mistakes (So You Can Laugh at Them From a Distance)
- Conclusion
- Real-World Coop-Building Experiences (So You Don’t Lose Your Mind)
- 1) The “I’ll clean it later” phase is a trap
- 2) Chickens will ignore your “rules” until you redesign the furniture
- 3) Predators don’t read your budget
- 4) Ventilation is not optional, even when it’s freezing
- 5) You will build it once… then immediately want to improve it
- 6) The best coop feature is the one that makes you check on them more
Building a chicken coop is basically like building a tiny house… except your tenants are feathered, dramatic,
and will review your work by loudly announcing it to the entire neighborhood at 6:03 a.m.
The good news: a well-built coop is not complicated. It’s a smart checklistspace, safety, ventilation,
and easy cleaningwrapped in wood and hardware cloth.
This guide walks you through planning, designing, and constructing a DIY chicken coop that’s predator-proof,
weather-ready, and actually pleasant to maintain (yes, that’s possible). Along the way, we’ll use practical
measurements for roosts, nesting boxes, and floor space, plus real-world build tips that save time, money,
and your sanity.
Start With a Coop Plan (Because “Wing It” Is a Bad Pun)
Before you buy lumber or start cutting, answer three questions:
How many chickens? What’s your climate? What predators live nearby?
Your answers determine coop size, ventilation strategy, and security level.
Right-size your coop and run
A common baseline for standard laying hens is 3–4 square feet per bird inside the coop and
roughly 10 square feet per bird in an outdoor run. More space is almost always better
less pecking drama, cleaner bedding, and fewer “why are you screaming?” moments.
Example: For 6 hens, aim for a coop around 24 sq ft (like 4’×6′) and a run around
60 sq ft (like 6’×10′). If your birds free-range daily, you can sometimes reduce run size,
but don’t skimp on the coop itselfbad weather happens, and chickens hate wet feet like cats hate baths.
Choose a coop style that matches your lifestyle
- Walk-in coop: easiest to clean and maintain; best if you have space.
- Raised coop: helps with drainage and deters some predators; adds shade space underneath.
- Tractor (mobile coop): great for pasture rotation; less ideal in predator-heavy areas unless reinforced.
- Attached run: convenient for contained backyard chickens; easier to predator-proof.
Pick the Right Location (Your Future Self Will Thank You)
Place your backyard chicken coop on high, well-drained ground where rainwater won’t pool.
Wet coops lead to odor, higher ammonia, and unhappy birds. Bonus points if the coop is reachable without
stepping into mud that tries to steal your boots.
Smart placement checklist
- Morning sun helps dry moisture and encourages laying.
- Afternoon shade reduces heat stress in hot climates.
- Wind exposure matters: you want airflow up high, not a draft at roost level.
- Convenience matters: close enough that you’ll actually check, clean, and collect eggs consistently.
Materials That Make a Coop Last (and Keep Predators Out)
Your coop’s “enemies” are moisture, rot, and burglars in fuzzy disguises. If raccoons had résumés,
they’d list “Experienced Locksmith” under skills. Build accordingly.
Recommended build materials
- Framing: 2×4 lumber for strength and easy fastening.
- Walls: exterior-grade plywood or siding; seal and paint for weather protection.
- Roofing: corrugated metal or shingles; include drip edge and overhang if possible.
- Fasteners: exterior screws (they resist loosening better than nails over time).
- Vent screening: hardware cloth (commonly 1/2″ or 1/4″), not chicken wire.
- Latches: predator-resistant (carabiners, barrel bolts, or latches raccoons can’t “solve”).
Hardware cloth vs. chicken wire (the important difference)
Chicken wire is for keeping chickens in, not for keeping predators out. Many predators can rip it,
bite through it, or reach through it. Hardware cloth is stronger and is widely recommended for coop and run security.
Step-by-Step: Building the Coop Structure
Step 1: Build a solid base (level beats perfect)
You have a few good options:
- Skids: pressure-treated runners on leveled gravelsimple and effective.
- Pavers or concrete perimeter: helps deter digging and improves drainage.
- Raised floor: keeps the coop drier and can reduce rodent interest (still secure the underside).
If you build on the ground, consider a dig-resistant strategy (more on predator-proofing below). If you raise the coop,
use sturdy bracing so it doesn’t wobble in wind or when you lean on it while cleaning.
Step 2: Frame the floor, walls, and roof
Frame like a small shed: floor joists, wall studs, then roof rafters. Add diagonal bracing if the structure feels “squishy.”
Chickens don’t care about squish, but your roof does.
Step 3: Add roofing with overhang and weather protection
A roof overhang helps keep rain off vents and walls. If you can, add a gutter or simple drip line to control water.
Water management is the unsexy hero of coop longevity.
Step 4: Install doors (human door + chicken pop door)
A full-size access door makes cleaning and inspections drastically easier. Add a separate pop door for chickens,
ideally with a secure latch (or an automatic door rated for outdoor use if you want extra convenience).
Ventilation: The Make-or-Break Feature Most Coops Get Wrong
Chickens generate moisture (their manure contains a lot of water), and moisture plus bedding can create ammonia.
Ventilation removes humid, stale air and brings in fresh airkey for flock health and odor control.
How to ventilate without turning your coop into a wind tunnel
- Place vents high (near the roofline) so warm, moist air can escape.
- Avoid direct drafts at roost height, especially in winter.
- Use screened openings covered with hardware cloth, not wide-open gaps.
- Balance intake and exhaust: one side can bring air in, the opposite side lets air out.
If you live in a cold-winter area, you still need ventilation. The goal is fresh air exchange while keeping roosting birds out of a draft.
Think “breathe,” not “blow-dry.”
Inside Layout: Roosts, Nesting Boxes, and the Art of Keeping Eggs Clean
Roosting bars (where chickens sleep and gossip)
Provide enough linear roost space so everyone can perch comfortably. Many guides recommend roughly
8–12 inches of roost space per standard bird (more for large breeds, less for bantams).
A simple 2×4 laid flat is a popular choice because it supports the foot well.
- Height: often around 18–24 inches above the floor works well for many backyard coops.
- Spacing: keep roosts far enough apart that birds aren’t stacked like pancakes.
- Cleaning hack: install a droppings board/tray under roosts to speed cleanup.
Nesting boxes (the VIP lounges)
A common standard is one nest box for every 4–5 hens. Typical box dimensions for many breeds are
about 12″×12″×12″. Place nesting boxes lower than the roosts so chickens don’t sleep in them
(sleeping in the nest box = poopy eggs = your new villain origin story).
- Add a small lip to hold bedding in place.
- Consider sloped tops to discourage roosting on the boxes.
- Use clean, dry nesting material and replace it regularly.
Flooring and bedding
Use absorbent bedding like pine shavings and keep it dry. Moisture control reduces odor and improves coop air quality.
Whatever bedding system you choose, plan for simple removal and refresh.
Predator-Proofing: Build Like Something Wants In (Because It Does)
A predator-proof chicken coop is not “extra.” It’s the difference between sleeping at night and waking up to a crime scene.
Design for raccoons, foxes, coyotes, weasels, rats, hawks, and neighborhood dogsdepending on where you live.
Non-negotiable predator-proof features
- Hardware cloth on windows, vents, and run walls (avoid chicken wire for security).
- Secure latches that can’t be opened by clever hands (raccoons have opinions about your latch choice).
- Reinforced corners and solid door framingno flexing gaps.
- Dig protection: bury hardware cloth or install a ground “apron” that extends outward from the run perimeter.
- Roofed run or overhead netting to reduce aerial predator risk.
If you use an apron, picture an underground “welcome mat” predators hit when they try to dig at the fence line.
It’s a simple method that can dramatically improve run security.
Make It Easy to Clean (Because Future You Deserves Nice Things)
The best DIY chicken coop is the one you’ll actually maintain. Cleaning doesn’t have to be miserableunless you design it that way.
Build for access and airflow, and your coop stays cleaner with less effort.
Low-stress cleaning upgrades
- Large access door or hinged wall panel.
- Droppings board under roosts (scrape daily/weekly).
- Smooth interior surfaces you can scrape and wipe.
- Removable nest box trays or easy-open nest access from outside.
- Feed and water setup that minimizes spills (wet bedding = stink accelerator).
Comfort and Safety Extras (Worth It, Not Fluff)
Weather-proofing
In hot climates, prioritize shade and ventilation. In cold climates, prioritize draft control at roost height while keeping vents open near the roofline.
Avoid “sealing it up tight”fresh air matters year-round.
Biosecurity basics for backyard flocks
Keep a clean coop and practice good hygiene when handling chickens and eggs. Wash hands after contact with birds or their environment,
and keep coop-only footwear or a simple “coop shoe” routine to avoid tracking germs into the house.
Quick Build Example: A Simple 6-Hen Backyard Chicken Coop
Here’s a practical blueprint-style summary you can adapt:
- Coop: 4’×6′ footprint (24 sq ft), 6’–7′ peak roof for headroom
- Run: 6’×10′ (60 sq ft), hardware cloth sides, roofed or covered
- Roosts: two 4′ roost bars (2×4 laid flat), about 18–24″ high, droppings board beneath
- Nesting boxes: two boxes at 12″×12″×12″ (1 per 4–5 hens guideline)
- Ventilation: two long, high vents under eaves (screened with hardware cloth)
- Security: carabiner-secured latches; apron around run perimeter
Common Mistakes (So You Can Laugh at Them From a Distance)
- Too small: cramped coops get smelly fast and increase stress behaviors.
- Bad ventilation: sealing everything “for winter” often backfires.
- Using chicken wire for protection: it’s not predator-proof.
- Roosts lower than nesting boxes: enjoy your new hobby: cleaning poop out of nest boxes.
- Hard-to-clean design: if it’s annoying, you’ll avoid itthen it gets worse.
Conclusion
A great chicken coop is a simple formula: enough space, strong predator protection,
smart ventilation, and easy cleaning access. Build those four things into your design,
and your coop will stay drier, cleaner, safer, and more comfortablemeaning healthier hens and better eggs.
Take the extra hour to install hardware cloth properly, choose secure latches, and plan your interior layout.
Your chickens will act like it was their idea all alongand honestly, that’s fine. Let them have this one.
Real-World Coop-Building Experiences (So You Don’t Lose Your Mind)
Even with the best chicken coop plans, the first build teaches lessons you can’t get from a sketch. Here are the
most common “wish I’d known that” experiences backyard keepers tend to shareserved with a side of humor,
because that’s how we cope (pun absolutely intended).
1) The “I’ll clean it later” phase is a trap
Most people start with heroic intentions: “I’ll do a deep clean every weekend!” Then real life shows up and
steals your Saturday. The experience many keepers report is that design beats motivation.
A coop that’s easy to access gets cleaned more often. A coop that requires yoga poses and a headlamp…
becomes a science experiment with feathers.
If you’re adding one “luxury” feature, make it a big clean-out door, a droppings board under roosts, or a layout
that lets you rake bedding without scraping your knuckles. Those small decisions turn maintenance from “ugh”
into “five minutes and done.”
2) Chickens will ignore your “rules” until you redesign the furniture
You’ll place a beautiful set of nesting boxes and imagine perfect eggs in perfect straw. Then your hens will all
lay in the same box like it’s a trendy brunch spot. Or they’ll sleep in the nest boxes because they’re cozy and
apparently your roosts didn’t pass the vibe check.
The common fix experience: raise roosts higher than nests, make nest boxes slightly dimmer/private, and block
nests at night if needed until they learn. Once the interior “hierarchy” makes sense to them, they usually settle
into a routinesometimes after a dramatic protest.
3) Predators don’t read your budget
First-time builders often underestimate how persistent predators can be. A raccoon can work latches, a fox can
dig, and small predators can squeeze through shockingly tiny gaps. The real-world lesson here is that
predator-proofing isn’t an upgradeit’s the base model.
People who’ve been through a scare often say the same things: hardware cloth everywhere it matters, secure
latches that require opposable thumbs (or a carabiner), and dig protection around the run. It’s cheaper to build
it right than to rebuild after something tests your defenses at 2 a.m.
4) Ventilation is not optional, even when it’s freezing
Many beginners try to “winterize” by sealing every crackthen wonder why the coop smells sharp or why bedding
stays damp. The experience many cold-climate keepers share is that chickens tolerate cold better than they
tolerate damp, stale air. The goal is airflow up high, with minimal draft where they sleep.
A practical approach is adjustable vents near the roofline: open year-round, with the ability to reduce direct
wind entry during storms. The difference is noticeable: drier bedding, fewer odors, and generally calmer birds.
(Calmer is relative. Chickens still have opinions.)
5) You will build it once… then immediately want to improve it
This is the secret hobby inside the hobby. Many people finish their DIY chicken coop, admire it, and then
realize they want:
a better egg door, a bigger run, a rain skirt, a feed bin, wheels, solar lights, a tiny porch swing
okay maybe not the porch swing, but give it time.
The most helpful experience-based advice is to design with future tweaks in mind. Use screws instead of nails.
Leave a wall section you can convert into another access panel. Build the run so you can extend it. Your coop
will evolve as you learn what your flock and your schedule actually need.
6) The best coop feature is the one that makes you check on them more
A surprising “experience” pattern is that convenience increases care. If collecting eggs is easy, you do it more
often, and eggs stay cleaner. If water is easy to refill, you notice problems sooner. If you can see into the coop
quickly, you catch issues earlylike mites, damp bedding, or the hen who decided sleeping in the feeder was a
lifestyle choice.
In other words: build the coop that makes you present. Chickens are low-maintenance compared to many pets,
but they do best when their humans show up consistently. Also, showing up regularly is how you earn the right
to brag about your “farm-fresh eggs,” even if your farm is technically a suburban backyard.


