Table of Contents >> Show >> Hide
- Why an Ammunition Crate Makes a Great Ottoman Coffee Table
- Tools and Materials You Will Need
- Step 1: Choose the Right Ammunition Crate
- Step 2: Clean and Prep the Crate
- Step 3: Reinforce the Box
- Step 4: Build or Upgrade the Ottoman Lid
- Step 5: Cut the Foam
- Step 6: Wrap the Lid With Batting
- Step 7: Upholster the Lid
- Step 8: Finish the Crate Exterior
- Step 9: Add Legs or Casters
- Step 10: Attach the Upholstered Lid
- Design Ideas for Your Ammo Crate Ottoman
- Common Mistakes to Avoid
- How to Style and Use the Finished Ottoman
- Real DIY Experience: What This Project Feels Like From Start to Finish
- Conclusion
- SEO Tags
Some furniture whispers. Some furniture shouts. And then there is the ammunition crate coffee table ottoman: it rolls into the room wearing boots, carrying history, and somehow still offering a soft place to kick up your feet. If you love rustic industrial decor, hidden storage, military surplus style, and practical DIY furniture, this project checks every boxpreferably a very sturdy wooden one.
This guide explains how to build a coffee table ottoman out of an ammunition crate using an empty wooden ammo crate, foam, batting, fabric or faux leather, hinges, legs or casters, and basic tools. The goal is simple: turn a rugged storage box into a comfortable, useful, conversation-starting centerpiece for your living room.
Before we pick up the drill, here is the non-negotiable safety note: use only an empty, clean ammunition crate. Do not use a crate that contains ammunition, explosive materials, powder residue, suspicious contents, chemical odor, leaking material, or unidentified military components. If anything about the crate seems questionable, stop and contact local authorities or a proper disposal service. This is a furniture project, not a “what could possibly go wrong?” documentary.
Why an Ammunition Crate Makes a Great Ottoman Coffee Table
A wooden ammunition crate is already built with many features furniture makers appreciate: strong sides, reinforced corners, useful storage space, interesting markings, metal hardware, and a tough rectangular shape. That means you are not starting from scratch. You are starting from “slightly intimidating storage box with excellent potential.”
As a coffee table ottoman, the crate can do several jobs at once. It can hold blankets, magazines, board games, remote controls, pet toys, seasonal decor, or the mysterious collection of charging cables every household somehow owns. With a padded upholstered lid, it also becomes a footrest, casual seating, or a soft landing zone for tired legs after a long day.
The finished look works especially well with farmhouse, rustic, industrial, cabin, masculine, vintage, military-inspired, or eclectic interiors. Pair it with leather seating, a plaid throw, black metal accents, or reclaimed wood shelves, and it looks intentionalnot like you dragged a crate inside and hoped guests would call it “design.”
Tools and Materials You Will Need
Materials
- One empty wooden ammunition crate or military surplus crate
- 3/4-inch plywood for the padded lid, if the original lid is not flat or strong enough
- 2-inch to 4-inch high-density upholstery foam
- Quilt batting or upholstery batting
- Durable upholstery fabric, canvas, denim, faux leather, or real leather
- Spray adhesive suitable for foam
- Heavy-duty staples, usually 3/8-inch to 1/2-inch
- Continuous piano hinge or strong butt hinges
- Soft-close lid support or toy-box-style lid support
- Wood screws
- Furniture legs, bun feet, or locking casters
- Mounting plates or corner blocks for legs
- Wood filler, sandpaper, primer, stain, paint, or clear topcoat
- Optional: decorative nailhead trim, handles, rope pulls, or metal corner brackets
Tools
- Tape measure
- Pencil
- Drill and driver bits
- Staple gun
- Scissors or fabric shears
- Utility knife or electric carving knife for foam
- Orbital sander or sanding block
- Screwdriver
- Clamps
- Safety glasses, gloves, and a respirator or dust mask
Step 1: Choose the Right Ammunition Crate
The best crate for this DIY coffee table ottoman is wooden, rectangular, structurally sound, and large enough to serve as a living room centerpiece. A practical size is usually somewhere around 30 to 42 inches long, 16 to 24 inches wide, and 14 to 20 inches tall before adding legs or casters. Smaller crates can work beside a chair, but for a coffee table, you want enough surface area to look balanced in front of a sofa.
Inspect the crate carefully. Look for cracked boards, loose fasteners, splintered edges, water damage, mold, strange smells, active rust, or questionable residue. Vintage is charming. Musty and mysterious is not charming. If the crate feels weak when you press on the sides or lid, reinforce it before moving forward.
If the crate has original markings, decide whether you want to preserve them. Military stenciling can add personality, but avoid sanding aggressively over painted markings unless you know the finish is safe. Older paint may contain lead, so treat old finishes with caution. When in doubt, test first or seal the surface rather than sanding it heavily.
Step 2: Clean and Prep the Crate
Remove dust, cobwebs, loose dirt, and hardware grime. Use a vacuum with a brush attachment, then wipe the crate with a damp cloth and mild soap. Do not soak the wood. Ammunition crates were built tough, but that does not mean they want a spa day in a bucket of water.
Let the crate dry completely. Then lightly sand rough areas, splinters, sharp edges, and uneven surfaces. Focus on places people will touch: top edges, corners, handle areas, and the lid. If the crate has old paint or unknown coatings, avoid dry sanding until you have confirmed it is safe. For questionable finishes, use a lead test kit or consult a professional.
After sanding, remove all dust with a vacuum and tack cloth. This step matters because paint, stain, and sealers do not bond well to dusty wood. Dust is basically glitter’s boring cousin: once it spreads, it ruins everything.
Step 3: Reinforce the Box
An ammo crate may be strong, but furniture needs to handle different stress than storage. People may lean on it, sit on it, push it with their feet, or drag it across a rug during movie night. Reinforcement keeps the project safe and sturdy.
Add corner blocks inside the crate using wood glue and screws. If the bottom feels thin, install a plywood panel inside the base. If you plan to add legs, reinforce each leg location with a wood block or mounting plate. This gives screws more material to bite into and prevents wobble.
Check the crate for square by measuring diagonally from corner to corner. If both diagonal measurements are equal, the box is square. If not, clamp it gently into shape before reinforcing. A slightly imperfect vintage crate is fine; a rocking, twisting ottoman is less fine.
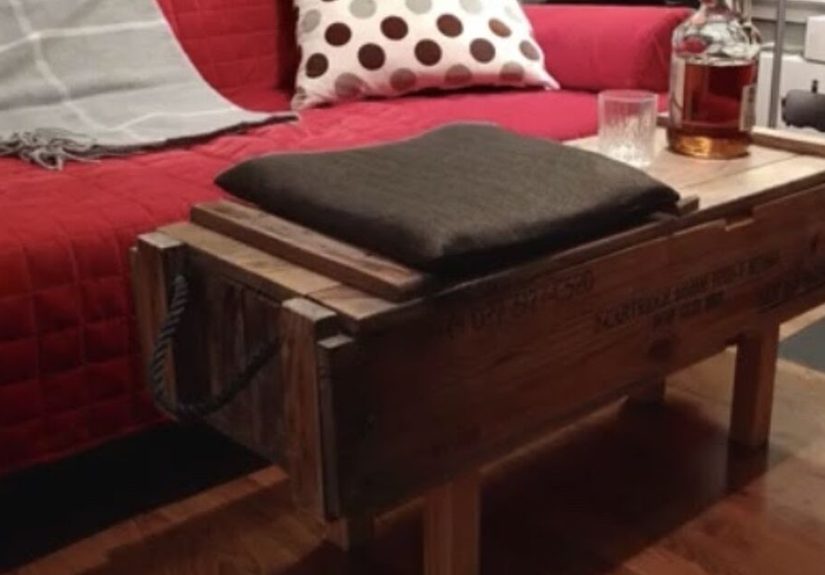
Step 4: Build or Upgrade the Ottoman Lid
The lid is where the crate becomes an ottoman instead of just a box with ambition. If the original crate lid is flat, strong, and hinged well, you may be able to upholster it directly. If it is warped, thin, uneven, or covered with hardware that makes padding difficult, cut a new lid from 3/4-inch plywood.
Measure the outside dimensions of the crate top. Cut the plywood lid to match the crate or allow a slight overhang of about 1/2 inch on each side for a softer upholstered profile. Sand the plywood edges smooth so they do not cut into the batting or fabric.
If you want the lid to open for storage, attach it with a continuous piano hinge along the back edge. A soft-close lid support is strongly recommended, especially if children may use the room. A heavy wooden lid can slam shut quickly, and nobody wants their DIY ottoman to develop villain energy.
Step 5: Cut the Foam
Place the plywood lid on top of the upholstery foam and trace the shape with a marker. Cut the foam using a long utility knife, serrated knife, or electric carving knife. An electric carving knife gives a surprisingly clean cut, which is why many DIYers secretly love it even if they pretend they bought it for Thanksgiving.
For a coffee table ottoman, 2-inch foam gives a tailored, firm look. Three-inch or 4-inch foam feels more plush and lounge-worthy. High-density foam is best because it holds its shape and does not collapse quickly. If you want a softer rounded edge, trim the top foam corners slightly before adding batting.
Attach the foam to the plywood lid with spray adhesive. Spray lightly and evenly according to the adhesive directions, then press the foam into place. Let it tack up before wrapping the batting.
Step 6: Wrap the Lid With Batting
Batting smooths the edges of the foam and gives the ottoman that soft, professional cushion shape. Cut the batting large enough to cover the foam, wrap around the sides, and extend several inches underneath the plywood.
Lay the batting flat, place the foam-covered lid upside down on top, and pull one side over the edge. Staple it to the underside of the plywood. Move to the opposite side, pull snugly, and staple again. Then repeat with the remaining sides. Work from the center outward, alternating sides to keep the tension even.
At the corners, fold the batting neatly like wrapping a present. Trim excess bulk if needed. The goal is smooth, rounded cornersnot a lumpy situation that looks like the ottoman is hiding snacks in its cheeks.
Step 7: Upholster the Lid
Choose a fabric that can handle real life. Upholstery-weight fabric, canvas, outdoor fabric, denim, faux leather, and leather are all good options. Thin cotton can work for decorative projects, but a coffee table ottoman gets feet, trays, pets, kids, crumbs, and the occasional “I swear I used a coaster” moment.
Cut the fabric several inches larger than the padded lid on every side. If your fabric has a pattern, center it carefully before stapling. Turn the lid upside down over the wrong side of the fabric. Pull one long side tight and staple at the center. Move to the opposite side, pull tight, and staple. Continue around the lid, always working from the center toward the corners.
For clean corners, fold the fabric into small pleats and keep the visible side smooth. Faux leather and thick fabric may need extra trimming at the underside to reduce bulk. Once everything looks neat, add more staples every inch or two. Trim extra fabric, but leave enough so the staples remain secure.
Step 8: Finish the Crate Exterior
Now decide on the look. You can preserve the original wood and seal it with a clear matte topcoat. You can stain it darker for a richer vintage feel. You can paint it black, olive drab, navy, charcoal, cream, or deep brown. Or you can lightly distress the edges after painting for a rugged, aged finish.
If painting, clean the surface, lightly sand glossy areas, prime if needed, then apply thin coats. Thin coats are better than one thick coat, because thick paint tends to drip, gum up details, and announce to the world that patience left the building. If staining, condition blotchy woods first, apply stain evenly, wipe off excess, and protect the finish with polyurethane or furniture wax.
Keep metal hardware visible if it adds character. Handles, latches, hinges, and corner brackets can make the finished piece look authentic. If the hardware is rusty, clean it with a wire brush and seal it, or replace it with vintage-style hardware.
Step 9: Add Legs or Casters
Legs elevate the crate and make it feel more like furniture. Bun feet create a classic storage ottoman shape. Tapered wood legs make it mid-century rustic. Black metal legs lean industrial. Locking casters make the ottoman easy to move, especially if the crate is heavy.
Turn the crate upside down and mark the leg positions. Place legs near the corners, but not so close that screws split the wood. Install mounting plates or corner blocks first, then attach the legs. If using casters, choose locking casters so the ottoman does not roll away dramatically when someone puts their feet on it.
After installing the legs, flip the crate upright and test for wobble. If one leg sits slightly high, add a felt pad or adjustable leveler. This tiny detail makes the piece feel finished instead of homemade in the “it rocks like a restaurant table” way.
Step 10: Attach the Upholstered Lid
Set the upholstered lid on the crate and align it carefully. Mark the hinge placement along the back. Drill pilot holes before installing screws; pilot holes reduce splitting and make the hardware easier to position accurately.
Attach the hinge to the lid first, then to the crate. Open and close the lid slowly to check clearance. If the fabric rubs, shift the lid slightly or use a spacer. Install the lid support according to the hardware instructions so the top stays open safely when you access storage.
Finally, test the ottoman. Open it, close it, sit gently, rest your feet, and place a tray on top. If the lid flexes, reinforce it. If the crate shifts, tighten the legs. If it looks fantastic, take a victory lap around the living room. You have earned it.
Design Ideas for Your Ammo Crate Ottoman
Rustic Leather Look
Use brown faux leather or real leather, dark stain, and black metal casters. This style pairs beautifully with a leather sofa, wool rug, and warm Edison-bulb lighting.
Farmhouse Military Vintage
Keep the original crate markings, seal the wood with a matte clear coat, and use cream canvas or ticking stripe fabric on the lid. Add short bun feet for a softer farmhouse feel.
Industrial Loft Style
Paint the crate charcoal or black, use gray upholstery fabric, and add metal hairpin legs. This version looks clean, modern, and slightly tougher than your average coffee table.
Cabin Weekend Style
Choose plaid wool-look fabric, warm stain, and chunky wood feet. Add a tray on top for mugs, books, and snacks. Suddenly the ottoman looks ready for a fireplace and a snowstorm.
Common Mistakes to Avoid
Using an unsafe crate: Never work with a crate that contains ammunition, explosive residue, unknown powder, or hazardous material. Only use a clean, empty crate.
Skipping reinforcement: A crate may look tough, but furniture gets daily pressure. Reinforce the base, corners, and leg attachment points.
Choosing thin fabric: Lightweight fabric may tear, stretch, or stain quickly. Upholstery fabric is worth the upgrade.
Forgetting lid safety: A heavy lid needs a support hinge or soft-close mechanism. This is especially important in homes with children.
Over-sanding old paint: Vintage paint can be risky. Test first, use protective equipment, and avoid creating unnecessary dust.
How to Style and Use the Finished Ottoman
Because the top is padded, use a tray when serving drinks or snacks. A wooden, metal, or woven tray gives you a flat surface for coffee mugs, candles, books, and remote controls. Without a tray, a coffee cup on foam becomes a tiny balancing act no one asked for.
Inside the crate, use small baskets or fabric bins to organize items. One bin can hold remotes and chargers, another can hold blankets, and another can hold games. This keeps the storage useful instead of becoming the living room version of a junk drawer.
For seasonal decorating, switch the tray display. In fall, use a candle, small pumpkin, and warm throw. In winter, add greenery and brass accents. In summer, keep it simple with a plant, coasters, and a stack of books. The crate brings the character; you just add the accessories.
Real DIY Experience: What This Project Feels Like From Start to Finish
Building a coffee table ottoman out of an ammunition crate is one of those DIY projects that feels easy in your head and slightly more dramatic on your garage floor. The first surprise is the weight. A real wooden ammo crate can be heavier than expected, especially if it has thick boards, metal hardware, or reinforced corners. That weight is good for stability, but it also means you should plan your workspace before you start. Dragging it around after every step gets old fast.
The second surprise is how much personality the crate already has. Scratches, dents, faded lettering, old handles, and uneven boards can make the piece feel authentic. At first, you may be tempted to sand everything perfectly smooth. But once you step back, you realize the imperfections are the whole point. A brand-new box can look like a prop. A weathered crate looks like it has stories, even if the only story you know is “I bought it from a surplus seller and almost dropped it on my foot.”
The upholstery stage is usually the most satisfying part. The moment foam and fabric go onto the lid, the project changes from rough storage box to actual furniture. Pulling the fabric tight takes patience. Start in the middle, alternate sides, and do not rush the corners. Corners are where beginner upholstery projects reveal all secrets. A neat fold can make the lid look custom; a bulky fold can make it look like the ottoman is wearing a wrinkled jacket.
Another practical lesson is to test hardware placement before committing. Hinges, lid supports, legs, and casters all affect how the ottoman works. A hinge placed too low may cause the lid to bind. Legs installed too close to the edge may split old wood. Casters without locks can make the ottoman mobile in the worst way. Dry-fit everything first, mark pilot holes, and open and close the lid several times before calling it done.
The best part comes when the ottoman lands in the living room. It does not look like something bought flat-packed and assembled with a tiny mystery wrench. It looks personal. It looks useful. It has storage, texture, history, and comfort. Guests will ask where you found it, and you get to say, with casual confidence, “I made it.” Try not to say it too smugly. Actually, say it a little smugly. You built furniture out of an ammunition crate. That deserves at least a small victory grin.
Conclusion
A DIY ammunition crate coffee table ottoman is a smart way to combine storage, seating, rustic decor, and upcycled character in one project. With a clean empty crate, a reinforced base, a padded upholstered lid, safe hinges, and a durable finish, you can create a piece that feels both rugged and comfortable. It is practical enough for everyday use and interesting enough to become the object everyone asks about when they walk into the room.
The key is balance. Preserve the crate’s original charm, but make it safe and functional. Keep the vintage details, but smooth sharp edges. Use tough materials, but add enough padding for comfort. Install sturdy hardware, but do not overcomplicate the design. When done well, this project turns surplus storage into a living room centerpiece with attitude, usefulness, and a surprisingly cozy top.
SEO Tags
Note: This project is intended only for clean, empty wooden ammunition crates used as decorative storage furniture. Do not cut, drill, sand, or repurpose any crate that contains ammunition, explosives, unknown residue, chemical odor, or hazardous material.


