Table of Contents >> Show >> Hide
- What You’re Actually Cleaning (and Why It Matters)
- Before You Start: Safety + Quick Reality Check
- How to Clean out a Sump Pit: 10 Steps
- Step 1: Unplug the Pump and Confirm It’s Truly Off
- Step 2: Remove the Sump Pit Cover and Take a “Before” Look
- Step 3: Disconnect the Discharge Pipe (If You Need to Remove the Pump)
- Step 4: Lift the Pump Out Carefully (No Cord-Yanking)
- Step 5: Remove Debris from the Basin (Big Stuff First)
- Step 6: Vacuum or Scoop Out the Sludge Layer
- Step 7: Scrub the Basin Walls and Bottom with Soap and Water
- Step 8: Clean the Pump Intake Screen and Check the Float Switch
- Step 9: Optional Disinfecting and Odor Control (Do It Safely)
- Step 10: Reinstall the Pump, Secure the Cover, and Test the System
- How Often Should You Clean a Sump Pit?
- Common Mistakes (a.k.a. “Basement Lore”)
- When to Call a Pro
- Bonus: Quick Maintenance Checklist (5 Minutes, Big Payoff)
- Real-World Lessons From the Sump Pit (Experience-Based Tips)
- 1) The Float Switch Is a Drama Queen (Treat It Gently)
- 2) Gravel Is the Sneakiest Villain in Your Basement
- 3) If It Smells Like a Swamp, Don’t Mask ItClean It
- 4) The Discharge Line Is Part of the System (Even if It Lives Outside)
- 5) Don’t Let Cleaning Day Become “Chemical Experiment Day”
- 6) Backups Aren’t Overkill If You’ve Ever Had a Flood Scare
- 7) The Best Time to Clean Is Not During the Storm (Shocking, I Know)
- Conclusion
Your sump pit is basically your basement’s bouncer: it stands by the door, keeps unwanted water from getting in, and
only causes drama when you ignore it for too long. If your sump pit is full of mud, gravel, mystery smells, and
“wait… is that a LEGO?”your sump pump has to work harder, clog more easily, and may fail right when you need it most
(which is always during the storm that knocks out power and optimism).
This guide walks you through how to clean out a sump pit in 10 straightforward steps, with practical
tips, safety notes, and a few laughsbecause if you can’t laugh at a bucket of sludge, what can you laugh at?
What You’re Actually Cleaning (and Why It Matters)
A sump pit (also called a sump basin or sump crock) is a below-floor reservoir that collects groundwater from drain
tile or the surrounding soil. When the water rises, the sump pump’s float switch triggers the pump to push water out
through a discharge pipe away from your foundation.
Over time, sediment settles in the bottom, debris falls in, and gunk coats the basin walls. That buildup can:
- Clog the pump intake screen or jam the impeller
- Trap odors and encourage mold/mildew
- Interfere with the float switch, causing short-cycling or failure to turn on/off
- Stress the motor and shorten the pump’s lifespan
Before You Start: Safety + Quick Reality Check
Cleaning a sump pit is usually DIY-friendly, but it’s not a “hold my coffee” kind of job. You’ll be working near
water, electricity, and bacteria. Take these seriously:
- Kill the power: Unplug the pump and consider flipping the breaker too.
- Ventilate: Open a window or run a fanbasement air plus cleaning products is… a vibe.
- Wear PPE: Gloves, eye protection, and an old outfit you won’t emotionally miss.
-
Know your pit type: If this is a sewage ejector pit (handles wastewater), stop and call a pro. That’s
not a “Saturday project,” that’s a “hazmat-adjacent event.”
Tools & Supplies
Grab everything first so you’re not sprinting upstairs mid-sludge:
- Rubber gloves + safety glasses
- Flashlight or headlamp
- Wet/dry shop vacuum (ideal) or a small bucket + scoop
- Stiff nylon brush (a.k.a. your new best friend)
- Old towels/rags
- Mild dish soap
- Optional: disinfectant (follow label directions) or a diluted bleach solution if appropriate
- Optional: zip ties or a clamp (if the discharge connection needs tightening)
How to Clean out a Sump Pit: 10 Steps
Step 1: Unplug the Pump and Confirm It’s Truly Off
Start with the boring-but-life-saving step: disconnect power. Unplug the sump pump, and if you want extra peace of
mind, switch off the circuit at the breaker panel. Do a quick tug test to confirm the cord is free and not
precariously draped into the pit like a villain’s trap.
Pro tip
If your pump is hardwired (no plug), don’t improviseturn off the breaker and consider having an electrician add a
proper disconnect if the setup is sketchy.
Step 2: Remove the Sump Pit Cover and Take a “Before” Look
Lift off the lid or cover. Use a flashlight to inspect the basin: look for rocks, sand, mulch, small toys, and
anything that screams “gravity did its thing.” Check for slimy buildup on the walls and note the water level.
Why this matters
A quick inspection helps you spot issues earlylike a stuck float switch, a loose discharge pipe, corrosion, or
evidence that debris is constantly falling in (which usually means the cover isn’t sealing well).
Step 3: Disconnect the Discharge Pipe (If You Need to Remove the Pump)
For a true deep clean, you’ll usually pull the pump out of the pit. That means loosening the discharge connection at
the pump. Some setups use a union fitting (bless whoever installed that), while others use clamps.
Pro tip
Keep a towel or small container handysome water may spill from the pipe. If the connection is stubborn, don’t Hulk it.
Gentle persuasion beats cracked PVC every time.
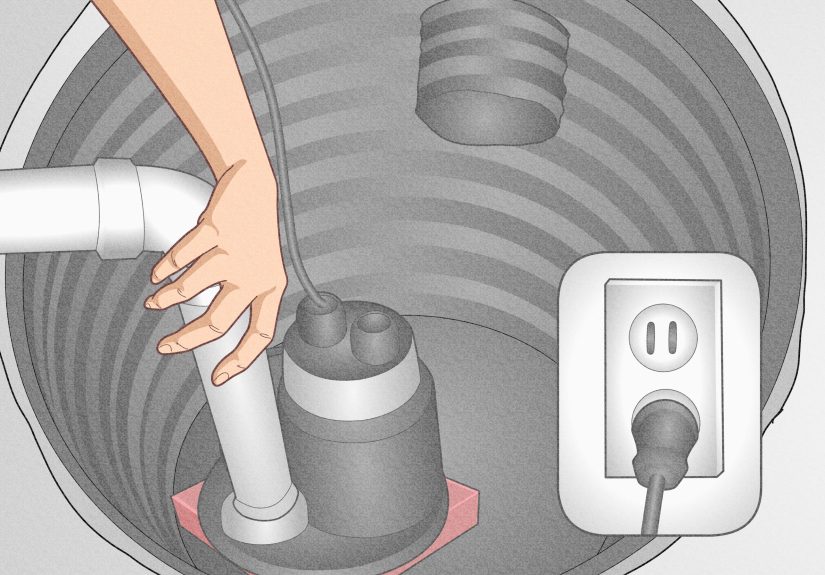
Step 4: Lift the Pump Out Carefully (No Cord-Yanking)
Pull the pump straight up by the handlenot the power cord, not the float, not your dreams. Set it in a large plastic
bin or on a tarp, because it will drip. It will also smell. This is normal. Regrettable, but normal.
What to look for
- Cracked housing, corrosion, or damaged wires
- A clogged intake screen
- Float switch movement (it should move freely)
Step 5: Remove Debris from the Basin (Big Stuff First)
Scoop out rocks, sticks, silt clumps, and any large debris by hand (gloves on!) or with a small scoop. If the pit is
nasty, a wet/dry shop vac is a game changerespecially for gravel and sludge.
Common debris culprits
- Construction grit (sand, concrete dust, tile bits)
- Yard debris tracked in through drains
- General basement “stuff” that migrates like it pays rent
Step 6: Vacuum or Scoop Out the Sludge Layer
Most sump pits develop a “basement smoothie” at the bottom: fine sediment mixed with organic gunk. Remove as much as
possible. If you use a shop vac, empty it outsidedo not pour sump sludge into a utility sink unless you love clogged
plumbing and regret.
Pro tip
If the sludge is thick, add a little clean water to loosen it first, then vacuum again. Think of it as pre-soaking a
dish… except the dish is your basement and the food is despair.
Step 7: Scrub the Basin Walls and Bottom with Soap and Water
Mix mild dish soap with warm water and scrub the basin walls, corners, and the bottom. Focus on buildup lines and
slimy areas. Rinse with a small amount of clean water, then vacuum or scoop the dirty rinse water back out.
Why not just blast it with harsh chemicals?
Because many pumps and basin components don’t need harsh cleaners, and some chemicals can damage plastics or seals. In
most cases, good old scrubbing does the heavy lifting.
Step 8: Clean the Pump Intake Screen and Check the Float Switch
Now clean the pump itself. Rinse the exterior and scrub the intake screen/inlet openings with a brush. If your pump
has a removable screen, follow the manufacturer’s guidance. Make sure the float switch (or vertical float) moves
freely and isn’t snagging on the pump body.
Quick diagnostic moment
- If the float sticks: reposition the pump, tidy cords, and remove any obstructions.
- If the screen is caked: that’s a clue your basin needs more frequent cleaning.
- If you see heavy corrosion: consider replacement planning before it fails mid-storm.
Step 9: Optional Disinfecting and Odor Control (Do It Safely)
If odors or mold are a concern, you can disinfect after the physical cleaning is done. Choose one
approach and follow product directions carefully. If using bleach, dilute properly and ventilate the area.
Never mix bleach with vinegar, ammonia, or other cleaners.
Safer, simpler option
For many homes, thorough scrubbing plus fresh water rinse is enough. If you do disinfect, keep it minimal and avoid
overdoing itespecially if you have a septic system or sensitive plumbing considerations.
Step 10: Reinstall the Pump, Secure the Cover, and Test the System
Put the pump back into the pit, reconnect the discharge pipe, and make sure the check valve (if present) is oriented
correctly. Reinstall the lid/cover. A good cover helps keep debris out and can reduce humidity and odor.
Test it like you mean it
Plug the pump back in (or turn the breaker on), then pour water into the pit until the float triggers the pump. Watch
the cycle:
- It should start smoothly, pump water out, and shut off cleanly.
- Listen for odd noises (grinding, rattling, or repeated short-cycling).
- Check for leaks at the discharge connection.
How Often Should You Clean a Sump Pit?
Most homeowners do a deep clean about once a year, with quicker checkups more often if the pump runs frequently or if
the basement is dusty. At minimum, plan to test your pump once or twice a yearespecially before seasons with heavy
rain, snowmelt, or storms.
Signs it’s time to clean sooner
- Musty odor around the sump basin
- Pump runs frequently or sounds strained
- Visible sediment buildup or debris in the pit
- Float switch looks stuck or the pump cycles oddly
Common Mistakes (a.k.a. “Basement Lore”)
- Cleaning while plugged in: hard pass. Electricity and water don’t need couples therapy; they need separation.
- Yanking the pump by the cord: cords are not handles, no matter how handle-shaped they look.
- Leaving the cover off long-term: debris falls in, humidity rises, and odors throw a party.
- Mixing cleaners: especially bleach with acids/ammoniadangerous fumes are not a “deep clean.”
- Ignoring the discharge line: a clean pit won’t help if the discharge is clogged or backflowing.
When to Call a Pro
DIY is greatuntil it isn’t. Consider a professional if:
- Your pit is tied to sewage (ejector pump system)
- You see electrical damage, repeated tripping, or burning smells
- The pump is loud, won’t shut off, or won’t turn on even after cleaning
- You suspect discharge line issues underground or significant backflow
- You want an annual inspection or upgrades like a battery backup system
Bonus: Quick Maintenance Checklist (5 Minutes, Big Payoff)
- Peek in the pit: remove visible debris
- Confirm the float moves freely
- Check the cover: seated properly, grommets intact if applicable
- Listen during a cycle test: unusual sounds = investigate
- Make sure water discharges well away from the foundation
Real-World Lessons From the Sump Pit (Experience-Based Tips)
The most useful sump pit advice usually isn’t the fancy stuffit’s the “learned it the hard way” stuff. Here are
experience-based lessons homeowners and maintenance pros commonly share, collected into one place so you don’t have to
discover them during a thunderstorm with a flashlight in your mouth.
1) The Float Switch Is a Drama Queen (Treat It Gently)
Many sump pump “failures” aren’t motor failures at allthey’re float switch problems. A tiny pebble, a loop of slack
in the power cord, or the pump sitting slightly crooked can stop the float from rising properly. People clean the pit,
put everything back, and accidentally pin the float against the basin wall. The pump then either never turns on (bad)
or never turns off (also bad, but louder). The fix is usually simple: reposition the pump, manage cords neatly, and
confirm the float travels freely before you close the lid.
2) Gravel Is the Sneakiest Villain in Your Basement
Gravel and sand are like glitter: once they’re in, they’re never really out. Some pits accumulate grit from drain tile
systems or construction dust. Homeowners often think, “It’s fine, it’s just a little sediment,” until that sediment
clogs the intake screen, jams the impeller, or makes the pump sound like it’s chewing cereal. A wet/dry shop vac is the
MVP here. The “experience tip” is to vacuum the pit more often than you think you need toespecially after basement
renovations or any time you’ve been cutting concrete, tile, or drywall nearby.
3) If It Smells Like a Swamp, Don’t Mask ItClean It
Deodorizers and “fresh scent” tablets can make a basement smell like a swamp wearing cologne. The better approach is
physical cleaning first: remove sludge, scrub walls, rinse, and vacuum out the dirty water. Odors typically come from
organic buildup and standing water residue. Once the pit is genuinely clean, a properly seated cover helps keep new
smells from forming by reducing open-air humidity and limiting debris entry.
4) The Discharge Line Is Part of the System (Even if It Lives Outside)
Homeowners sometimes clean the pit and still get poor performance because the discharge line is partially clogged,
frozen, or positioned poorly. The “real life” clue is this: the pump sounds like it’s running, but the water level
barely dropsor it drops and then rises again quickly. That can indicate backflow, a check valve issue, or discharge
trouble. Experience-based best practice: during your test cycle, actually go outside and confirm water is exiting where
it should, and that it’s directed away from the foundation.
5) Don’t Let Cleaning Day Become “Chemical Experiment Day”
In the enthusiasm of “I’m finally cleaning this,” some folks combine productsespecially bleach plus something acidic
like vinegarbecause it feels extra productive. It’s not. It’s dangerous. Seasoned cleaners follow a simple rule:
one cleaner at a time, plenty of ventilation, and rinse between steps. Most of the time, soap, water,
and scrubbing are enough for a sump pit. Disinfect only if you truly need it, and always follow directions.
6) Backups Aren’t Overkill If You’ve Ever Had a Flood Scare
People tend to consider battery backups right after an outagebecause that’s when they learn the sump pump is powerless
without power. Anyone who’s lived through “the pump died during the storm” typically becomes a backup-system
enthusiast overnight. Experience suggests that if your area gets frequent storms, or if your basement is finished (or
full of irreplaceable stuff like photo albums and holiday decorations you swear you’ll organize someday), a backup plan
is worth considering. Even a basic water alarm can provide early warning.
7) The Best Time to Clean Is Not During the Storm (Shocking, I Know)
The most common theme in sump pit stories is timing. If you only look at your sump pit when water is already rising,
you’ve turned maintenance into emergency response. The more experienced approach is boringbut effective: clean and test
on a calm day, before the wet season. It’s cheaper, safer, and far less likely to end with you calling a plumber while
wearing pajama pants and panic.
Conclusion
Cleaning out a sump pit isn’t glamorous, but it’s one of the most high-impact home maintenance tasks you can doespecially
if you want to avoid basement flooding, funky odors, and that awful moment when your pump chooses a storm to retire.
Follow the 10 steps: cut power, remove debris, scrub the basin, clean the pump, and test everything afterward. Then
close it up with a proper cover and schedule quick checkups so it never gets out of hand again.
Your future self (and your basement) will thank you. Possibly with dryness. Definitely with fewer surprises.


