Table of Contents >> Show >> Hide
- Quick Answer
- Before You Start: Check These 4 Things First
- Method 1: Use the Laptop’s HDMI Port Plus a Second Video Output
- Method 2: Use a Docking Station or USB Display Adapter
- Why an HDMI Splitter Usually Is Not the Answer
- How to Set Up the Displays in Windows
- How to Set Up the Displays on a Mac
- Troubleshooting Tips If One Screen Refuses to Cooperate
- Which Method Should You Choose?
- Final Thoughts
- Experience and Practical Notes From Real-World Setups
- SEO Tags
Trying to connect two screens to a laptop can feel weirdly dramatic for something that should be simple. You buy the cables, plug everything in, and then one monitor lights up while the other sits there like it is protesting your life choices. The good news: setting up two displays from a laptop is usually very doable. The less-fun news: one plain HDMI port on a laptop does not magically turn into two separate HDMI desktops just because you found a splitter online with exciting packaging.
If you searched for how to connect 2 laptop screens with HDMI, you are probably trying to do one of two things: add two external monitors to one laptop, or use your laptop with one external monitor plus another screen in an extended setup. In most real-world cases, there are two easy methods that actually work. One uses your laptop’s HDMI port plus a second video output. The other uses a docking station or USB display adapter that creates extra display connections for you.
This guide breaks down both methods in plain English, with enough detail to help you avoid wasting money on the wrong gadget. No techno-magic. No “just reboot it and believe.” Just practical steps, real examples, and a few warnings that can save your Saturday.
Quick Answer
To connect two screens to a laptop with HDMI, use one of these methods:
- Method 1: Connect one monitor to the laptop’s HDMI port and connect the second monitor through USB-C, Thunderbolt, Mini DisplayPort, or another video-capable port using the correct adapter.
- Method 2: Connect both monitors through a docking station, USB-C hub, or USB-to-HDMI adapter that supports dual displays.
What usually does not work for an extended desktop is a cheap HDMI splitter. Splitters are typically for mirroring the same image to multiple screens, not creating two separate workspaces.
Before You Start: Check These 4 Things First
1. Look at your laptop’s ports
Start by checking the left and right sides of your laptop. You may have more than just HDMI. Common display-capable ports include:
- HDMI
- USB-C with video output
- Thunderbolt 3, 4, or 5
- Mini DisplayPort
This matters because many laptops can run two external screens only when one is connected through HDMI and the other uses a different video path, such as USB-C or Thunderbolt. A USB-C port is especially useful if it supports video output, because a simple USB-C-to-HDMI adapter may solve your whole problem without a dock.
2. Confirm how many external displays your laptop supports
Not every laptop supports the same number of displays. Some Windows laptops can drive two or more external monitors without drama. Some MacBooks support multiple external screens, but the exact number depends heavily on the model and chip. So before you buy accessories, check your laptop specifications. That five-minute step can prevent a very annoying “why is the second monitor black?” afternoon.
3. Know the difference between mirroring and extending
Mirror mode shows the same image on both screens. Great for presentations. Terrible for productivity if you want one screen for email and another for spreadsheets. Extend mode creates separate desktop space across displays, which is what most people want.
4. Use decent cables
Not every HDMI cable is a hero. A damaged or low-quality cable can cause flicker, no signal errors, or resolution limits. If your setup acts haunted, swap cables before blaming the laptop. It is the IT version of checking whether the lamp is plugged in.
Method 1: Use the Laptop’s HDMI Port Plus a Second Video Output
This is the simplest method when your laptop already has HDMI and at least one more video-capable port, such as USB-C or Thunderbolt.
What you need
- One HDMI cable for the first monitor
- A second cable or adapter for the second monitor, such as:
- USB-C to HDMI
- Thunderbolt to HDMI
- Mini DisplayPort to HDMI
- Two monitors with available inputs
How it works
Monitor one connects directly to the laptop’s HDMI port. Monitor two connects through the second video-capable port. This creates two separate signal paths, which is exactly what extended display mode needs.
Step-by-step setup
- Turn on both monitors.
- Connect the first monitor to the laptop’s HDMI port.
- Connect the second monitor to the laptop’s USB-C, Thunderbolt, or Mini DisplayPort using the proper adapter or cable.
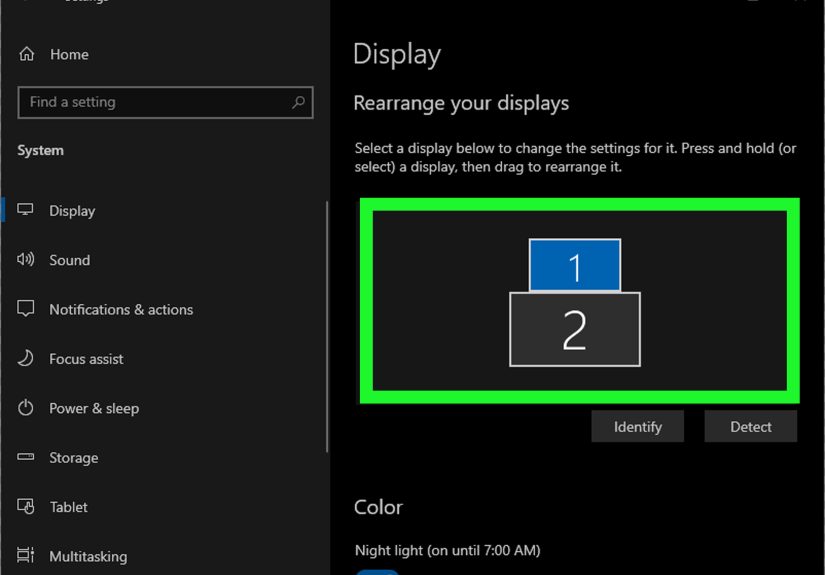
- On Windows, go to Settings > System > Display.
- Click Identify so you can tell which screen is which.
- Under multiple displays, choose Extend these displays.
- Drag the monitor icons so they match your physical desk layout.
- Click Apply.
On many Windows laptops, you can also press Windows + P and select Extend. That is often the fastest fix when the screens are showing the same thing by accident.
Best for
- People who want a clean setup without a dock
- Laptops that already support video over USB-C or Thunderbolt
- Home office users who want two monitors and minimal extra hardware
Example
Let’s say your laptop has one HDMI port and one USB-C port that supports DisplayPort Alt Mode. You can connect Monitor A with HDMI and Monitor B with a USB-C-to-HDMI adapter. Result: two external displays, one happier workflow, and far less window-shuffling rage.
When Method 1 will not work well
If your USB-C port is only for data transfer and charging, it may not send video. In that case, the adapter will not help, and you will need Method 2. Also, if your laptop model supports only one external display total, adding more cables will not magically change its limits.
Method 2: Use a Docking Station or USB Display Adapter
If your laptop has only one usable display output, or if you want a one-cable desk setup, this method is often the winner.
What you need
- A docking station, dual-display hub, or USB graphics adapter
- One or two HDMI cables, depending on the dock’s output ports
- Any required drivers, if the device uses USB graphics technology
How it works
A dock or USB adapter adds display outputs through a single laptop connection. Some docks use your laptop’s native video output through USB-C or Thunderbolt. Others use technologies like DisplayLink to send display data over standard USB connections, which can be extremely useful when your laptop does not support video over USB-C.
Two common versions of this method
Option A: USB-C or Thunderbolt dock
This is great for modern laptops. You connect one cable from the dock to the laptop, then connect both monitors to the dock. Many docks also add USB ports, Ethernet, audio, and charging. Your desk suddenly looks like it got its life together.
Option B: USB-to-HDMI adapter or DisplayLink dock
This is the fallback champion. If your laptop has just one HDMI port and no second native video output, a USB graphics adapter can add another monitor. Some products even allow two HDMI monitors from a single dock. Just remember that many of these require software or drivers.
Step-by-step setup
- Connect the docking station or USB display adapter to the laptop.
- Install any required drivers or companion software if prompted.
- Connect each monitor to the dock or adapter using HDMI.
- Turn on the monitors and select the correct HDMI input on each one.
- Open your laptop’s display settings.
- Select Extend these displays.
- Arrange the displays to match your real desk setup.
Best for
- Laptops with only one video output
- Users who want dual monitors plus charging and accessories through one cable
- Work-from-home setups that need flexibility
Potential downsides
Not all docks are created equal. Some support only one display at a time. Some support two screens, but only at lower resolutions or refresh rates. USB graphics solutions can be perfect for office work, browsing, writing, research, and spreadsheets, but they may be less ideal for fast-paced gaming, color-critical creative work, or very high-refresh setups.
Why an HDMI Splitter Usually Is Not the Answer
This is where a lot of people get tripped up. An HDMI splitter sounds like exactly what you need. One HDMI input, two HDMI outputs, case closed, right? Sadly, no. In most cases, a splitter takes one video signal and duplicates it to multiple screens. That means both monitors show the same image.
So if your goal is an extended desktop, where Monitor 1 shows your Zoom call and Monitor 2 shows your notes, a basic HDMI splitter usually will not get you there. It is better for conference rooms, digital signage, or showing the same content on multiple displays.
Think of it like photocopying one page twice. You get two copies, not two different chapters.
How to Set Up the Displays in Windows
- Right-click the desktop and choose Display settings.
- Click Identify to label each screen.
- Scroll to Multiple displays.
- Select Extend these displays.
- Drag the numbered screens so the cursor moves naturally between them.
- Choose the correct resolution and scaling for each monitor.
If one monitor is missing, click Detect. If that still does not work, reseat the cable, try a different port, and restart the laptop. Yes, restarting is boring advice. It is also annoyingly effective.
How to Set Up the Displays on a Mac
On a Mac, connect the displays, then open System Settings and go to Displays. From there, you can choose whether to mirror or extend the screens, arrange their position, and set the primary display. Mac users should be extra careful to check model-specific display support before buying accessories, because external display limits vary across MacBook generations and chip families.
Troubleshooting Tips If One Screen Refuses to Cooperate
No signal on the second monitor
- Make sure the monitor is on the correct HDMI input.
- Try another cable.
- Confirm the adapter supports video, not just charging or data.
- Open display settings and click Detect.
Both monitors show the same image
- Switch from Duplicate to Extend in display settings.
- If you are using an HDMI splitter, that is probably the issue.
The dock is connected, but only one monitor works
- Check the dock’s specs. Some multiport adapters support only one active display output at a time.
- Update the dock firmware or required drivers.
- Make sure your laptop supports the dock’s display mode.
Everything works, but performance feels sluggish
- Lower one or both monitor resolutions if needed.
- Close background apps.
- Use a native video output instead of a USB graphics adapter when possible.
Which Method Should You Choose?
Choose Method 1 if your laptop already has HDMI plus another video-capable port. It is often the easiest, cheapest, and cleanest path.
Choose Method 2 if your laptop has limited ports, your USB-C port does not output video, or you want a more polished desk setup with charging and accessories handled through one hub or dock.
If you are shopping for hardware, the smartest move is to match the accessory to your laptop’s actual port capabilities instead of buying whatever claims “dual monitor support” in giant letters. Marketing can be enthusiastic. Reality can be petty.
Final Thoughts
Connecting two screens to a laptop with HDMI is absolutely possible, but the trick is understanding that one HDMI port alone usually does not equal two independent HDMI monitors. The two practical solutions are simple: use HDMI plus a second native display output, or use a dock/USB display adapter built for dual-monitor setups.
Once you have the right hardware, the rest is mostly cable management, display settings, and a brief emotional journey through your operating system’s menus. After that, you get the reward: more screen space, less tab-hopping, and a setup that makes you look like the kind of person who definitely has a color-coded calendar.
Experience and Practical Notes From Real-World Setups
In real life, the experience of connecting two laptop screens with HDMI is usually less about the actual plugging-in part and more about choosing the right path before you buy anything. The biggest mistake people make is assuming every USB-C port does video, every dock supports dual monitors, and every HDMI gadget can extend a desktop. That is how perfectly reasonable adults end up sitting on the floor behind a desk surrounded by cables, quietly questioning modern civilization.
When the setup is done correctly, though, the improvement is immediate. A writer can keep research open on one screen and a draft on the other. A remote worker can put video meetings on one monitor and keep chat, calendars, or documents on the second. A student can watch a lecture on one display while taking notes on another. Even something as simple as paying bills becomes less annoying when you can keep your bank page on one screen and your spreadsheet on the other. Suddenly, your laptop goes from “small rectangle of compromise” to command center.
Method 1 usually feels the most natural because it is direct. One cable goes into HDMI, the second goes through USB-C or Thunderbolt, and the system behaves like it understands your ambitions. The desktop extends smoothly, windows move where they should, and you can get back to work without extra software. This is the setup many people end up liking most because it is simple and dependable. Fewer parts generally means fewer weird surprises later.
Method 2 is where convenience and complexity shake hands. A good dock can transform a laptop setup beautifully. You arrive at your desk, plug in one cable, and suddenly you have power, monitors, keyboard, mouse, storage, and maybe even Ethernet. It feels efficient in a deeply satisfying way. On the other hand, budget docks and adapters can be a little fussy. Sometimes you need drivers. Sometimes one HDMI port on the hub works only if the other one is disconnected. Sometimes the laptop needs a restart before it decides to cooperate. It is not always dramatic, but it can be slightly theatrical.
Another common experience is discovering that the monitors work, but the arrangement is hilariously wrong at first. Your mouse exits the left side of the laptop and appears on the right monitor, which is physically on your left. You drag a window upward and it disappears into what feels like another dimension. Thankfully, this is easy to fix by dragging the display boxes into the correct order in settings. It takes about thirty seconds and removes a surprising amount of daily irritation.
There is also the issue of expectations. For office work, web browsing, writing, school tasks, and general productivity, most dual-monitor solutions are more than enough. But if you are hoping for ultra-high refresh gaming across multiple displays through a bargain USB adapter, reality may hand you a firm and immediate “absolutely not.” Matching the hardware to the task makes all the difference.
The best experience usually comes down to three things: checking your laptop’s display limits, buying the correct adapter or dock, and setting everything to Extend instead of Duplicate. Do those three things right, and connecting two screens to a laptop becomes much less of a mystery and much more of a small victory.


