Table of Contents >> Show >> Hide
- Understanding the Basics Before Touching a Wire
- Tools and Materials You May Need
- Step 1: Turn Off the Power
- Step 2: Remove the Old Device Carefully
- How to Connect Wires to a Receptacle
- How to Connect Wires to a Switch
- Wiring a Receptacle and Switch in the Same Box
- Switched Receptacles: What Makes Them Different?
- GFCI, AFCI, and Tamper-Resistant Protection
- Common Mistakes to Avoid
- Testing Your Work
- When to Call a Licensed Electrician
- Real-World Experience: Lessons From Receptacle and Switch Projects
- Conclusion
Connecting wires to a receptacle and a switch sounds like one of those simple home projects: black wire here, white wire there, tighten a few screws, and voilàelectricity behaves. In real life, however, wiring is not a “close enough” hobby. A loose connection can create heat, a reversed connection can make devices unsafe, and one wrong assumption can turn a peaceful Saturday project into a very memorable lesson involving sparks.
This guide explains how receptacles and switches are typically wired in a standard U.S. residential setting, what each wire usually does, which tools are helpful, and when it is smarter to call a licensed electrician. The goal is not to turn you into an electrical contractor overnight. The goal is to help you understand the process clearly, work more safely, and recognize the difference between a simple replacement and a job that deserves professional hands.
Important safety note: Electrical codes vary by location, and modern U.S. installations may require GFCI protection, AFCI protection, tamper-resistant receptacles, proper box fill, grounding, and permits. Always follow local code and manufacturer instructions. If you are unsure, stop and hire a licensed electrician.
Understanding the Basics Before Touching a Wire
Before learning how to connect wires to a receptacle and a switch, it helps to understand what the devices actually do. A receptacle, often called an outlet, provides a place to plug in lamps, chargers, appliances, and other devices. A switch controls the flow of electricity to a light, fan, half-switched receptacle, or another load.
In a typical 120-volt household circuit, the hot wire carries power from the electrical panel, the neutral wire carries current back, and the ground wire provides a safety path if something goes wrong. The hot wire is commonly black or red, the neutral wire is usually white, and the ground wire is bare copper or green. That said, never trust color alone. Older homes, previous repairs, or creative wiring decisions from “Uncle Bob the Weekend Electrician” can make colors unreliable.
Tools and Materials You May Need
For a basic receptacle or switch replacement, the usual tools include a non-contact voltage tester, a plug-in receptacle tester, wire strippers, needle-nose pliers, screwdrivers, electrical tape, wire connectors, and the correct replacement device. You may also need a multimeter if you need to identify line and load conductors or verify voltage.
Choose devices rated for the circuit. A 15-amp receptacle is common on 15-amp circuits. A 20-amp receptacle has a different slot shape and should only be used where the circuit is properly rated for 20 amps. Many modern homes also require tamper-resistant receptacles, especially in living areas, bedrooms, kitchens, and other accessible spaces.
Step 1: Turn Off the Power
The first step is simple but non-negotiable: turn off the power at the breaker panel. Do not rely on flipping a wall switch. A switch may interrupt only part of the circuit, and the box can still contain live wires. Find the correct breaker, switch it off, and then verify the power is off using a tester.
Use a non-contact voltage tester near the wires and terminals before touching anything. Then test the device itself. If you are replacing a receptacle, plug in a lamp or tester before shutting off power so you can confirm the breaker actually controls that outlet. After turning the breaker off, confirm the lamp or tester is dead. Electricity is wonderfully useful, but it is not famous for giving second chances.
Step 2: Remove the Old Device Carefully
After confirming power is off, remove the cover plate and unscrew the receptacle or switch from the electrical box. Pull the device forward gently. Do not yank it out like you are starting a lawn mower. The wires may be short, stiff, or connected to other devices in the box.
Before disconnecting anything, take a clear photo. This tiny step can save a surprising amount of confusion later. Notice which wires are connected to brass screws, silver screws, green screws, and any black or dark-colored common screw on a switch. If there are multiple cables entering the box, label them with tape before removing the device.
How to Connect Wires to a Receptacle
A standard duplex receptacle usually has brass-colored screws on one side, silver-colored screws on the other, and a green grounding screw. The hot wire connects to the brass terminal. The neutral wire connects to the silver terminal. The bare copper or green ground wire connects to the green grounding screw.
Side-Wiring a Receptacle
Side-wiring is a common and reliable method when done correctly. Strip the wire to the length recommended on the device. Bend the exposed copper into a hook using needle-nose pliers. Place the hook around the screw in a clockwise direction so tightening the screw pulls the hook closed instead of pushing it open. Tighten the screw firmly, but do not crush or damage the conductor.
Make sure no insulation is trapped under the screw and no bare copper sticks out beyond the terminal area. The connection should look neat, secure, and boring. In electrical work, boring is beautiful.
Back-Wiring vs. Backstabbing
Some receptacles allow back-wiring using a clamp-style terminal tightened by a screw. This can be acceptable when the device is listed for it and the wire is installed according to the manufacturer’s instructions. However, many inexpensive receptacles also have push-in holes, often called backstab connections. These can loosen over time and are not ideal for high-quality work.
For a stronger connection, many electricians prefer side terminals or screw-clamp back-wiring on quality devices. Whatever method you use, follow the strip gauge on the device and the instructions included with the receptacle.
Connecting the Ground
The ground wire should be connected to the green screw on the receptacle. If the electrical box is metal, the box must also be grounded. This is usually done with a short pigtail wire connected to the metal box using a grounding screw or clip, then joined to the circuit ground and device ground with a wire connector.
Never cut off the ground wire because it is “in the way.” The ground is not decoration. It is a safety feature that helps reduce shock and fire risk when a fault occurs.
How to Connect Wires to a Switch
A standard single-pole switch controls one light or load from one location. Unlike a receptacle, a simple switch usually connects only the hot circuit. The neutral wires typically stay connected together in the back of the box and do not attach to a basic single-pole switch unless the switch requires a neutral, such as many smart switches.
Single-Pole Switch Wiring
On a basic single-pole switch, one hot wire brings power in, and the other wire carries switched power out to the light or device. These wires connect to the two brass screws on the switch. The ground wire connects to the green screw. In many single-pole switches, the two brass terminals are interchangeable, but you should still follow the manufacturer’s instructions.
If you see a white wire connected to a switch, do not assume it is neutral. In some older switch loops, a white wire may be used as a hot conductor and should be re-identified with black or red tape. This is one reason photos, labels, and testing matter.
Three-Way Switch Warning
If a light is controlled from two locations, you are likely dealing with a three-way switch. A three-way switch has a common terminal and two traveler terminals. The common terminal is usually darker than the traveler screws. Connecting the common wire to the wrong terminal can make the switches behave like a puzzle box with an attitude.
If you are replacing a three-way switch, label the wire on the common terminal before disconnecting it. The travelers usually connect to the remaining two terminals. Three-way and four-way switch wiring can vary, so do not guess based on wire color alone.
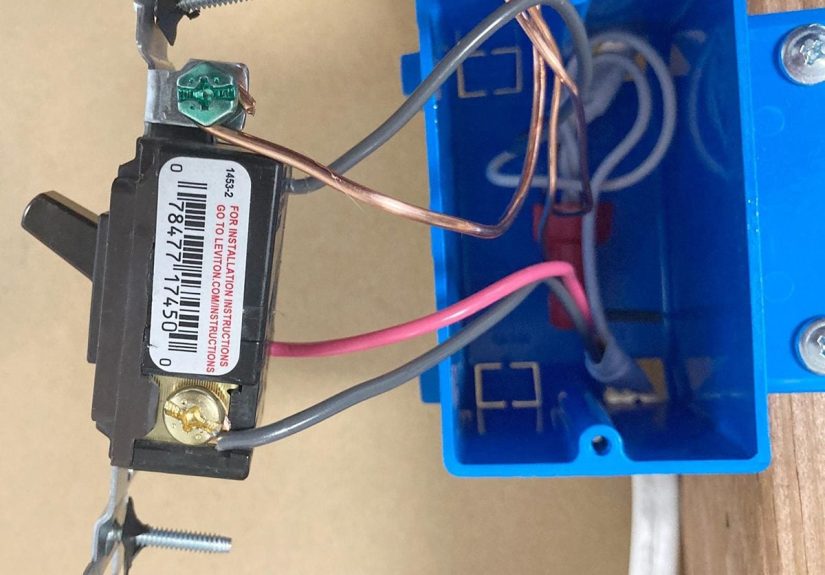
Wiring a Receptacle and Switch in the Same Box
A combination box may contain both a receptacle and a switch. The switch may control a light, a fan, or even half of the receptacle. The wiring depends on the circuit layout, so there is no single universal pattern that applies to every box.
In one common setup, power enters the box, feeds the receptacle, and also feeds the switch through a pigtail. The neutral connects to the receptacle and continues to the load if needed. The switch sends switched hot power to the light or controlled device. Grounds are tied together and connected to each device.
A pigtail is a short piece of wire used to connect a device to a group of wires. For example, instead of using a receptacle as a pass-through connection, the incoming hot, outgoing hot, and a short hot pigtail can be joined with a wire connector. The pigtail then connects to the receptacle’s brass screw. This method can create a more reliable connection and makes future replacement easier.
Switched Receptacles: What Makes Them Different?
A switched receptacle is an outlet controlled by a wall switch. Sometimes the entire receptacle is switched. Other times, only one half is controlled while the other half stays always hot. This is common in bedrooms or living rooms where a switch controls a lamp plugged into the outlet.
For a half-switched receptacle, the small metal tab between the hot-side brass screws is removed. This separates the two halves of the receptacle. One brass terminal receives constant hot power, while the other receives switched hot power. The neutral tab usually stays intact unless the circuit design requires otherwise.
This is a place where mistakes are easy. Removing the wrong tab, forgetting the tab, or mixing up constant hot and switched hot can produce confusing results. If you are not comfortable identifying conductors, this is a good point to call an electrician.
GFCI, AFCI, and Tamper-Resistant Protection
Modern electrical safety is about more than simply making the outlet work. Many areas of the home require GFCI protection, especially where water may be present, such as bathrooms, kitchens, garages, basements, laundry areas, outdoor locations, and other required spaces. GFCI devices help reduce shock risk by shutting off power when they detect a ground fault.
AFCI protection helps reduce fire risk from certain arc faults. Depending on the room, circuit, and local code, AFCI protection may be required at the breaker, receptacle, or another listed device. Tamper-resistant receptacles are also commonly required in residential areas to help prevent children from inserting objects into outlet slots.
When installing a GFCI receptacle, pay close attention to the LINE and LOAD terminals. The power source connects to LINE. The LOAD terminals are used only when you want the GFCI to protect downstream receptacles. If LINE and LOAD are reversed, the device may not work as expected. Many modern GFCI devices include labels and indicators, but the safest approach is to read the instructions before connecting wires.
Common Mistakes to Avoid
Leaving Loose Connections
Loose connections can create heat and arcing. Make sure screws are tight, wire connectors are properly sized, and wires are securely held. Tug gently on each wire after connecting it to confirm it is not loose.
Reversing Hot and Neutral
Reverse polarity happens when the hot and neutral wires are connected to the wrong terminals. A receptacle may still appear to work, but it can create a shock hazard. Always connect hot to brass and neutral to silver on a standard receptacle.
Overcrowding the Electrical Box
Every electrical box has a fill capacity. Too many wires, devices, and connectors in a small box can damage insulation, stress connections, and violate code. If the box is crowded, do not force everything in with heroic thumb pressure. Use the correct box size or call a professional.
Ignoring Aluminum Wiring
Some older homes have aluminum branch-circuit wiring. Aluminum wiring requires special devices and connectors rated for aluminum conductors. Do not connect aluminum wire to standard copper-only devices. If you find aluminum wiring, contact a licensed electrician.
Using the Wrong Device Rating
Devices must match the circuit and application. Outdoor receptacles need weather-resistant devices and proper covers. Damp or wet locations may require GFCI protection. A bathroom or kitchen circuit may have specific requirements. The cheapest device on the shelf is not always the right device for the job.
Testing Your Work
After wiring the receptacle or switch, fold the wires carefully back into the box. Keep grounding wires away from hot terminals where possible. Mount the device straight, attach the cover plate, and then restore power at the breaker.
For a receptacle, use a plug-in tester to check for correct wiring. Test GFCI receptacles using the TEST and RESET buttons. For a switch, verify that it controls the intended light or load properly. If the breaker trips immediately, the device gets warm, you smell burning, or the switch crackles like a campfire, turn the power off and call an electrician.
When to Call a Licensed Electrician
Call a professional if you find damaged insulation, burned wires, aluminum wiring, no grounding path, knob-and-tube wiring, overloaded boxes, repeated breaker trips, flickering lights, buzzing switches, warm outlets, or anything you cannot confidently identify. Also call an electrician when adding new circuits, modifying kitchen or bathroom wiring, working in a panel, or installing devices that require code calculations.
There is no shame in hiring help. In fact, the most experienced DIY homeowners know when a job has crossed the line from “I can handle this” to “I would like my house to remain pleasantly unburned.”
Real-World Experience: Lessons From Receptacle and Switch Projects
One of the biggest lessons from working with receptacles and switches is that the easiest-looking job is not always the easiest job. A simple switch replacement can turn into detective work when the box contains three cables, two mystery whites, a red traveler, and a ground bundle tucked in the back like it is hiding from taxes. The best habit is to slow down. Take photos, label wires, and test before disconnecting anything.
Another practical lesson is that old devices often fail quietly before they fail dramatically. A loose receptacle that barely grips a plug may not seem urgent, but weak contact can create heat. A switch that feels mushy, buzzes, or sparks may be telling you it is done with its career. Replacing worn devices with properly rated, quality components can make the home safer and more pleasant to use.
Good wire management matters more than beginners expect. If wires are folded sharply, crammed behind the device, or forced against terminal screws, the installation becomes harder to service later. A neat box is easier to inspect, easier to troubleshoot, and less likely to develop loose connections. Think of it as packing a suitcase: technically, you can sit on it until it closes, but that does not mean your socks are happy.
It is also worth learning the difference between a device connection and a circuit connection. Many older installations use receptacle terminals to pass power through to the next outlet. While this may be allowed in some cases, pigtailing often makes future maintenance easier. If the receptacle fails, downstream devices are less likely to lose power simply because one outlet was removed or damaged.
Testing is the step people are most tempted to skip after the lights come on. Do not skip it. A receptacle tester can reveal open grounds, reversed polarity, and other common problems. A GFCI tester can confirm that a protected outlet trips as expected. Testing takes minutes, and those minutes are much cheaper than repairing damage caused by a hidden wiring error.
Finally, the most valuable experience is learning humility around electricity. Confidence is useful; overconfidence is expensive. If the wiring in the box does not match the diagram you had in mind, the answer is not to keep guessing until something works. The answer is to pause, identify the circuit correctly, and get qualified help when needed. A successful wiring project is not just one where the light turns on. It is one where the connection is safe, code-conscious, durable, and boring in the best possible way.
Conclusion
Learning how to connect wires to a receptacle and a switch can help you understand your home’s electrical system and handle simple replacements more confidently. The essential rules are straightforward: turn off the power, verify it is off, identify each wire, connect hot to the proper terminal, connect neutral where required, ground every device correctly, and test the finished work.
Still, electrical work deserves respect. Modern wiring must satisfy safety rules for grounding, GFCI protection, AFCI protection, tamper-resistant devices, box fill, and proper device ratings. When the wiring is confusing, damaged, outdated, or outside your skill level, hiring a licensed electrician is not giving up. It is choosing the option that lets you sleep betterand keeps your walls from becoming unwilling participants in a science experiment.


