Table of Contents >> Show >> Hide
- Frozen vs. Fresh Scallops: What Actually Matters
- Thawing & Prepping Scallops Like a Pro
- Method #1: Pan-Seared Scallops with Brown Butter Lemon-Caper Sauce
- Method #2: Broiled “Scampi-Style” Scallops with Garlic Butter & Crunch
- Method #3: Grilled Scallop Skewers with Ginger-Lime Glaze
- Troubleshooting: How to Fix the Most Common Scallop Problems
- FAQ: Quick Answers Before Your Pan Gets Hot
- Real-Life Scallop Stories & Lessons (So You Don’t Cry Into the Skillet)
- Conclusion
Scallops have a weird reputation: fancy enough for white-tablecloth dates, yet somehow responsible for more “why is this rubber?” moments than most seafood. The good news? Scallops are actually one of the fastest, easiest proteins to cookif you understand two things: moisture is your enemy, and time is a cruel comedian.
Whether you’ve got fresh scallops from the seafood counter or a bag of frozen scallops hiding behind the peas, you can turn them into something genuinely impressive in minutes. Below you’ll get three tasty methodspan-seared, broiled, and grilledplus the prep moves that make each one work (and keep your dinner from tasting like “sad ocean eraser”).
Frozen vs. Fresh Scallops: What Actually Matters
Fresh scallops can be amazing, but frozen scallops aren’t “lesser”they’re often frozen quickly after harvest, which can lock in quality. What matters more than “fresh vs. frozen” is whether your scallops are dry or wet.
- Dry scallops are not treated with moisture-retaining additives. They brown more easily and taste sweeter and cleaner.
- Wet scallops are often treated so they hold extra liquid. They can cook up fine, but they tend to steam instead of sear, which is the culinary equivalent of wearing socks in a hot tub.
When possible, ask for “dry scallops” (or scallops with no added solution). If you’re working with wet scallops (or you’re not sure), don’t panicjust lean harder into the drying steps below.
Size counts (literally)
Scallops are often sold by “count,” meaning how many fit in a pound (like 10/20 or U-10). Lower numbers = bigger scallops. Bigger scallops are more forgiving for searing; smaller ones are great for skewers, pasta, or broiling.
Thawing & Prepping Scallops Like a Pro
Step 1: Thaw frozen scallops safely (and keep them happy)
If your scallops are frozen, thaw them in the refrigerator overnight for best texture. Need it faster? Seal them in a bag and submerge in cold water. If you use the microwave defrost setting, cook immediately afterward (microwaves can create warm spots that start cooking the edges).
Avoid thawing on the counter. Room-temp thawing is basically an open invitation for bacteria and a guaranteed way to get uneven texture.
Step 2: Don’t “wash” scallopsdry them
Rinsing scallops adds water, and water is the villain of browning. Instead, give them a quick check for shell fragments, then pat them very dry with paper towels. If they seem extra wet, do this:
- Pat dry.
- Salt lightly.
- Rest on paper towels in the fridge for 10–15 minutes.
- Pat dry again.
This quick “drying rest” helps the surface moisture disappear so you get a real crust instead of a pale, steamy shrug.
Step 3: Remove the side muscle (if present)
Some scallops have a little rectangular “tab” on the side (the tough abductor muscle). Pinch it off and discard. It’s not dangerousjust chewy in the “I regret my choices” way.
Step 4: Know when they’re done
Scallops cook fast. Most medium-to-large sea scallops take roughly 2–4 minutes total depending on method and size. For food safety, seafood is commonly recommended to reach 145°F, and scallops should look opaque and feel firm (not hard). Overcook them and they’ll go from tender to bouncy like a stress ball.
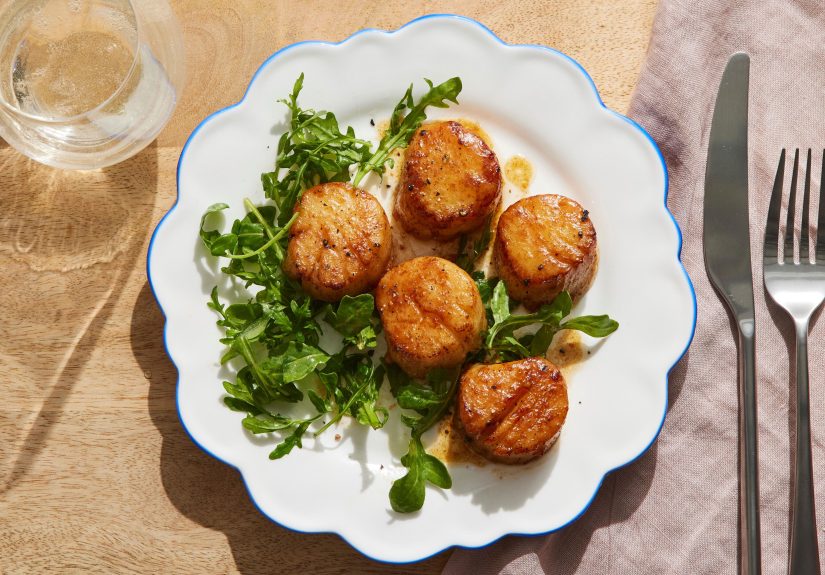
Method #1: Pan-Seared Scallops with Brown Butter Lemon-Caper Sauce
This is the “restaurant scallops” move: a deep golden crust, tender center, and a sauce that tastes like you hired someone named “Chef Luca” to live in your pantry.
Best for
- Dry scallops (fresh or thawed)
- Large sea scallops (10/20 or U-10 are especially forgiving)
- When you want maximum wow in minimum time
You’ll need
- 1 lb scallops, thawed if frozen, patted very dry, side muscle removed
- Kosher salt + black pepper
- High-heat oil (avocado, grapeseed, canola)
- 2–3 tbsp unsalted butter
- 1 clove garlic, lightly crushed (optional)
- 1–2 tbsp capers (optional but delightful)
- Lemon (juice + zest if you’re feeling fancy)
- Parsley or chives for finishing
Step-by-step
- Dry + season. Pat scallops dry again (yes, again). Season with salt and pepper.
- Heat the pan like you mean it. Use a heavy stainless-steel or cast-iron skillet. Heat over high until the oil shimmers and is just barely smoking.
- Sear without crowding. Place scallops flat-side down with space between them. Don’t move them. No poking, no shuffling, no “just checking.” Let them form a crust for about 2–3 minutes (large scallops may take closer to 3–4).
- Flip once. Turn scallops and cook 30–90 seconds more, depending on size. You’re finishing the center, not building a second crust the size of a winter coat.
- Brown butter magic. Reduce heat to medium. Add butter (and garlic if using). As butter foams and turns golden, spoon it over the scallops for 20–30 seconds.
- Brighten it up. Add capers and a squeeze of lemon. Kill the heat. Sprinkle herbs and lemon zest.
Frozen-scallop adjustment
Thawed frozen scallops often release extra moisture. If they keep “sweating,” do the fridge-drying rest (paper towels + 10–15 minutes) before searing. If you skip this, your pan-sear may turn into pan-steam, and nobody invited that guy.
Serve it with
- Cauliflower purée or mashed potatoes (hello, brown butter sauce sponge)
- Arugula salad with citrus vinaigrette
- Simple couscous or rice pilaf
Method #2: Broiled “Scampi-Style” Scallops with Garlic Butter & Crunch
Broiling is the weeknight hero: fast, hands-off, and surprisingly forgivingespecially when your scallops aren’t perfect searing candidates. You still want them dry, but you don’t need the same pan-scorching intensity.
Best for
- Frozen scallops (thawed) or smaller scallops
- When you want easy cleanup and big flavor
- When your stovetop is already a war zone
You’ll need
- 1 lb scallops, thawed if frozen, patted dry
- 3 tbsp melted butter (or olive oil + butter combo)
- 2 cloves garlic, minced
- 1/3 cup panko or fresh breadcrumbs
- 2–3 tbsp grated Parmesan (optional but encouraged)
- Lemon zest + juice
- Salt, pepper, pinch of red pepper flakes (optional)
- Parsley
Step-by-step
- Heat the broiler. Set a rack about 6 inches from the heat.
- Dress the scallops. Put scallops in a single layer in a broiler-safe dish. Toss butter with garlic, a little lemon zest, salt, and pepper. Drizzle over scallops.
- Add crunch. Mix breadcrumbs with Parmesan and a tiny drizzle of butter/oil until sandy. Sprinkle over scallops.
- Broil. Broil 6–8 minutes, watching closely, until scallops are opaque and the top is golden. If your scallops are huge, they may need an extra minute; if they’re small, start checking at 5.
- Finish. Hit with lemon juice and parsley.
Tasty variations
- Miso-butter broiled scallops: Stir 1–2 tsp white miso into melted butter, add a little honey, broil, then finish with lime.
- Herby Dijon crust: Mix breadcrumbs with Dijon, chopped herbs, and a little mayo for a thicker topping that browns beautifully.
Pro tip
Broilers are dramatic. One minute you have “golden,” the next minute you have “we’ve invented seafood jerky.” Stay nearby, like a responsible adult.
Method #3: Grilled Scallop Skewers with Ginger-Lime Glaze
Grilling scallops feels like a flex because it’s fast and looks impressive. The key is control: hot grill, quick cook, and skewers that keep scallops from doing that annoying spinning thing.
Best for
- Cookouts, summer dinners, or anytime you want smoky char
- Medium-to-large scallops
- People who like saying “glaze” as if it’s a lifestyle
You’ll need
- 1 lb scallops, thawed if frozen, patted dry
- Oil, salt, pepper
- Skewers (metal, or wooden soaked 20–30 minutes)
- Quick ginger-lime glaze: 1 tbsp soy sauce, 1 tbsp lime juice, 1 tsp grated ginger, 1–2 tsp honey, 1 tsp sesame oil (optional)
Step-by-step
- Preheat the grill. Medium-high heat. Clean grates and oil them lightly.
- Skewer smart. Thread scallops onto two parallel skewers if you canthis keeps them stable so you can flip easily.
- Season. Brush scallops with oil, then salt and pepper.
- Grill fast. Grill about 1–2 minutes per side (large scallops may take ~2 minutes per side). You want light char and an opaque exterior.
- Glaze at the end. Brush glaze on during the last 30 seconds so it doesn’t burn. Finish with extra lime and chopped scallions or cilantro.
Serve it with
- Coconut rice + cucumber salad
- Grilled corn with lime and chili
- Warm tortillas + crunchy slaw for scallop tacos
Troubleshooting: How to Fix the Most Common Scallop Problems
“My scallops won’t brown.”
- Cause: Too much moisture or pan not hot enough.
- Fix: Pat dry aggressively, use a heavy pan, don’t crowd, and wait until oil shimmers before adding scallops.
“They’re rubbery.”
- Cause: Overcooked.
- Fix: Pull earlier. Scallops continue cooking from residual heat. Aim for firm and opaque, not tight and squeaky.
“They stick to the pan.”
- Cause: You flipped too early or your pan wasn’t properly heated/oiled.
- Fix: Let the crust form. When scallops are ready, they usually release more easily.
“They taste ‘fishy.’”
- Cause: Age, improper storage, or a general seafood sadness situation.
- Fix: Buy from a trusted source, keep cold, use within a day or two if fresh, and brighten flavors with lemon, herbs, or a sharp sauce.
FAQ: Quick Answers Before Your Pan Gets Hot
Can I cook scallops straight from frozen?
You can, but it’s tough to get a great sear because frozen scallops shed water as they thaw. If you must cook from frozen, broiling is your best bet. For pan-searing or grilling, thaw first, then dry thoroughly.
How do I store scallops?
Keep scallops cold. Fresh scallops should be stored in the coldest part of the fridge and cooked soon (often within a day or two). Frozen scallops stay best tightly sealed in the freezer, and once thawed, they shouldn’t be refrozen.
What’s the easiest “fancy” sauce?
Brown butter + lemon is undefeated. Add capers if you want salty-bright punch, or finish with a spoonful of pesto if you want to feel like you own a basil farm.
Real-Life Scallop Stories & Lessons (So You Don’t Cry Into the Skillet)
If scallops have ever hurt your feelings, you’re not alone. A lot of home cooks have a “scallop era” that starts with optimism and ends with a plate of perfectly seasoned rubber coins. The good news is that most scallop disasters aren’t mysteriousscallops are just brutally honest about technique.
One common experience: you buy scallops, you’re excited, you rinse them (because that feels hygienic), and then they refuse to brown. The pan is hot, the oil is shimmering, you do everything “right,” and yet you’re staring at pale scallops that look like they’re in a spa, not a skillet. That moment teaches the biggest scallop truth: dryness is the difference between sear and steam. The next time you skip the rinse and instead pat them down like you’re trying to help them pass a paper-towel audition, the crust shows up almost magically. It’s not magic, of courseit’s physics. But it feels like magic, and in weeknight cooking, that counts.
Another familiar lesson is timing. Scallops cook so fast that the rest of dinner can’t be an afterthought. If you’re making mashed potatoes, salad, and a sauce, and you start searing scallops while the potatoes are still “thinking about boiling,” you’ll either overcook the scallops or eat everything else cold. Most people eventually learn to treat scallops like the final 5-minute sprint: prep the sides, set the table, pour the drink, then cook scallops last. When scallops are done, dinner should be ready to land immediatelylike an airplane that has exactly enough fuel to not circle the airport.
There’s also the “crowding the pan” phase. It happens because you own one skillet, you’re hungry, and the scallops look lonely spread out. So you pack them in like commuters on a Monday train. The result is predictable: the pan temperature drops, liquid releases, and your scallops simmer in their own moisture. The first time you finally cook in batchesgiving each scallop personal space and emotional supportyou’ll see why restaurants do it. The crust gets deeper, the texture stays tender, and you stop wondering whether you accidentally bought scallops made of memory foam.
Frozen scallops can add another wrinkle: they often bring more moisture to the party. Many cooks notice thawed scallops “weeping” on the cutting board and assume the fix is higher heat. Higher heat helps, but it’s not the whole story. The real win is a two-step dry: pat dry, chill briefly on towels, pat dry again. That tiny fridge rest feels sillyuntil you get that bronze sear you’ve been chasing. It’s one of those small, boring steps that makes your final plate look like you paid for it.
Finally, a big emotional milestone: learning that scallops don’t need a complicated marinade to taste great. Plenty of people try to “save” scallops with long soaks, heavy sauces, or aggressive seasoning. Then they try the minimalist approachsalt, hot pan, butter, lemonand realize scallops already taste sweet and rich on their own. The flavor isn’t the problem; it’s almost always moisture or overcooking. Once you get that, scallops become less scary and more like a reliable party trick. The kind where guests say, “Wait… you made this at home?” and you get to casually nod like you do this every day (even if you absolutely do not).
Conclusion
Cooking scallopsfresh or frozencomes down to a simple formula: thaw safely, dry thoroughly, and cook quickly. Pan-sear for that classic crust, broil when you want easy flavor with minimal fuss, and grill when you want smoky char and summer energy. Master the moisture game, and scallops stop being intimidating and start being your fastest route to a “wow” dinner.
![18 Best Types of Charts and Graphs for Data Visualization [+ How to Choose]](https://corkopencoffee.org/wp-content/uploads/2026/05/18-best-types-of-charts-and-graphs-for-data-visualization-how-to-choose-qKM1PBYG-thumb.jpg)


