Table of Contents >> Show >> Hide
- What “Standing Rib Roast” Means (and Why It Matters for Carving)
- Carving Station Setup: The 2-Minute Checklist That Saves Dinner
- Don’t Skip the Rest: Carving Is Easier When Juices Aren’t Sprinting Away
- The Expert Method: Remove the Bones, Then Slice Like a Steakhouse
- Step 1: Remove any twine (and identify the bones)
- Step 2: Stand the roast so the bones face you
- Step 3: Separate the meat from the rib bones in one long, confident cut
- Step 4: (Optional but smart) Save the ribs for later… or for immediate “chef snacks”
- Step 5: Find the grain, then slice against it
- Step 6: Choose thickness based on the vibe
- Alternative: Carve Bone-In Slices for Maximum Drama
- Pro-Level Serving Strategy: Handling Mixed Doneness Without Starting a Family Debate
- Common Carving Problems (and the Quick Fixes)
- Carving Example: A Simple Plan for a 4-Bone Standing Rib Roast
- How to Store Leftovers Without Ruining Tomorrow’s Sandwiches
- Real-World Carving Experiences (The 500-Word “I Learned This the Hard Way” Section)
- Final Thoughts: The “Expert” Secret Is Simpler Than You Think
A standing rib roast (a.k.a. prime rib’s fancy, bone-in cousin) has one job: make your dining table look like it’s
wearing a tuxedo. Your job is simplercarve it cleanly so every slice is juicy, tender, and looks like you knew
what you were doing the whole time.
This guide walks you through the pro approach: how to set up your carving station, how to remove the rib bones
without sacrificing meat (or dignity), and how to slice the roast against the grain for maximum tenderness.
I’ll also cover common carving problems, serving strategies for mixed doneness crowds, and a section of real-world
carving experiences (including the mistakes that teach you the mostunfortunately).
What “Standing Rib Roast” Means (and Why It Matters for Carving)
“Standing” refers to roasting the rib section with the bones attached, so the roast can literally sit (stand) on the
rib bones like a built-in rack. That bone structure changes carving in two key ways:
-
You have a natural guide: the curved rib bones show you exactly where to run your knife to separate
meat from bone. -
You have to decide: carve “bone-in” slices for a dramatic look, or remove the bones and slice the
boneless roast for cleaner, more uniform portions.
Either approach can be “expert,” but if you want consistent slices that plate well (and don’t require a tiny saw at
the table), removing the bones first is the classic move.
Carving Station Setup: The 2-Minute Checklist That Saves Dinner
Before you touch the roast, set yourself up for success. Great carving is mostly preparationplus a little bit of
not panicking.
Tools you actually need
- Long slicing knife or carving knife (10–14 inches): length matters more than drama.
- Carving fork (or sturdy tongs): to steady the roast without using your hand as a brake.
- Large cutting board with a juice groove (or a rimmed sheet pan under the board): prime rib is juicy on purpose.
- Kitchen twine snips/scissors: if your roast is tied, don’t wrestle knots with a knife.
- Warm platter: optional, but very “steakhouse at home.”
Positioning: make it stable first
A wobbly roast is how you end up inventing new swear words. If the roast won’t sit flat, shave a very thin slice
from the bottom to create a stable base (yes, even pros do this). Put a damp kitchen towel under the cutting board
so it doesn’t skateboard across your counter mid-slice.
Don’t Skip the Rest: Carving Is Easier When Juices Aren’t Sprinting Away
Resting isn’t just a cooking tipit’s a carving tip. When you carve too soon, hot juices rush out, the meat seems
“wetter” on the board, and slices can tear instead of cutting cleanly. Resting lets juices redistribute and gives
you neater cuts.
Practical rule: rest long enough that the roast stops “sizzling angrily” and the exterior feels slightly less
volcanic. Many cooks rest a rib roast for 20–30 minutes (sometimes longer for very large roasts), loosely tented
with foil. For food safety, use a thermometer and follow established safe-temperature guidance for whole cuts, plus
an appropriate rest period.
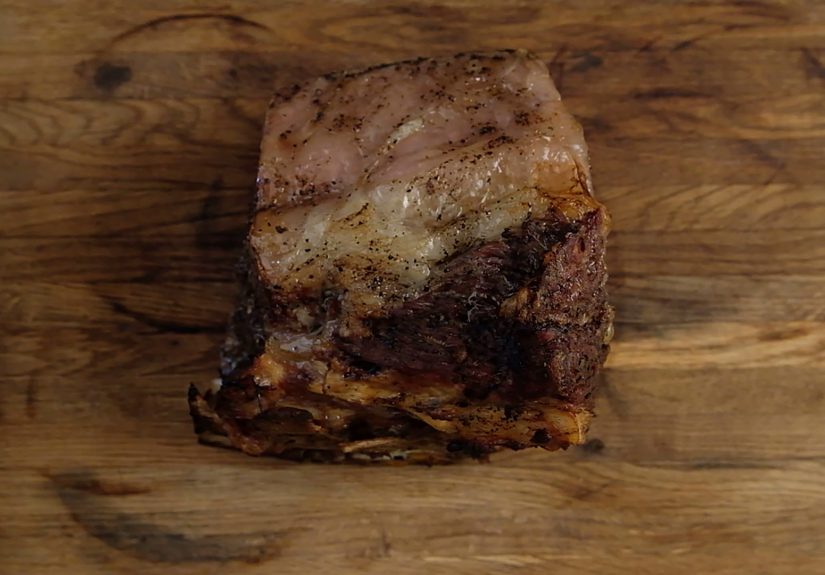
The Expert Method: Remove the Bones, Then Slice Like a Steakhouse
This is the go-to technique for clean, even slicesperfect for serving a crowd, making a platter, or pretending you
have a carving cart and an audience.
Step 1: Remove any twine (and identify the bones)
If your roast is tied, snip and remove the twine first. If the butcher “cut the bones away and tied them back on”
(a common pro trick), you’ll see a seam between the bone rack and the roast. That’s basically your carving cheat code.
Step 2: Stand the roast so the bones face you
Set the roast with the rib bones angled up toward you, like a curved fence. Anchor it with a carving fork or tongs.
Your knife will travel along the bone curve; your job is to keep the blade tight to the bones to avoid leaving a
lot of meat behind.
Step 3: Separate the meat from the rib bones in one long, confident cut
Starting at one end, slide the knife down between meat and bones, following the natural curve. Use long strokes
(think “paintbrush,” not “tiny nervous sawing”). Keep the knife pressed gently against the bones as you go.
- Tip: If you hit resistance, you’re likely bumping boneadjust angle, don’t force.
- Tip: Work slowly, but keep your strokes long. Short choppy cuts shred the outer crust.
Once you reach the board, the roast should lift away from the rib rack. Congratulations: you’ve just turned a
standing rib roast into a boneless prime rib that slices like a dream.
Step 4: (Optional but smart) Save the ribs for later… or for immediate “chef snacks”
The rib rack isn’t trashit’s delicious. You can brush it with a bit of seasoning and give it a quick reheat or
sear, then serve as bonus ribs. Or hide in the kitchen and “quality test” them like a responsible professional.
Step 5: Find the grain, then slice against it
The grain is the direction the muscle fibers runon a rib roast, it typically runs along the length of the roast.
Slicing across that grain shortens fibers, which makes each bite more tender.
Look at the cut end of the roast: you’ll see lines in the meat. Slice perpendicular to those lines.
Step 6: Choose thickness based on the vibe
- Steakhouse-style: 3/4-inch to 1-inch slices for a bold, meaty plate.
- Classic holiday platter: 1/2-inch sliceseasy to serve, still generous.
- Buffet or “everyone wants seconds”: 1/4-inch to 3/8-inch slices for more portions.
Use smooth, even strokes. Let the sharpness do the work. If you have to press hard, your knife isn’t sharp enough
(or your roast is still too hot and squishy).
Alternative: Carve Bone-In Slices for Maximum Drama
If you want that jaw-dropping “yes, I served a bone-in slice like a medieval banquet” presentation, you can carve
without fully removing the bones.
How to do it
- Stabilize the roast on the board (remove a thin bottom slice if needed).
- Cut slices perpendicular to the bone rack, aiming for one rib per portion.
- After each slice, run the tip of the knife along the bone to release the meat cleanly.
This method is a little slower and less uniform, but the presentation is unbeatable. If your guests are the type to
take pictures of food before eating, this is your moment.
Pro-Level Serving Strategy: Handling Mixed Doneness Without Starting a Family Debate
Standing rib roasts often cook with a doneness gradient: the center is rarer, the ends are more done. Instead of
seeing this as a problem, treat it like a feature.
- For rare lovers: serve center slices.
- For medium folks: serve mid sections.
- For “no pink” guests: serve end slices (and offer au jus for moisture).
If you need to bump doneness for a few slices, you can dip them briefly in hot au jus or place them in a warm pan
of broth for a minute. It’s gentler than blasting slices in the microwave (which has the culinary elegance of a
car alarm).
Common Carving Problems (and the Quick Fixes)
“My slices are shredding instead of cutting cleanly.”
Usually this is a knife issue, not a you issue. Use a longer slicing knife and sharpen it. Also: cut with long
strokes and avoid sawing. If the roast is extremely hot, let it rest longer so the exterior firms up.
“I’m leaving too much meat on the bones.”
Keep the blade tight to the bone curve. Use the bones as your guide rail. If the rib rack was tied on, find the
pre-cut seam and follow itdon’t freestyle.
“The roast keeps sliding around.”
Stabilize it: shave a thin slice off the bottom if needed, use a damp towel under the board, and anchor the roast
with a fork or tongs. Don’t chase it around the counter like it owes you money.
“My beautiful crust is falling off.”
That’s typically from sawing or using a dull blade. Long, clean strokes protect the crust. Also, avoid pressing
down hardpressure crushes that crunchy exterior you worked for.
Carving Example: A Simple Plan for a 4-Bone Standing Rib Roast
Let’s say you’ve got a 4-bone roast for a holiday dinner. Here’s an easy, guest-friendly flow:
- Rest the roast on a warm-safe spot, loosely tented.
- Set up your board, knife, fork, platter, and a small bowl for trimmings.
- Remove twine, then separate the roast from bones in one clean pass.
- Slice 1/2-inch pieces, starting at the end with the best-looking crust.
- Plate slices in a shingled row, spoon a little warm au jus nearby (not over the crust unless requested).
- Serve ends to well-done fans, center to rare fans, and enjoy your new role as “Carving Hero.”
How to Store Leftovers Without Ruining Tomorrow’s Sandwiches
Carve only what you plan to serve, if possible. Leaving part of the roast intact helps it stay juicier in the
fridge. Wrap tightly and refrigerate promptly after the meal.
For reheating slices: warm gently in au jus or broth, or reheat low-and-slow in the oven with a little moisture.
High heat turns leftovers into “sad roast jerky,” which is not the legacy you want.
Real-World Carving Experiences (The 500-Word “I Learned This the Hard Way” Section)
The first time I carved a standing rib roast in front of people, I made the classic mistake: I treated carving like
a test of strength. I was gripping the fork like I was wrestling a bear, sawing with a short knife, and wondering
why the roast looked like it had been through a paper shredder. The meat was deliciousbecause rib roast is
basically delicious by lawbut my slices looked like “rustic chunks,” which is food-blogger code for “oops.”
The next time, I changed exactly two things: I used a longer slicing knife and I waited longer before carving. That
was it. Suddenly, the blade glided instead of fought, the crust stayed on the slices instead of flaking off in
random bits, and the cutting board didn’t flood like a tiny beef-themed water park. Resting doesn’t just keep meat
juicyit gives the surface time to firm up so you can slice cleanly. It also gives you time to breathe,
refill drinks, and stop staring at the roast like it’s about to judge you.
I’ve also learned the power of the “stable base” move. If your roast wobbles, your confidence wobbles, and then
everything wobbles. Taking a thin slice off the bottom feels wronglike you’re ruining perfectionbut it’s the same
idea as leveling a table leg. Once the roast sits flat, your knife work becomes calmer, and calm knife work looks
like expertise even if you’re improvising.
Another real-life win: carving for mixed doneness without making it weird. At one dinner, I announced, “Center is
rare, ends are more done,” and everyone acted like I’d just revealed a magic trick. The people who wanted pink got
the center, the people who didn’t got the ends, and nobody had to request “please cook mine again” (a phrase that
makes rib roast quietly cry). When I had a couple of guests who wanted medium-well, I warmed their slices briefly
in hot au jus. They were happy, the meat stayed tender, and the crust on everyone else’s slices stayed crisp.
Peace was maintained.
Finally, the bones. The bones are not a problemthey’re a bonus. Once you separate them, don’t toss them aside like
packaging. A quick reheat or sear turns them into a snack that makes the cook feel like a genius. And if you’re
carving in front of guests, keeping the rib rack nearby is basically a prop that says, “Yes, this was a whole
magnificent thing moments ago.” It adds theater. And food, at holidays, is at least 20% theater.
Final Thoughts: The “Expert” Secret Is Simpler Than You Think
Expert carving isn’t fancy. It’s sharp tools, a stable roast, a little patience, and slicing against the grain.
Remove the bones first for clean portions (or carve bone-in for drama), keep your cuts long and confident, and
remember: if the roast is delicious, you’re already winning.


