Table of Contents >> Show >> Hide
- Why a Napkin Rose Works (And Why Guests Love It)
- What You Need
- Method 1: The Classic Rolled Napkin Rose (Best for Beginners)
- Method 2: The “Petaled” Rose (A Structured, Plate-Friendly Fold)
- Method 3: The Origami-Style Napkin Rose (For the “I Like a Challenge” Crowd)
- Paper Napkin Rose Tips (Because Paper Has Opinions)
- Troubleshooting: Fix the Most Common “Why Does Mine Look Like That?” Problems
- Table Setting Placement: Where Should the Rose Go?
- How to Fold a “Bouquet” for Parties (Without Losing Your Mind)
- FAQ: Napkin Rose Folding
- Real-World “Experience” Notes: What Usually Happens When You Try This at Home (And How to Win Anyway)
- Conclusion
If you’ve ever looked at a beautifully set table and thought, “Wow, I should really get my life together,” here’s the good news: you can fake it with a napkin. A napkin rose fold is one of those small details that makes guests assume you own matching containers and never lose Tupperware lids (even if your kitchen drawer looks like a plastic avalanche).
In this guide, you’ll learn how to fold a napkin into a rose with clear, beginner-friendly steps, plus a few variations for cloth napkins, paper napkins, and different table settings. We’ll also cover troubleshooting, styling ideas, and practical tips for folding a whole bouquet’s worth for parties, weddings, baby showers, or any night you want to turn “Tuesday leftovers” into “intimate bistro vibes.”
Why a Napkin Rose Works (And Why Guests Love It)
A rose napkin fold checks three boxes that matter for hosting: it’s pretty, it’s portable, and it’s low-commitment. Unlike fresh flowers, it won’t wilt. Unlike candles, it won’t set off the smoke alarm when someone dramatically waves their hands while telling a story. And unlike elaborate centerpieces, it won’t block eye contact across the tablewhich is crucial if you’re trying to read whether your friend actually likes your new “experimental” recipe.
- Instant upgrade: Your plates can be basic; the napkin does the heavy lifting.
- Budget-friendly decor: One supply. Zero glue. Minimal regret.
- Customizable: Change color, size, and “tightness” to match your theme.
- Photogenic: Great for weddings, brunches, and social posts where you pretend you’re effortlessly elegant.
What You Need
Best Napkin Types for a Rose Fold
You can fold a rose with either cloth or paper napkins. The “best” option depends on the look you want and how much structure your napkin has.
- Cloth napkins: Ideal for crisp petals and a sturdier rose shape. A standard 18–20 inch square is the sweet spot.
- Paper napkins: Great for casual parties. Choose thicker dinner napkins (not ultra-thin cocktail napkins) for cleaner folds.
- Color: Red, blush, and white are classic, but deep green or navy looks surprisingly “modern floral.”
- Texture: Slightly stiff fabric (or lightly starched linen/cotton) holds a rose shape better than super-slippery cloth.
Optional Helpers (Not Required, But Very Nice)
- Iron or steamer: Sharp creases = sharper petals.
- Light spray starch: Helps cloth napkins hold shape for longer events.
- Napkin ring or small ribbon: For “rosebud” styles that need gentle support.
Method 1: The Classic Rolled Napkin Rose (Best for Beginners)
This is the most popular “napkin rose” method because it’s fast, forgiving, and looks impressive even if you don’t fold with laser precision. The basic idea: fold into a triangle, roll into a band, coil it into a bud, and pull out the inner flaps as petals.
Step-by-Step Instructions
- Start with a flat square napkin.
Lay your napkin flat on a table. Smooth it out so you’re not folding accidental “wrinkles of doom” into the final rose.
- Fold diagonally into a triangle.
Bring one corner to the opposite corner. You now have a large triangle. Align edges looselyperfection is optional; charm is mandatory.
- Roll from the long edge upward (about halfway).
With the long edge of the triangle closest to you, roll the napkin upward like you’re making a soft band. Stop when you have a remaining triangle “tail” at the top (usually 3–5 inches depending on napkin size). This leftover section becomes part of the petals.
- Flip it over.
Turn the napkin so the rolled portion is underneath. You should see two “tails” (corners) sticking out.
- Roll one tail across to form the rosebud.
Starting with the left tail (or rightroses don’t judge), roll it across the band toward the other side. Keep it snug, but don’t crush it like you’re trying to win an arm-wrestling match with fabric.
- Tuck the end underneath to lock it.
When you reach the other side, tuck the loose end into a pocket created by the rolled layers. This is the “don’t fall apart when someone sneezes” step.
- Stand it up and pull down the inner flaps.
Stand the roll upright like a little candle. Then gently pull the two inside flaps downward to form petals. Adjust the petals until it looks like a rose, not a cinnamon roll with stage fright.
- Optional: add “leaves.”
If extra corners remain underneath, fan them outward slightly. With green napkins, this looks like leaves. With white napkins, it looks like… modern art. Both are valid.
Styling Ideas for Method 1
- On the plate: Place the rose in the center for a classic look.
- In a glass: Set the rose in a water goblet or wine glass for “restaurant fancy” energy.
- With a place card: Tuck a name tag under the rosebud coil for weddings or dinner parties.
- With a sprig: Slide a small herb sprig (rosemary, thyme) next to the rose for a subtle fragrance.
Method 2: The “Petaled” Rose (A Structured, Plate-Friendly Fold)
Want something that looks like a fuller flower sitting on the plate? This method uses repeated corner folds, then you pull flaps from underneath to create cupped “petals.” It’s slightly more technical, but it’s great for formal place settings and can even cradle a small roll on the plate if you want to get extra charming.
Step-by-Step Instructions
- Fold the napkin in half both ways to mark the center.
Fold in half, open. Fold in the other direction, open. You’re creating center creases as guides.
- Fold all four corners to the center.
Bring each corner in to meet at the center point, making a smaller square.
- Repeat: fold corners to the center again.
Do the same corner-to-center fold one more time. You’ll get an even smaller, thicker square.
- Flip it over and fold the four corners to the center.
Turn the napkin over carefully (keep a hand on it so it doesn’t spring open), then fold corners into the center again.
- Hold the center down and pull out the petals from underneath.
Press a finger firmly on the center. Reach underneath and gently tug the flap at each corner partially out to form cupped edges. Continue pulling remaining corners underneath into petal shapes until you have a layered flower effect.
When to Use Method 2
- Formal dinners: Looks polished and intentional.
- Brunches and showers: Works well with pastel napkins and floral plates.
- Roll-friendly plating: The “cupped” shape can hold a small dinner roll for a restaurant-style presentation.
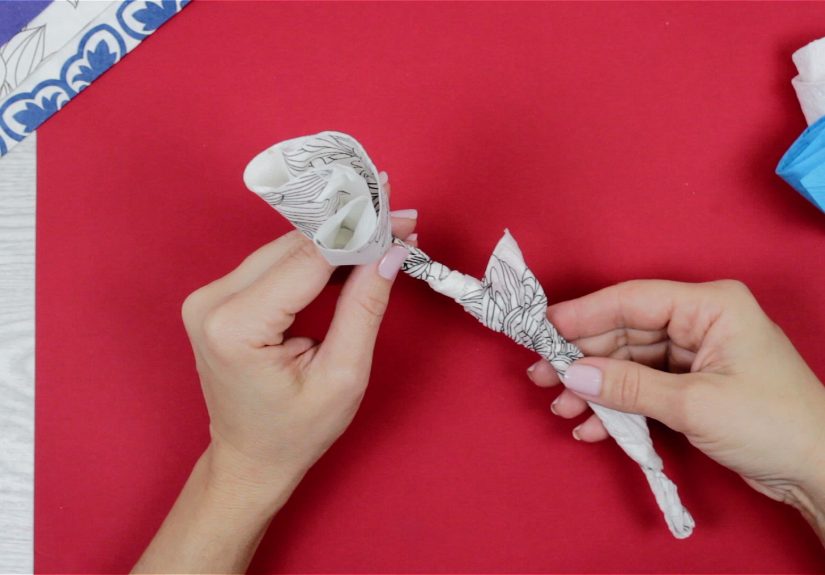
Method 3: The Origami-Style Napkin Rose (For the “I Like a Challenge” Crowd)
If you want a rose that feels more like paper-folding art, try an origami-inspired napkin rose. This approach often uses a triangle base and a series of small folds and rolls to build a spiral rose. It’s not difficult, but it rewards patience and a napkin with decent structure.
Quick Overview (So You Know What You’re Signing Up For)
- Fold the napkin into a triangle.
- Create a narrow folded band by folding up from the bottom edge in small increments.
- Roll the band into a spiral, tucking the end to secure.
- Shape the outer layers to look like petals (gently flare edges outward).
Tip: If your folds look a little uneven during the process, don’t panic. The final spiral hides small imperfections like a very polite magician.
Paper Napkin Rose Tips (Because Paper Has Opinions)
Paper napkins fold differently than cloth. They crease easily (good!) but tear easily (less good!). To make a paper napkin rose that survives contact with actual humans:
- Use thicker napkins: Dinner-size paper napkins hold shape better than thin cocktail napkins.
- Roll gently: Tight rolling can rip layers, especially at corners.
- Don’t overwork the petals: Too much pulling and fluffing can shred edges.
- Consider the “rosebud” look: A tighter bud is sturdier than fully opened petals with paper.
Troubleshooting: Fix the Most Common “Why Does Mine Look Like That?” Problems
Problem: My rose keeps unrolling
- Cause: The tuck isn’t deep enough, or the roll is too loose.
- Fix: Re-roll slightly tighter and tuck the end farther into the pocket. Cloth napkins may benefit from a light iron press first.
Problem: It looks like a burrito, not a rose
- Cause: Petals weren’t pulled out, or the spiral is too uniform.
- Fix: Gently pull down the inner flaps (Method 1) and flare the edges outward. A little unevenness actually helps it look more “flower-like.”
Problem: The petals are drooping
- Cause: Fabric is too soft or slippery, or the napkin is slightly damp.
- Fix: Use a stiffer napkin, iron it, or lightly starch it. For events, fold closer to setup time so the shape stays crisp.
Problem: The center is bulky
- Cause: Rolling too much of the napkin before forming the bud.
- Fix: In Method 1, roll only about halfway so the bud doesn’t become a thick cylinder.
Table Setting Placement: Where Should the Rose Go?
A napkin rose is both functional and decorative, so you have options. For traditional place settings, napkins often go to the left of the forkbut decorative folds are commonly placed on the plate or in a glass at the setting. If you’re using chargers or want the rose to be the visual “wow,” placing it on the plate is the easiest win.
- Classic: Rose centered on the dinner plate.
- Traditional-with-a-twist: Rose to the left of the fork, angled slightly toward the plate.
- Modern: Rose tucked under the rim of the plate, with a menu card layered on top.
- Restaurant-style: Rose standing in a glass at the top right of the plate.
How to Fold a “Bouquet” for Parties (Without Losing Your Mind)
Folding one napkin rose is fun. Folding 40 napkin roses is… a personality test. Here’s how to do it efficiently:
Batch-Folding Strategy
- Prep first: Iron or smooth all napkins before you start. Flat napkins fold faster and cleaner.
- Assembly line: Do step 1 for all napkins (triangle fold), then step 2 for all (half-roll), then finish them one by one.
- Set them in “holders”: Place finished roses in muffin tins, egg cartons, or small cups to keep their shape until setup time.
- Transport smart: Use shallow boxes with parchment between rows to prevent petal crushing.
FAQ: Napkin Rose Folding
What size napkin works best for a rose napkin fold?
A standard 18–20 inch square cloth napkin is ideal because it has enough fabric to form petals without becoming overly bulky. Paper dinner napkins also work well, especially thicker options.
Can I make napkin roses ahead of time?
Yesespecially with cloth napkins. If you’re making them a day ahead, store them upright in a container so the petals don’t flatten. For paper napkins, same-day folding tends to look freshest.
Do I need starch for a cloth napkin rose?
Not always. If your napkins are soft or slippery, a light starch and quick iron can help the rose keep its shape longerparticularly for weddings or long events.
Is a napkin rose fold only for fancy occasions?
Absolutely not. A napkin rose is basically “joy in linen form.” Use it for date night, Mother’s Day brunch, birthday dinners, or whenever you want your table to look like it’s trying its best (relatable).
Real-World “Experience” Notes: What Usually Happens When You Try This at Home (And How to Win Anyway)
The first time most people try a napkin rose, it’s a classic tale: you fold confidently for 30 seconds, then the napkin suddenly becomes a slippery eel and you start negotiating with it like, “Listen, I don’t need you to be perfect. I just need you to stop aggressively unrolling.”
Here’s the most useful reality check: a napkin rose doesn’t need symmetry to read as a rose. Real roses are uneven and dramatichonestly, they’re kind of messy divas. Your napkin rose can have one petal slightly larger than the other and still look intentional. In fact, a little irregularity can make it look more natural, which is a fancy way of saying “you’re not losing; you’re styling.”
Another common discovery: fabric choice is everything. If your cloth napkin is super soft and drapey, it may fold beautifully for rectangles and fans, but roses ask for a bit of backbone. People tend to get the best results with napkins that feel slightly structuredcotton with a tighter weave, linen that’s been pressed, or anything that doesn’t behave like a scarf in a gentle breeze. If your petals slump, it’s rarely “you’re bad at folding.” It’s usually “your napkin is too relaxed about life.”
There’s also the “too tight vs. too loose” learning curve. Roll too tight and the rose looks like a tiny fabric torpedo (impressive, but not floral). Roll too loose and it looks like it’s melting into a napkin pancake. The sweet spot is snug enough to hold, but loose enough that you can still pull out petals without tearing or distorting the layers. A good trick is to roll with gentle pressure, then do your shaping at the endbecause shaping while rolling is how you end up with a rose that looks like it’s mid-identity crisis.
If you’re folding roses for guests, there’s a surprisingly effective psychological tactic: set out one or two “practice roses” on a side plate and call them “samples.” People see them and assume every rose is supposed to have a slightly different personality. That way, if one rose is a bit more “rosebud” and another is more “full bloom,” it looks curated rather than accidental. Hosting is 40% cooking, 10% cleaning, and 50% confidently pretending your choices were on purpose.
Finally, the biggest practical win: batch folding is your friend. When you fold a bunch in a row, your hands memorize the movement and you get faster without even noticing. The first rose might take a few minutes, the fifth is smoother, and by the tenth you’re basically a napkin florist. Put on music, fold in an assembly line, and store finished roses upright so the petals don’t flatten. This is one of those rare party-prep tasks that can actually feel relaxinglike origami, but with a payoff you can put on a dinner plate and quietly admire before anyone arrives.
Conclusion
Learning how to fold a napkin into a rose is one of the easiest ways to elevate a table setting without buying extra decor. Start with the classic rolled rose (fast and forgiving), try the petaled rose for a more formal look, and experiment with origami-style roses when you’re in the mood to impress yourself.
The best part? Once you’ve made a few napkin roses, you’ll start spotting opportunities everywhere: bridal brunches, holiday dinners, birthday parties, or even just a weeknight meal that deserves a little sparkle. Because sometimes “adulting” is simply turning a square napkin into a flower and calling it a win.


