Table of Contents >> Show >> Hide
- Why This Project Works So Well
- What You Need Before You Begin
- Choose a Design Before You Touch the Wood
- How to Shape the Organizer Safely and Smartly
- Sanding: The Secret Behind the Expensive Look
- Pick the Right Finish for a Modern Desk Organizer
- Simple Modern Design Ideas That Actually Look Good
- Common Mistakes to Avoid
- How to Style It on Your Desk
- Final Thoughts
- Experience: What You Learn After Making One
If your desk currently looks like a tiny office supply tornado touched down and never apologized, this project is for you. A modern desk organizer made from a single block of wood is one of those rare DIY wins that checks every box: it looks expensive, feels custom, takes up very little space, and makes you seem dramatically more organized than you may actually be. That last part is called design, and frankly, we love that for you.
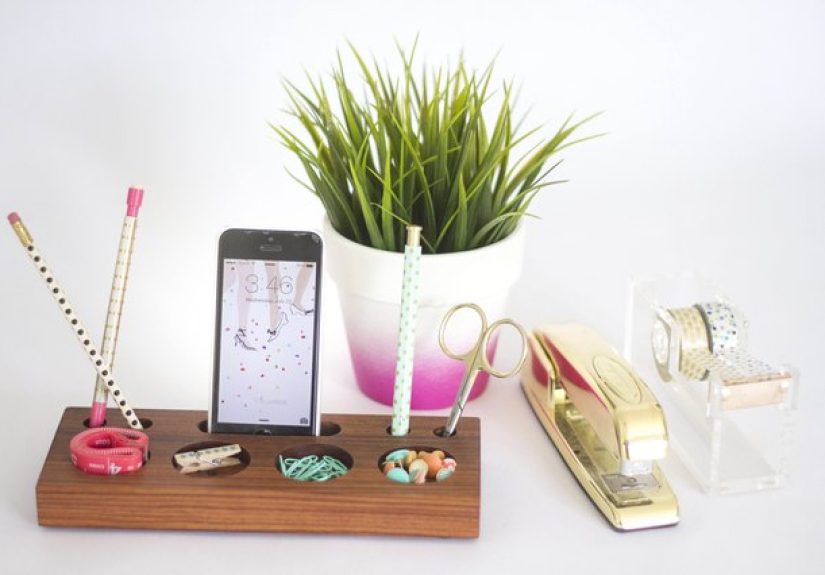
The beauty of this project is its simplicity. Instead of building a complicated organizer with dozens of glued-together pieces, you start with one solid block of wood and transform it into something sleek, useful, and quietly stylish. Think clean lines, soft edges, and purposeful storage for pens, sticky notes, paper clips, your phone, or whatever else tends to multiply on your desk when you are not looking. The end result feels somewhere between minimalist decor and “I absolutely have my life together” energy.
Even better, this is a project you can customize without turning it into an engineering thesis. You choose the compartments, the size, the wood tone, and the final finish. Want a slot for your phone? Add one. Need a tray for clips and chargers? Easy. Prefer a simple pen holder with one sculpted catch-all dish? Also a great look. A modern desk organizer is less about copying one exact template and more about shaping something that fits the way you actually work.
Why This Project Works So Well
A single-block organizer has a few serious advantages over flimsier desk accessories. First, it is stable. A solid wood base stays put when you grab a pen or set down your phone, which means no sliding, tipping, or that annoying shuffle across the desk. Second, it looks cleaner than most store-bought organizers because there are fewer seams, fewer pieces, and fewer visual distractions. Modern design loves restraint, and a wood block delivers that effortlessly.
It is also a smart use of material. A compact hardwood offcut or a pre-cut block from a home center can become something that feels handcrafted and intentional instead of forgotten in a workshop corner. In other words, this project is part organization upgrade, part design flex, and part redemption arc for a piece of wood that deserved a better destiny.
What You Need Before You Begin
For a safe and polished version of this project, keep your materials simple. Start with a rectangular wood block that already has straight, square sides. Hardwood such as walnut, maple, cherry, or oak gives the most refined look, but pine can work if you want a lighter, more casual feel or a lower-cost practice run. You will also want a ruler, pencil, painter’s tape, sandpaper in a few grits, a tack cloth or clean rag, and your finish of choice.
If your design includes drilled recesses, deep pen holes, or a phone slot, plan for those shaping steps to be done by a skilled adult, a supervised maker space, or a woodworker using the appropriate tools. That keeps the project practical without pretending power tools are as harmless as a butter knife. They are not. They are more of a “respect me or regret me” category.
Choose a Design Before You Touch the Wood
Start With What You Actually Use
The best desk organizer is not the one with the most compartments. It is the one that solves your everyday mess. Before you sketch anything, place the items you use most often on your desk and study them. Maybe you reach for two pens, a mechanical pencil, sticky notes, earbuds, and your phone. Maybe you need a shallow tray for paper clips and a narrow channel for charging cables. Maybe you want a tiny dish for rings or a watch while you work. Build around behavior, not fantasy. Your organizer should reflect your real routine, not the imaginary life where you color-code tax documents for fun.
Keep the Layout Clean
Modern style relies on balance and negative space. That means you should not crowd the top of the block with too many holes and recesses. Pick two to four functional zones and leave breathing room between them. A common combination is a row of pen holes, one rectangular tray, and one angled slot for a phone. Another good layout is a wide catch-all area paired with a few smaller holders for writing tools.
Painter’s tape can help you preview the design before any shaping begins. Mark out each section and look at it from above. If it already feels busy in tape form, it will feel even busier in wood. Simplify early. Your future self will thank you every time they set down a pen instead of squinting at a cluttered wooden puzzle.
Think About Scale
A desk organizer should feel useful, not oversized. A piece that is too large becomes a blocky paperweight with ambition issues. A piece that is too small will fill up immediately and still leave your desk messy. Aim for a footprint that holds daily essentials without dominating your workspace. A slim rectangular shape often works best for modern desks because it lines up neatly with monitors, notebooks, and keyboards.
How to Shape the Organizer Safely and Smartly
Begin With a Smooth, Square Blank
If your wood block is rough, splintery, or uneven, fix that first. A crisp blank gives the finished piece its clean architectural look. Sand the faces and edges until they feel even and pleasant in the hand. Modern design looks simple, but it depends heavily on precision. Small flaws stand out more when the style is minimal.
Mark Every Cutout Before Any Drilling or Cutting Happens
Use a ruler and pencil to map your compartments carefully. Centering matters. Parallel lines matter. Symmetry matters unless you are intentionally going asymmetrical for a more sculptural look. For pen holes, space them evenly. For a tray, make sure the proportions look calm and intentional rather than random. For a phone slot, test the angle and thickness with your actual phone before committing to the layout. Nothing ruins the mood faster than a handmade organizer that rejects your phone like a nightclub bouncer.
Let the Right Tools Do the Heavy Lifting
Once the layout is finalized, the recesses and slots can be shaped by a skilled adult or in a supervised shop using the correct bits and cutting methods for clean woodwork. The goal is simple: crisp openings, minimal tear-out, and controlled depth. Pen wells should feel neat and vertical, shallow trays should look deliberate instead of hacked out, and phone slots should support the device securely without wobble.
After the main shaping is done, refine the organizer by easing any sharp top edges. This is one of the easiest ways to make the project feel more expensive. Hard corners can look harsh and can chip more easily over time, while softened edges feel smoother, more modern, and more pleasant to use every day.
Sanding: The Secret Behind the Expensive Look
Sanding is not the glamorous part of woodworking, but it is the part that separates “beautiful handmade piece” from “garage object with potential.” Start with a grit that smooths the surface without gouging it further, then work up to finer grits. Many woodworkers use a progression that moves from medium sanding to fine sanding, always with the grain, until the wood feels consistently smooth.
Take your time in the compartments and around the edges. These areas are easy to rush, and rushed sanding shows. A shallow tray with scratchy tool marks will catch the light in all the wrong ways. A well-sanded tray, on the other hand, has that velvety look that practically says, “Yes, I am handmade, but make it refined.”
Before you apply any finish, remove every trace of sanding dust. Wipe the piece thoroughly with a clean cloth. Dust left on the surface can interfere with the finish and leave the final result looking cloudy or gritty, which is not the vibe.
Pick the Right Finish for a Modern Desk Organizer
Oil for Warmth
If you want the wood grain to glow and the piece to feel natural in the hand, an oil-based finish is a strong choice. It tends to enrich color and highlight figure beautifully, especially on walnut and cherry. This is great for a warm, understated look that still feels modern.
Wipe-On Poly for Durability
If your organizer will see heavy daily use, a more protective finish can make sense. A wipe-on polyurethane-style finish is popular because it gives better wear resistance while still looking clean and low-sheen when applied lightly. That matters on a desktop item that may be touched constantly, bumped by mugs, or exposed to the occasional mystery spill.
Keep the Sheen Under Control
Modern wood accessories usually look best in matte, satin, or low-luster finishes. High gloss can make a simple organizer feel overly formal or plasticky. The magic here is subtlety. You want people to notice the wood, not feel like they are staring into a shiny candy shell.
Apply thin coats, allow proper drying time, and lightly smooth between coats if needed. Then let the organizer cure fully before loading it up with office gear. Yes, waiting is annoying. No, smudging a half-cured finish is not a better option.
Simple Modern Design Ideas That Actually Look Good
If you want your organizer to feel current instead of crafty, stick to a restrained palette of shapes. Circles, rectangles, and long narrow slots tend to look clean and intentional. Here are a few combinations that work especially well:
- A row of pen holes paired with one wide tray for clips, earbuds, or keys
- A phone slot with a shallow catch-all dish beside it
- A sticky-note recess, two pen wells, and a narrow rear groove for business cards
- A monolithic walnut block with only one sculpted bowl and one slim slot for a very minimal look
Wood choice changes the personality of the piece, too. Walnut feels rich and modern. Maple feels bright and clean. White oak feels grounded and architectural. Cherry starts warm and deepens over time. Pine can look charming, but it reads more casual and dents more easily. If you want that gallery-shop look, hardwood is usually the better bet.
Common Mistakes to Avoid
Trying to Store Everything
Your organizer is not a tiny warehouse. If it tries to hold every item you own, it will look crowded and lose its elegance. Focus on the essentials.
Ignoring Depth
Compartments that are too shallow may feel decorative but not useful. Compartments that are too deep can make small items hard to grab. Think about how your fingers will interact with the organizer, not just how it looks from above.
Rushing the Finish
Blotchy stain, dusty topcoats, and gummy surfaces almost always come from impatience. Finish is where the piece either becomes “gift-worthy” or “maybe keep it in the garage.” Choose wisely.
Forgetting the Desk Around It
The organizer should complement your workspace. A sleek black desk can handle darker woods. A light Scandinavian-style setup may look better with maple or oak. Design is a team sport.
How to Style It on Your Desk
Once finished, do not immediately stuff every compartment with random office debris like you are filling a survival bunker. Curate it. Put in only what you use regularly. One or two premium pens, a notepad, your phone, maybe a few clips or earbuds. Leave a little empty space. That negative space is what makes the organizer feel calm and high-end.
You can also pair it with other natural materials for a cohesive look: a leather desk pad, a brass lamp, a ceramic mug, or a simple plant. Suddenly your workspace looks less like a place where tabs go to multiply and more like a place where good ideas might actually happen.
Final Thoughts
Making a modern desk organizer from a block of wood is one of those deeply satisfying projects that manages to be practical, attractive, and surprisingly personal. It is small enough to finish without turning your life into a month-long renovation show, but substantial enough to feel like real craftsmanship. Best of all, the project invites you to slow down and make thoughtful choices about how you live and work.
That is the real charm of woodworking, even on a compact project like this. You are not just carving holes into wood. You are shaping a better daily routine. You are creating order from clutter, style from simplicity, and maybe even a little peace from the desktop chaos. Not bad for a humble block of wood.
Experience: What You Learn After Making One
The most interesting part of this project is what happens after the organizer is done and sitting on your desk. At first, it feels like a small decorative upgrade. Then, over a few days, you realize it changes how you interact with your workspace. You stop scattering pens everywhere because now they have a home. Your earbuds stop disappearing into some mysterious desk dimension. Your phone lands in the same place every time. A simple object starts shaping your habits, and that is when the project becomes more than just a woodworking exercise.
One common experience people have is discovering that less storage often works better than more. When you first plan the organizer, it is tempting to add a slot for every possible object. But after using it, many people realize the best version is the one that holds only their daily essentials. The cleaner design feels calmer, looks better on the desk, and gently discourages clutter from coming back. In that sense, the organizer becomes a kind of editor for your workspace. It quietly tells you, “You do not need twelve pens out here, and honestly, we both know it.”
Another thing you notice is how much the finish changes the emotional feel of the piece. A softly oiled walnut organizer feels warm, rich, and tactile. A satin-finished maple block feels crisp and bright. White oak can make the whole desk feel a little more architectural and deliberate. People often expect the compartments to be the star, but in daily use, the surface and feel of the wood matter just as much. You touch it constantly. That is why careful sanding and a restrained finish matter more than flashy design tricks.
There is also a surprisingly strong sense of pride that comes from using something you made yourself, especially when it is small but visible every single day. Large furniture projects are impressive, sure, but a desk organizer sits right in front of you. It becomes part of your routine. Every time you reach for a pen or set down your phone, you get a tiny reminder that useful things can also be beautiful. That is deeply satisfying in a way that mass-produced office accessories rarely are.
People also tend to learn a design lesson from this project: proportions are everything. A difference of a little space between pen holes, the depth of a tray, or the angle of a phone slot can completely change how polished the final result feels. Making one organizer often leads to ideas for a second, better one. Maybe the next version gets a shallower tray, a cleaner silhouette, or a slightly different wood species. That progression is part of the joy. The project teaches your eye as much as it teaches your hands.
Finally, this kind of build often becomes a great gift project because it feels personal without being overly complicated. Once you have made one for yourself, it is easy to imagine versions for a student, a coworker, a parent, or a friend who works from home. You can tailor the layout to their habits and choose a wood tone that suits their space. That mix of function, customization, and handmade quality gives the organizer a thoughtful feel that store-bought gifts often lack. It may start as a desk accessory, but in practice, it becomes a useful object with character, memory, and a little bit of everyday magic.